Got hamburger but only have hot dog buns? Easy! Shape the burgers to fit the buns. Got hot dogs but only have hamburger buns? Thant’s a bit trickier but not insurmountable. I learned this from an episode of a Jacque Pepin program on PBS that he was cooking with his granddaughter. It’s fun to do on purpose, too. Tonight we had 4 hot dogs, 2 hot dog buns and 2 hamburger buns. Andrew was pleasantly surprised with dinner.
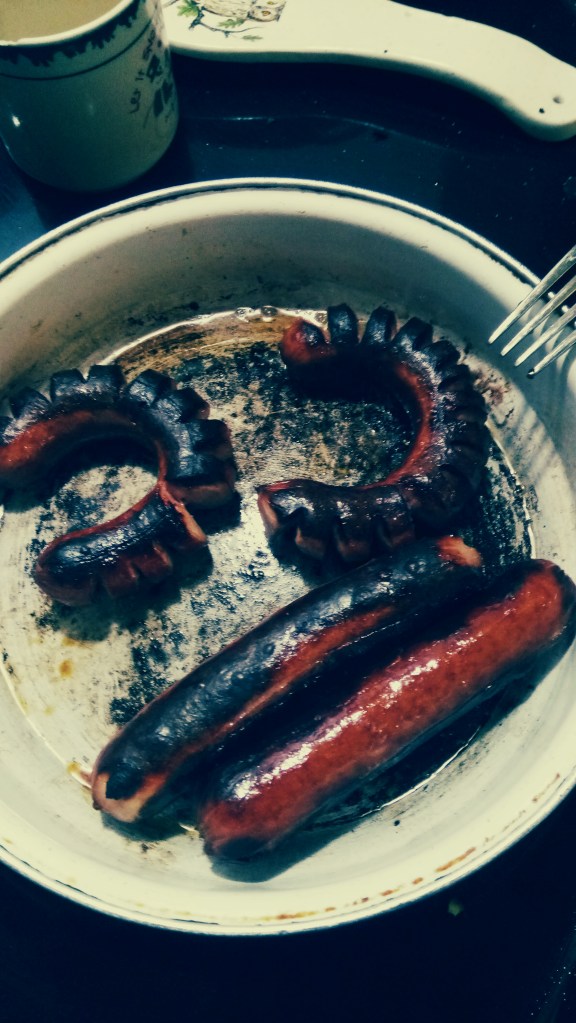
Cut slits in the hot dogs, most of the way through but not quite. About 3/4 through.
The uncut dogs will stay straight, the cut ones will begin to curve as they cook. You might want to cook the cut side 1st so it gets done, since you won’t be able to turn them to that side once they start to curve/coil/bend/whatever!
Be patient. I’m not so patient. Still, they’re hot dogs (well, OK, these are li’l smokies, but still…hot dogs) and the stuff you smother them is just part of their character.
They might not make compleat circle (well, OK, probably not) so I pulled leftover fried onions/mushrooms/shaved brisket to fill it in. If you don’t have leftovers you can just fry up some onions for the middle. I just added the leftovers to the pan to warm them up.
Toasted buns are nummy, so nip a few under the broiler for extra scrumptiousness. I used gouda here, but you can leave yours plain or use ay cheese you happen to have on hand. Just don’t loose track of time! Burnt buns are not yummy and eating hotdogs without the bund kind of negates the point of the great hot dog trick.
This is how they fit on the buns.
Dress the dogs with anything you like. This is how we did ours tonight. Even chili would be yummy.
These are great with a soda, beer, what have you and on the side you can have chips, potato salad, tater tots, French fries, cole slaw, beans…any picnicy thing your tummy desires. Dessert can be cake, ice cream, pie, cookies…again, anything your tummy desires.
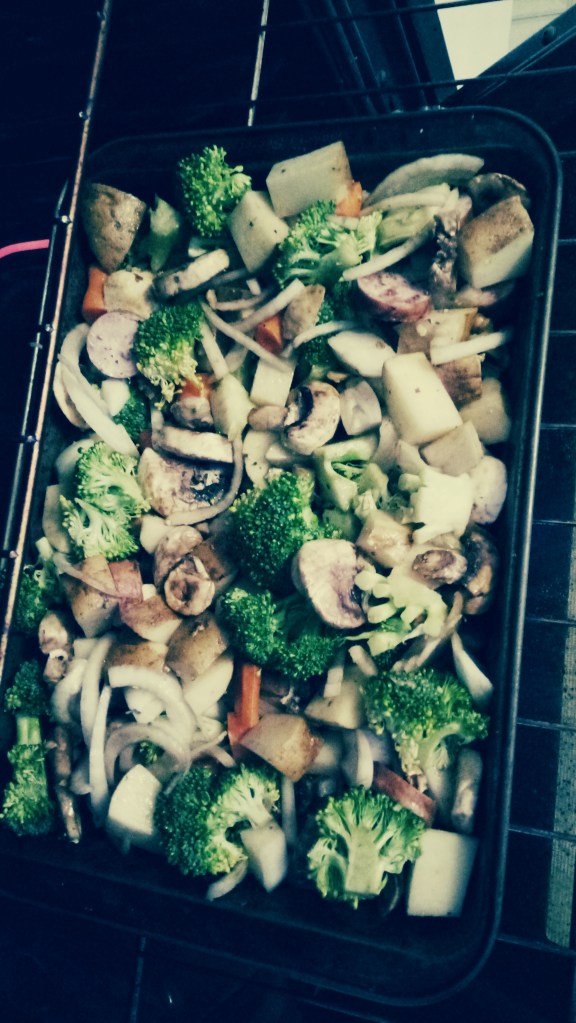
You have kielbasa but no sauerkraut, but you do have random veggies in the fridge and pantry, *sigh* what to do, what to do… Chop them up and bake ’em in the oven! It’s a good, quick thing to have when you want to clean the scraps out of the fridge and get other stuff done while it bakes.
Pull out what you’ve got. I had onions that I’d already cut and used about 1/2 of each, Then carrots, broccoli, mushrooms, potatoes, some walnuts. If you have peas, beans, turnips or anything else from the garden go ahead and toss those in, too. Maybe I should have tossed in a few tomatoes? Oh, well, there’s always next time. Don’t forge the meat, which this time was kielbasa. Whatever you happen to have will do, whether other sausages, leftover chops, steaks, roasts, pork, lamb, beef, chicken, turkey…or none at all and you can turn this into a lovely vegetarian main course or a vegetable side-dish.
Sprinkle with pepper, salt, basil and any seasoning you feel like, then drizzle with melted bacon fat, olive oil, butter, balsamic vinegar, Worcestershire sauce, truffle oil or whatever tickles your fancy. Toss it well and bake for about an hour while you shower and settle in front of the TV, help the kids with their homework, do the dishes, fold the laundry, check the mail…
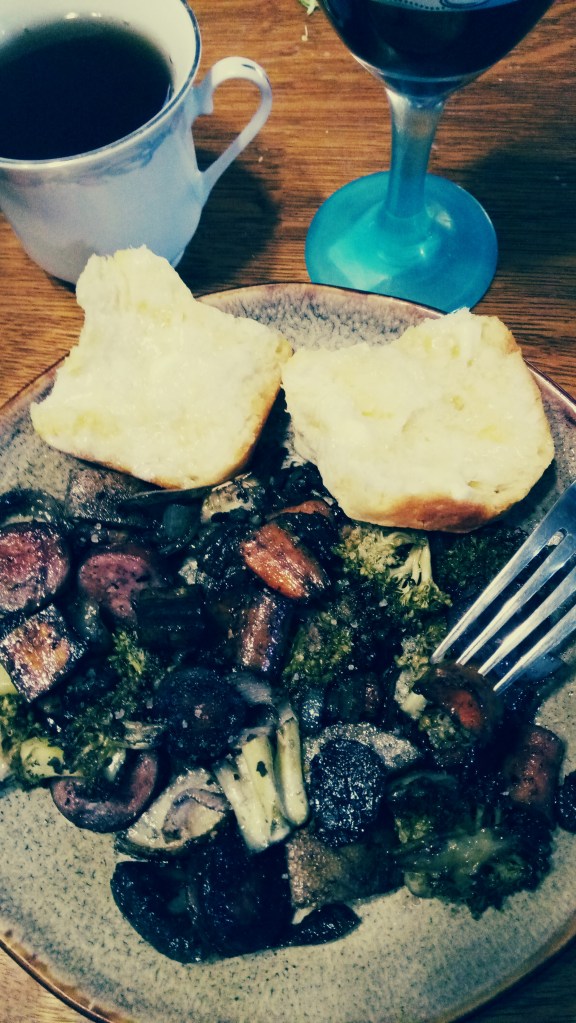
When it’s about half done, pull it out and mix it up so everything gets a good dose of the oils and juices that have seeped out and about in the pan. At this point you can also throw together a batch of biscuits, scones or soda bread or open a roll of biscuits if you have one and feel lazy. Toss it in and everything should be ready about the same time.
Serve with a lovely glass of milk, beer, wine or soda of your choice, even tea is nice. Maybe a salad from the garden, too. That’s where the tomatoes are going now.
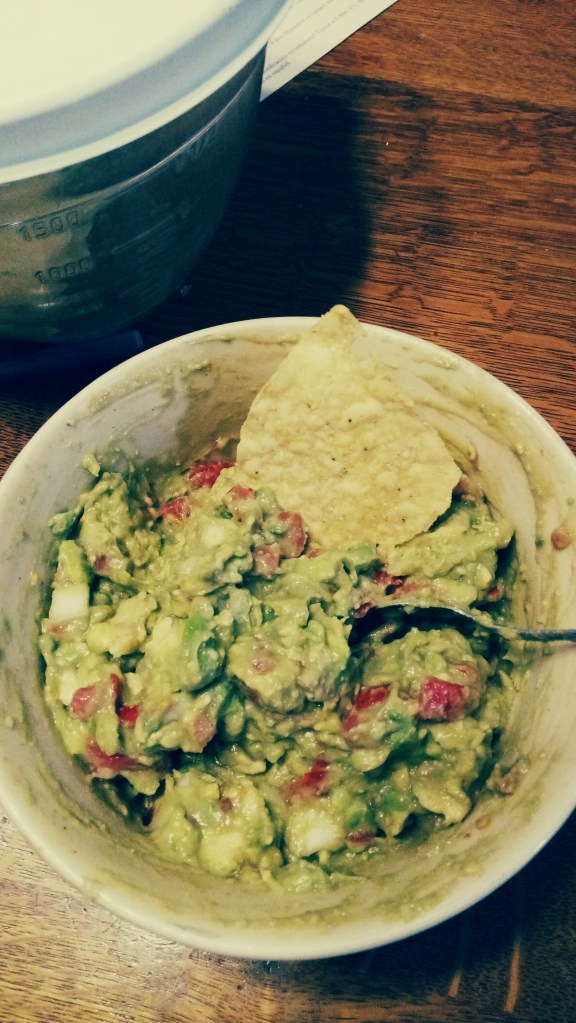
Another part of an amazing Mexican food dinner. Eat it with just chips as a snack while watching TV, playing games or conversing with friends or serve as a side dish to garnish burritos, tacos, enchiladas or any other dish you like.
Mince 1/2 a yellow onion (you can use any onion, this is what I usually have around) and chop 1/2 a large tomato or however many smaller tomatoes it takes to get as much as you want, then sprinkle with granulated garlic or just add some chopped fresh garlic to taste.
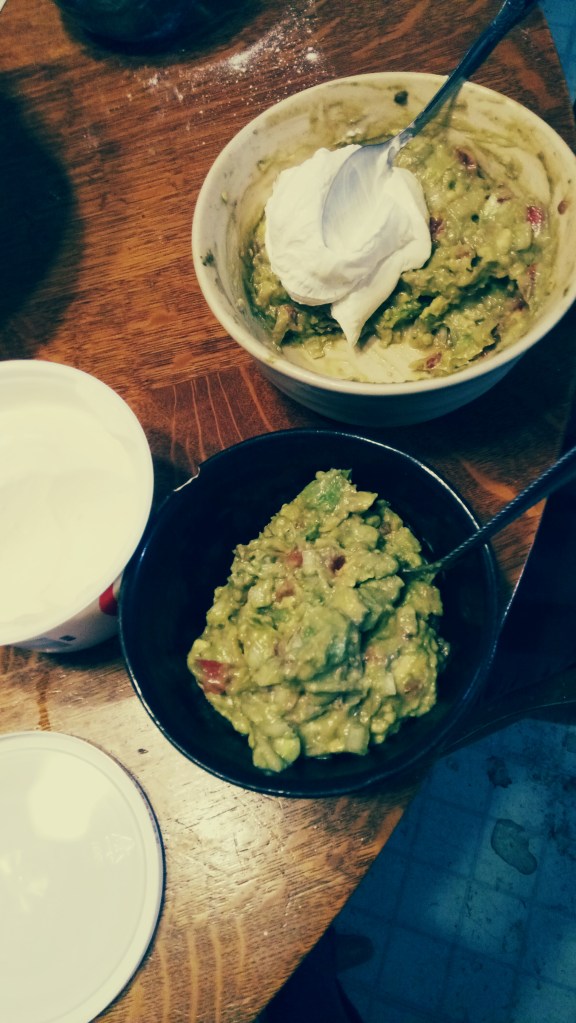
Peel and add 2 avocados then squeeze lemon juice over it all and mix, smashing or mincing the avocado as you go. This met with Paco’s approval until the avocados went in. He doesn’t like avocados, they’re bad for parrots.
Something I probably should have mentioned and taken pictures of before as I did it…Well, something to add next time I make guacamole. To open avocados:
Cut in 1/2 from top to bottom
twist apart
using a spoon, scoop yummy stuff out of the side without the pit
Using the spoon, scoop out the yummy stuff from the other half and scrape out the pit. Your hands will feel amazing after doing this since the avocado is luxuriously fatty. It makes a great facial, too.
If you like you can add crema or sour cream. Not everyone likes this so I divided the batch in half and only added it to mine.
Serve with chips as a dip or as a garnish for any Mexican food you happen to be having.
If you like you can try the old science experiment and stick 3 toothpicks into the pit, set it in a small cup of water and hope for roots and a shoot. Don’t forget to change the water often (preferably daily). I don’t have a picture of this because my house is insane while waiting for the bathrooms to get fixed during continuing adventures in plumbing. The shower drain collapsed and the insurance vs subcontractor negotiations took a while. At least it’s about to get fixed…Finally…so I’ll have an excuse to celebrate and add in when it’s done.
I didn’t grow up drinking tea. There are several reasons for this, cultural, family, personal, but that’s another story. Still, I played with tea sets as a kid and the idea of tea time and tea ceremonies flitted through my mind a various times. Selling pottery once-upon-a-time gave us the opportunity to sell other things, including tea, to go along with our wares. That was when I discovered tea, real tea, not the wimpy bags of leaf dust that make washwater-tasting dirty liquid. Now I drink tea regularly. Not every day, but often.
I’ve also learned to make scones. Jam, whether home-made (especially with home-grown produce!) or store-bought is also a common, if not necessary, part of tea time. I bought some Devonshire cream a while back. It was lovely. Now I’m experimenting with making my own clotted cream. Wish me luck! Skip to the bottom for the oven method of making clotted cream. I’m sure you should only call this Devonshire cream if you make it in Devonshire or are from there, but as a cross reference there it is.
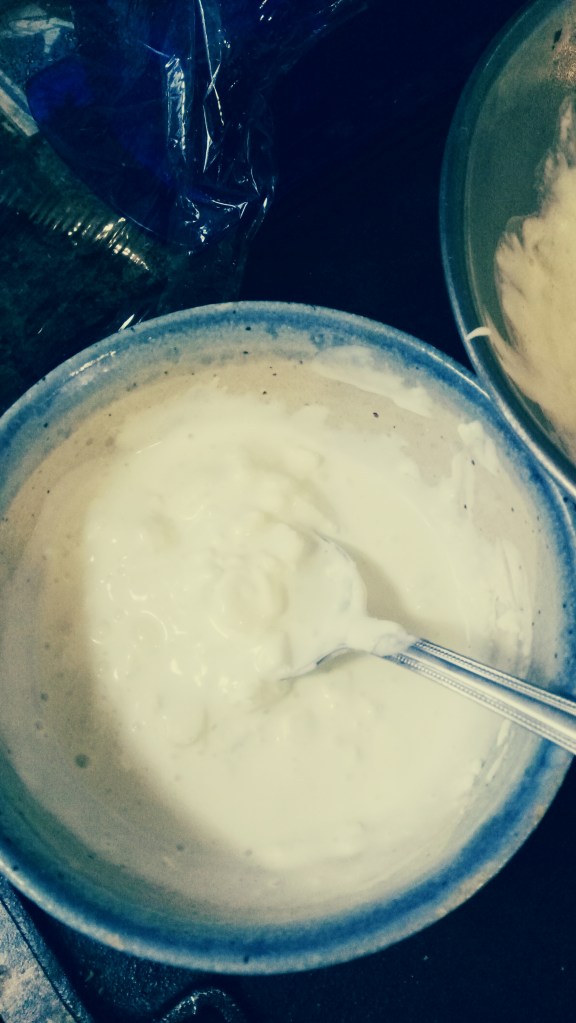
Use the highest butterfat content cream you can find.
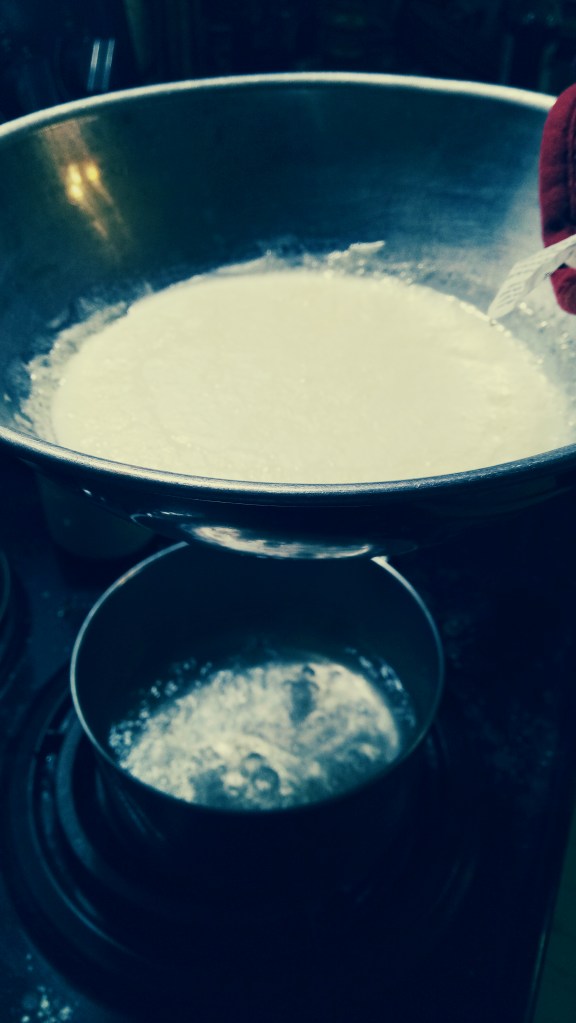
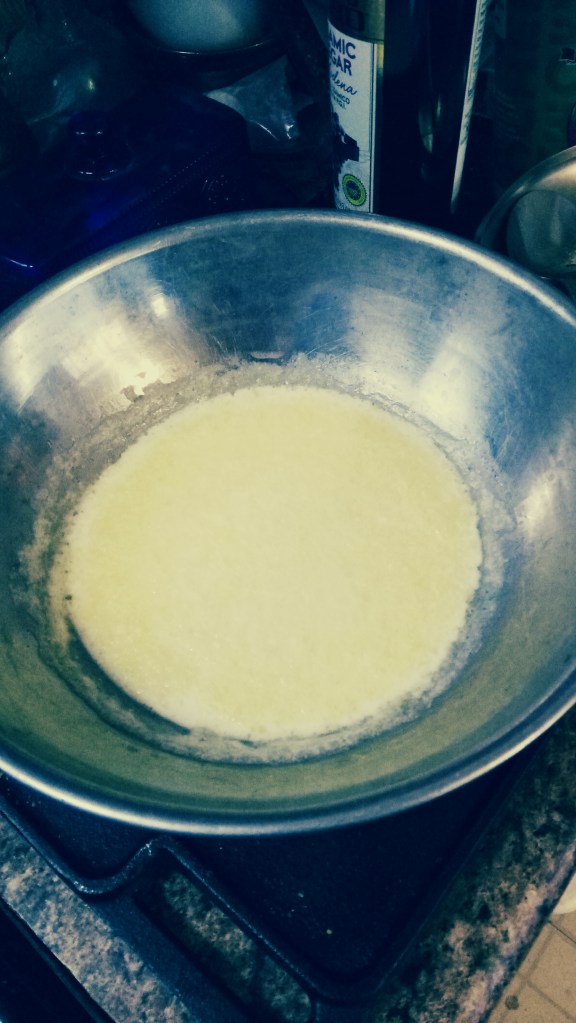
Take a cup or more of cream, put it in a bowl and put that bowl over a pan of water. Don’t let the bowl touch the water. Bring the water to a boil and let it go for about an hour. The recipe I found said 16 oz (2 cups) and simmer at 180 degrees, but I can’t find my candy thermometer so I’m winging it. For an hour.
Remove the bowl from the heat and allow to cool then cover and refrigerate for 8 to 12 hours, or overnight.
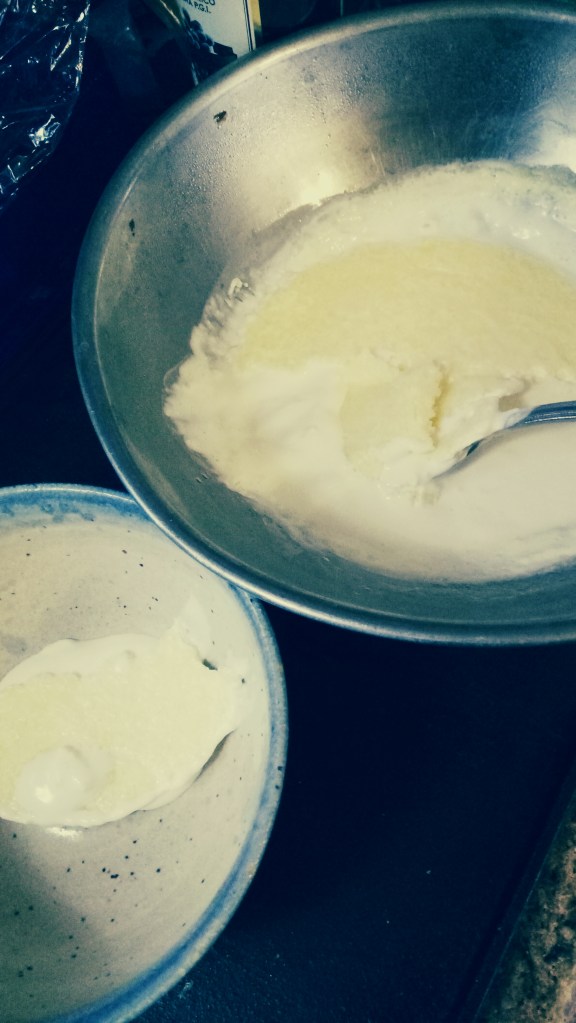
Skim the clotted cream off the top and serve with scones and jam.
The top stuff was kind of stiff. Maybe I over-cooked it? So I took out any thickened stuff from the bowl with it and whipped it up with a hand mixer. The consistency wasn’t as thick as I’d expected, but was useable and delicious. Next time I try this I will have either found my candy thermometer or bought another one.
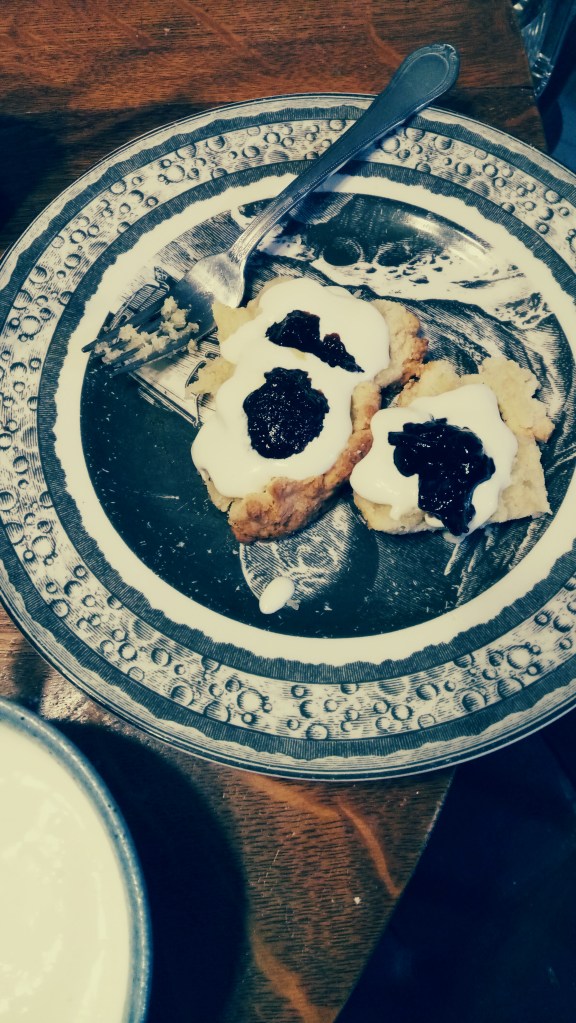
Split a scone and add cream
Then add jam. Strawberry is traditional, or so I’ve heard.
Other jams are nice, like figgy jam (on the left) or blackberry (on the right)
And honey works as well. Of course you can put the jam on first (on the left)
Of course, once you do this you will be part of the eternal discussion, does the jam go on first or does the cream? If your in Cornwall or Devon this will be an important distinction. When in Cornwall, do the jam first. When in Devon, put the cream on first…or so I’ve heard. Apparently the Cornish way is followed in London and elsewhere. If in doubt, wait for your host to act first and follow their lead.
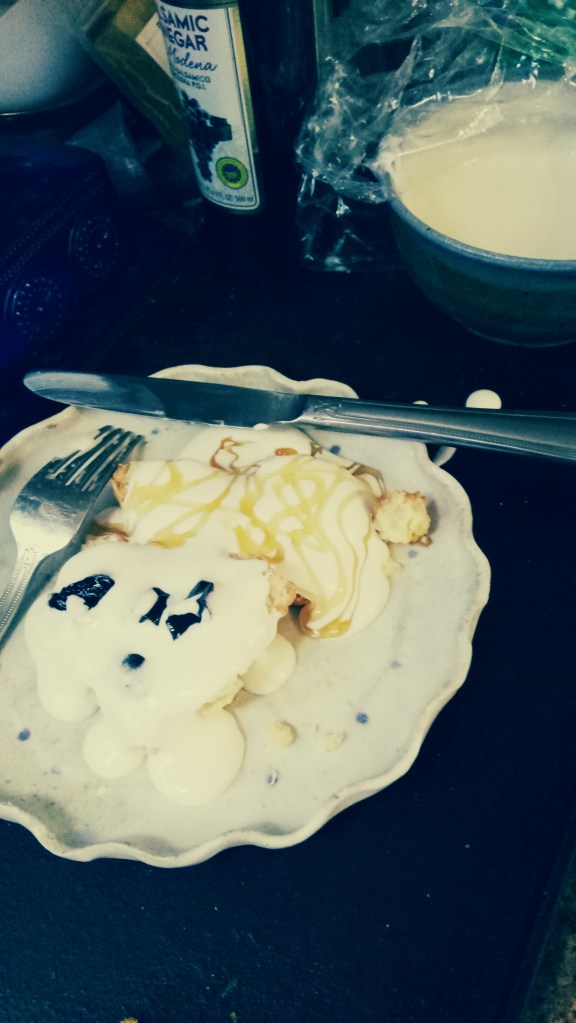
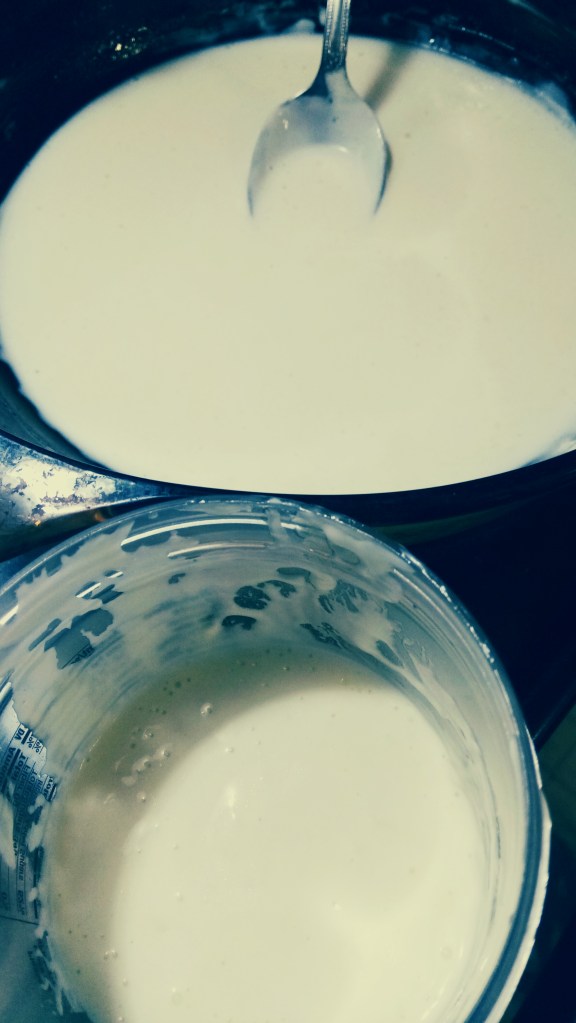
I tried an alternative method of making clotted cream the other night. I used the oven. Even easier, if longer, but it was basically made while I slept. I used a glass casserole dish, put a pint of cream in it and set it in the middle of the oven on the lowest setting, 175, for 8-12 hours. In the morning I let it cool in the oven. Once it was cool enough to handle I took it out, skimmed off the thickened stuff at the top and put it into a clean ice cream container. he very top was kind of tan and hard-ish but after mixing it in it recombined well and, once refrigerated, it was all nicely sturdy and homogenous.
I added the leftover un-clotted cream to the buttermilk from the day before and used it in the scones the next Saturday. Don’t waste this stuff, it’s fabulous! I’m sure it would be wonderful in making cakes, too.
Brie by itself on a cheese board is amazing. With other cheeses, wine and a variety of breads and crackers is wonderful as well. But baked, especially in puff pastry, takes it to a whole different level. As either an hors d’oeuvre with chopped almonds and tarragon (or other spices) or a dessert with chopped hazelnuts and berries, drizzled with honey…oh, my! What a way to start or end a feast!
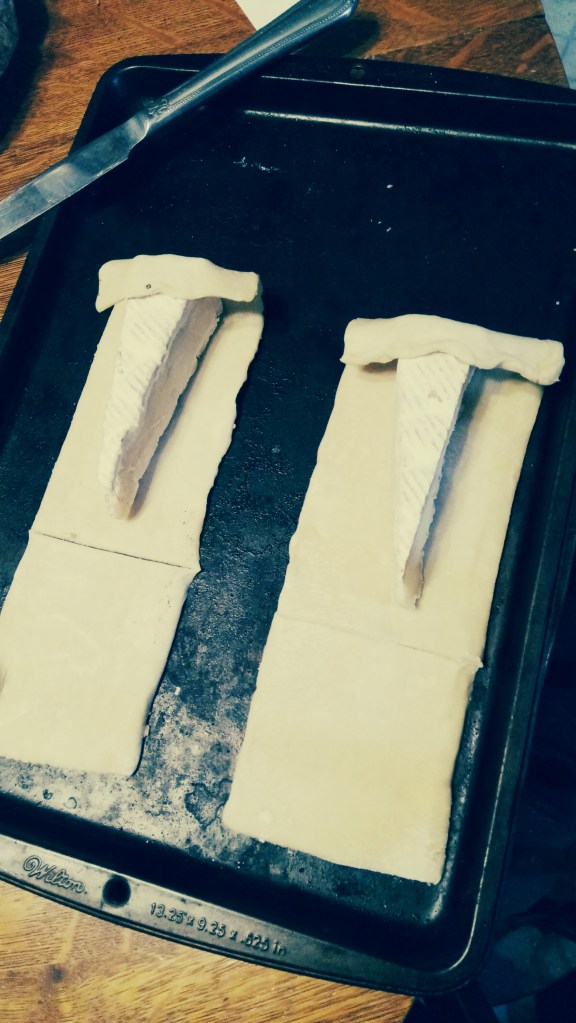
You can either wrap and bake a whole piece of brie or you can do individual pieces. I chose to do individual pieces for us. Start by placing the pieces on sheets of puff pastry. If you made your own, fabulous! if you bought it you’ll have to that it in the fridge first.
Fold the end of the pastry over the end of the brie
Fold one side up, tucking the end of the pastry as if you’re gift wrapping it.
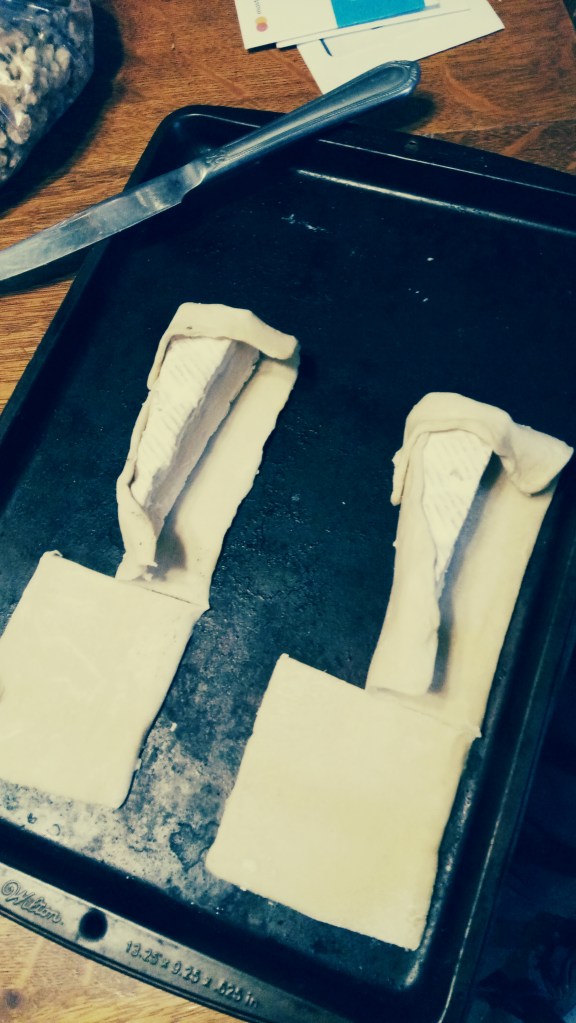
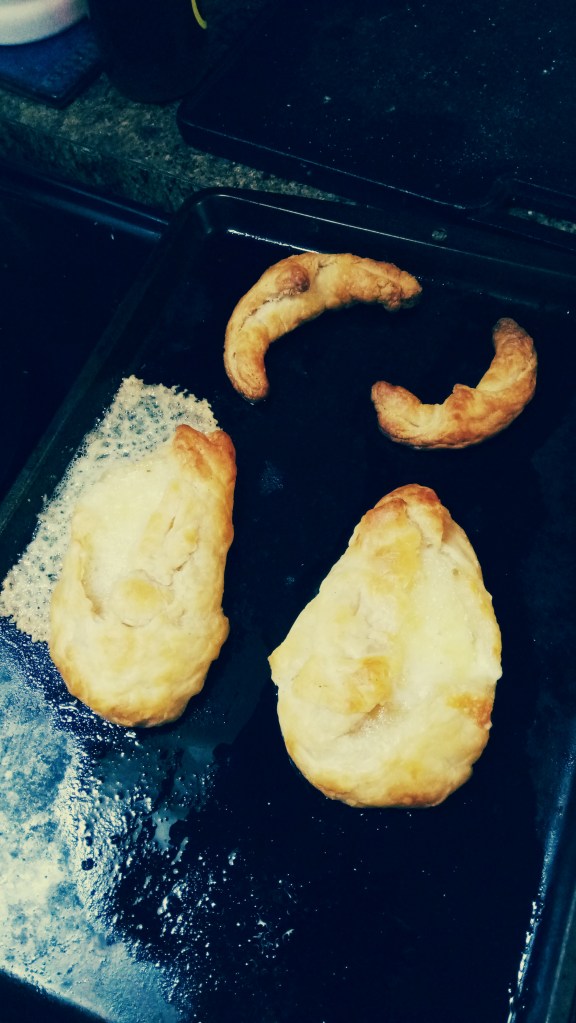
And fold the other side up and cover any exposed brie with more pastry and pinch it all together to seal well. Roll any leftover pastry into croissants or maybe make little cups and fill with jam or spiced nuts for additional appetizers or dessert sides.
Bake on a lightly greased cookie sheet for about 10 minutes or until golden brown. Oh, dear! Some cheese melted and escaped! Don’t despair! This is the best part. Don’t let anyone else have it, it’s amazing!
Serve drizzled with honey and jam or fruit on the side. The honey fig jam was amazing, but blackberry, apricot, raspberry or any other you happen to have would be nice, too.
Make a whole dinner menu from wrapped tings! Some baked brie for starters, beef Wellington for the main course, vegetable eggrolls, wonton, phylo-wrapped spinach, nuts and cheese for the vegetable side, and baked Alaska for the dessert. A major dinner event compleat with candles, nice linens, fine china and wine. maybe I need to get working on the rest of the menu!
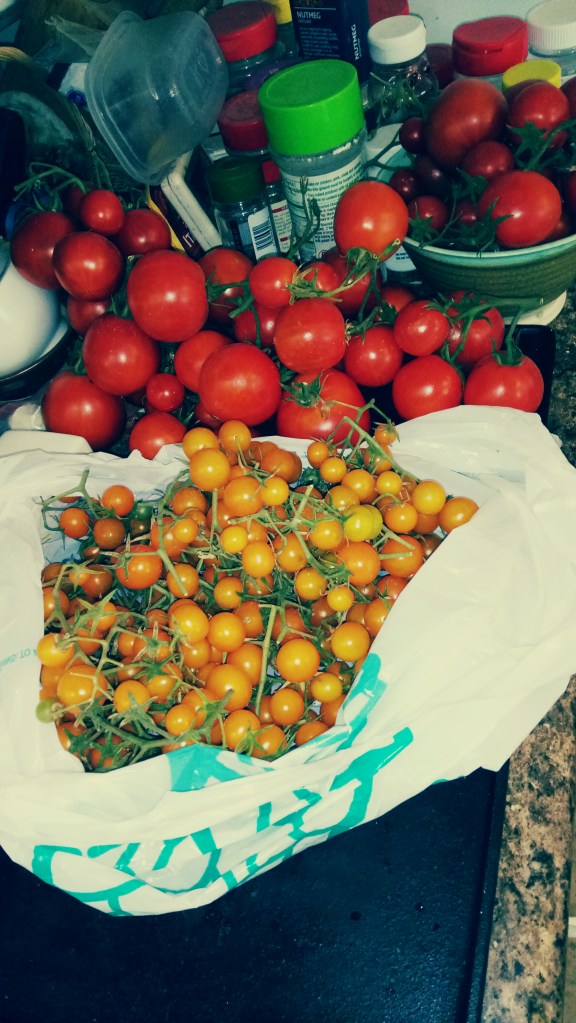
When one has a garden and a surfeit of tomatoes, and has made all the variations on salads and sandwiches that one can bear there may be nothing for it but to put all the tomatoes in one pot and make sauce.
Pick your tomatoes.
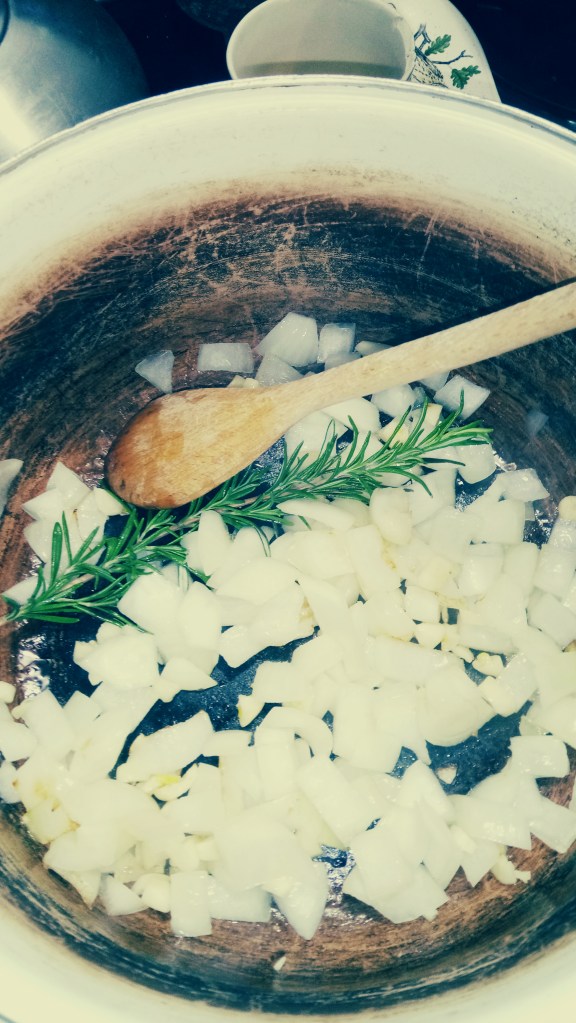
Set a pot on the stove and toss in a chopped onion with a knob of butter, bacon fat or some olive oil. Stir with a spoon or wooden thing frequently. Add rosemary, garlic and celery if you like. Make sure the garlic doesn’t burn or it’ll be bitter.
While that’s sautéing, wash and cut your tomatoes into quarters, unless they’re small, then you can cut them in 1/2 or just toss really small ones (smaller than cherry) in whole.
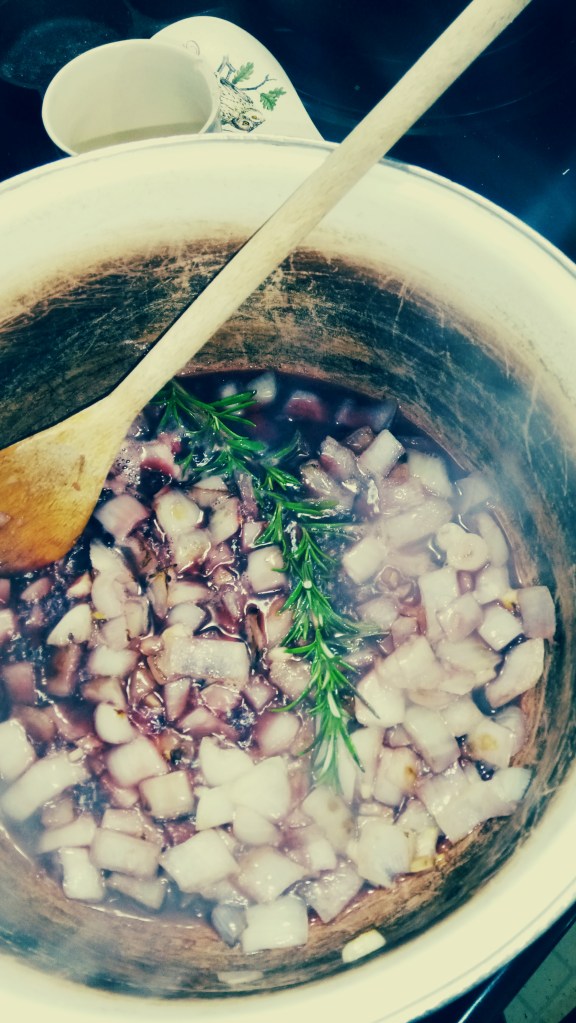
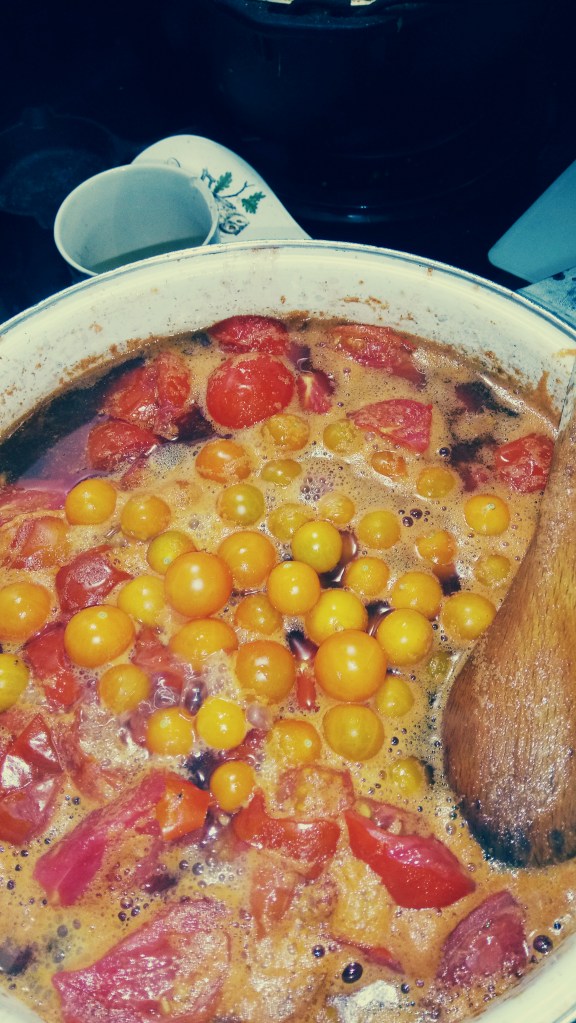
When the onions have gone soft and are starting to show some colour, toss in the tomatoes and add some wine and a sprig of rosemary if you have some.
And enough water to make sure the tomatoes don’t burn. You want them to simmer down to sauce but not dry up. You also don’t want to simmer for ages trying to simmer off excess water. After a while the little ones will burst and start to break down. It’s fun to smash them with a spoon to help it along, though.
When it’s simmered a while but doesn’t seem to be breaking down compleatly, it’s OK to zap it in a blender…just don’t fill it over 1/2 full and start slow with a towel between your hand and the lid. You don’t want your kitchen looking like a murder scene. You’ll want to avoid burns, too. Use another pot or bowl to get all the sauce done if that’s what you want.
Once you’ve zapped part or all of the sauce, put it back in the pot to finish simmering.
Add pepper, oregano, basil and any other seasonings you like. Simmer a bit more and serve over pasta, make pizza, lasagna, dip breadsticks…all the good stuff! Have good noms!
Save the extra sauce in the fridge for a few days or freeze it in smaller containers for future use.
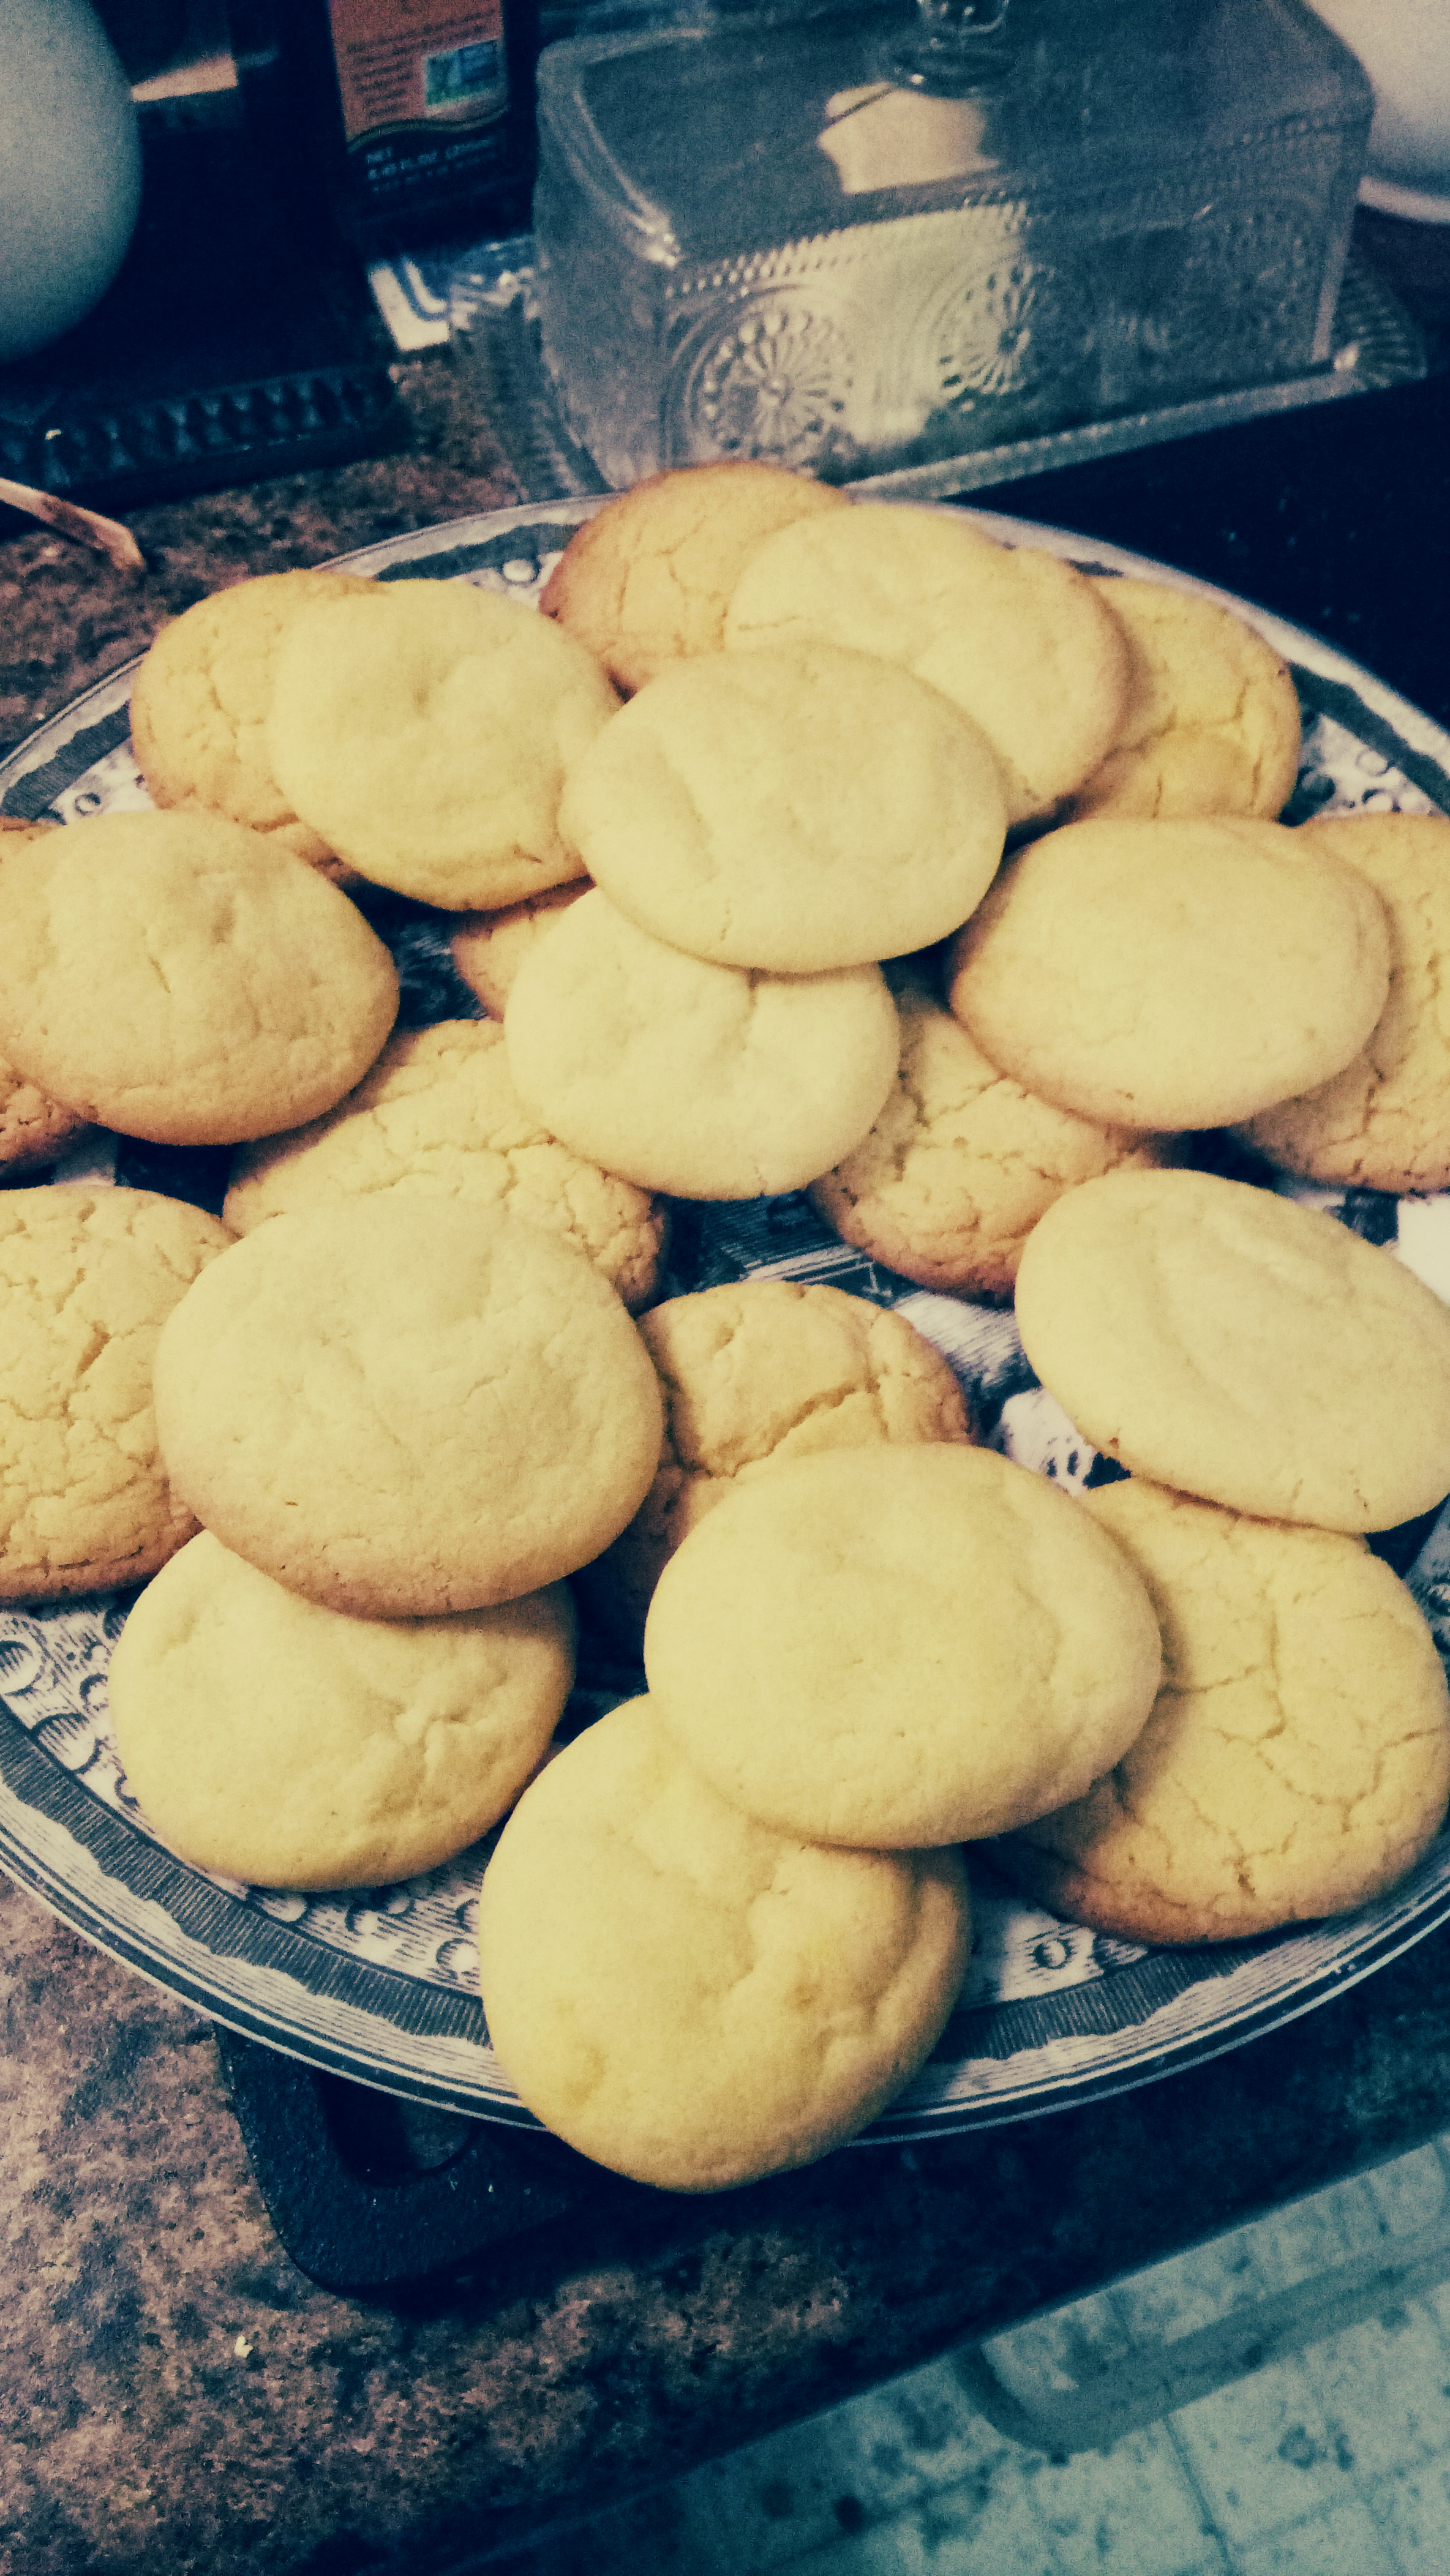
Someone just asked me this (again)…what a question! So many cookies, so little time! Anyway, it lead to a bit of a short essay which I’ll copy and paste here below:
ViviLnk
The cookie-cookie I always made most often was chocolate chip. Now I make brownies (bar-cookies) more often because they’re faster to put together and I don’t have to wait for the butter to soften. These are the cookies I taught my grandkids to make when they were 2 and 4 and came over with their Mom a lot. The cookie-cookies I do most when there are no eggs are shortbread (butter, sugar, vanilla and flour! That’s it! Easy-peasy!) and the cookies I make the most when I have a surfeit of eggs are meringues which get made in combination with lemon cookies because meringues use just the whites and lemon cookies use just the yolks. Sometimes I make other kinds of things from the yolks when I need whites or other uses for whites when I use need just yolks for something…but I digress…ANYWAY!!!… I acquired my Mom’s cookie press after my Dad died and we divvied up the rest of the ‘estate’ (house stuff). She used to make cookies that were chocolate and vanilla (I suppose you could use any flavours with contrasting colours, though) * make them 1/2 and 1/2, quartered, spiraled etc…basically mix, divide into sections for contrast, put sections together so they’ll make interesting designs when rolled into a log and cut into cookies. I adore lemon bars (and I suppose one could use other flavours such as raspberry *I love framboise!*, blackberry, apricot…) and fruit/nut bars are yum. Mom also made Mexican wedding cookies (round shortbread cookies with chipped nuts rolled in powdered sugar while still warm). So many cookies, so little time! And there’s so many more from around the world to explore! Around the world in cookies! What an idea!
Well…maybe around the world in (with?) cookies might be a way to spur me to bake and blog ore often on my days off…Cinco de Mayo is coming up, Andrew’s got walnuts in the fridge, maybe Mexican wedding cookies are next…Oh! Tomorrow! Yum! We’ll see if I manage. Happy noms everyone!
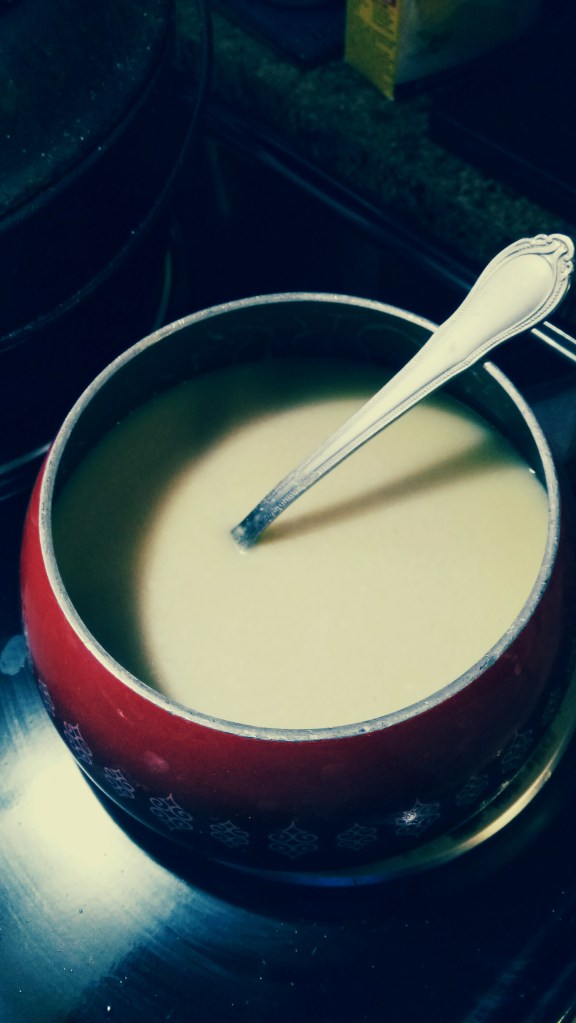
Once upon a time fondue pots were almost required as wedding or housewarming gifts. Now they can readily be found in thrift stores. It seems to be making a comeback, at least a little bit of interest in spots. Who doesn’t like melted cheese on bread and stuff? This is the way my Mom made it since the ’70s. The original recipe called for gruyere cheese, but since we couldn’t find that reliably back then we did the best we could.
If you don’t have a fondue pot you can use a pan on the stove, but be warned, it’ll get thick on the table and you’ll have to re-melt it, which can be a bit of a pain, so if you make it and like it you might want to pick up a proper fondue pot next time you see one. If it’s decorative you can leave it on display as a conversation piece (make up an epic family story or some such acquisition story). Stories are good.
Cut a loaf of French bread into cubes, about an inch square or so. It helps if they mostly have crust so you can spear the fondue forks through the crust and get a good grip on them so they don’t fall off in the pot. It also helps if the loaf is a day or so old, nut not hard. Something off the bargain rack from yesterday is fine, or plan ahead and buy the day before, but bargain bread is cheaper.
Grate 1 lb of Swiss cheese. Mix in a Tbsp of cornstarch.
Grate 3 triangles of that soft happy cow snacking cheese. The colder the better, it kind of squishes through the grater. If you save a bit of Swiss to grate after this it’ll help clean up the grater. Mix it in with the Swiss and corn starch.
Rub the fondue pot’s sides with a clove of garlic. This really does make a yummy difference.
On the stove over medium heat warm 1/2 bottle of dry white wine. I use Riesling. Yes, you can find it dry or dry-ish.
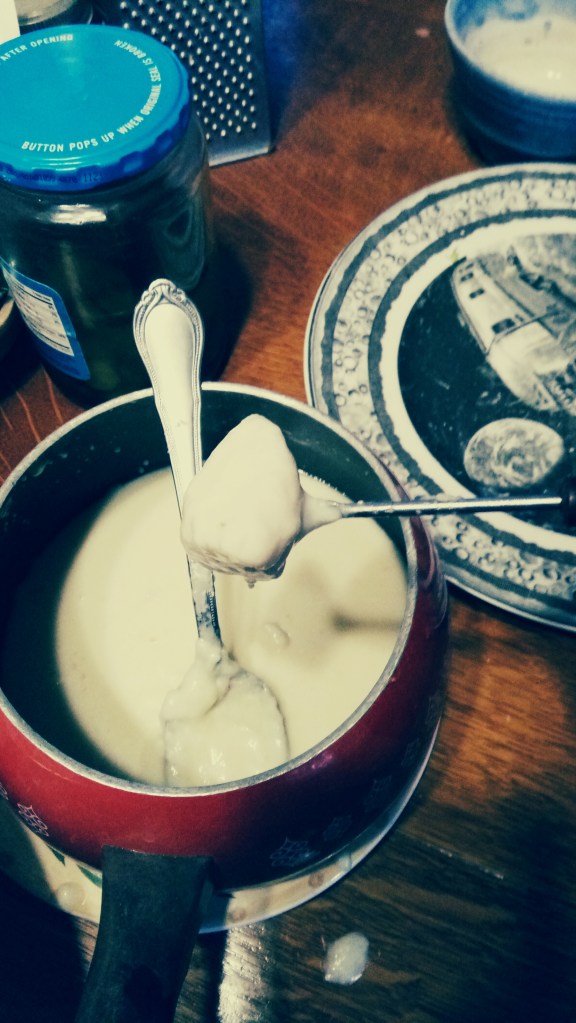
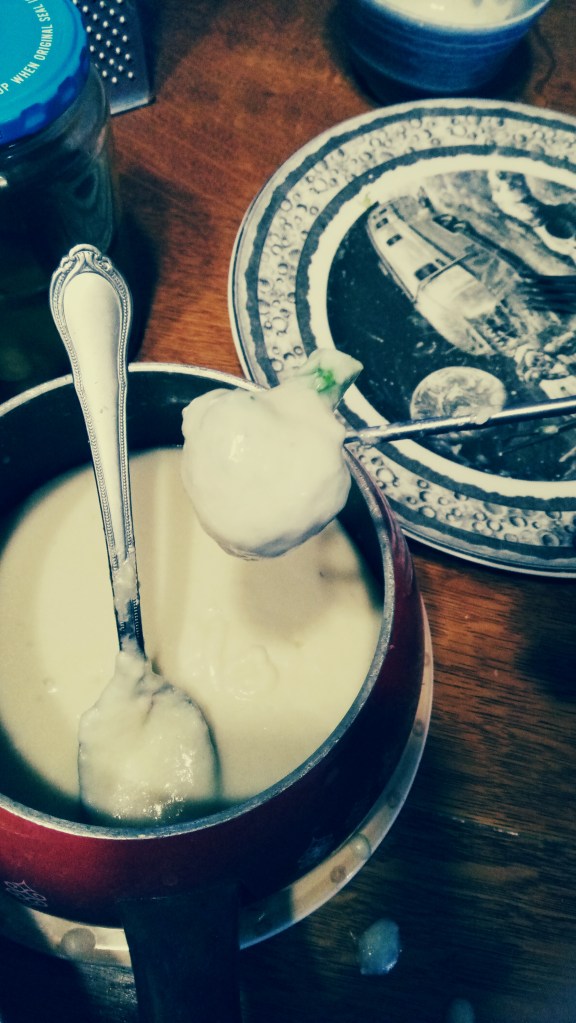
A handful at a time, melt the cheese in the warm wine. Stir constantly. this’ll take a bit of patience, but it’s worth it.
If you have an actual fondue pot either plug in the burner and set it on the table or light the sterno or tea light to put under it on its stand. Put the pot on the stand and let everyone choose a fork and start dipping. Put one or two on your plate and eat them with a regular fork as they cool just a bit. Only use the fondue fork for dipping, since it has to go back into the pot.
If you feel adventurous you can try pieces of mushroom, broccoli, cauliflower or even warmed up leftover roast. Any bite-sized morsel that can stay firm on a fondue fork. This is peasant food, originally made to use up leftover cheese and bread, so using up other leftovers is perfectly acceptable.
Don’t drop your bread or other dipping morsels in the pot! You’ll have to pay a forfeit, like buying the next round, kissing your neighbour/sweetie, doing the washing-up or maybe even just a coin or 2 in the charity can. If there are any leftovers you can save them til tomorrow, re-melt it in the microwave and put it over some leftover bread. Yummy breakfast or brunch. Any leftover bread can be used in stuffing, made into croutons for salads and soups or turned into bread crumbs for something else later. Have fun playing with your food!
A salad on the side is refreshing or crudités or some cold cuts and pickles are nice, too or maybe an artichoke as a first course. The same wine you use to melt the cheese should go well with it, too. A nice, light beer or water is fine as well.
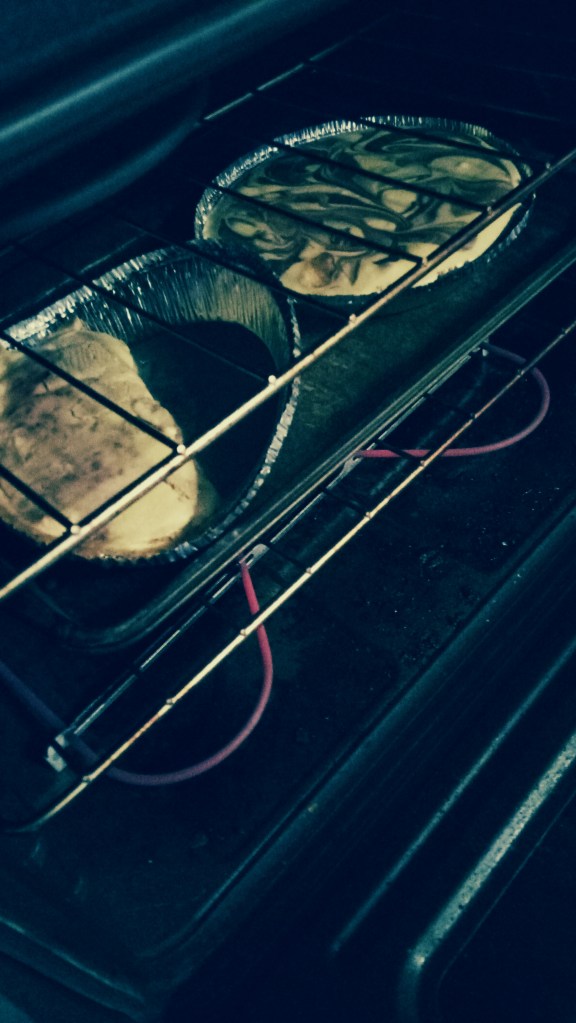
Once upon a time I decided to try making cheesecake. I loved cheesecake but it was expensive and not sold everywhere. I looked up several recipes in my cookbooks, found one that was obviously beyond my abilities, a large chocolate marble cheesecake, and bought the ingredients. Why try making one obviously more complicated than a rank beginner would normally try? Well, if I make a simple one and blow it, I’ll know it’s too complicated and never make one again. If I challenge myself and blow it I’ll figure out what I did wrong and try again with a simpler version. I didn’t blow it. I even made cheesecakes for barter and gifts over the years.
Last night one of my roommates mentioned he had a hankerin’ for cheesecake and did I know how to make it? Of course I did and proceeded to plan to make it the next day. On my errands I picked up the cream cheese and another graham cracker (OK, chocolate cookie) crust and at home left them on the counter to soften while I did other things. My roomie came home, put his things away in the fridge and laughed, informing me that we now had 8 packages of cream cheese! Oh darn! Now friends have given me all sorts of ideas for using extra cream cheese and we’ll probably need more! But on to our recipe…
NOTE: For a plain cheesecake in a springform plan using 1/2 this recipe, skip to the bottom.
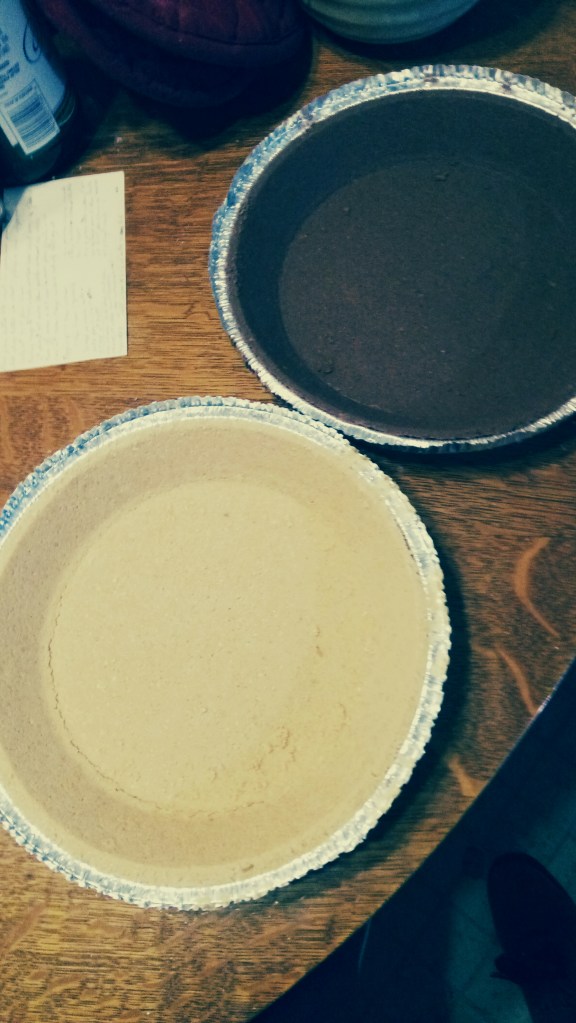
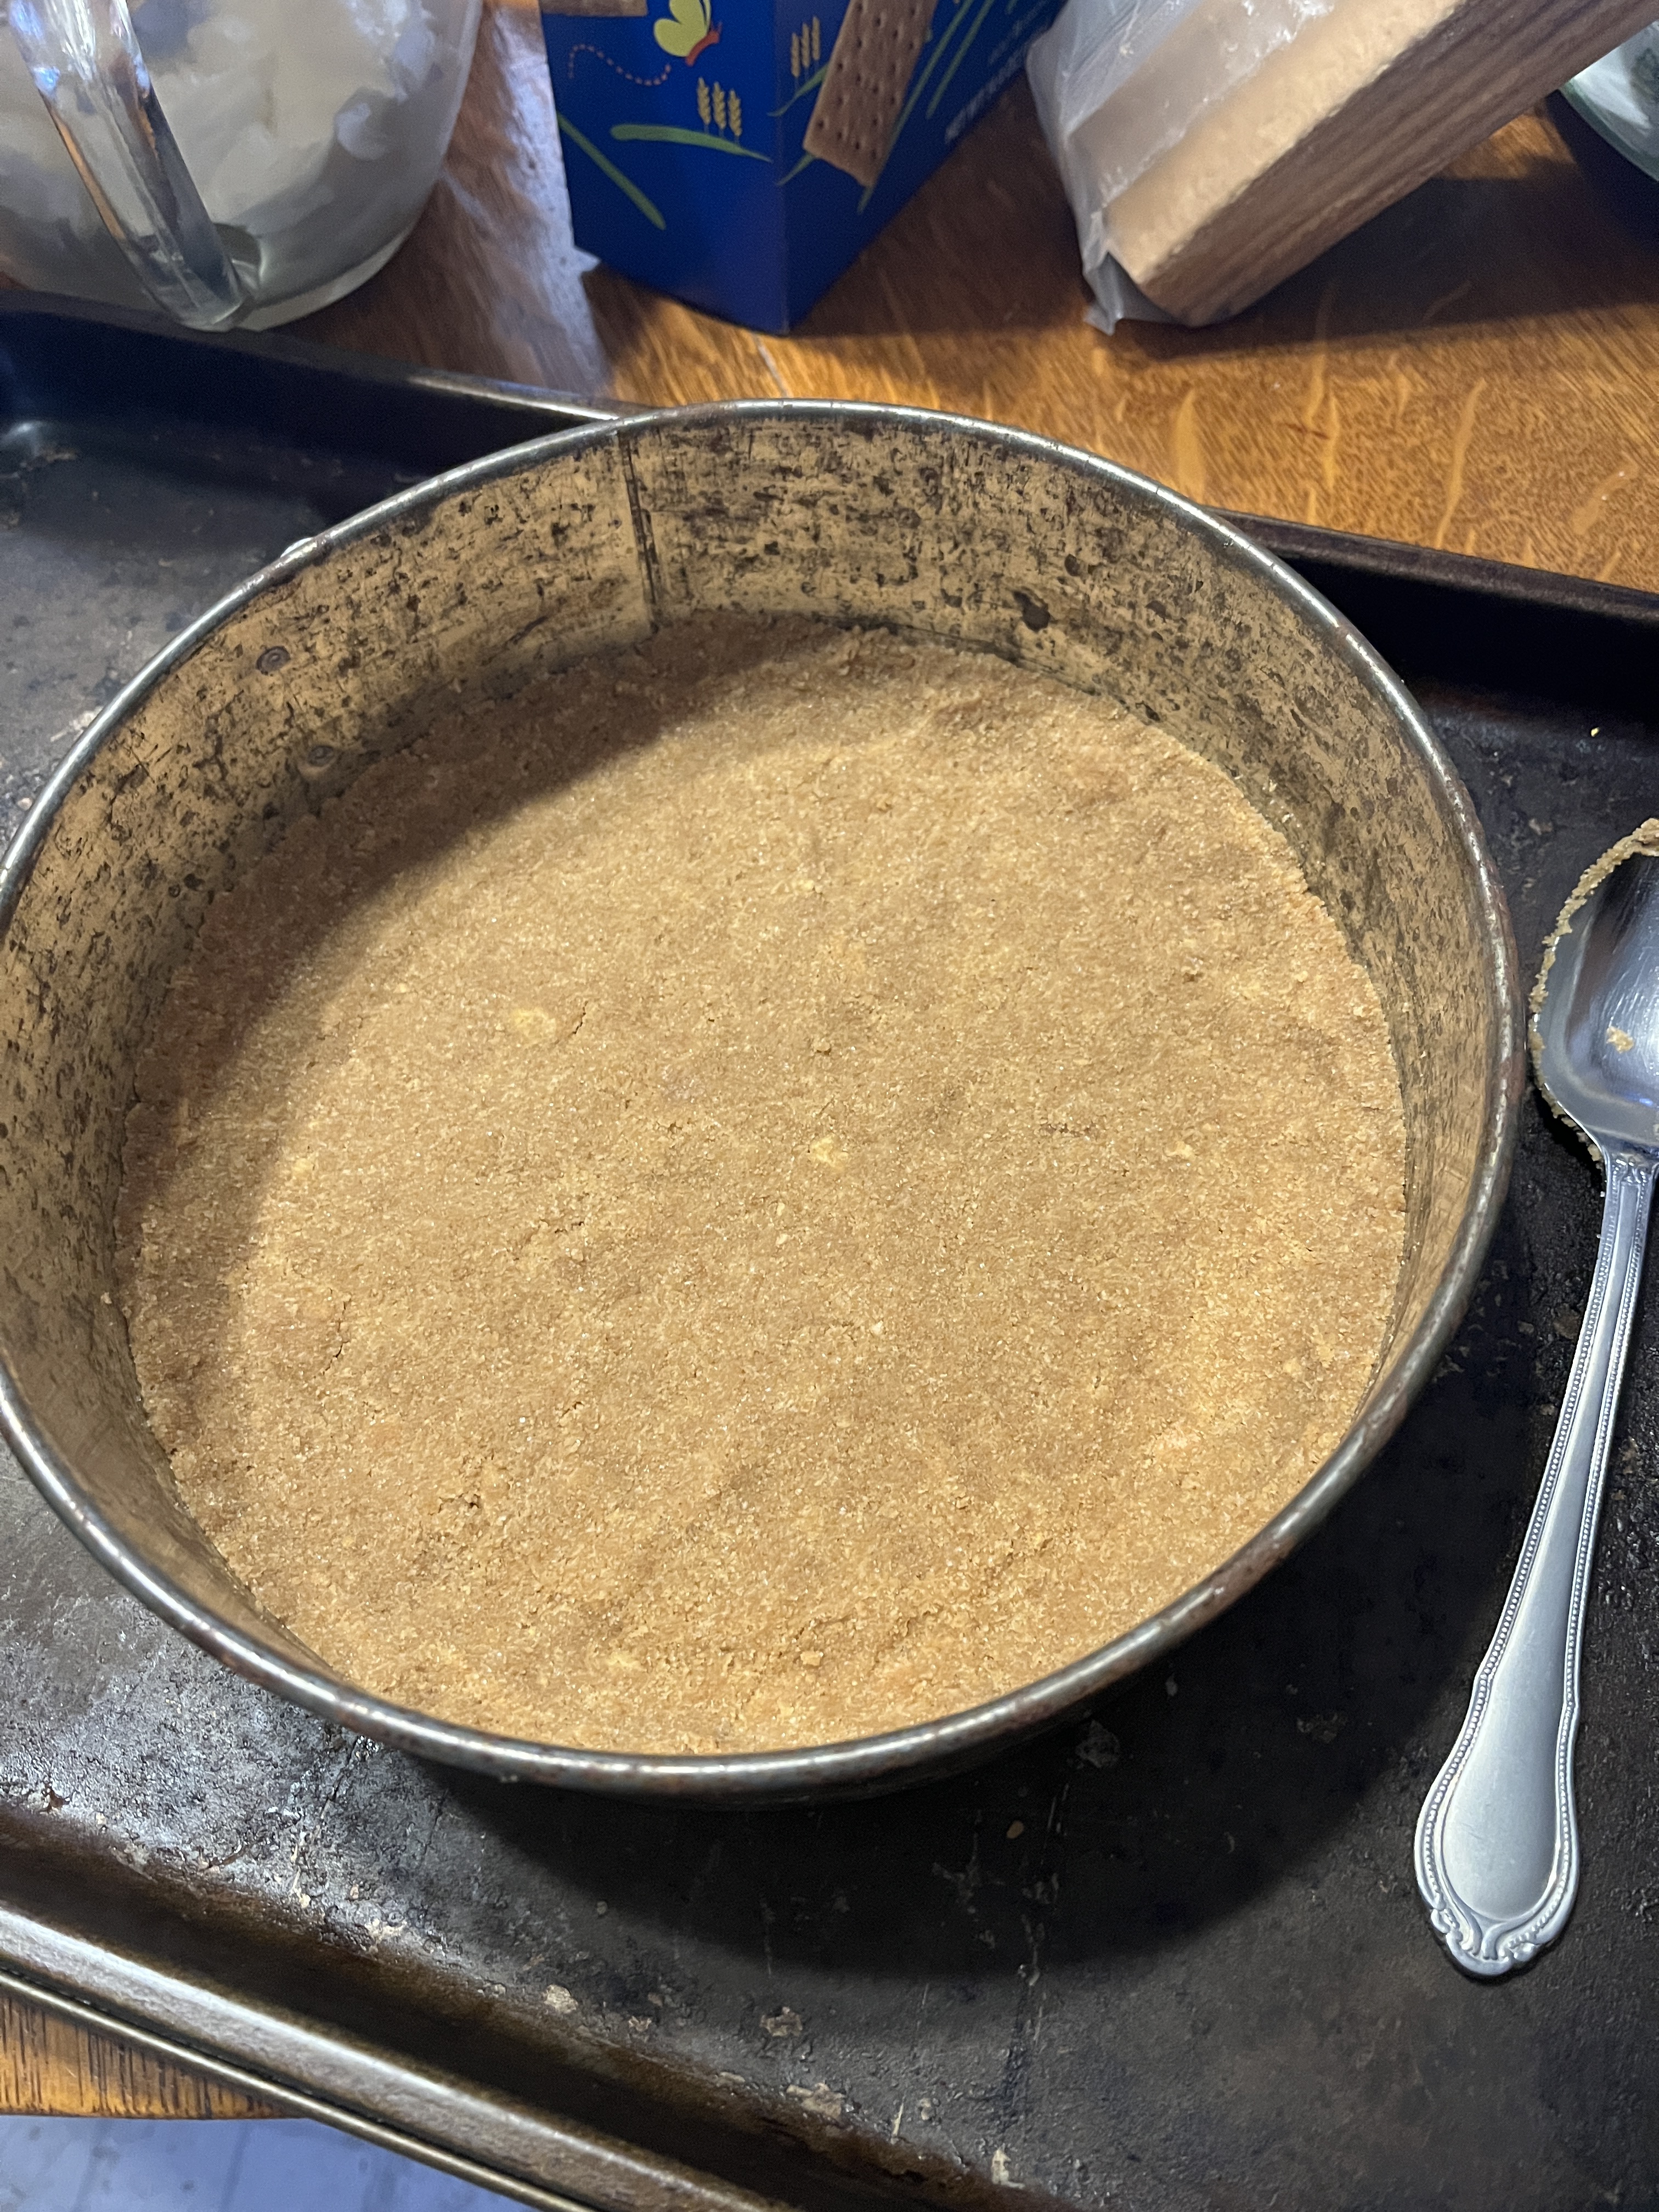
First, make the crust (if you haven’t bought 2 already). Yes, if you buy the pre-made ones in regular aluminum pie tins you’ll need 2. In a frying pan combine:
6 Tbsp melted butter
1 1/2 c graham cracker crumbs
1/4 c sugar
Mix and press into the bottom of a springform pan. Don’t have one? Quick! You still have time to grab one at a big-box store (houseware kitchen stuff department) or a kitchen supply store in a mall, whatever’s open when you need it). Now that you have it, wash it, dry it and get back to cooking. Once the crust is pressed evenly into the bottom of the pan and just a titch up the side, set it aside and get to the filling. Next time I make one I’ll add photos.
In a large bowl mix up the filling with a hand-mixer or a stand mixer if you have one. If you don’t do a lot of baking you might just want to get an inexpensive handmixer at a big-box store. They come in handy more than you expect.
2 lb ( 4 8-oz packages) cream cheese, softened
1 tsp Vanilla
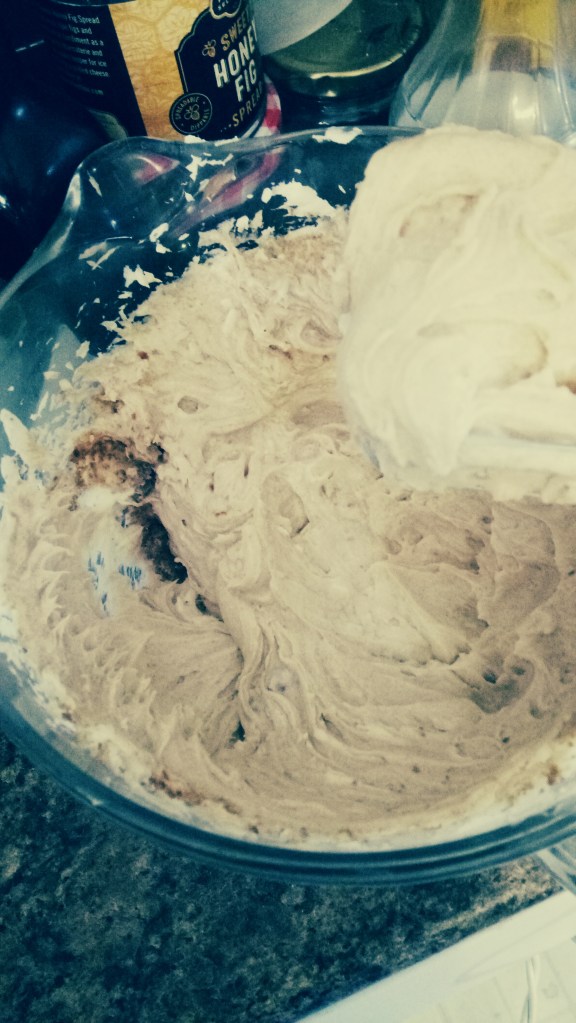
Beat until soft and creamy. Then add:
1 1/2 cup sugar The picture looks a bit odd because I used 1/2 c brown sugar.
Beat until fluffy.
6 lg eggs
Beat in 1 at a time until well blended, scraping sides often.
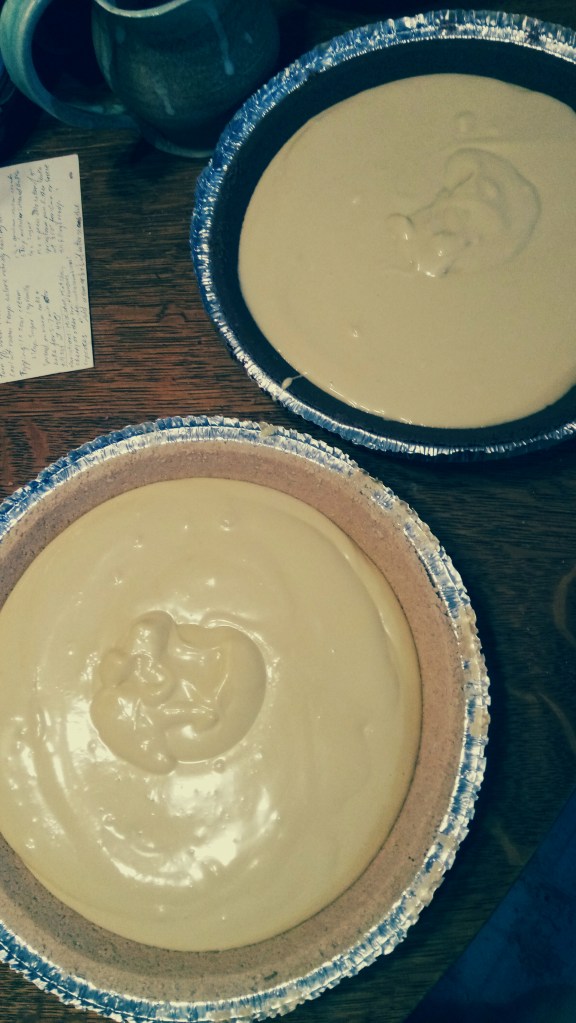
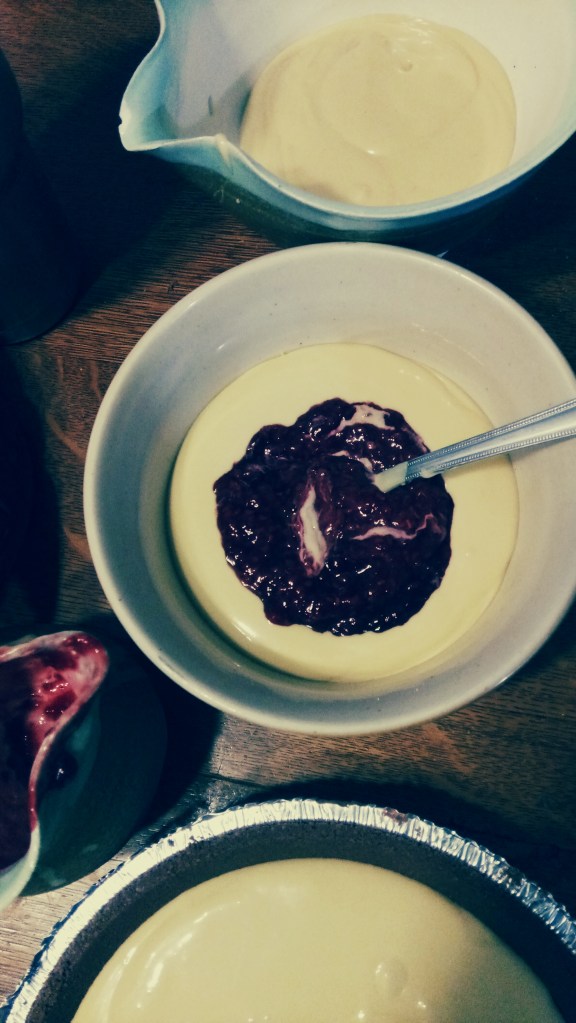
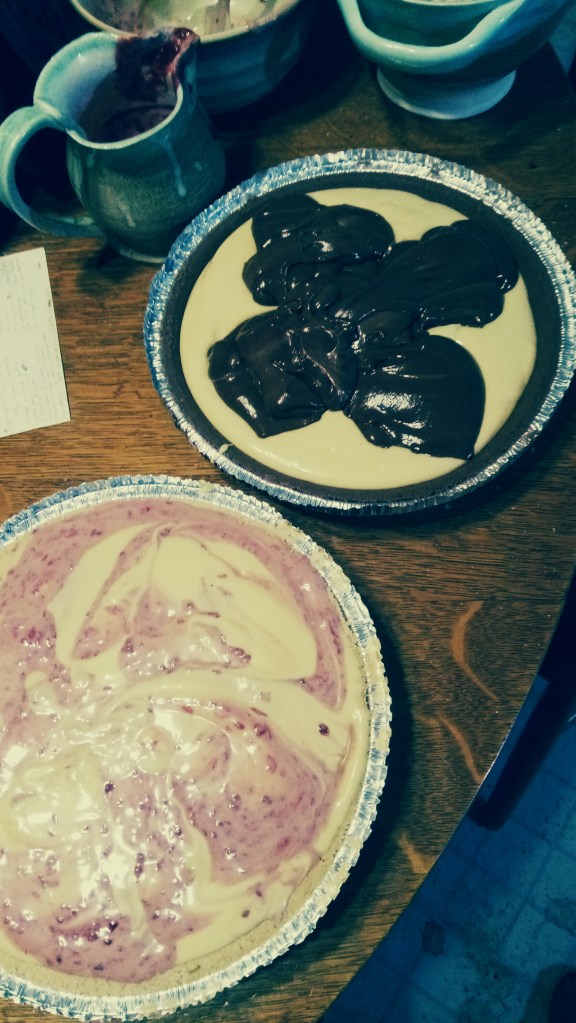
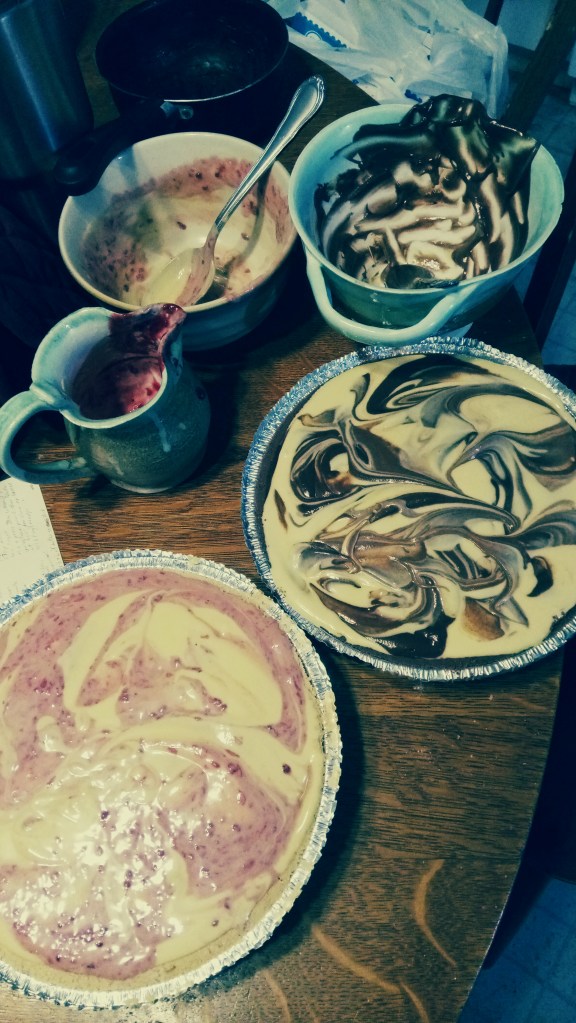
Put about 1/3 of the filling in another bowl and put the rest in the crust. If you’re using 2 store bought crusts, fill each about 2/3 full and divide the rest between 2 bowls. This way you can use 2 different flavours for swirling.
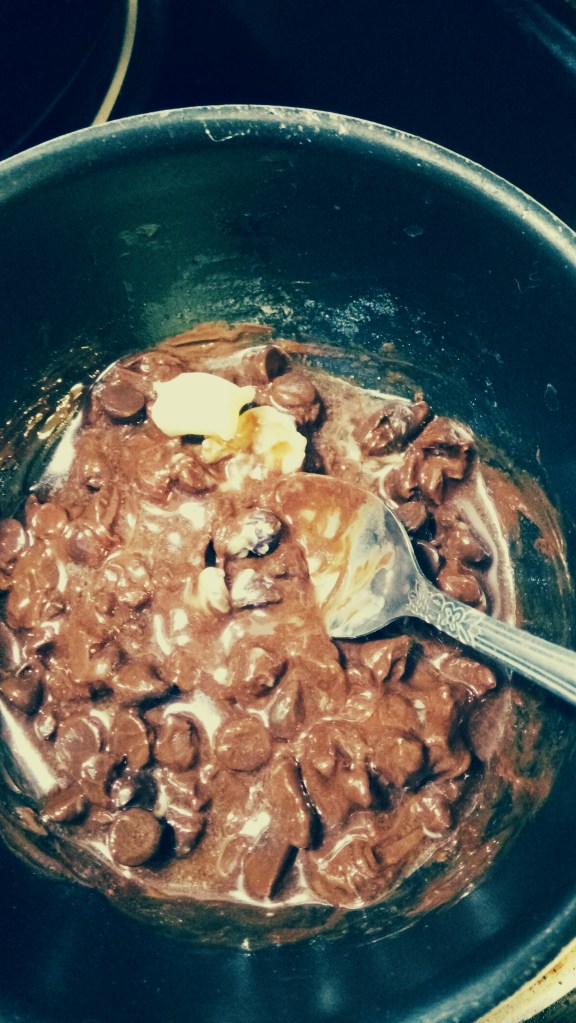
In a small pan (preferably a double boiler, but if you want to live dangerously put the small pan on the stove, turn it on for a moment, just long enough to start melting the butter and turn it off) melt:
1 tbsp butter or shortening
3 squares baking chocolate or chocolate chips
Alternately use fruit puree, syrup (home-made or store bought, I used leftover home-made) or jam, warming slightly if needed for mixing.
Stir until smooth and add to the filling in the small bowl. Then add this to the filling, putting it on top in spots or stripes. Without dipping deep enough to mess up the crust, swirl gently.
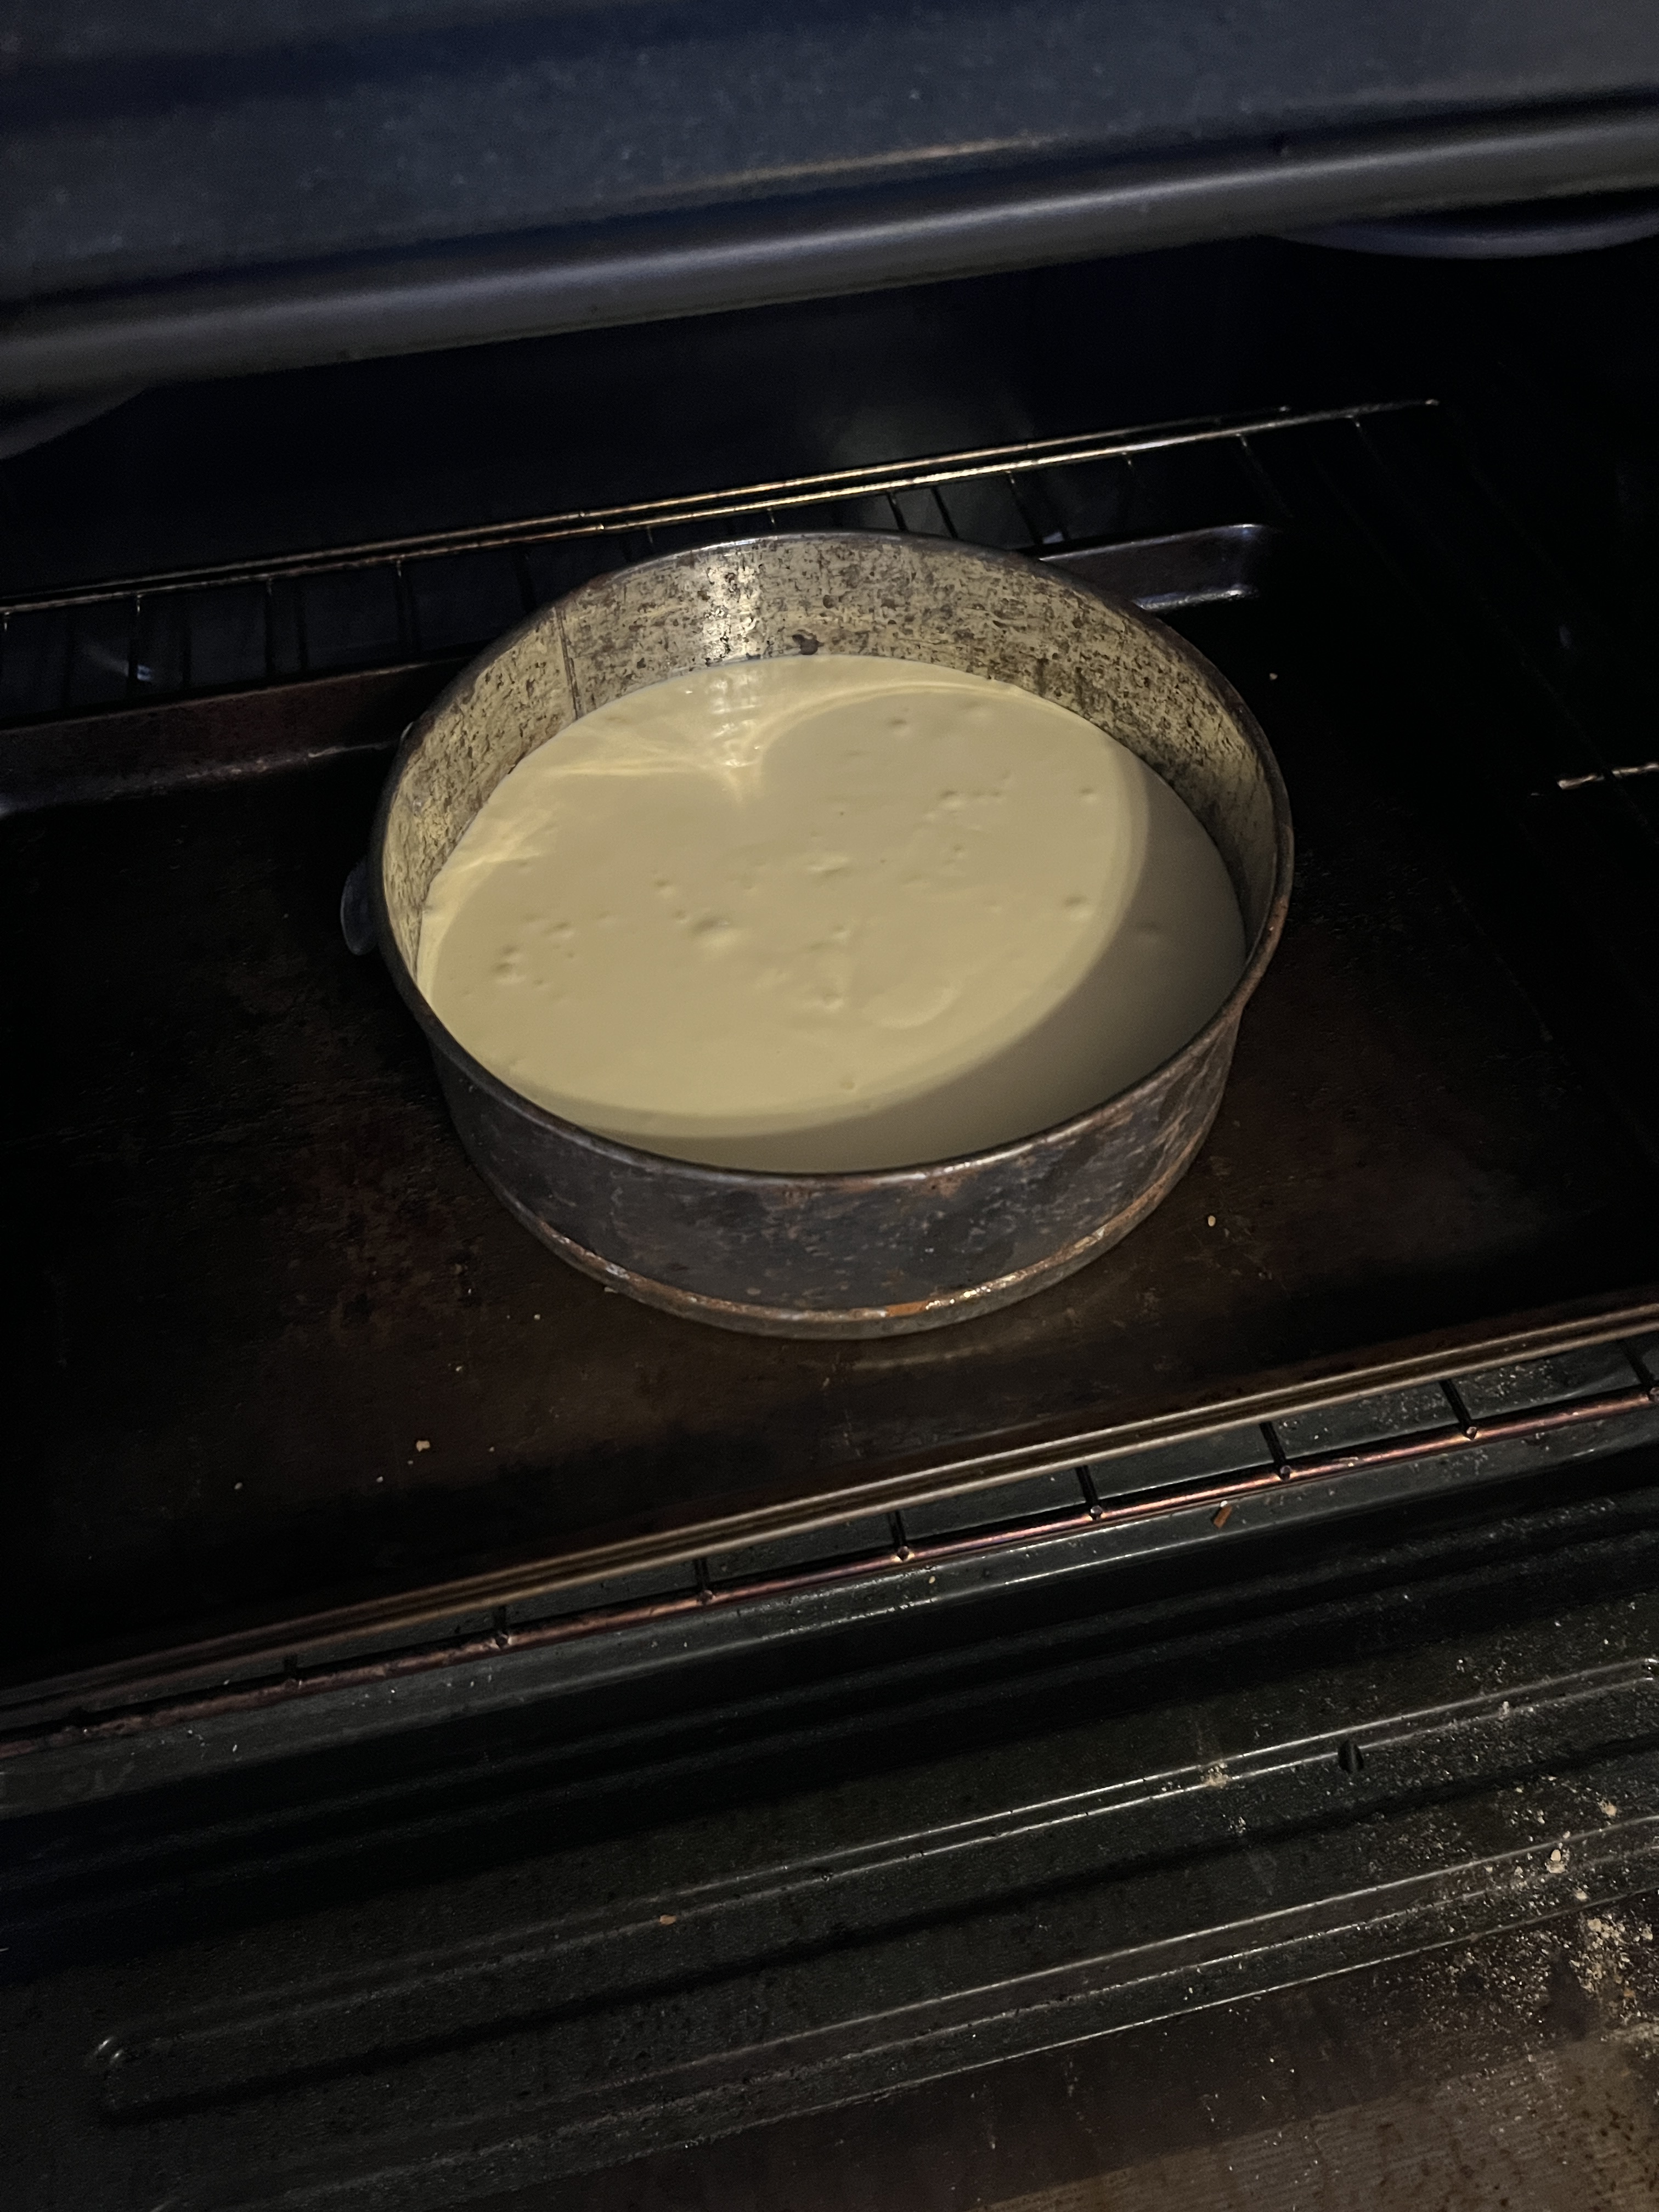
Put the cheesecake on a rimmed baking tray in case of accidents.
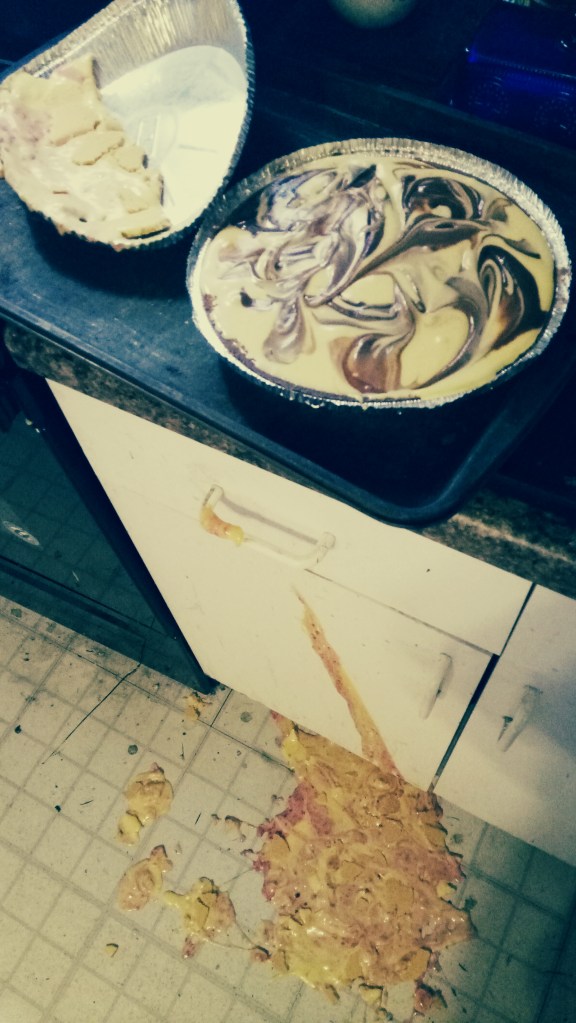
If you’re using store-bought graham cracker crusts be careful, the aluminum is flimsy! Support them from the bottom! if they buckle as you carry them across the room, bad things can happen! I probably should have put the tray next to the pie tin on the table and carried the whole tray to the oven. *sigh* Learn from my mistakes!
Pre-heat the oven and bake at 450 degrees Fahrenheit for 15 minutes. Then reduce the temperature to 300 and bake for another hour, checking occasionally to make sure it doesn’t get more than golden-brown around the edges.
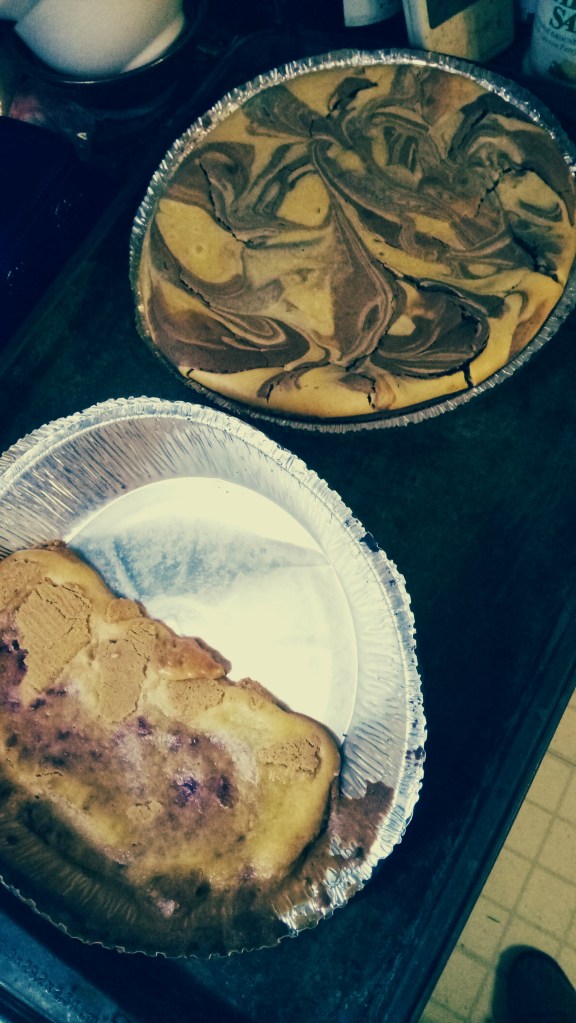
Turn off the oven and let the cheesecake cool in there for 30 minutes or so then cool at room temperature before putting in the fridge. Yes, I baked the disaster, but took it out way before the other one since it was smaller now. At least Andrew will have a couple servings even if they don’t look great. No I didn’t drop it, it just collapsed and spilled. I managed to save this much.
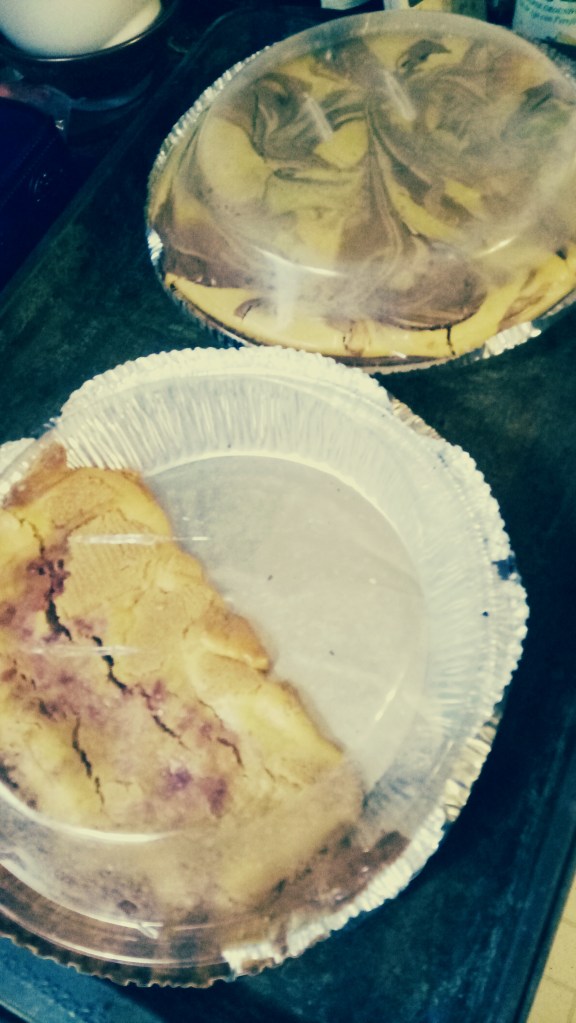
Once cool you can take the labels off the plastic forms the crusts came with (you DID take those OUT before you filled them, didn’t you!?), invert them and use them to cover the cheesecakes. Fold the aluminum side-flare-things that held them on and fold them back down in a few places to hold them on. If you do this while they’re still warm they’ll accumulate condensation and make the tops of the cheesecakes yucky.
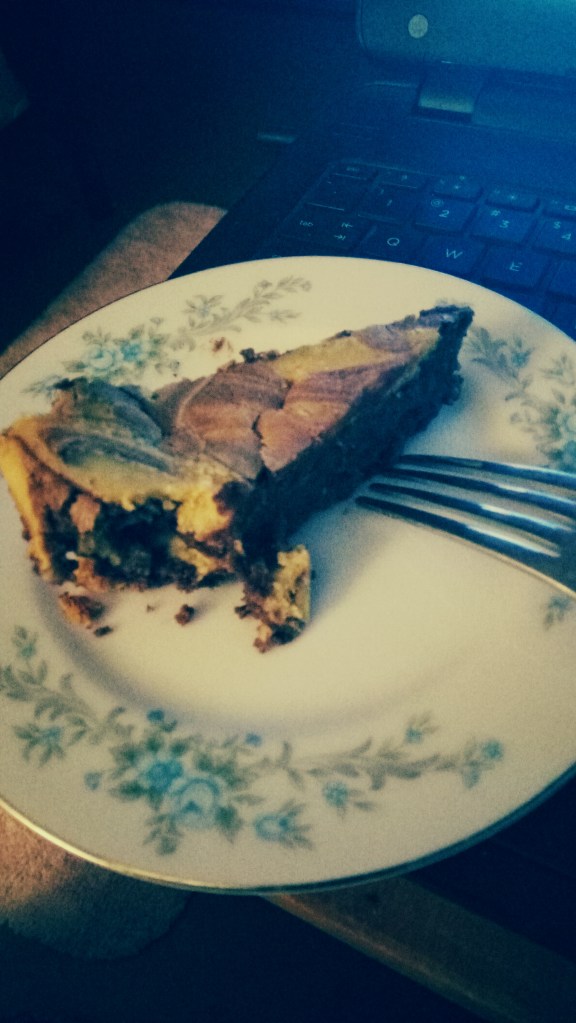
Serve with or without fruit, but fruit (especially berries) make it extra festive. Adults can have sparkling wine on the side, maybe with a berry in that, too. Milk, tea or coffee are also good.
Variation: Plain. Why dress up something that’s wonderful? OK, anything worth doing is worth over-doing, so you can also mint chocolate, white chocolate in a chocolate cheesecake and use chocolate cookie crumbs for the crust. Maybe add nuts and spice to a crust that you fill with pumpkin cheesecake? Have fun creating masterpiece deserts! Another option is using cupcake tins with cupcake liners, dividing the crust between them, pressing into the bottom, of course, and making individual cupcheesecakes/cheesecupcakes/cheesefairycakes…whatever. Adjust the baking time accordingly (or just keep checking more often until they’re done).
If you just want to make a plain cheesecake, here’s what you do:
Oops, when editing months apart things happen, so go back up to the part just under the pictures of the store-bought crusts for how to make a graham cracker crust, then put the graham cracker, butter and sugar mixture into the bottom of a springform pan and press it evenly into the bottom, from the center out to the edges, making it seal the joint between the sides and the bottom of the pan.
2 4-oz blocks of cream cheese
1 tsp vanilla
3/4 c sugar (granulated or brown, your choice).
3 eggs
Pre-heat the oven while you mix things up. With a hand mixer mix the cream cheese and vanilla until creamy. Add the sugar and mix well. Add the eggs one at a time, mixing well then pour into it into the pan.
Bake in the center of the oven at 450 for 15 minuted then reduce the temperature ti 300 and bake for another hour.
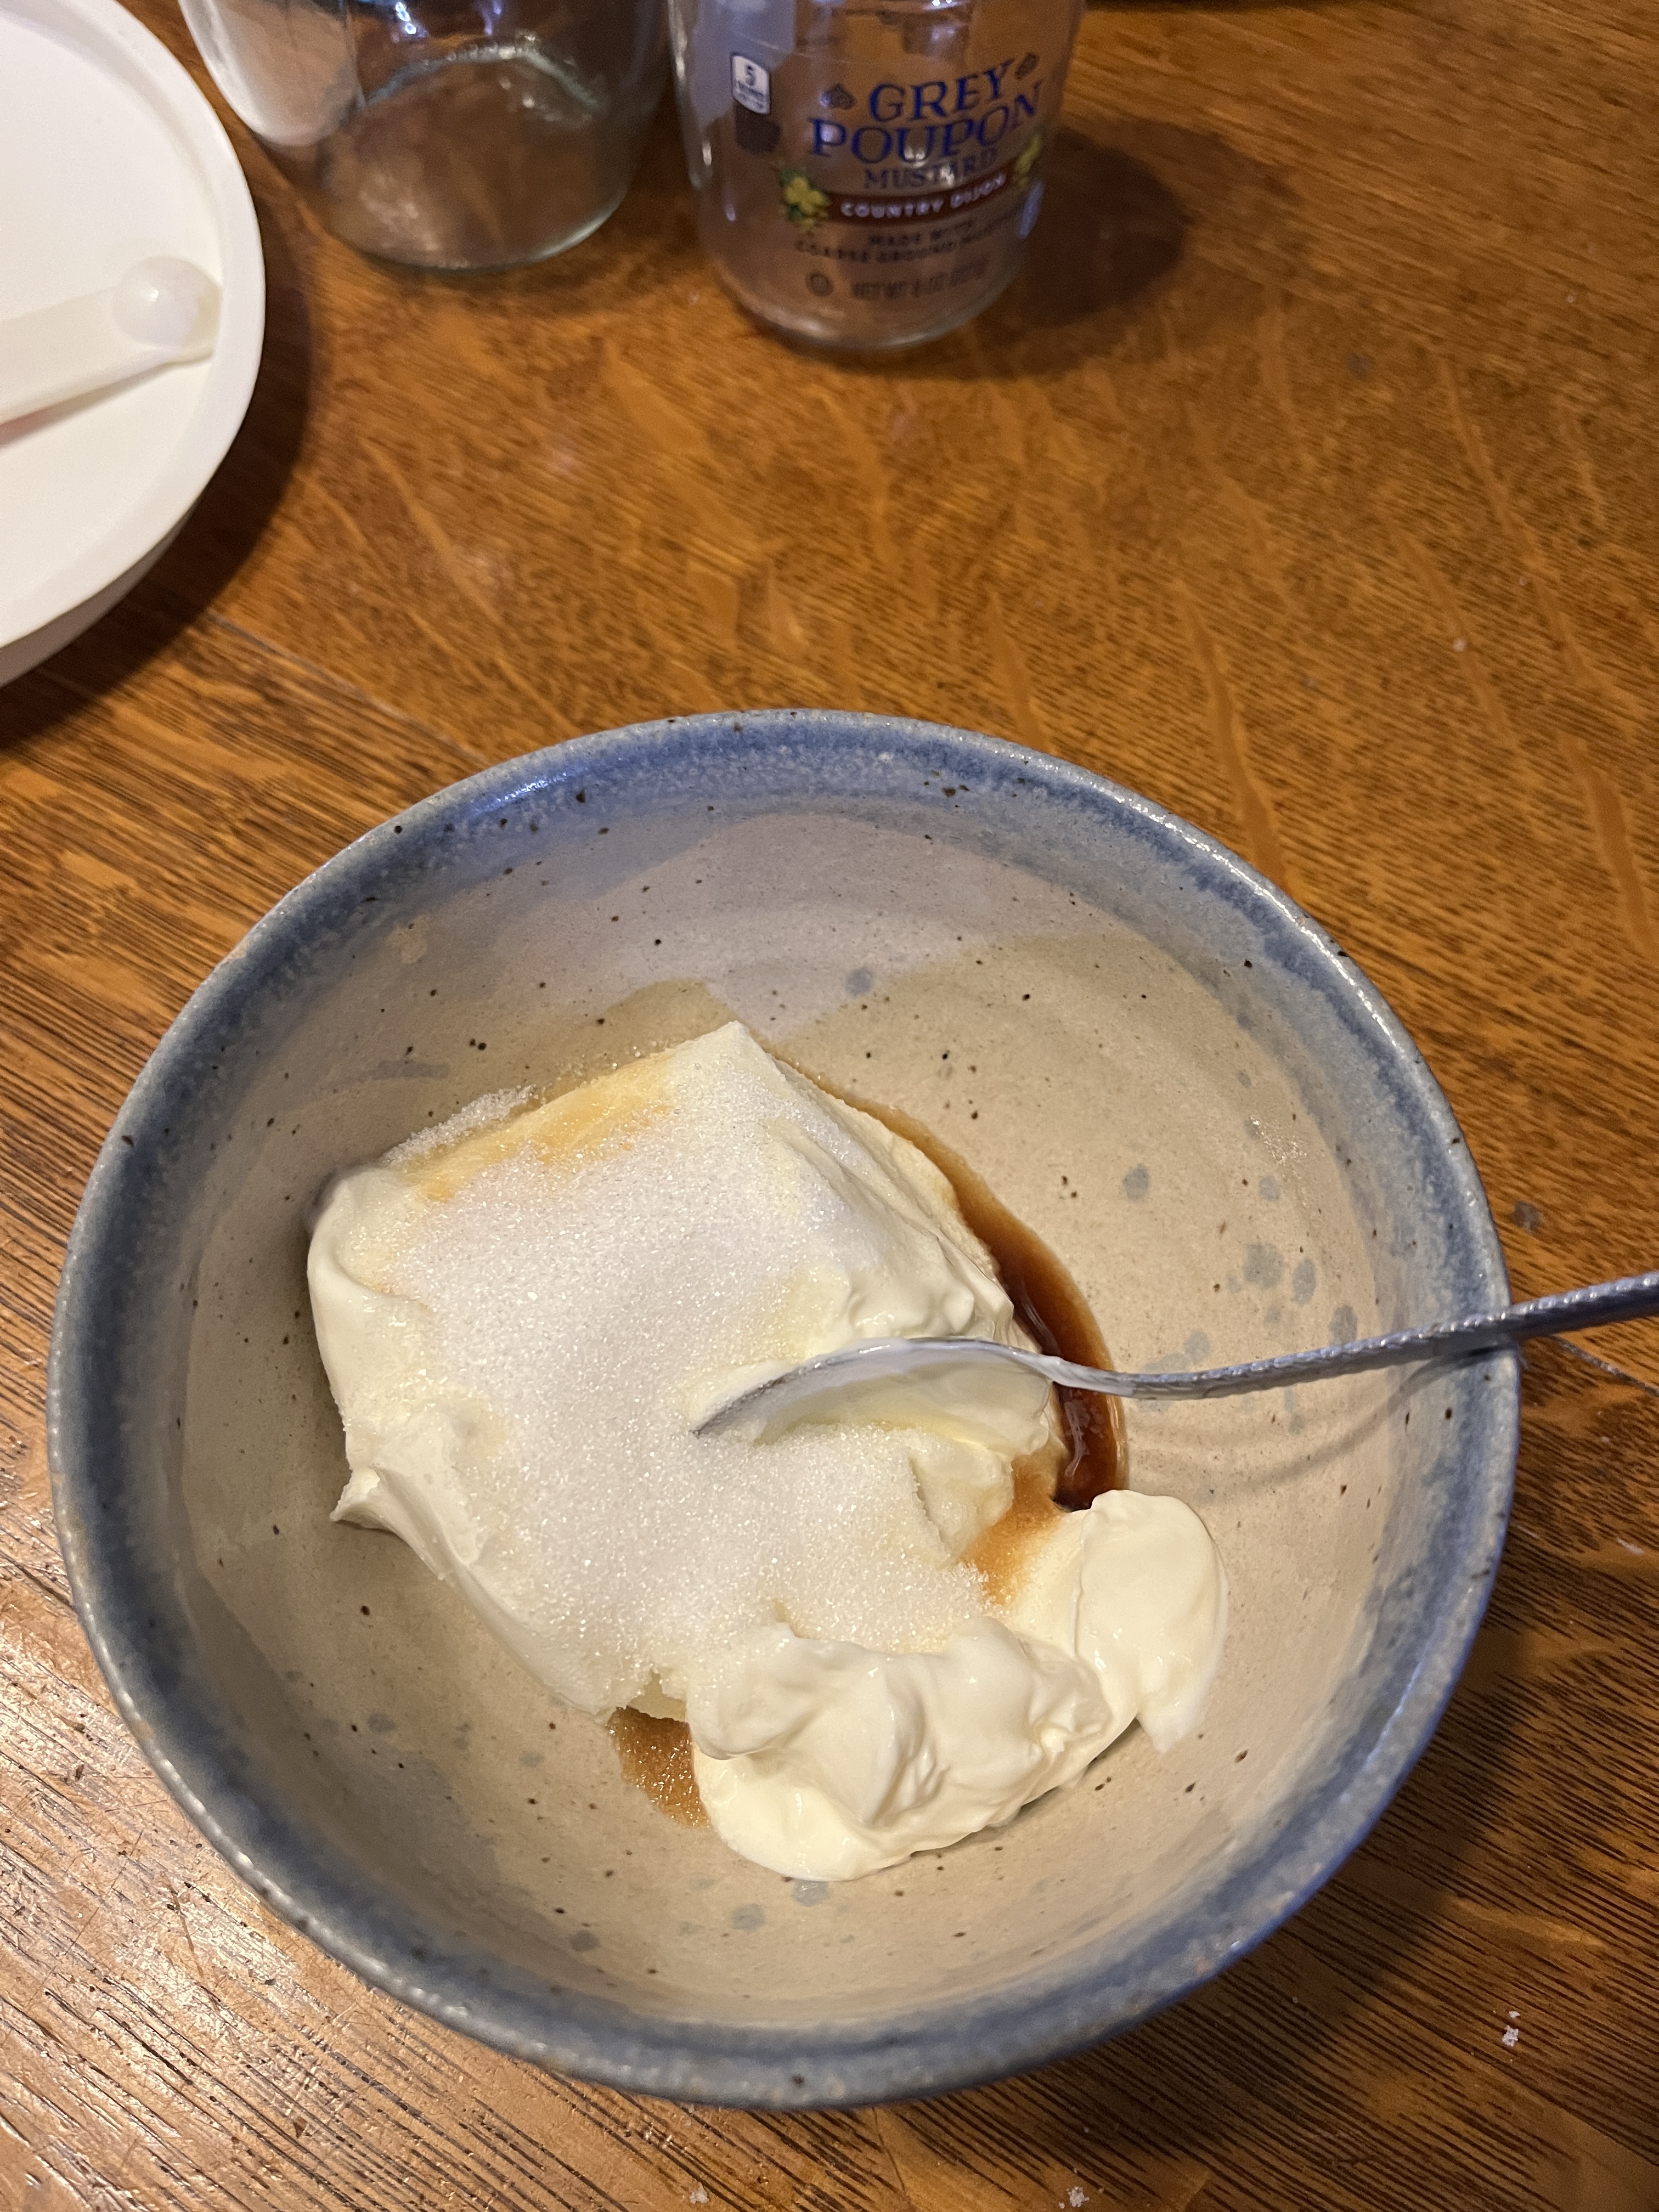
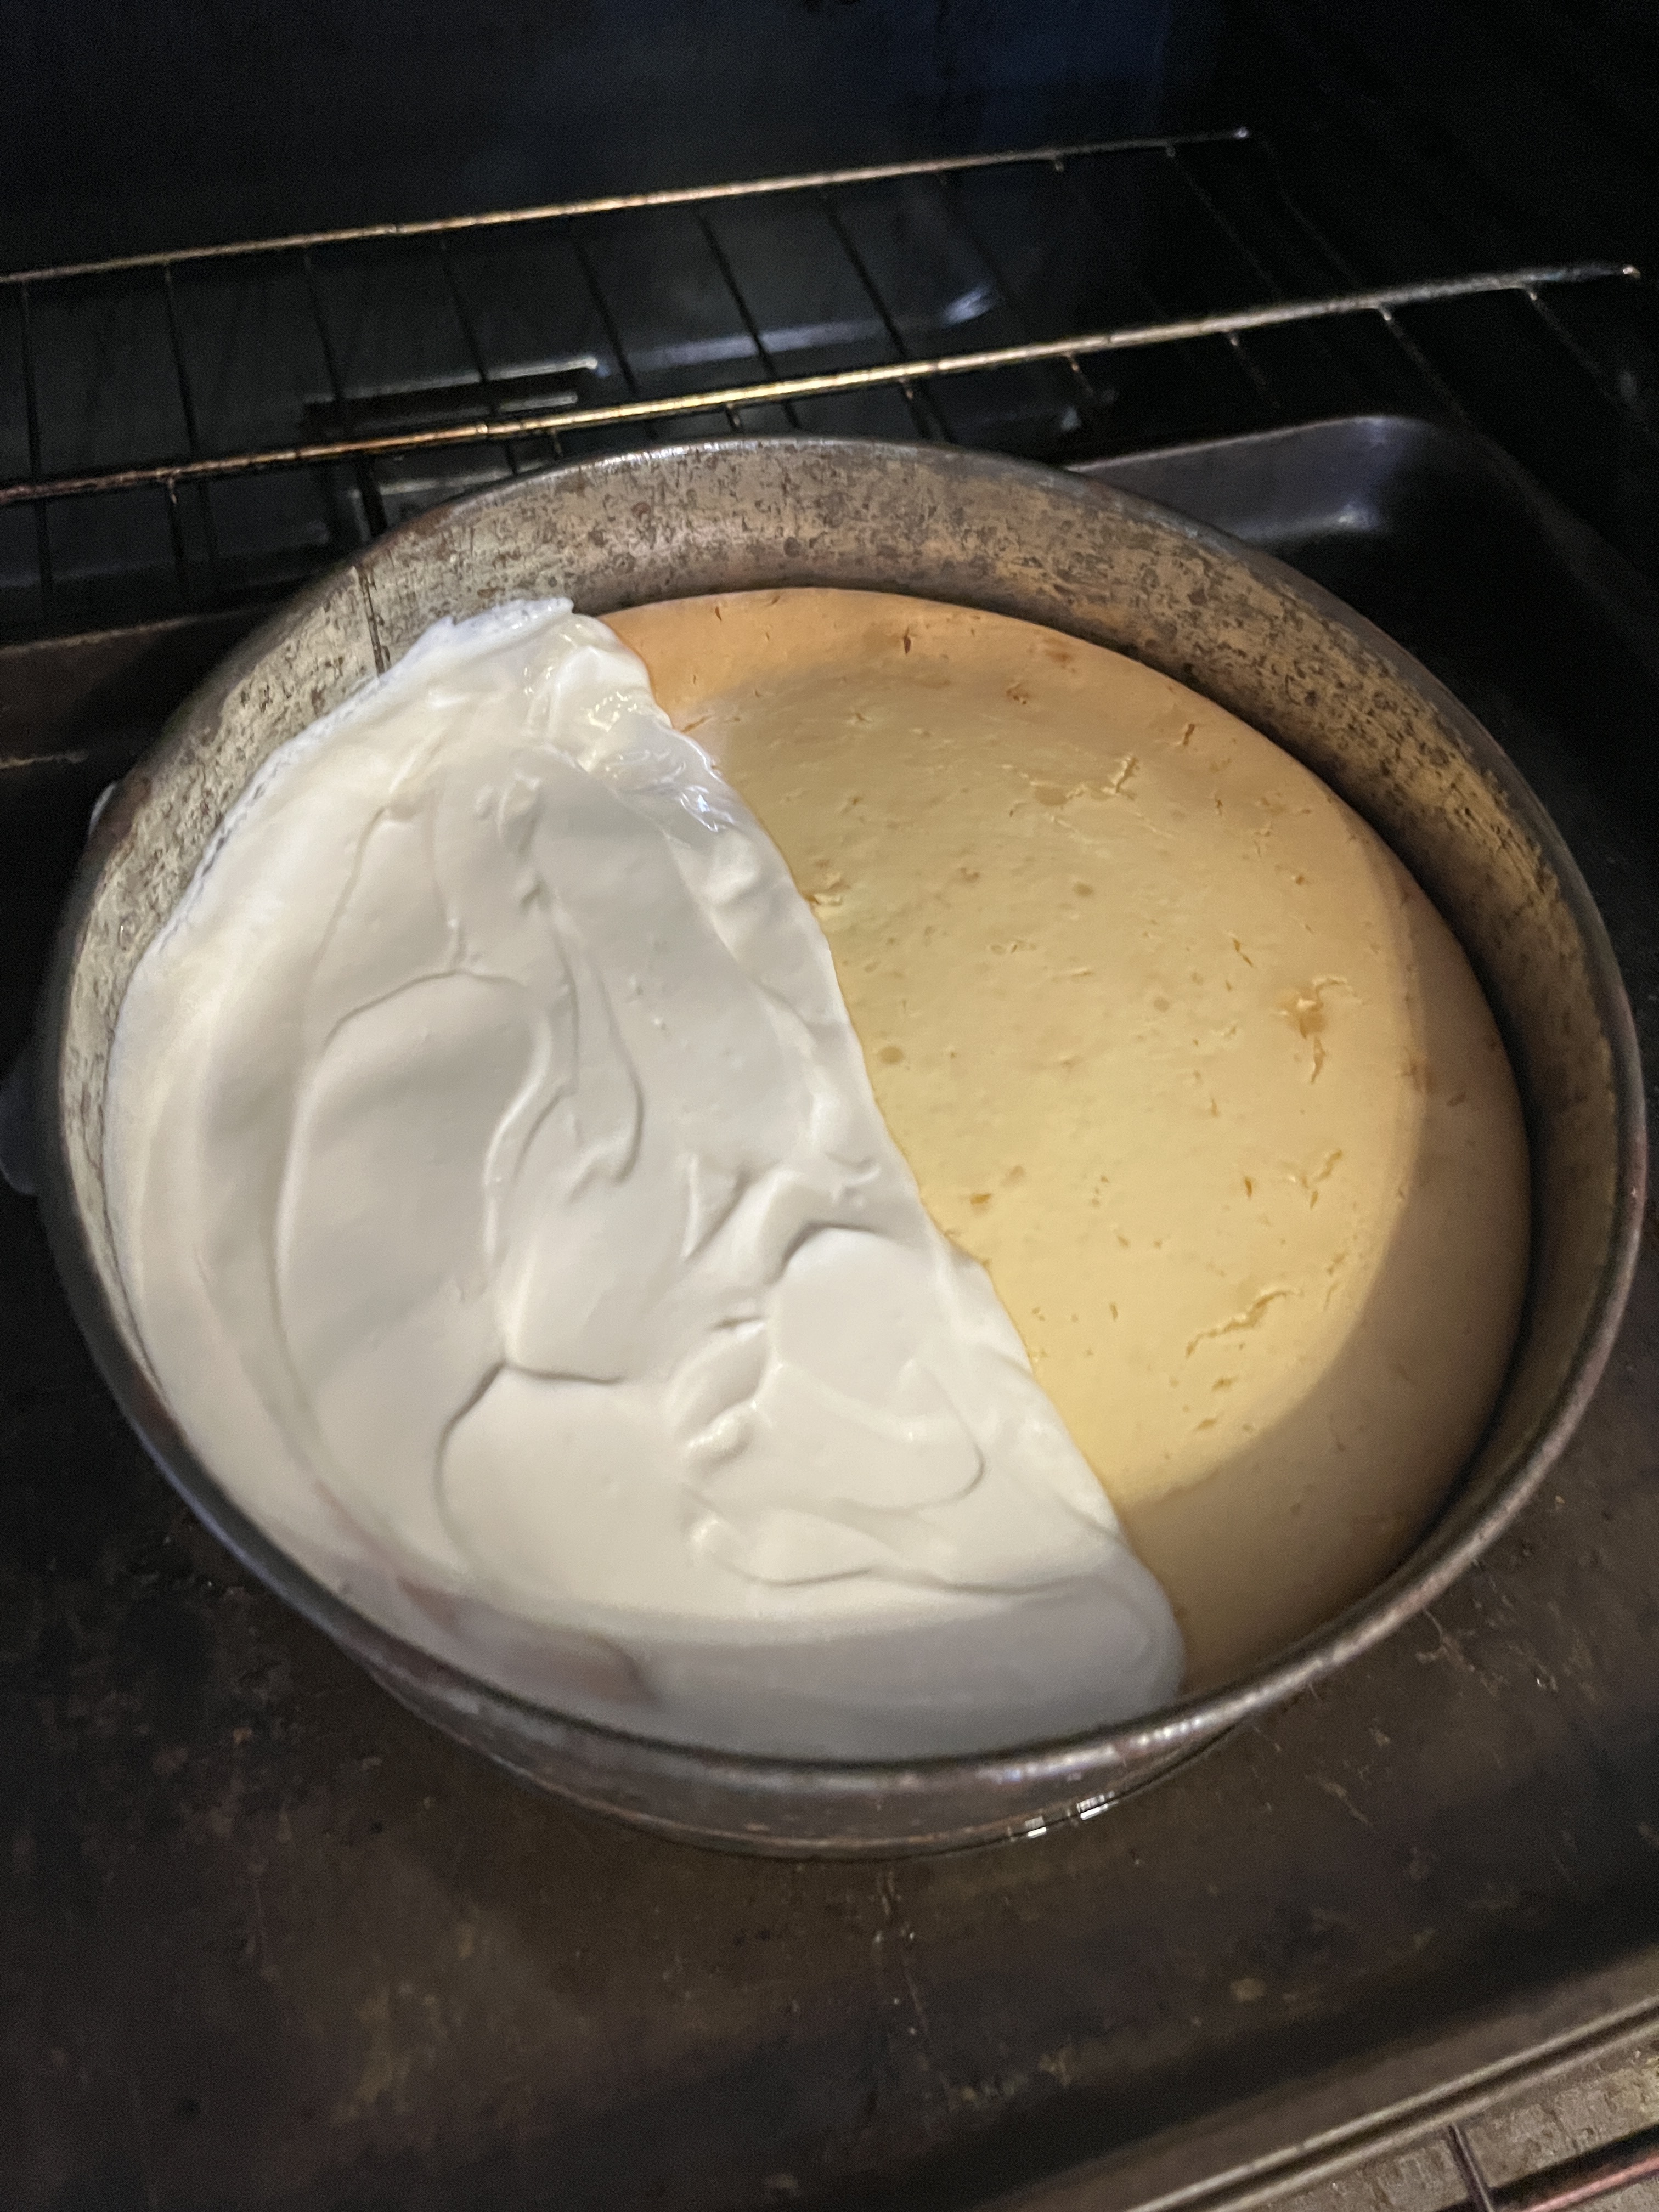
Optional sour cream topping (yummy, but also handy for hiding cracks):
1 c Sour Cream
1 tsp Vanilla
2 Tbsp sugar
Mix well, spread on warm cake and bake at 450 for 5 to 7 minutes. My friend isn’t too keen on sour cream so I just made enough to cover 1.2 the cheesecake. I like it, if you don’t then leave it off. It’s normal for a cheesecake to crack a bit so this can hide the minor cracks. Mix it up and spread it on for the last 5 minutes or so of baking then turn off the oven and let the cheesecake cool in the oven for 30 minutes before taking it out and letting it cool compleatly.
Refrigerate until time to serve. Since it’s plain it can be served as is (wonderful) or dressed up with sauces like caramel, chocolate, strawberry or other fruits. Mint makes a nice garnish and Champaign, Prosecco and other sparkling wines go well with it as does sparkling apple cider as the non-alcoholic versions are fine for kids and bubbles and stemware make everything special.
Just the thing for picnics, pot lucks, easy side on a hot night with sandwiches for dinner or a lunch. Quick, easy, versatile and if you make it yourself it can be just how you like it. Make it as basic or as fancy as you like.
Peel a few potatoes…or not, if the peels are thin and fine like on Yukon Golds you can leave them on, or if they’re red and you want the colour go ahead and leave them on, just wash them well under the tap. Then cut them into bite-sized pieces, put into a pan, cover with water and boil til tender, about 10 minutes.
While that’s boiling, cut up a stalk or 2 of celery and some onion (part or whole, depending on the size of the onion and how many potatoes you’re using). Put them in a bowl big enough for the potatoes and mixing.
Drain the potatoes or pull them out with a slotted spoon or other implement and add to the bowl with the onions and celery. Dress with your favourite vinegar (or not, it’s your potato salad after all). They drink it up easier when they’re hot. I used malt vinegar this time, but Balsamic, red wine or cider vinegar are nice too. Experiment.
Add ground pepper, garlic (powdered or minced), mustard (optional), relish (optional) and any other seasonings you think might be nice.
When it’s cool enough to not melt the mayonnaise, add enough mayonnaise to make it yummy, then garnish with paprika.
You can add any other stuff like shopped hard-boiled egg, bell peppers (any colours), jicama, chopped grapes, tiny tomatoes, chopped apple, grated carrot…make it a sweet or savoury as you like. Even some walnuts or hazelnuts can go in for a crunchy bit of variety.
As as far as mustard and relish go, it’s up to you. Chow chow, piccalilli, chutney, whatever. And the seasonings, also, are up to you. Make it more Greek with oregano, Asian with teriyaki, spice it up with salsa…make it up as you go, be adventurously international. Then garnish with colourful spices, parsley, fresh sprigs of fennel or dill, radish roses, green onions, edible flowers (fennel and dill flowers are pretty as well as tasty, as are pansies, nasturtiums and roses) or whatever looks fun and is edible.
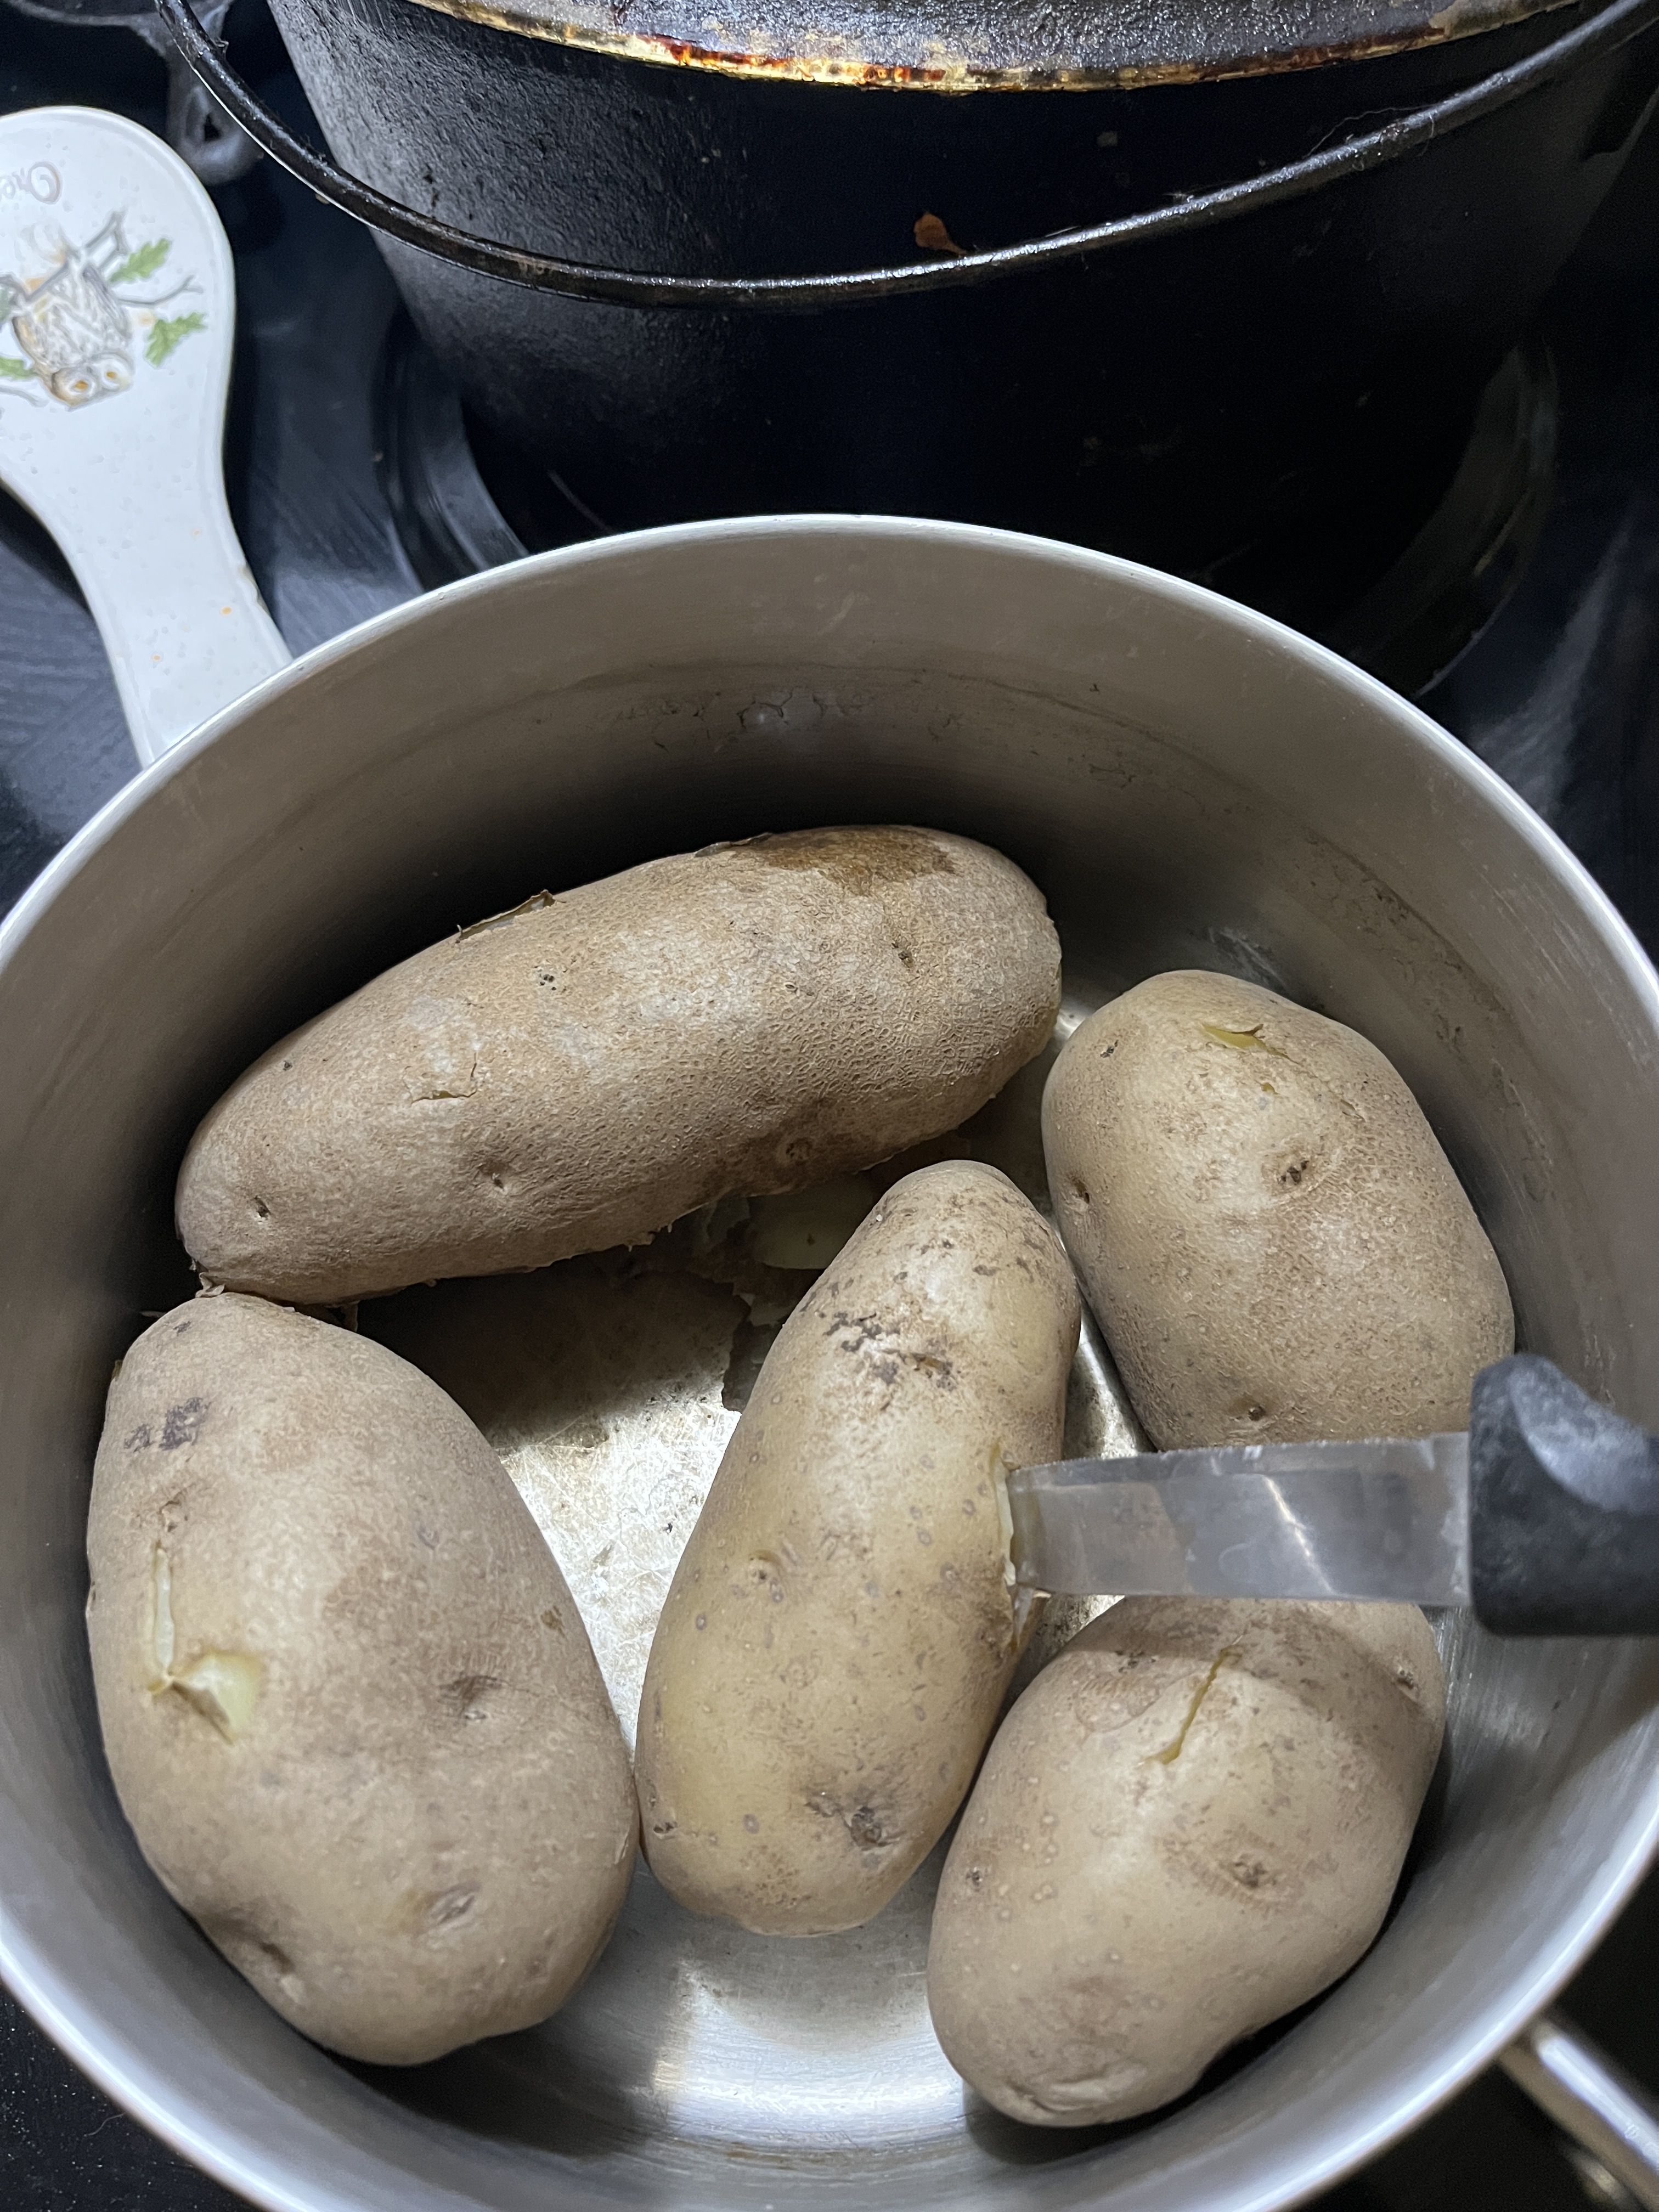
Update: Today I had to do something with some potatoes, so I boiled them. When a knife or fork can easily poke in, they’re done, turn it off and let them cool. Then I drained them and let them cool a bit while I made brownies.
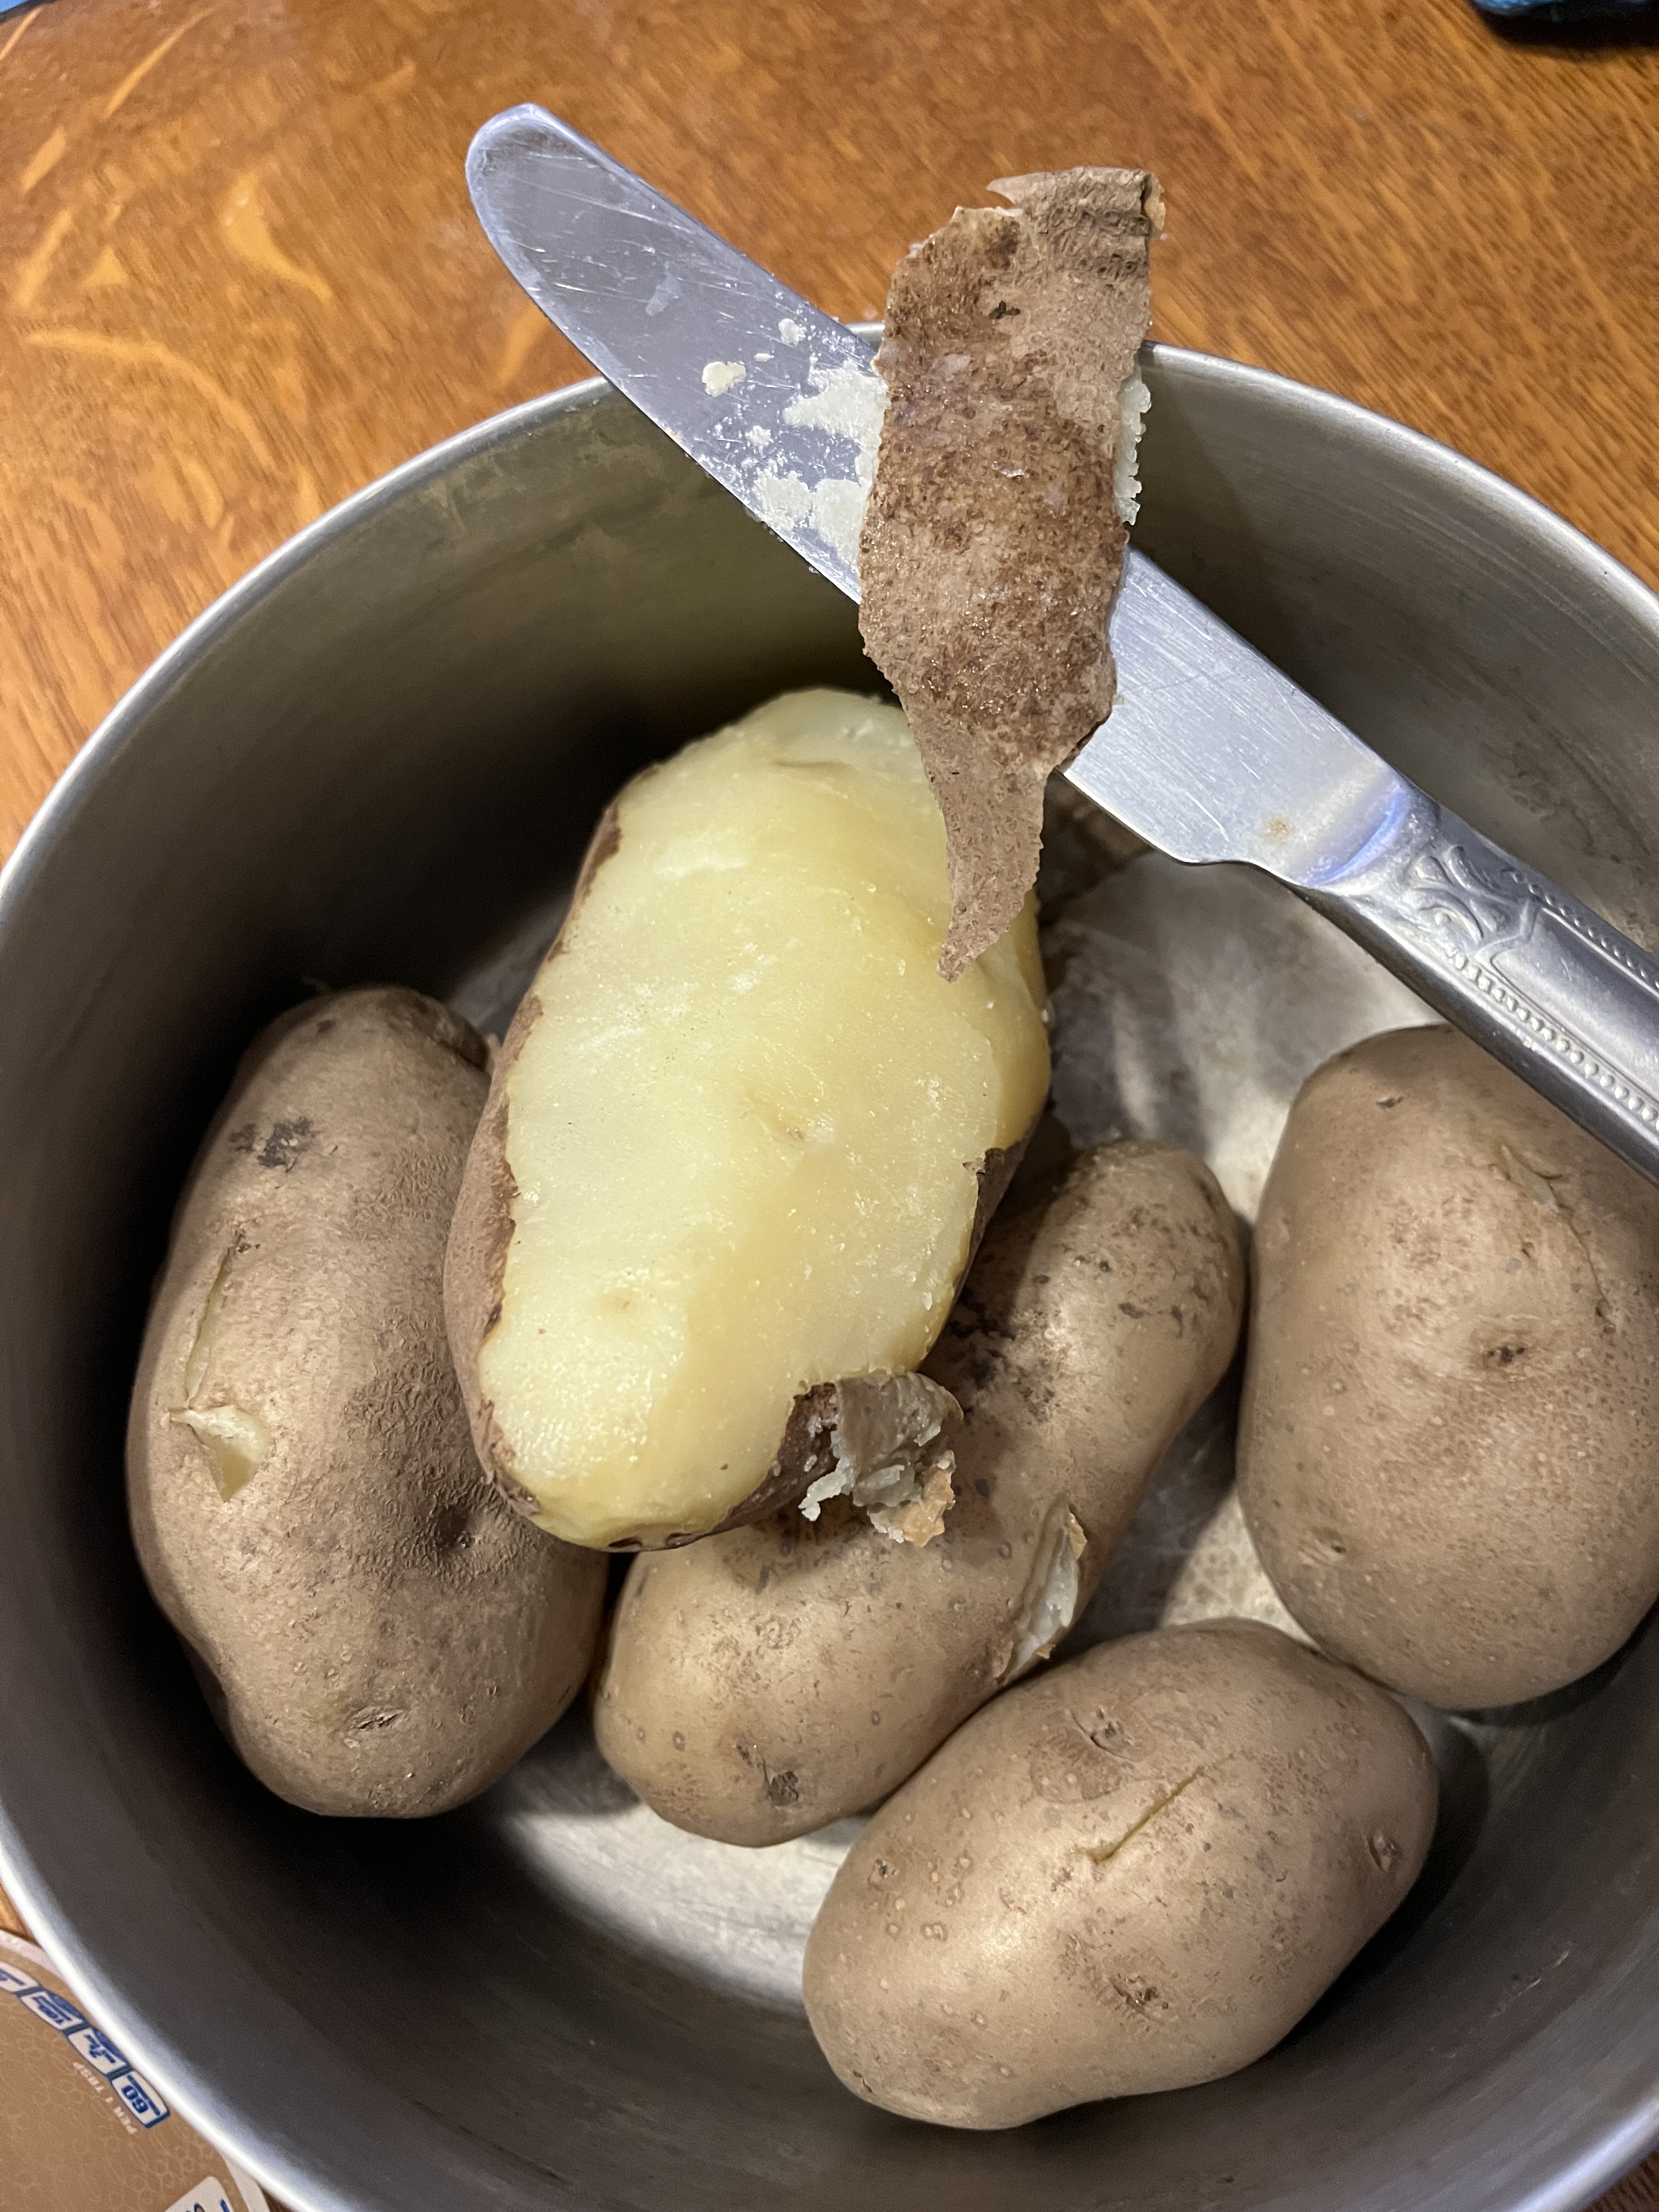
When they’re cooked they’re easier to peel, you can even use a butter knife! It’s a nice, safe introduction for kids to help in the kitchen.
You can cut them in-hand with the same butter knife so you don’t have to get the cutting board all sticky with potato starch.
If you don’t want to peel them you don’t have to, just cut off any nasty bits.
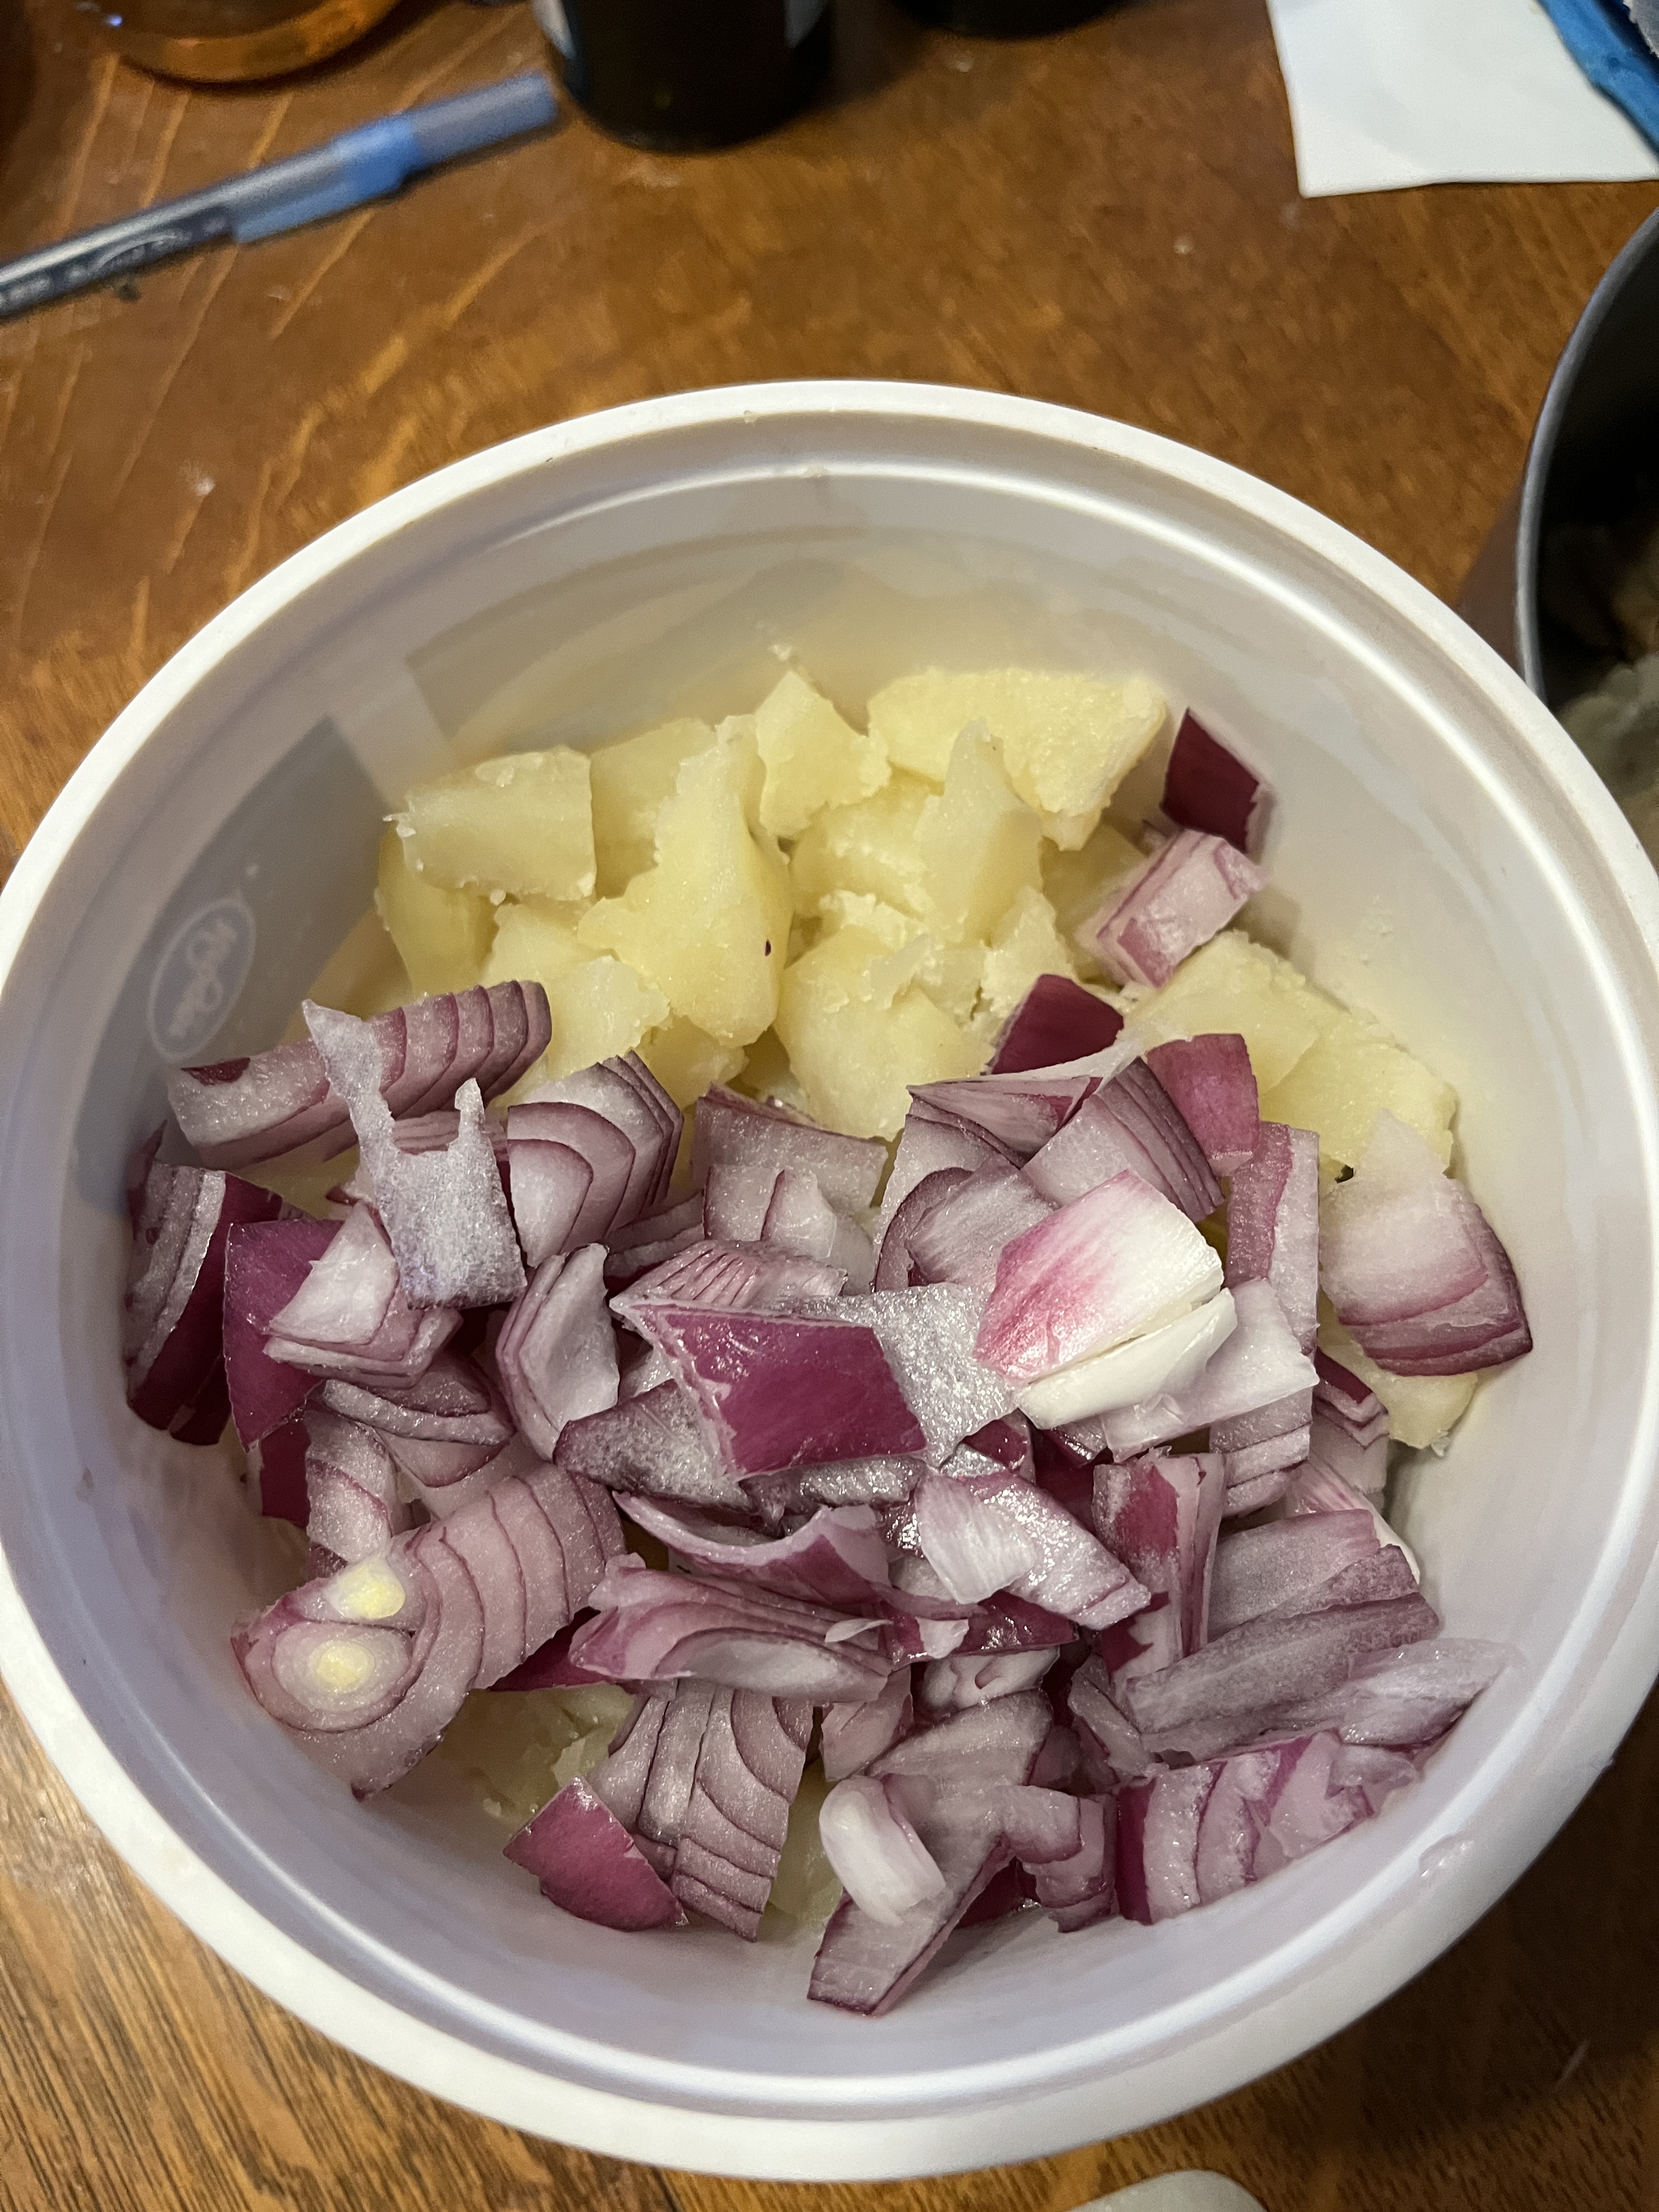
Then cut up an onion. OK, maybe 1/2 an onion, it’s up to you. I’m down to my last onion, but fortunately it’s a red one, so my potato salad gets to be colourful. I usually use yellow onions but they were out and the red were cheaper than the white. The next week the white were on sale, so I use whatever. I put it all together in an old margarine container (waste not want not) so I had fewer dishes to wash.
Sprinkle in pepper, garlic and celery seed if you didn’t have any celery stalks to use. Always keep celery seed around for these celery emergencies.
Add a big spoonful or 2 of relish and a smaller spoonful of mustard. This time I used some nice Dijon.
Then add 3 or 4 big, gloppy spoonfuls of mayonnaise and maybe a splash of Worchestershire. You can use soy or teriyaki too if you want.
Mix it all up, garnish with paprika and refrigerate.
Update 9/5/22: Today I added a sweet potato when I boiled the potatoes. Fabulous. This winter I’ll have to try a turnip, beet, carrots or even a parsnip. Should be interesting and in the case of the beet, more colourful.


You must be logged in to post a comment.