Posted by: briellethefirst | April 1, 2011

Dill


Dill

Dill

Dill (Anethum graveolens) is another annual that usually only gets about 3 feet tall. My Dad grew it to use in his pickles when he grew cucumbers and kind of got attached to it so it went wild for a while. My Sisters hate it now…too much of a good thing! On the other hand stripey yellow and black caterpillars that grow up to be swallowtail butterflies love it, so it all balances out. On hot days it perfumes the garden without even being brushed against, one reason my sisters grew tired of it, but I love it.

The first season in my new house (over a decade ago) I planted a variety called Long Island Mammoth. WOW! It grew, kept growing and became a neighbourhood attraction. The whole 8′ row grew nearly 7′ tall by Twelfth Night! I should probably mention that I live in the Phoenix, AZ area so my gardening season starts in September. Usually it only grows about 3 feet tall.  As it started to flower it also started to wilt and on closer inspection it had TONS of aphids. I went straight to my collection of old organic Gardening magazines to find a cure that wouldn’t kill me. The next day was dreary and drizzly, so being a proper Arizonan I took the stack out to the back porch to enjoy the weather with a cup of tea. As I searched for articles I was entertained by the native finches and not-so-native sparrows frolicking in my dill forest. After a while I realized they weren’t frolicking so much as feasting…on aphids! I sat back, enjoying tea and a show better than anything on TV.
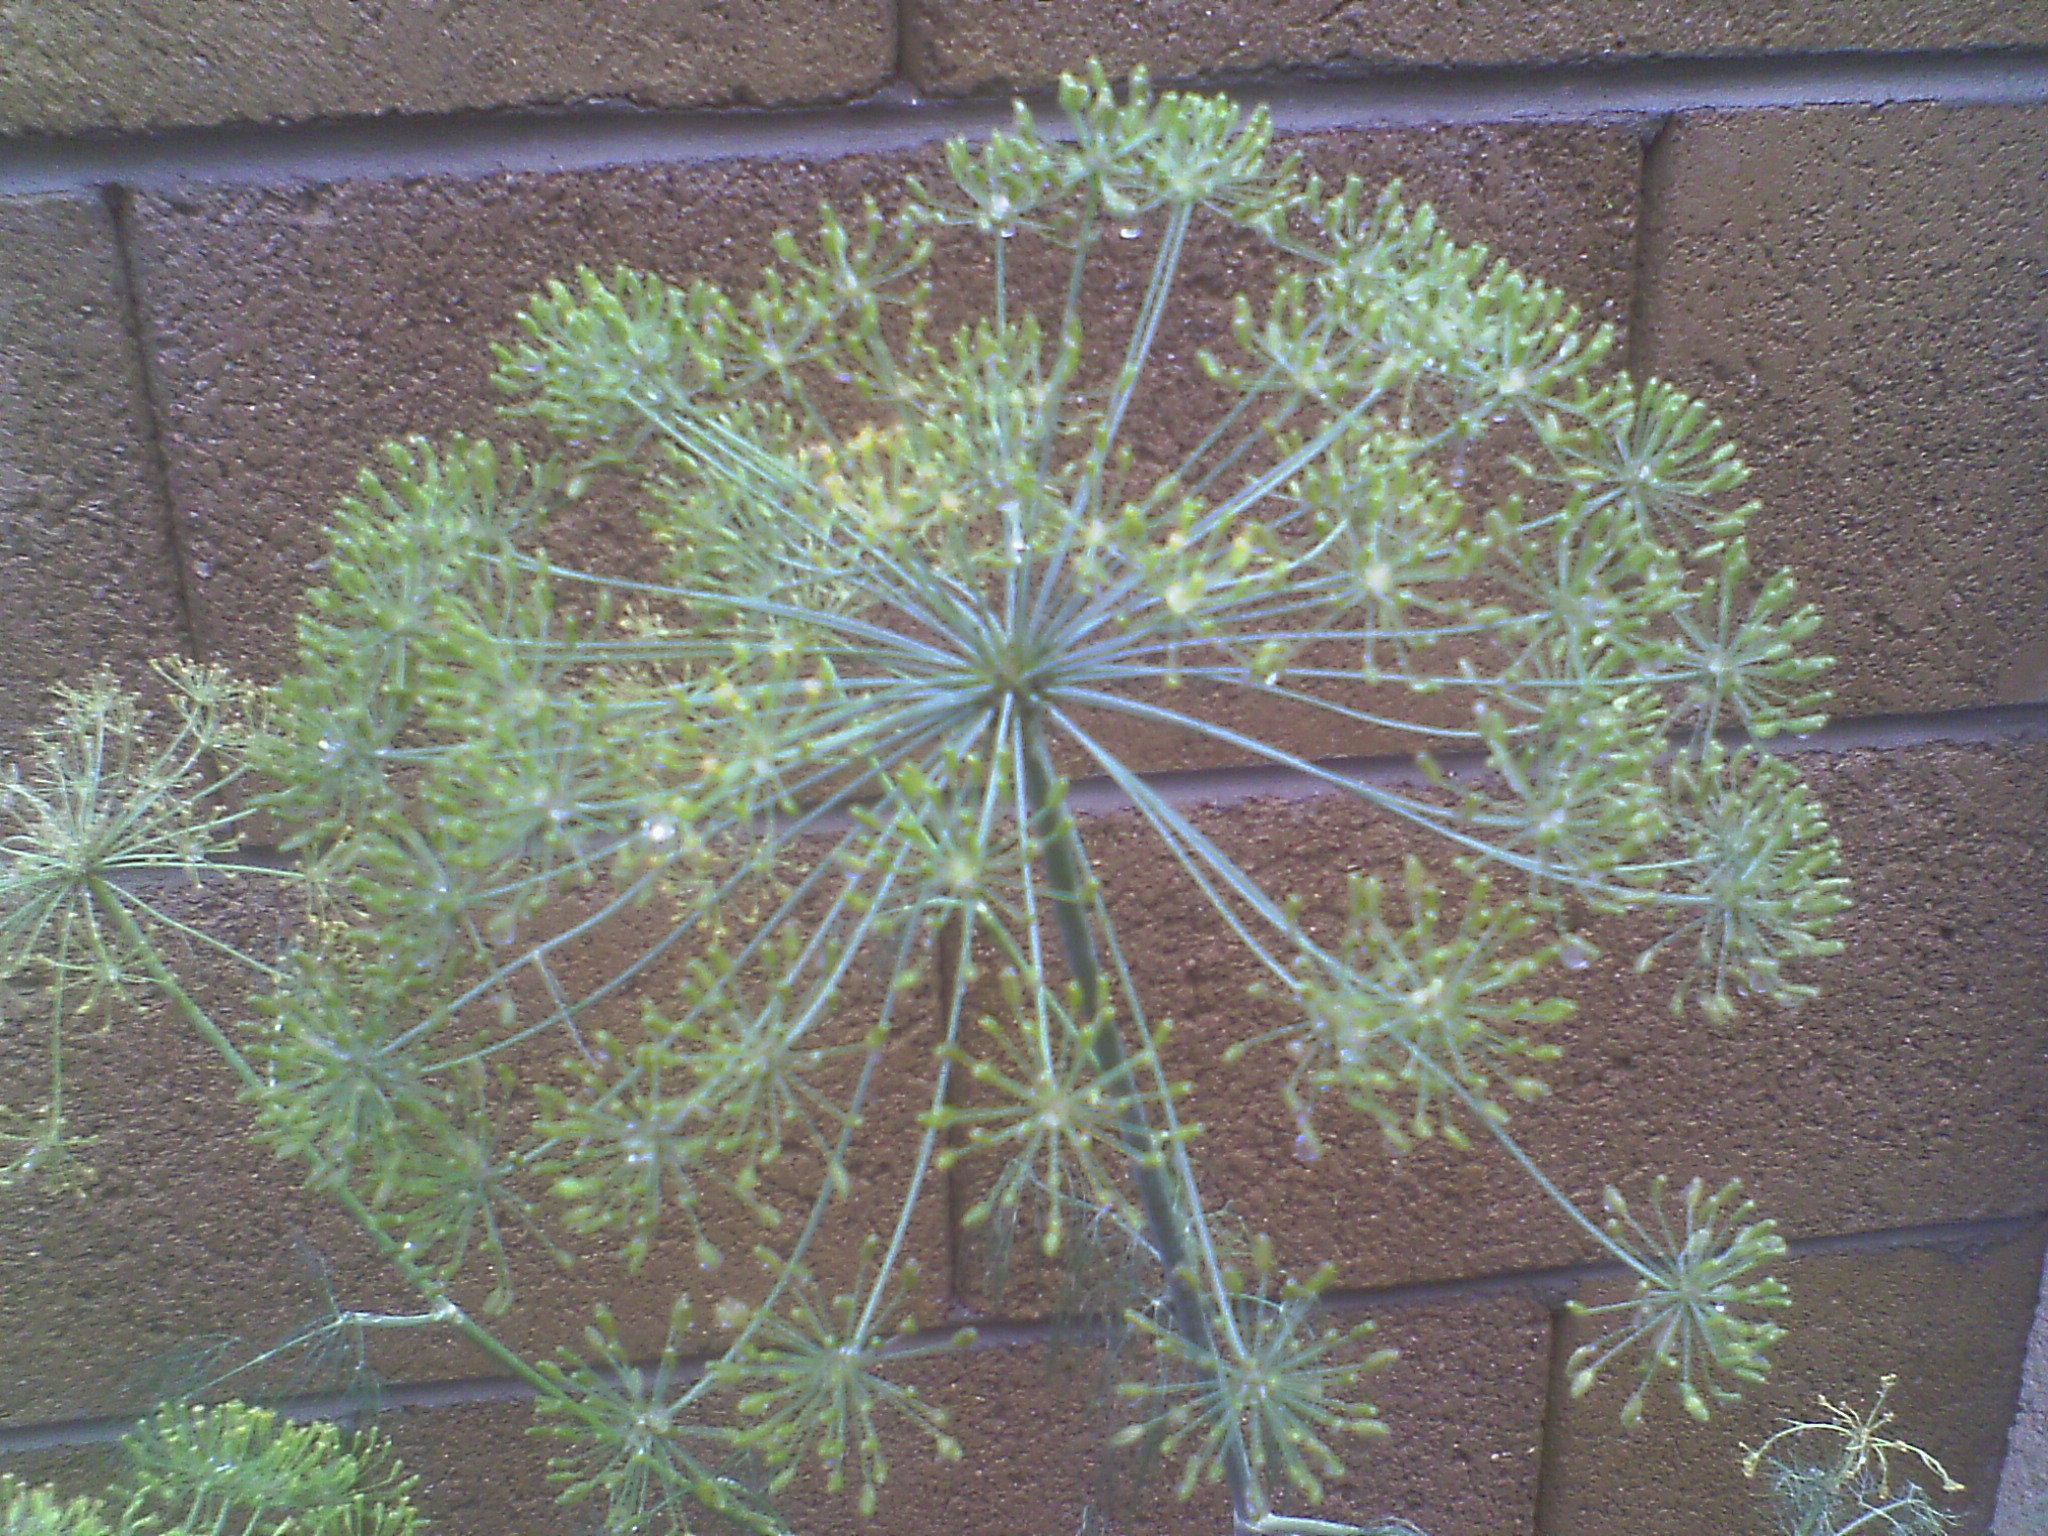
Immature dill seed head

Dill setting seed

Dill is an annual, so although you can often find it already started at nurseries it may be easier and is definitely cheaper to start it from seed. I start mine in September but if you don’t live in the southern part of the US with wonky seasons you’ll probably want to start it as soon as it’s warm enough to plant other stuff in your garden. Plant it in rich soil the back to it doesn’t get in the way of other shorter plants. It’s a good companion to onions, cabbage family and potatoes. Look up companion planting…it’s fun! The earliest evidence we have for dill’s cultivation is in Neolithic lake settlements in Switzerland, so we’ve been using it a long time. Don’t grow it too close to fennel and other relatives like parsley, caraway and anise or it may cross-pollinate and the seed won’t quite turn out as expected.

20240401_200303389_iOS The leaves are used extensively in Scandinavian cooking and in fish. They make a nice garnish, flavour vinegar nicely and are almost essential in pickles and by extension potato salad (cold or warm). The seeds can be used in pickles, cheese, asparagus or beets. Use it fresh, dry or frozen. Sometimes the flowers are used in pickles and left in for decorative affect. If you want to harvest the seeds and wait til they’re compleatly ripe you’ll lose most of them to nature. Put the almost-ripe seed heads in paper bags to dry and rub off any that don’t fall off on their own. Store in airtight containers when they’re compleatly dry so they don’t get moldy.  Use it sparingly at first, a little goes a long way, but once you find the right dishes for dill it will be indispensable, even if only for the seed’s reputation to relieve gassiness.

Update: In the picture I just added (4/1/24) the red and black bug is a young ladybug before it gets old enough to earn its wings. They look scary but love the aphids that love dill and other plants so don’t kill them!

Posted by: briellethefirst | March 29, 2011

Dipping Chocolate


Guess what I learned to do today!? Oh, right…you read the title. Well then, it was fun. I made a stiff semi-sweet genache and rolled it into a dozen little balls. Then I melted some semi-sweet chocolate chips with a few white chocolate chips just for interest. This is generally done over a double boiler, but I’m impatient and daring, so I briefly heat a burner, turn it off and set the covered pan with the chocolate in it on the warm burner  while I do something else for a few minutes, like rolling the genache. You’ll want to lay a piece of waxed paper on a plate or cookie sheet. When the chocolate melts, take a genache ball and dip it in the melted chocolate, rolling it around with your finger until it’s compleatly covered, then put it on the waxed paper to set.

Make sure you touch up any thin spots your fingers leave and make a swirl or wavy flourish on top to mark what the filling is. You can make your own flourish code: swirl for dark chocolate genache, m-ish for milk chocolate genache, coloured white chocolate swirl for a fruit, green white chocolate or a sugared mint leaf for peppermint, a nut on top of a nut filling, B-ish flourish on a brownie…whatever you feel like. What do you dip? Whatever you have that can stand up to the dipping process without falling apart. Try cookie bits, pretzels, potato chips, fruit, peanut brittle, marshmallows… You will want these things to be eaten soon if they’re perishable, but that usually isn’t a problem in my house.

While the chocolate is still soft and sticky you can also sprinkle with coloured or chocolate oblong-things  or chopped nuts or shredded coconut or you can put other cool candy or cake decorations on that are small enough for the candy but big enough to work with with fingers or tweezers. Come to think of it, you can also mix up some buttercream icing and pipe it onto the candies just like you’d decorate a cake, only with fine, delicate tips. Have fun!

And no, you aren’t allowed to lick your fingers till you’re done…but it’s yummy when you do! This is a fun activity to do with kids…if you can keep them from eating it all before they’re done! But you can set them up for holiday memories at a side table to make the fancy desert sideboard stuff (thus keeping them relatively quiet and out from under foot) while you finish the rest of the holiday preparations. And a last-minute edit, if you’re working with just one hand this is a super, elegant desert you can manage with just one-hand!

Dipped Chocolates

Dipped Chocolates

Posted by: briellethefirst | March 28, 2011

Rosemary


IMAG0004Rosmarinus officinalis is a piney-smelling shrub. Some varieties will grow into lovely formal or informal hedges 4 foot tall or more, while others are prostrate and make good tall ground-covers or at least drape nicely over walls or rocks in rock gardens. All can make handsome Bonsai, trained into formal or trailing styles.

Being a native of the Mediterranean it tolerates heat, drought and abuse very well. It does, however, reward kindness of water, fertilizer and judicious pruning with strong growth. You can harvest the leaves and sprigs any time as needed, but they are strongest just before flowering or they can be dried or frozen for future use.

In the kitchen Rosemary is used in soups, sauces, stews, pork, lamb, rabbit and chicken. It complements peas and spinach and livens up bread. Herbal preparations such as butter, vinegar, oil or honey benefit from its addition. Use a little at a time until you’re used to it because it can be rather strong. It is welcome in all fragrant concoctions and the French and Italians burned it as incense. Bees like its flowers.

Flowering Rosemary

Rosemary flowers

Rosemary is said to grow only in righteous households, but is apparently very tolerant of sin. In ancient Greece students wore Rosemary to help their memory while studying for exams. Modern research may confirm its memory-enhancing properties. According to English custom brides ensure fidelity and love by giving the groom Rosemary on their wedding morning and it is said that women rule where Rosemary flourishes. Men who are sensitive about appearances of their position in the household may consider judicious late-night pruning to keep the local gossips quiet-just don’t get caught by the insomniac down the street.

Rosemary and night-blooming datura

Rosemary and night-blooming Datura

Posted by: briellethefirst | March 25, 2011

Chamomile in the Garden


Smells good! When my kids were little and we lived in Florida we had a big garden out back. They’d show people around saying “do this”, brushing their hands over the chamomile or thyme and holding them up to their face. Whoever they were giving a tour to would do the same and smile. Chamomile has kind of an apple-y, flowery sweet smell so it’s no wonder people started making tea out of it. The most common types are German and Roman. German Chamomile (Matricaria recutita) is an annual flower most commonly used for tea. Roman chamomile (Anthemis nobilis) is a perennial, creeping, flowering ground-cover that’s also used for tea. When Sean was still in diapers he’d walk through the garden, lean

From my garden

From my garden

over and bite the flowers off.

You could enjoy them that way if you want, but you’ll probably like it better as tea. To make tea you can use the same measurements as with normal tea. Rinse the teapot with hot water then put 1 tsp dry herb into the teapot for each cup you’re making tea for. Steep for 3 to 5 minutes and pour. If you like, sweeten it to taste with sugar or honey. Some people mix chamomile with other herbs like mint or flavour with lemon and if you don’t finish the pot you can use it as a hair rinse, especially if you’re blonde.

It’s easy to grow in the garden but in hotter areas you might want to protect it from the worst sun  or pot it up and bring it inside for the worst part of summer. While it does spread it’s not as wild as mint. In the Middle Ages and Renaissance it was grown in flowery meads or lawns along with mints, thyme yarrow and other low-growing herbs and flowers. Alyssum, Johnny jump up and violets would be nice additions to the mix. They were also planted into benches so their scent would be released when sat upon. It works well in the front of an herb garden or mixed with flowers or between rocks or stepping-stones. Like most herbs it does well in decent soil, good drainage and regular water without staying wet. If it doesn’t do well where you put it try another spot and don’t worry too much over it, a little neglect enhances the flavour. Even if it’s just in a pot on the windowsill try growing your own herbal tea.

Posted by: briellethefirst | March 21, 2011

Blow The Birds Out of Your Little Trees!


Little Trees! Cat’s first regular food was broccoli, courtesy her brother. She was about 4 or 5 months old and playing on her blanket while we ate dinner. We didn’t notice when Sean dropped some broccoli over the side of his high chair and ‘shared’ some of his with her. When we finished and I got up from the table she had a floret stub in each hand and a smile sprinkled with green. Unlike a certain US president and a few odd family and friends I’ve never had trouble getting my kids to eat broccoli. I just called them little trees and told them to blow the little birds out before they ate it. I suppose the herbed butter or cheese sauce may have helped, but even sans topping they still ate it. When I tried the little birds thing with my grand kids they just gave me funny looks, but cheese, butter and threats of no desert got them to eat it and now that they’re used to it they eat it right up…usually.

For cheese sauce start by melting/heating 2Tbsp butter or olive oil in a saucepan. Add 2 Tbsp flour and mix it up until it just starts to tan. Slowly add 1/2 c milk while whisking vigorously to keep it smooth. If it gets too thick (and it will) add more milk a little bit at a time so it’s like a thin gravy. Add 1 c cheese and stir to melt. Season with salt, pepper and nutmeg. Pour over the veggie or pasta of your choice. Of course you can use low-fat milk or half and half if you like, you can also try different cheeses or a mixture of cheeses and alter the seasoning as you like. When you’re the cook you’re in charge. Yes, you might feel bad about eating something with fat in it but the nice thing it’s fresh, no extra chemicals and you control the ingredients so have fun and enjoy your vegetables!

Posted by: briellethefirst | March 20, 2011

Croutons


Yum! Croutons…a favourite addition to soups and salads…and a yummy snack, too! Not only are they simple to make but they also use up and preserve yesterdays bread (if you can resist their butter, savoury yumminess).  Start with yesterday’s leftover bread. Slice it, then stack the slices manageably-high and cut them into sticks, then cut the sticks into cubes. The exact size is up to you. Now take a big bowl, a cookie sheet and a frying pan, put the bread cubes in one bowl and melt 2 Tbsp butter in the pan over medium heat. Take a handful of bread cubes and toss into the melted butter, tossing them gently but quickly to distribute the butter as evenly as possible. Brown lightly and turn them out onto the cookie sheet. Spread the cubes in an even layer on one end of the sheet so the next batch has room. Melt more butter in the pan, add garlic or herbs or wine or Worcestershire sauce or…whatever sounds good to you and repeat until you are out of bread cubes. You may need more than one cookie sheet. Salt and bake at 250 deg f. for 10 minutes or until dry. When cool store in plastic containers, zip-close bags or decorative counter-top containers. Serve with soup, salads, as a garnish, zap in the blender for emergency bread crumbs or just eat as a snack. Yes, it’s buttery (you cold have substituted olive oil) but at least you know what’s in it (and what’s not, like preservatives), And you worked to make it so you’ll be more careful about portion control.

Posted by: briellethefirst | March 20, 2011

Corned Beef And Cabbage


March 17th or thereabouts is a dinnertime we look forward to every year. We have a yummy boiled dinner, even though it isn’t traditionally Irish but Irish-American. If I were doing something traditionally Irish I’d do something like stew, colcannon, soda bread…stuff like that…and sometimes I do but this year we wanted this. I get the point cut instead of the flat cut. I think it has more flavour, but you can get the other if you like. The really cool thing about corned beef is that it’s all made in one pot. I love simple!

Open the package and plop it into a pot big enough for it and water, adding the seasoning packet that comes with it. If it doesn’t have a packet use 1/2 to 1 tsp each coriander, thyme, peppercorns, a bay leaf and whatever sounds good to you, even garlic. Cut an onion into quarters and add it to the pot. Bring to a good simmer and cook as per the package directions. Mine was almost 3 lbs and said 2-3 hours or until tender.

Garden fresh potatoes and carrots

Carrots and potatoes, fresh from the garden

While you’re waiting for the meat to cook go out to the garden and harvest a few potatoes and carrots…and turnips if you grew them. OK, if you didn’t think that far ahead you still have time to run to the store if you don’t have any in the pantry. About an hour before serving scrub (or peel if they look sad) a few carrots, cut them into even chunks and add them. Then scrub several potatoes (if you use russet potatoes, with tougher skins, you can peel them), cut into quarters or smaller depending on the size if the spud and add them, too.

Carrots...yum!

Adding carrots to the pot

Just waiting for cabbage

Bubblin’ away!


quartered cabbage

Cabbage quarters

While you’re waiting for the potatoes and carrots you can grab a cabbage from the garden…OK, you either (a) don’t live where you can garden in the winter or (b) didn’t think that far ahead, again. Just get one from the fridge that you bought for today. Peel off the 1st wimpy leaf or 2, quarter it, cut the core off and set aside.  About 15 minutes before serving take the beef out and put it on a platter. Dip the veggies out with a spotted spoon and put in serving bowls. Put the cabbage in the water still in the pot, cooking about 10-15 minutes or until soft. Slice the corned beef against the grain (so it’s tender and not stringy) into thick slabs, cutting in half to serve if necessary. Serve with butter, sour cream, and some people like mustard or horseradish.

Leftovers, if you have any, can be made into sandwiches, hash or even a variation of bubble and squeak.

Cat and the kids were over for dinner the year I originally wrote this and we were very full with plenty of leftovers and the dogs got a treat. As we ate I mentioned some exceptional corned beef I’d recently had at an elaborate gathering of friends. My friend had used brown sugar and I don’t remember what else, but Cat said “don’t abuse my cabbage!” so I guess I’ll stick with this…for now. The next day we had enough for a second dinner for all of us and there was enough after that for another dinner for me tonight. The dogs got the leftover cooking water as a treat. Kenzie asked for bonfire candy I still have in a tin as I dished out ice cream for desert. I finally took photos to insert of the cookin’ but forgot to take any of the finished meal til it was put away! At least we have happy tummies all around.

Posted by: briellethefirst | March 15, 2011

Artichokes


GO ARTICHOKES!!! OK, I don’t wave a pink and green flag for my school team and mascot anymore, but I’ll never stop boiling up the real thing for dinner. When I was a kid we looked forward to artichoke season and loved every meal with them. They made up most of the meal and Mom would make a casserole so we could fill up any empty spots left in out happy tummies. There was usually a lot of casserole left and never any artichoke. Back then they were cheap and easy peasant food, 15 or 20 cents apiece but now they’re expensive epicurean endeavors. If you’re familiar with them you understand and if you’ve never tried one, you really need to. I know they look scary and they are prickly but I promise, they aren’t from another planet, they are simpler to deal with than they look and they are SO worth it! Last night I only had 2, one for me and one for my daughter and the 3 and 6 year olds surprised us and asked to try them. Kenzie wasn’t so thrilled but Andrew loved them. They filled up with fish fingers.

First, choose one for each person unless you are a very sharing couple and will be having more wonderfulness for dinner, but even then I’d get one for each of you.

IMG_20200419_171624Pass up any with loose leaves and a pointy end.

IMG_20200419_165700
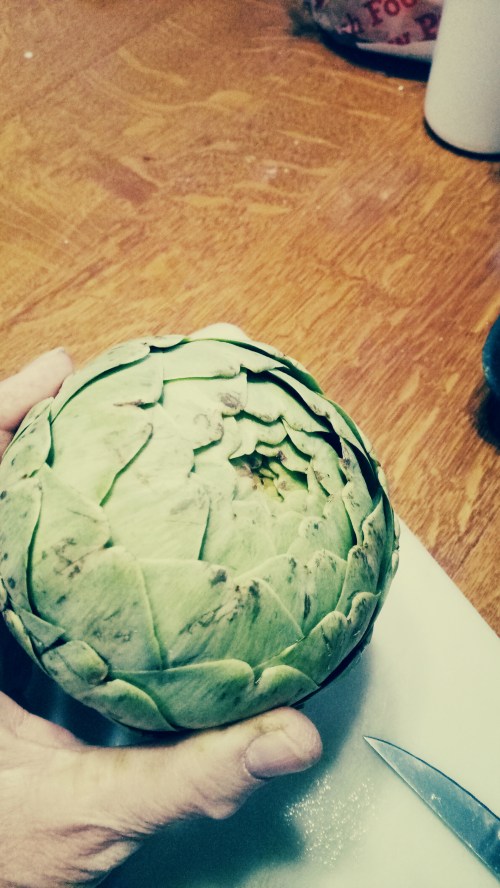
You want a good, fat, round bud with tight-ish leaves and a rather flat end where the leaves kind-of turn in. You’ll know what I mean when you see it. If you have a choice between one with a darker cut-end on the stalk and a lighter cut-end take the lighter one, it’s fresher.

IMG_20200419_165802Once you get it home and it’s time to cook it’s easy. Cut off the end of the stem. Traditionally it’s cut very short so it can sit up straight on the plate, but I like having as much as I can so I leave the stem long-ish and peel the tough skin.

IMG_20200419_165641Strip off the bottom few leaves and rinse well. You can do this before or after you cut the stem. Many people use kitchen shears to cut off the prickly ends of the leaves but I don’t bother since they’ll soften when they’re boiled and the sooner you get them in the water the sooner you can eat!

IMG_20200419_170833
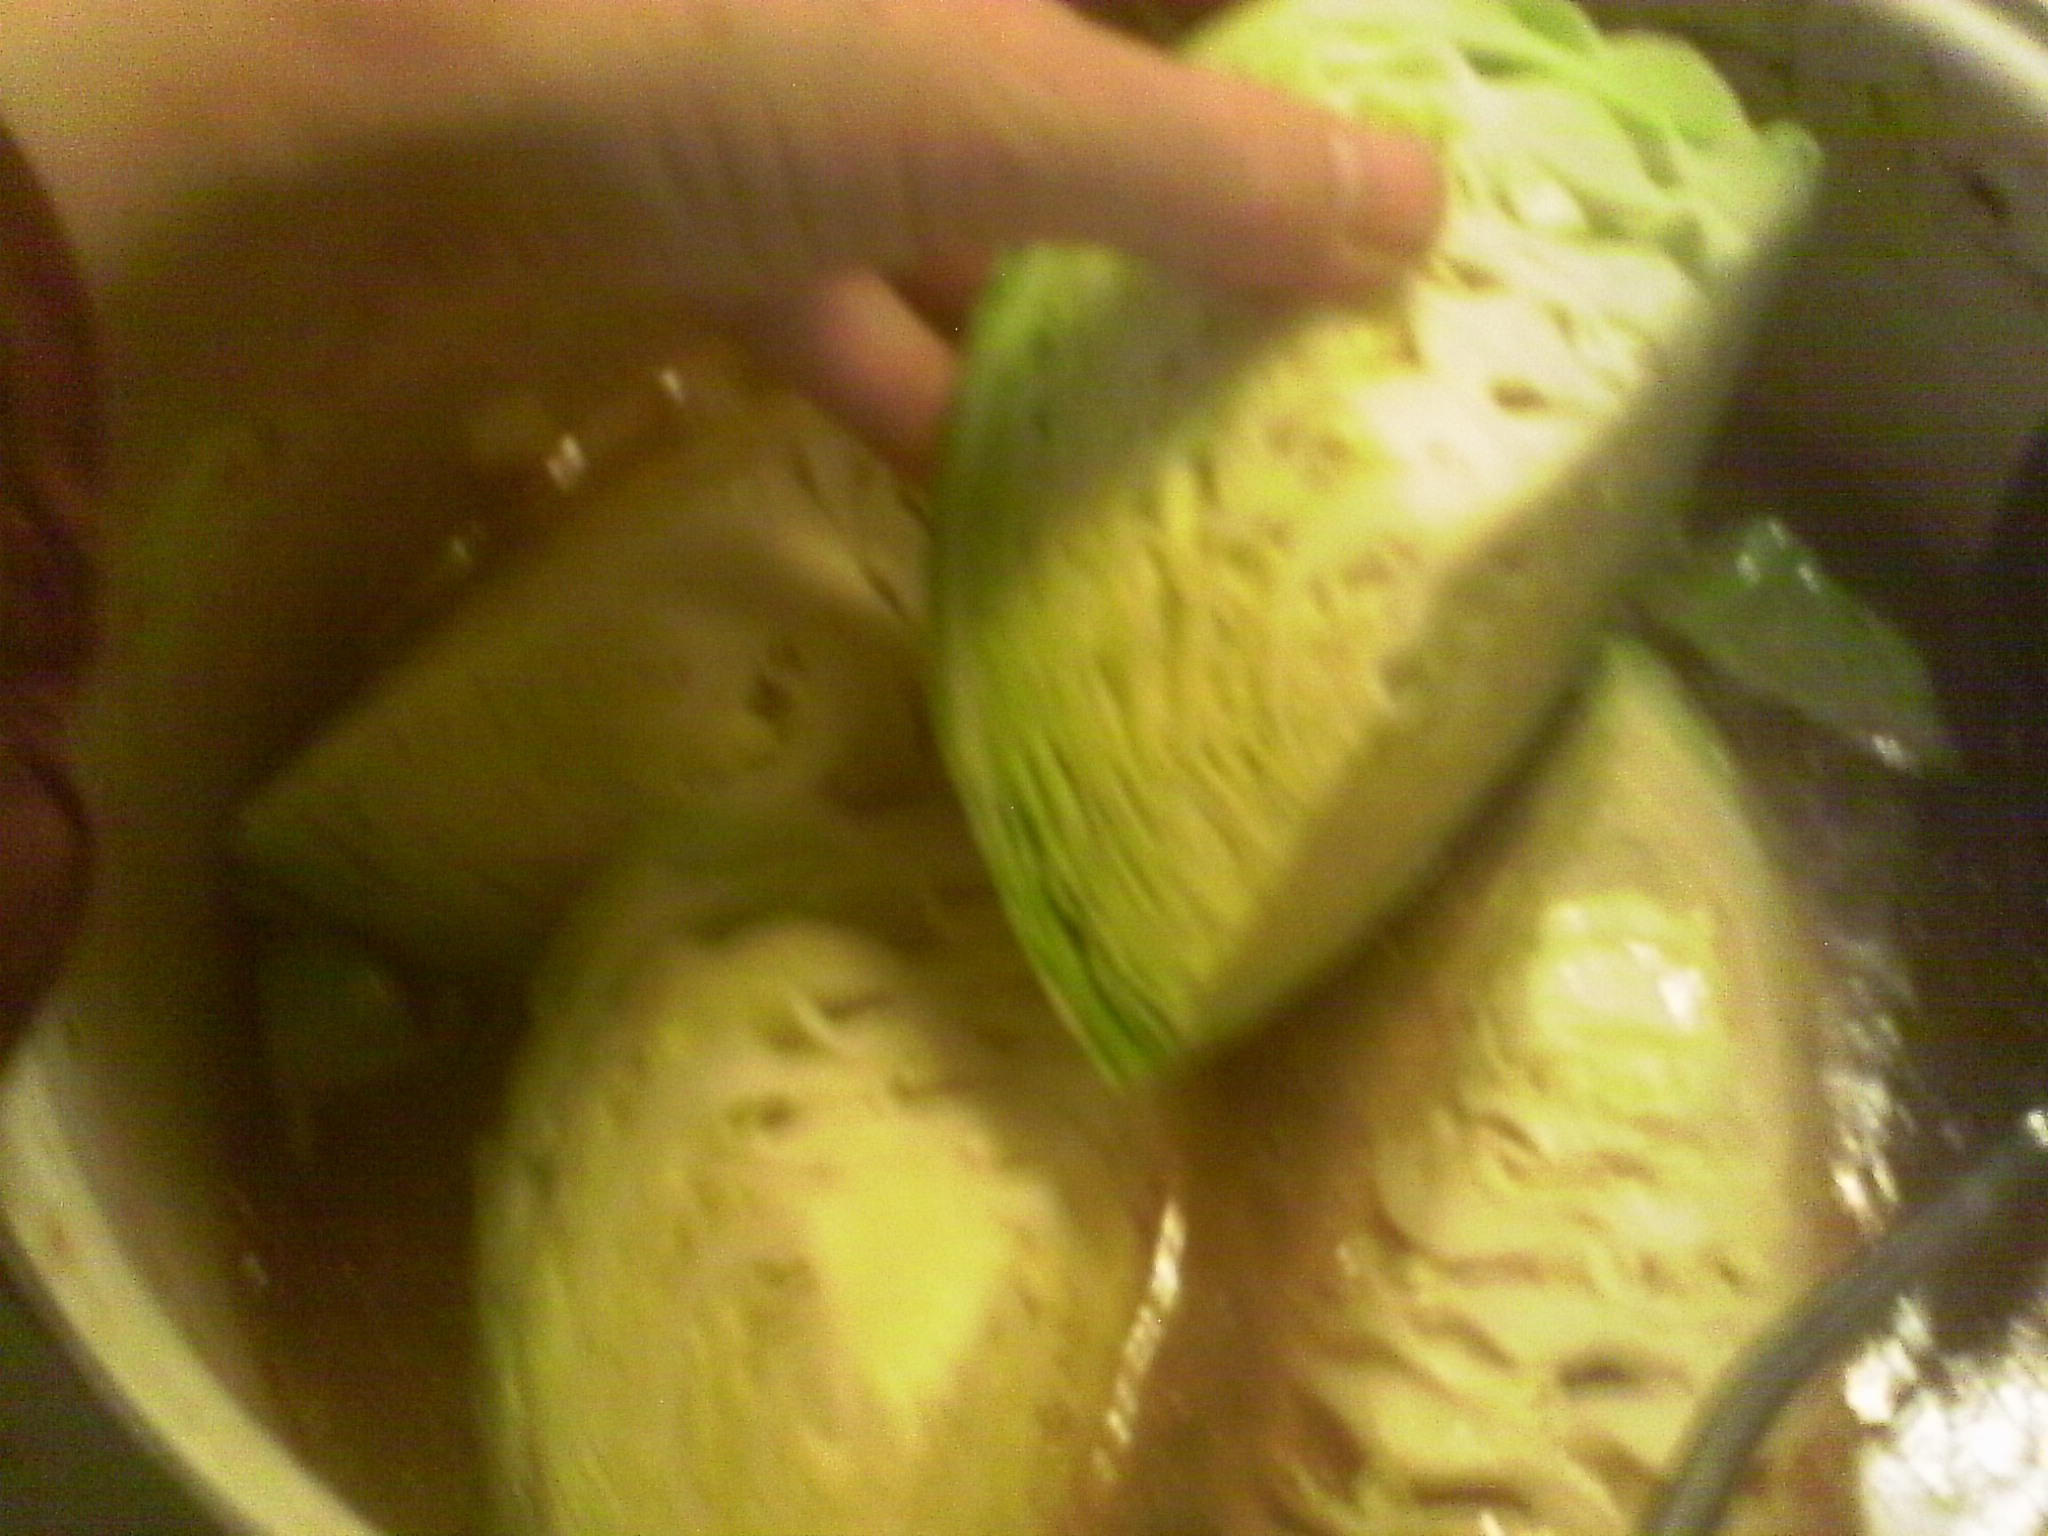
Put them in a pot and cover with water. You can slice up a lemon to add to the water if you want. Bring to a boil and cover loosely with a lid. Boil for about 30 minutes or until you can easily poke a fork in the bottom. Pull them out, let them drain.

IMG_20200419_182739Serve with a pat of butter on the side of the plate.

IMG_20200419_183212When they are cool enough to touch, peel off the outside leaves and, one by one, wipe each one over the butter and scrape off the thick inside end (that was connected to the plant) against your teeth. Discard the rest of the leaf on the side of your plate or a plate set out for them.

IMG_20200419_184425When you get down far enough you can nip the tender ends off the leaves, and when they get too small and thin (just covering the choke) you take a butter knife or spoon and scoop out the fuzzy middle, discarding it with the rest of the leaves and leaving a small bowl in the heart of the artichoke.

IMG_20200419_184747
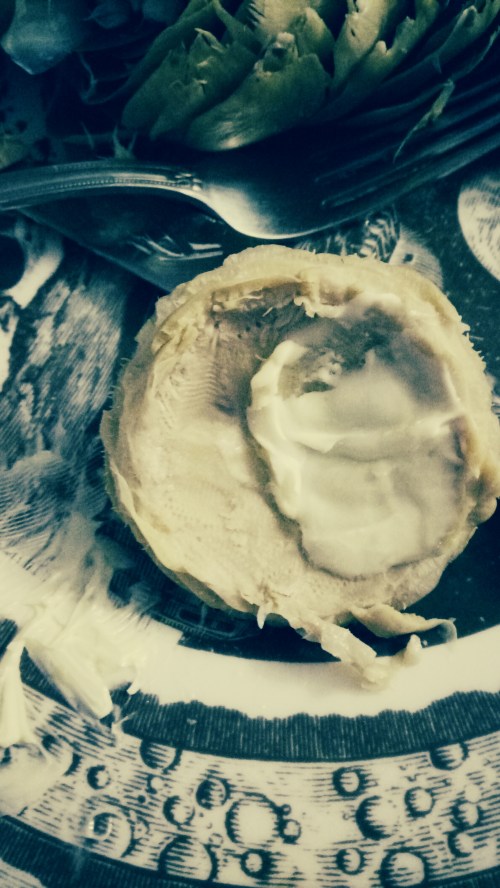
Spread butter inside and enjoy.

Artichokes can be served hot or cold. Hot they are usually served with softened or melted butter, garlic butter or hollandaise sauce. Cold artichokes are yummy with mayonnaise, either plain or flavoured or hollandaise. Enjoy appetizers while you wait for them to cook, serve some home-made bread and follow-up with a salad if you’re still hungry. Water or wine go best with artichokes and don’t even think about milk, it just tasted nasty while you’re eating artichokes. Save it for the lovely chocolate cake desert. Don’t put the leaves down the garbage disposer in your sink! They will break it! Put them in the compost heap instead or give them to your chickens. If you don’t have compost or chickens just throw them away.

IMG_20200419_174827
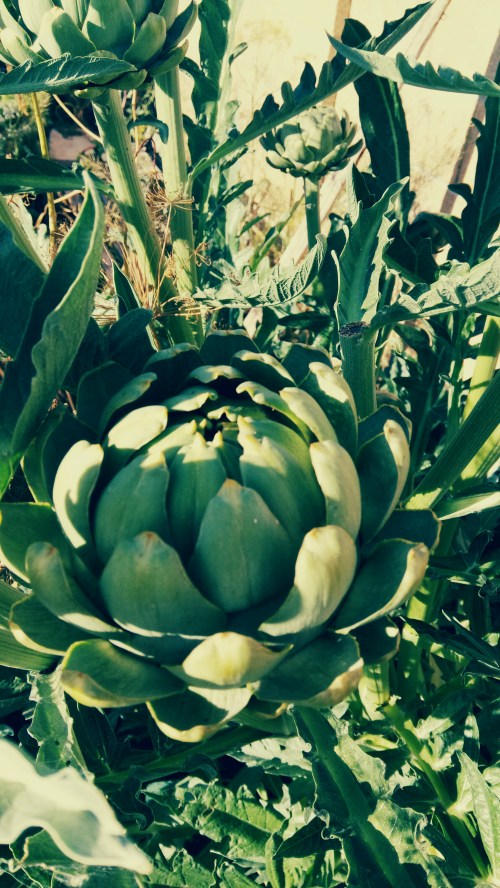
Want to grow artichokes? They’re easy and pretty but big. I put them in the east end of my garden where the afternoon sun bakes everything else into dust. The leaves are big, silvery-grey-green and spread about 2 to 3 feet from the stem, shading the ground and the plants get 3 to 5 feet tall so they can make a lovely background plant in an odd corner. While the general advice is that they should be grown in well fertilized, well-drained soil and given plenty of water I’ve had surprising success with moderately rich clay soil and negligent watering habits. It is  a big thistle, just a weed, after all, and the flower is what you eat. They flower in the spring and fall. The first will be the biggest and the next ones will be smaller. In cold areas where they would die in the winter freeze you can grow them in big pots and over-winter them inside.


In the garden

In the garden

Closer

Closer

If you’re feeling adventurous you can pick the later ones when they’re small and boil to eat them whole as a side dish or in a salad or pickle them or you can just let them bloom and enjoy them in the garden. They even make nice dried displays when you cut them just as they reach their peak and hang them upside-down in the shade to dry. And by the way, I wasn’t kidding…I went to Scottsdale Community College so my school mascot really was an artichoke.


Posted by: briellethefirst | March 14, 2011

Pi Day!


Cat celebrating Pi day last year

Cat's first meringue

Cat’s first meringue

Cat celebrating Pi day last year

The Quiche

The Quiché

No, I didn’t spell it wrong. Today is 3/14, March 14th, so it’s pi day. And what do we do on pi day? We make pie! Or at least eat it. Yes, you can just buy a pie, or a few, and that’s yummy. Or you can buy a graham cracker crust, cook up some pudding (or mix up some instant pudding) for the filling, top it with whipped cream (make it yourself or buy prepared, your choice) and enjoy. A layered or marbled pudding/cream pie would be nice, topped with whipped cream and whatever sprinkles, nuts, crushed candy or whatever you have handy would be nice. If you want to go to a bit more trouble and actually bake something you can buy a frozen pie-crust, fill it with canned filling and bake it. Or you can go all-out and make a pie from scratch. We’ll assume we have engaged in the butter vs lard vs shortening debate. I like butter, you can use your choice.

1 1/4 c Flour, 1 tsp Salt, 1 tsp Sugar, 1 stick (1/2 c) Butter, 3 to 4 Tbsp Ice Water

Cut the butter into small pieces and freeze for 15 minutes or so. Mix the flour, salt and sugar and make a pile on a clean counter or table. If you prefer a bowl you can mix in that, too. Add the butter and cut until the mix looks like rough sand with some small bits of butter sprinkled throughout. Mix in the ice water one Tablespoon at a time until the dough holds together. Form into a ball and flatten it, wrap it and refrigerate for at least 15 min, even over night or freeze it till later but if you freeze it thaw it in the fridge overnight so you can roll it out.

Roll into a circle, rolling from the center out and turning 1/4 turn frequently. You’ll get the hang of it soon. When it’s big enough to fit in and over the sides of the pie tin drape it over the rolling-pin and lay it gently in the pie tin. Ease it into the bottom and up the sides evenly, tearing extra pieces off that hang over and patching shorter or torn spots with the extra. If you’re going to fill it with an uncooked cream filling, pre-bake your pie at 425 deg Fahrenheit until brown. To keep the bottom flat line it with aluminum foil or waxed paper and a hefty layer of beans to hold it down. If you want to use a variety of pretty legumes go ahead because you  can’t cook them up to eat because they’ll stay hard. Keep them in a pretty jar as your pretty pie beans. When cool fill, top, garnish and serve. What to do with any extra pie crust trimmings? paint them with melted butter, sprinkle with cinnamon and sugar and bake about 5-10 min. Kids love it.

If you make a filling that needs baking refrigerate the crust while you get the filling ready. If making it from scratch, lay the filling pieces in decoratively and whatever sauce it needs. Kids usually like doing this. Bake until the filling is done, and if the edges start to get too brown shield them with a strip of foil for the rest of the baking.

What should you fill it with? That’s up to you and your imagination…fruit, custard, nuts, meat, eggs… Will it be the main course, side dish or desert? Is it a holiday specialty or a last-minute peasant meal? I’ll put my imagination to work on it in another post.

3/22: I added pictures. We went wild last Pi Day. Cat made her first pie crust, Quiche, cheesecake and banana cream pie from scratch. She made two different Quiche fillings but only made enough crust for one Quiche and the banana pie, so I pulled my emergency crust from the freezer. You never know when you’ll have a pie emergency! The cheesecake crust was store-bought, too, since we were short on graham crackers (kids…sheesh!) so my emergency supplies got re-stocked. It was a very yummy Pi Day!

Posted by: briellethefirst | March 13, 2011

Mint


Chocolate Mint

Chocolate Mint

Please confine your Mint! In Arizona mine behaves pretty well, but in Florida and Washington it invaded the lawn (great smell when mowed) and took over our strawberry patch (problem). Sinking wood, metal or plastic edgings around it in the garden does slow it down but it will find its way around/over/under/through most barriers eventually. Planting it in a pot is a good way to contain its exuberance or you just can plant it in the lawn far enough away from the garden not to be a bother and control it by mowing it with the grass.

Peppermint

Peppermint

Once upon a time lawns were planted with herbs like Mint, Thyme, Chamomile and Yarrow and were called flowery meades (short for meadow I think). This was definitely more pleasant to mow than grass! You may have to set your mower blades for a taller cut, but it’s definitely worth it when you walk or sprawl on your lawn. In Florida it was in full sun and thrived through the hottest, driest parts of the year, so it’s tough. In Arizona it can burn out in the full-sun areas, but try different varieties in different areas to see what works best for you.

If you want Mint (and it’s a nice plant to have around) there are lots of varieties to choose from. Apple Mint, Bergamot, Cat Mint, Chocolate Mint, Corsican Mint, Lemon Balm, Pennyroyal, Peppermint, Spearmint…check your favourite nurseries and catalogues to start your collection. As long as it doesn’t get eaten by critters nothing much bothers mint.

Mint can be used fresh, dried or frozen. Fresh leaves seem to have more flavour but dried lasts longer. Use it in drinks, sauces, jellies, confections, ethnic cuisine, cosmetics and as a garnish and in potpourri. When I weeded it out of our strawberry patch I made herbal beads out of it.

For hot tea use 1 tsp dry herb per cup and one for the pot or a 1 inch long sprig of fresh, clean leaves per cup. Always start with cool fresh water and bring it just to a boil. Pour the hot water over the leaves in the pot or cup and let steep for 3 to 5 minutes. Strain and sweeten it desired. Tea strainers and tea balls are available in shops and catalogs if you’re picky about such things. Adjust the amount of herb to suit your taste. You can also use the sun to brew your iced tea. Fill a gallon jar with cold water and add 6 to 8 teabags of the flavour of your choice. You can substitute sprigs of fresh, clean herb for teabags or dry herbs in teaballs. Make sure they don’t have any visitors on them (aphids, etc.).  Put the top on the jar and set it out in the sun for 4 to 8 hours. Remove the herbs and refrigerate until you’re thirsty, serve over ice and sweeten to taste. Experiment with different herbs until you find your favourite one or create a custom blend.

« Newer Posts - Older Posts »

Categories