Posted by: briellethefirst | February 21, 2023

I Fixed A Drawer!


So. I bought this house 20-some years ago. The family we bought it from had been displaced by a nearby freeway project. The powers that be moved them to a “comparable” home not in the freeway path that they could keep or sell, whatever they wanted, which was (is) the standard deal for progress projects like freeways out here. They stayed just long enough to sell this house. I think they got shafted by ADOT, but we ended up with a house.

Anyway, the owners before our previous owners did a lot of do-it-yourself handyman special projects…many of which I’ve been fixing over the past 2 decades. Their idea of a great kitchen project was to take out the lovely 1950s vintage wood cabinets and replace them with cheap white garage cabinets with ugly white plastic handles. That show EVERY speck of dirt! Ugh!

So far I’ve successfully masked and spray painted one set of doors for a touch of character. And some strip lighting.

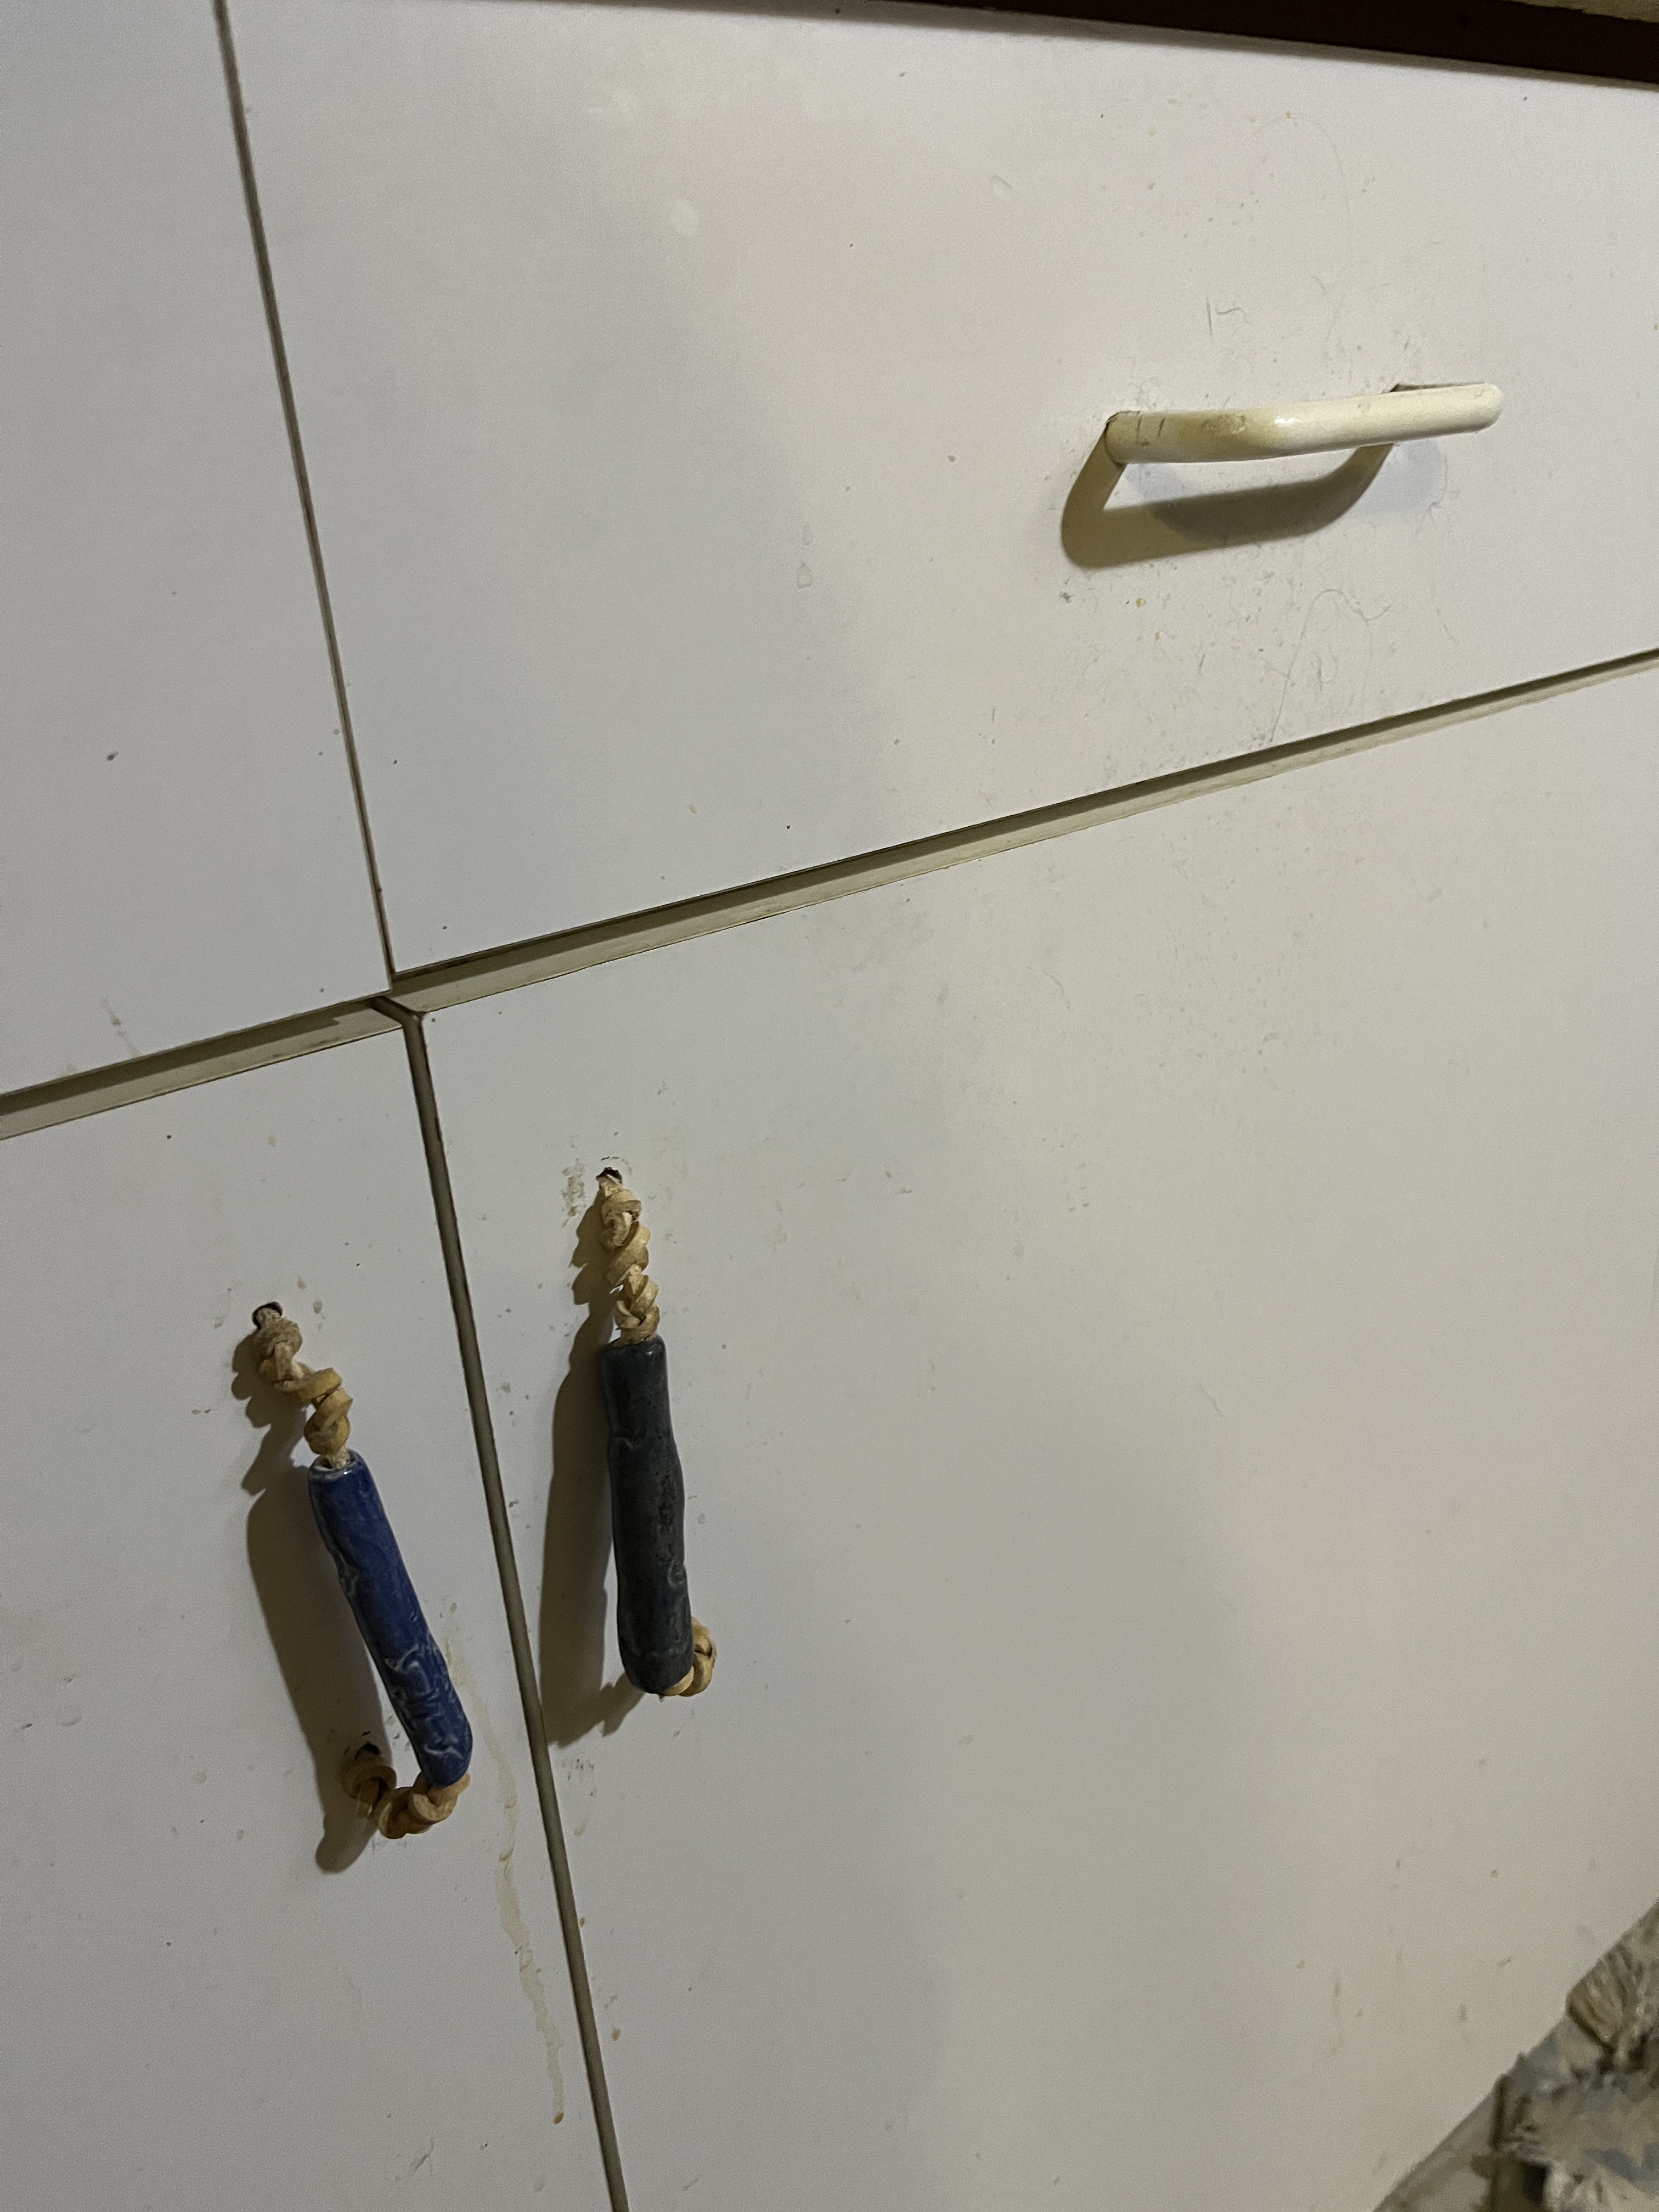
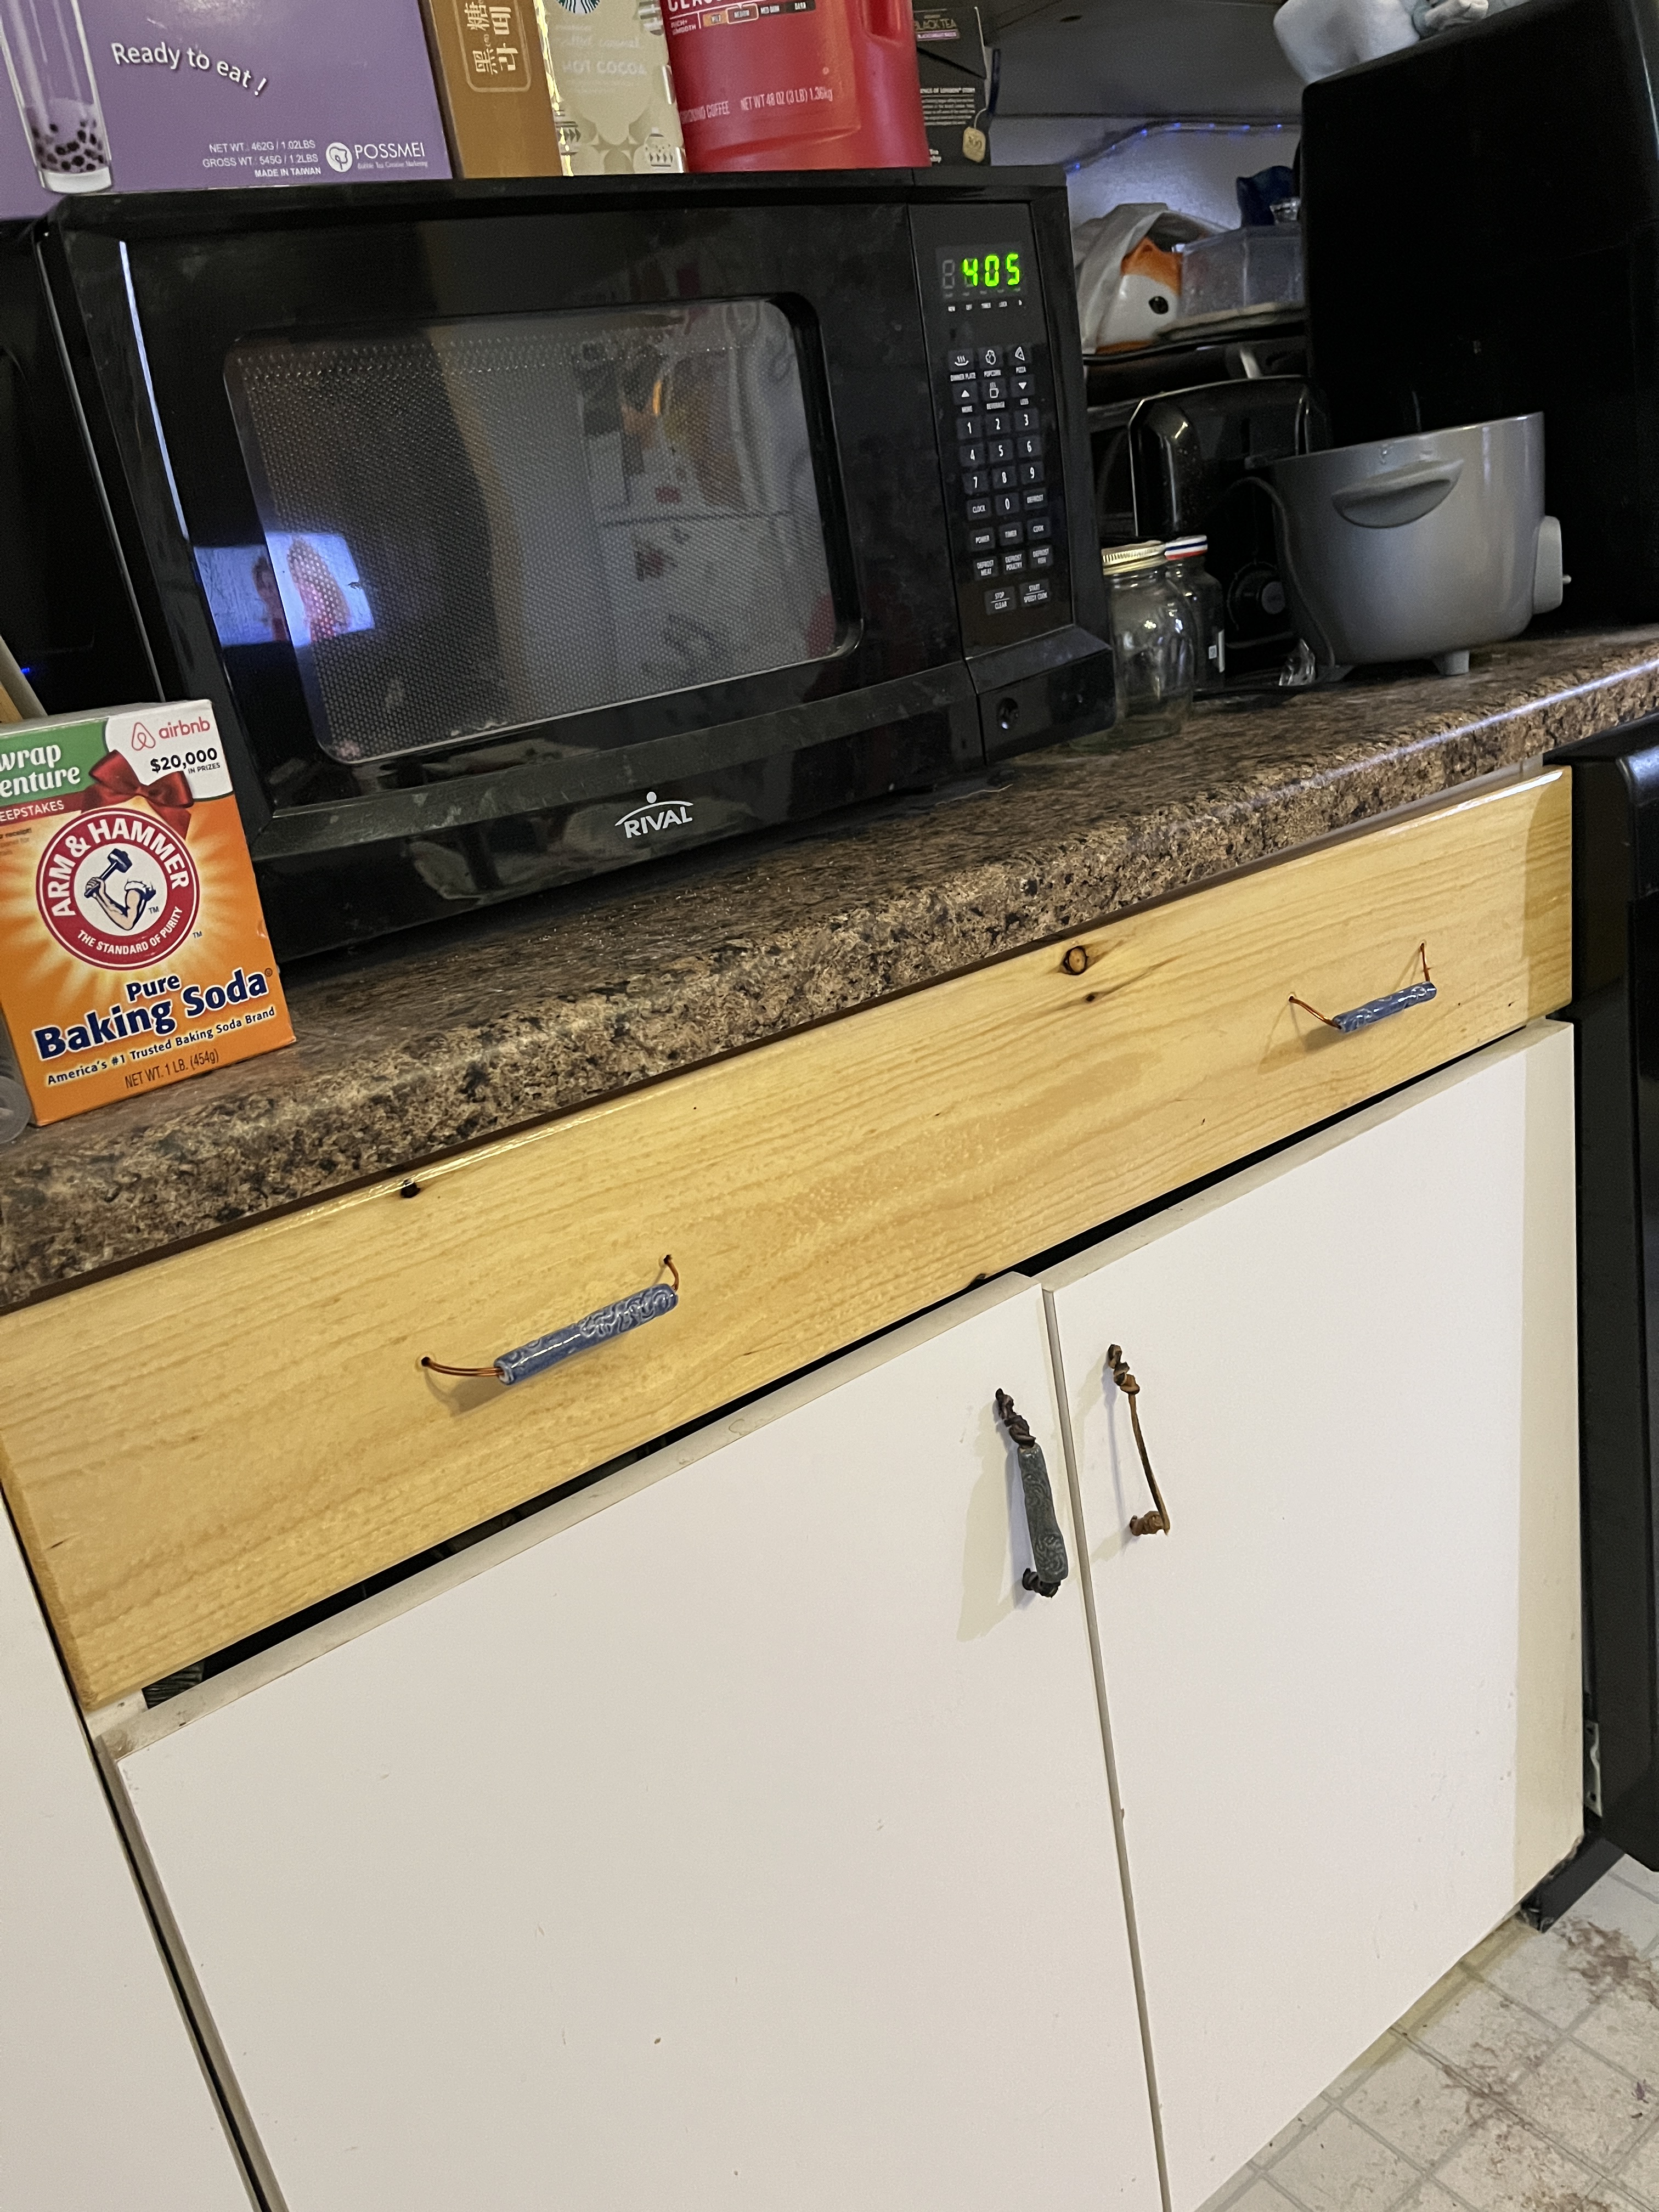
I also made long stoneware beads and used them as handles, tying them on with leather shoelaces and replacing the boring, ugly plastic ones. These eventually break and a few of the beads have fallen and broken but I can make more to replace them.I got most of them done but can’t get to the ones in front of the sink…the sink’s in the way! I’ll figure that out later.

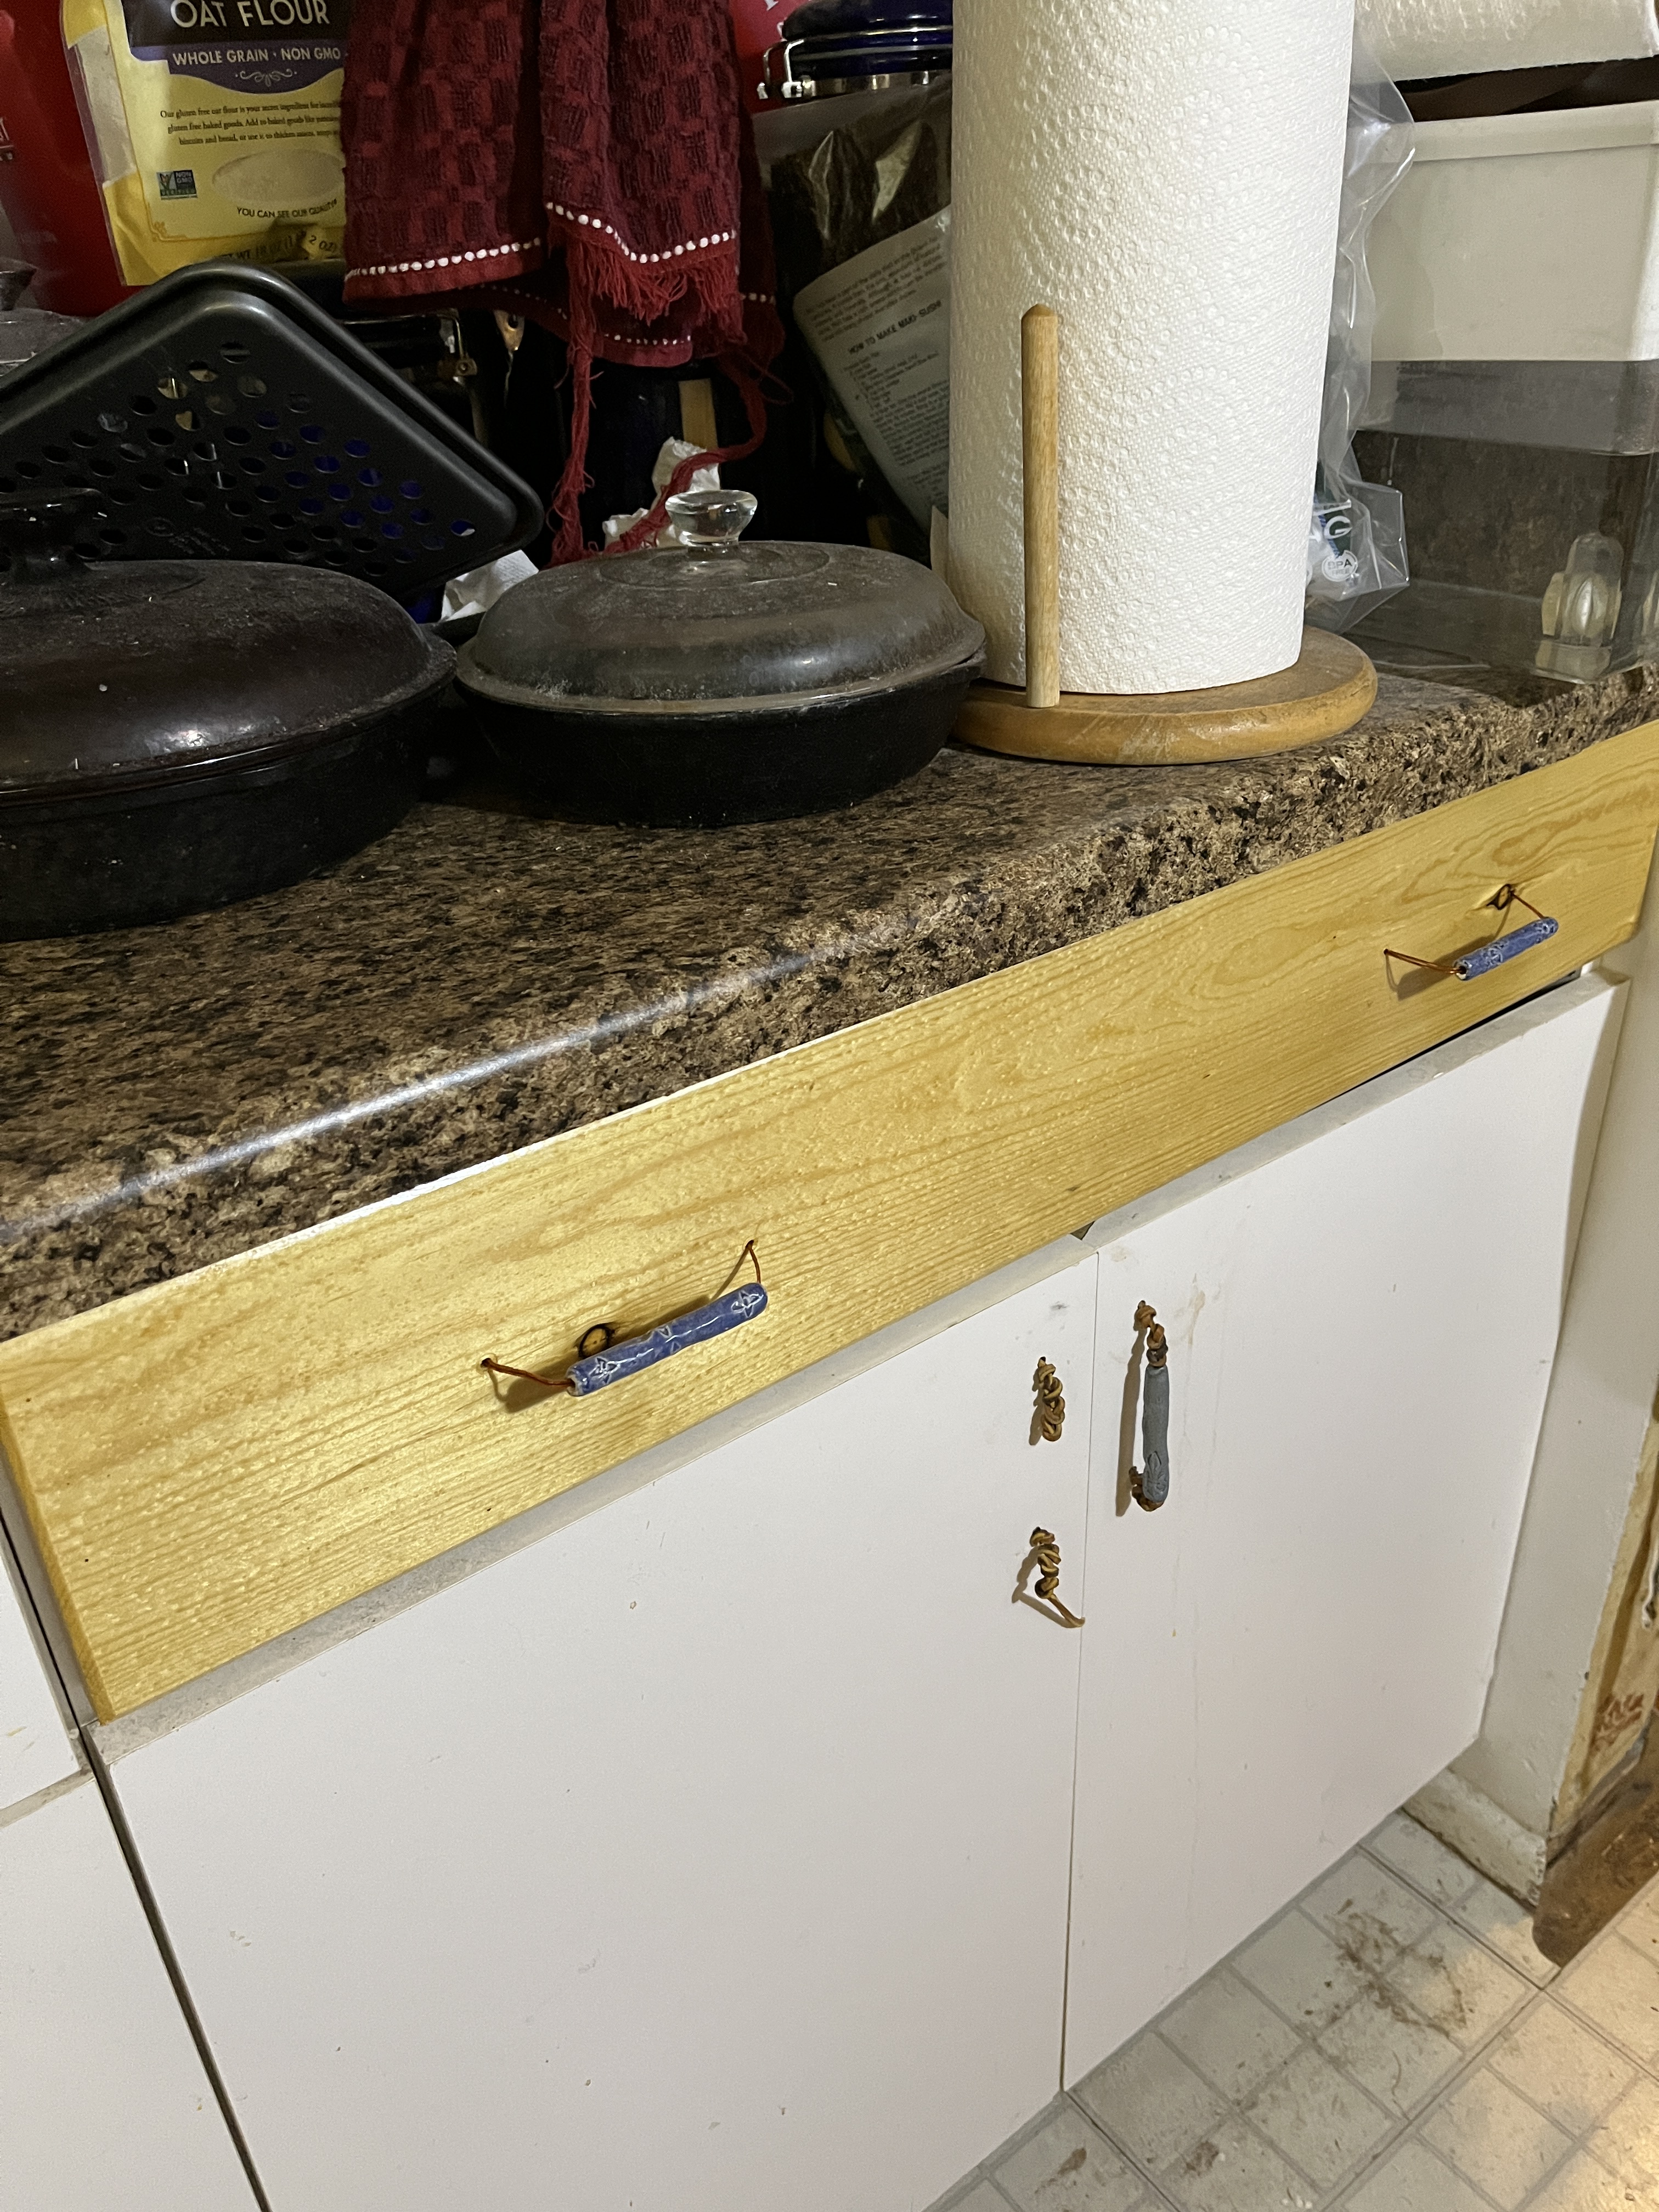
And added some brackets for character and actually hold up a shelf above the sink. I added the blue accent paint a few years ago when I had a bit of time on a rainy day and couldn’t work in the garden. I didn’t want to do too much because I’d always intended to replace them…eventually…yes, the sink needs scouring…I’ve been busy making drawer fronts this week!

The cabinets are cheaply made of particle board veneered with melamine. They don’t hold together very well. They finally forced the issue of replacing when the front fell off one, then another and a 3rd is soon to go. Over the past few months I’ve measured and remeasured and double checked and finally measured again and thought “Yay! They’re all the same size!” so I went to the hardware store, picked out 2 boards and had them cut to size.

I planned which ones would go where based on the grain patterns and knots and marked the back tops to keep track. This won’t show when in use unless you know to look into the drawers upside-down. Then I figured out where to put the handles and drilled that, then figured out where the screws would go to hold them to the drawer frames and drilled pilot holes.

Finally I was ready to finish. I found my plane and did a simple bevel around the edges.

After applying spar varnish (I want it to hold up to whatever my kitchen can throw at it!) I let them sit in the spare room away from the rainy night. The next day I put a 2nd coat on the backs and let them sit another day. Then I sanded some blemishes off the fronts and did 3 coats on them over the course of 3 days. Yes, this is a slow process, but worth it.

I gave them an extra day to dry and cure before putting on the handles and installing them. The stove-side drawer went first. I somehow have a spool of copper wire so instead of leather bootlaces I used that. It should last a long time. I measured, measured again, cut the wire and put the handles on. I’ll get better at the twisting by the time I’ve finished, but these’ll last a lot longer than boot laces. I also figured it would be easier to put the handles on before I screwed the drawer front in place. I was right.

Because of the odd way the drawers were originally put together meant there was a gap between the front and the bottom of the drawer. I bought some pre-finished oak 1/4-round and cut it to size to fill the gap. Well, close enough. The glue I’d dripped in to try to hold things together a few years ago gets in the way but nothing’s falling through that hole.

Finally time to put the front on the drawer! I’d measured and drilled right and the screws went right in. I glued in the 1/4 round and had a finished drawer again! No more pulling it open by the middle divider! No more worrying about things falling out! Or being seen while the drawer was closed! YAY! It’s beautiful. I love it. I can’t wait to finish the others. And yes, I need to mop my kitchen floor…I’ve been busy. Anything that falls on the floor can be catfood or chicken food so at least it won’t be wasted.

Now on to the other drawers. I bring the baking drawer front one in to mark where the pilot holes will go. HEARTBREAK! It’s a few inches too short! Somehow over the months of measuring and re-measuring I’d ended up measuring wrongly. *heavy sigh* And yes, I’ll take a bit of time off from this project to mop my kitchen floor.

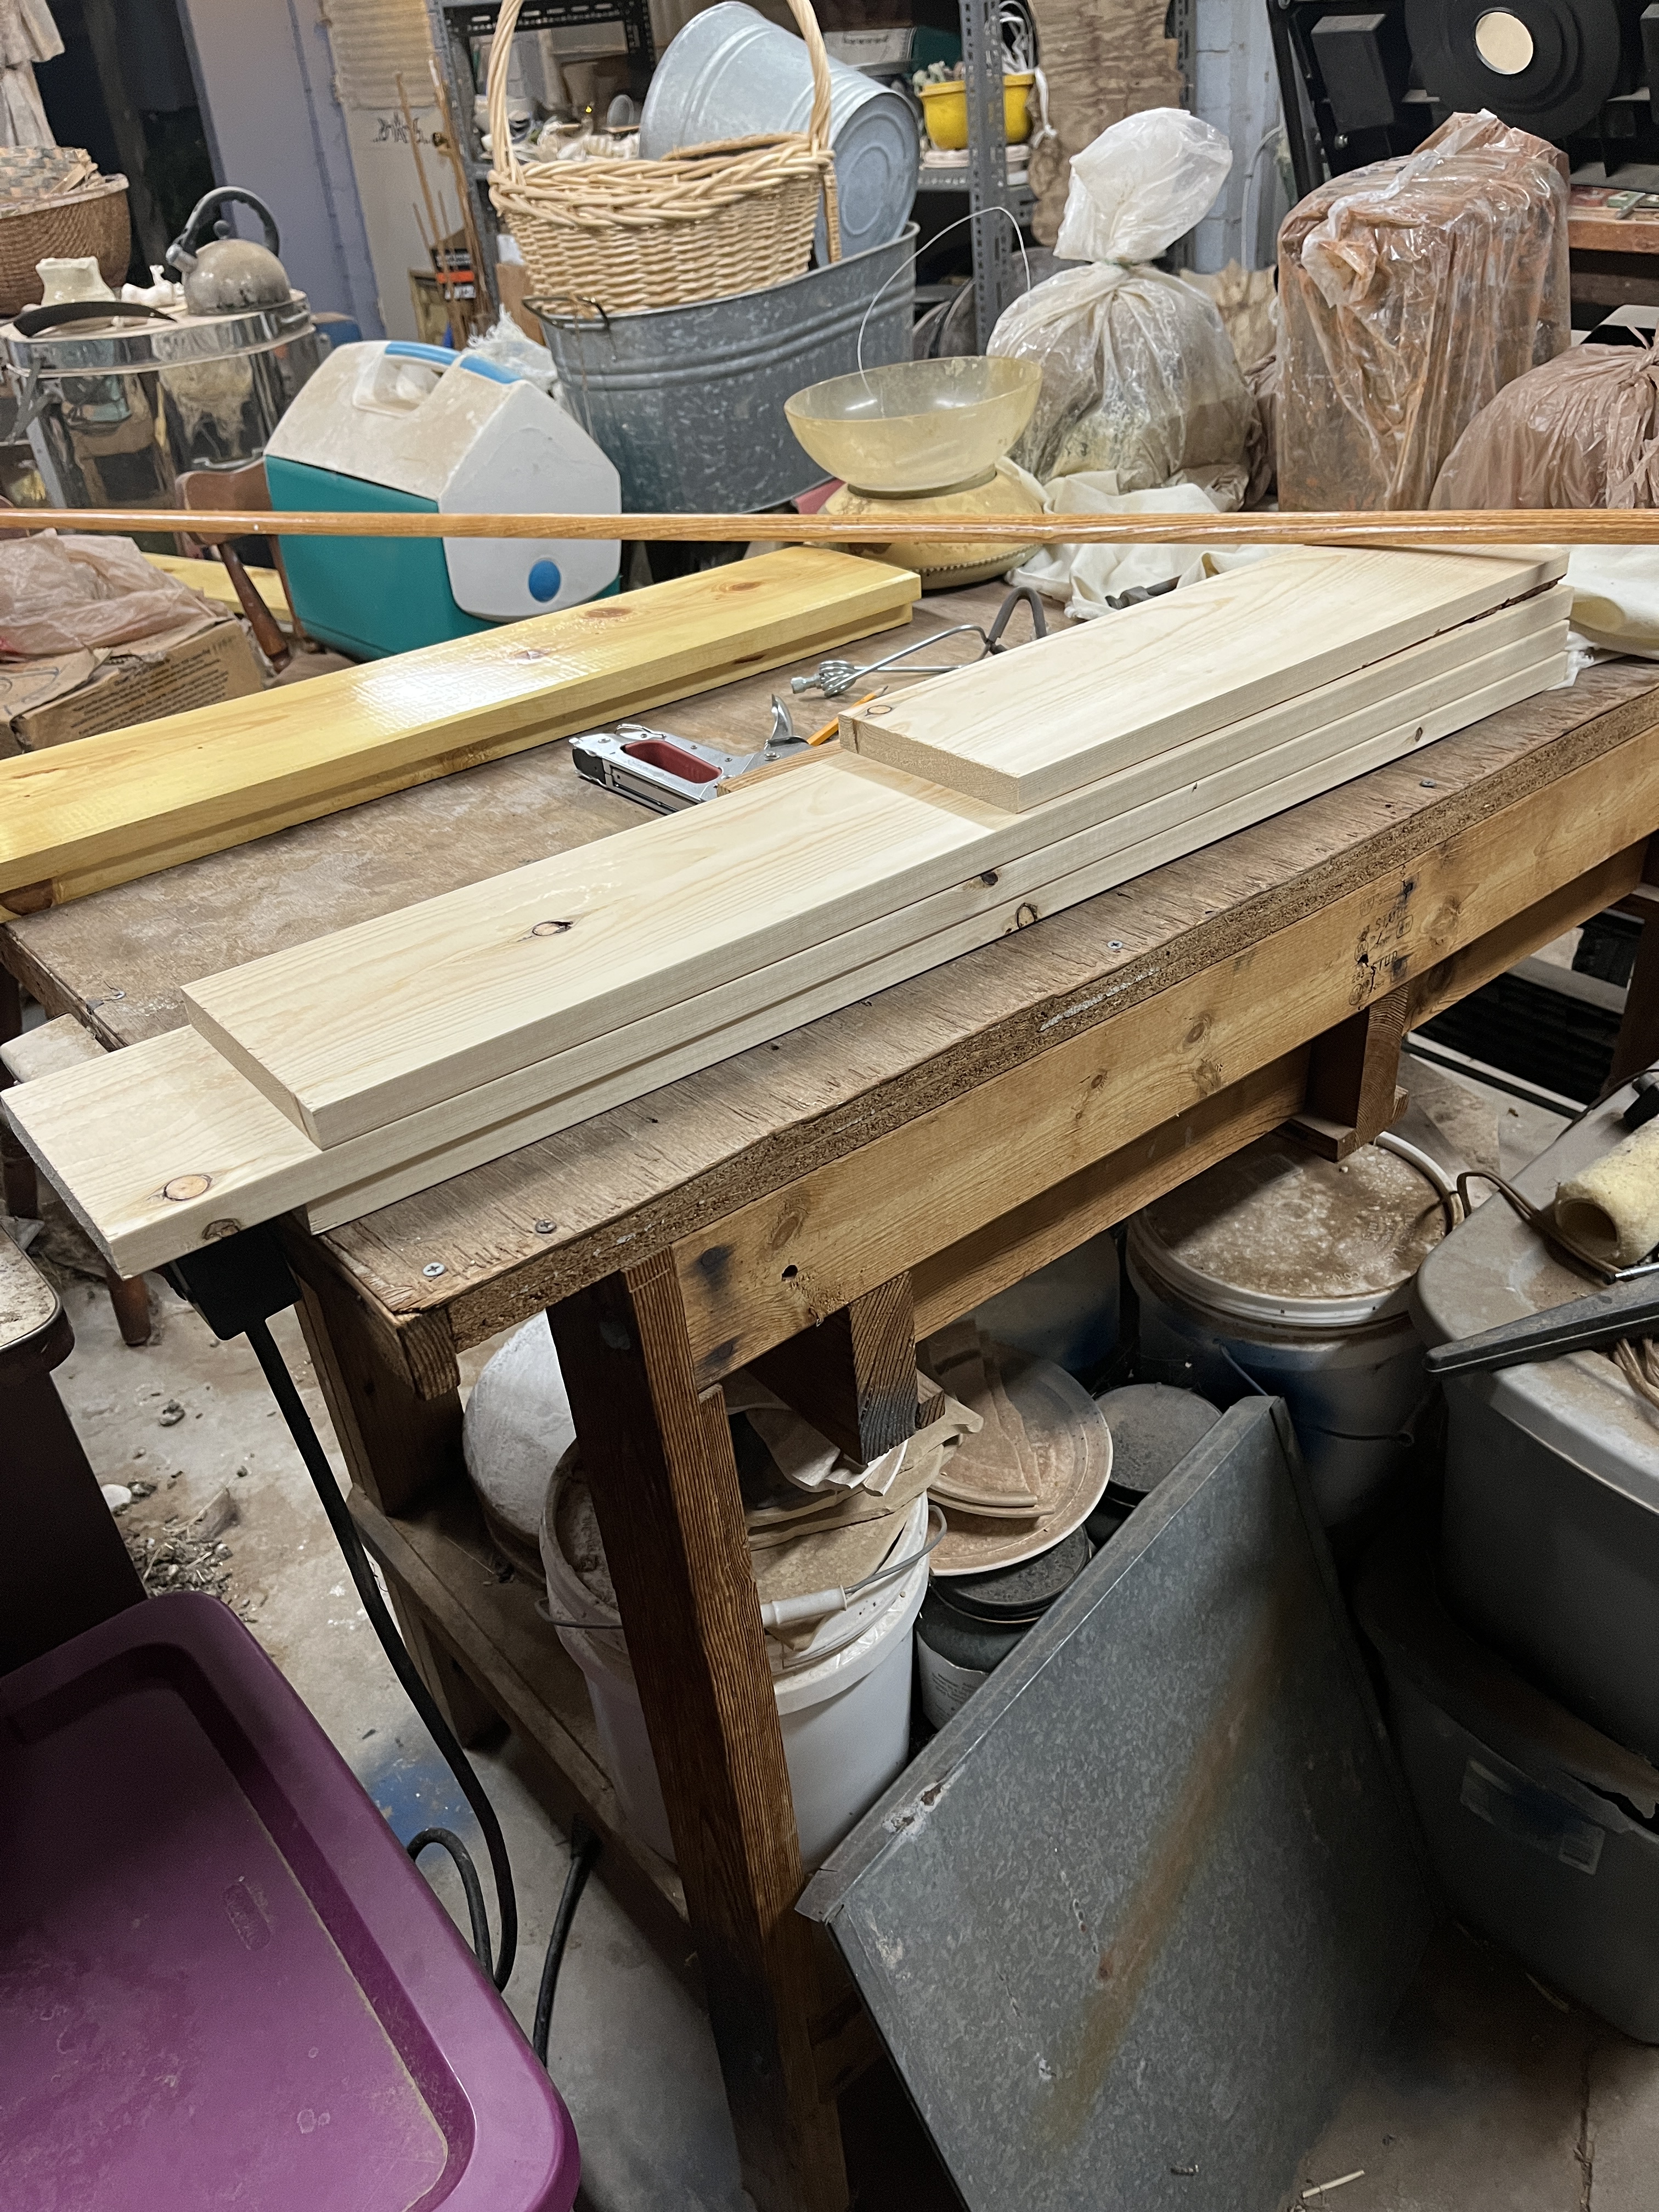
So more actually accurate measuring of the actual apertures and not the fallen-away drawer fronts gave me better numbers. I took the now-accurate numbers to the hardware store, chose a pretty 10′ board and explained my predicament to some understanding employees who made 3 accurate cuts for me so the drawer fronts will have the board graining continuous along the front of the cabinets. YAY! These are stacked in order in my pottery/patio/art studio waiting for me to write on their backs like their predecessors. Yes, I’ll add pictures when these are done.

Now I have 3 lovely drawers for my next project…whatever that is! And I’ve figured out how to do the rest of the cabinet doors…but that’s another blog post. At least I have time to make more handle beads so I can actually finish this some day.

Update 10/12/24

I just realized that I fixed the other drawers in April 2023 but didn’t update this post! So here it is!

I did the new drawer-fronts the same way I did the first ones, only this time I measured better and correctly. I got the baking drawer in first

Insides

Then the silverware drawer

And its insides

And the whole frontage in that side of the kitchen. Unfortunately the faux-drawer in front of the sink isn’t easy to get out without pulling out the sink so it’ll have to wait. *heavy frustrated sigh* A friend from high school even came by to try to figure it out and no luck there, either, so it’s just outside waiting for another day.

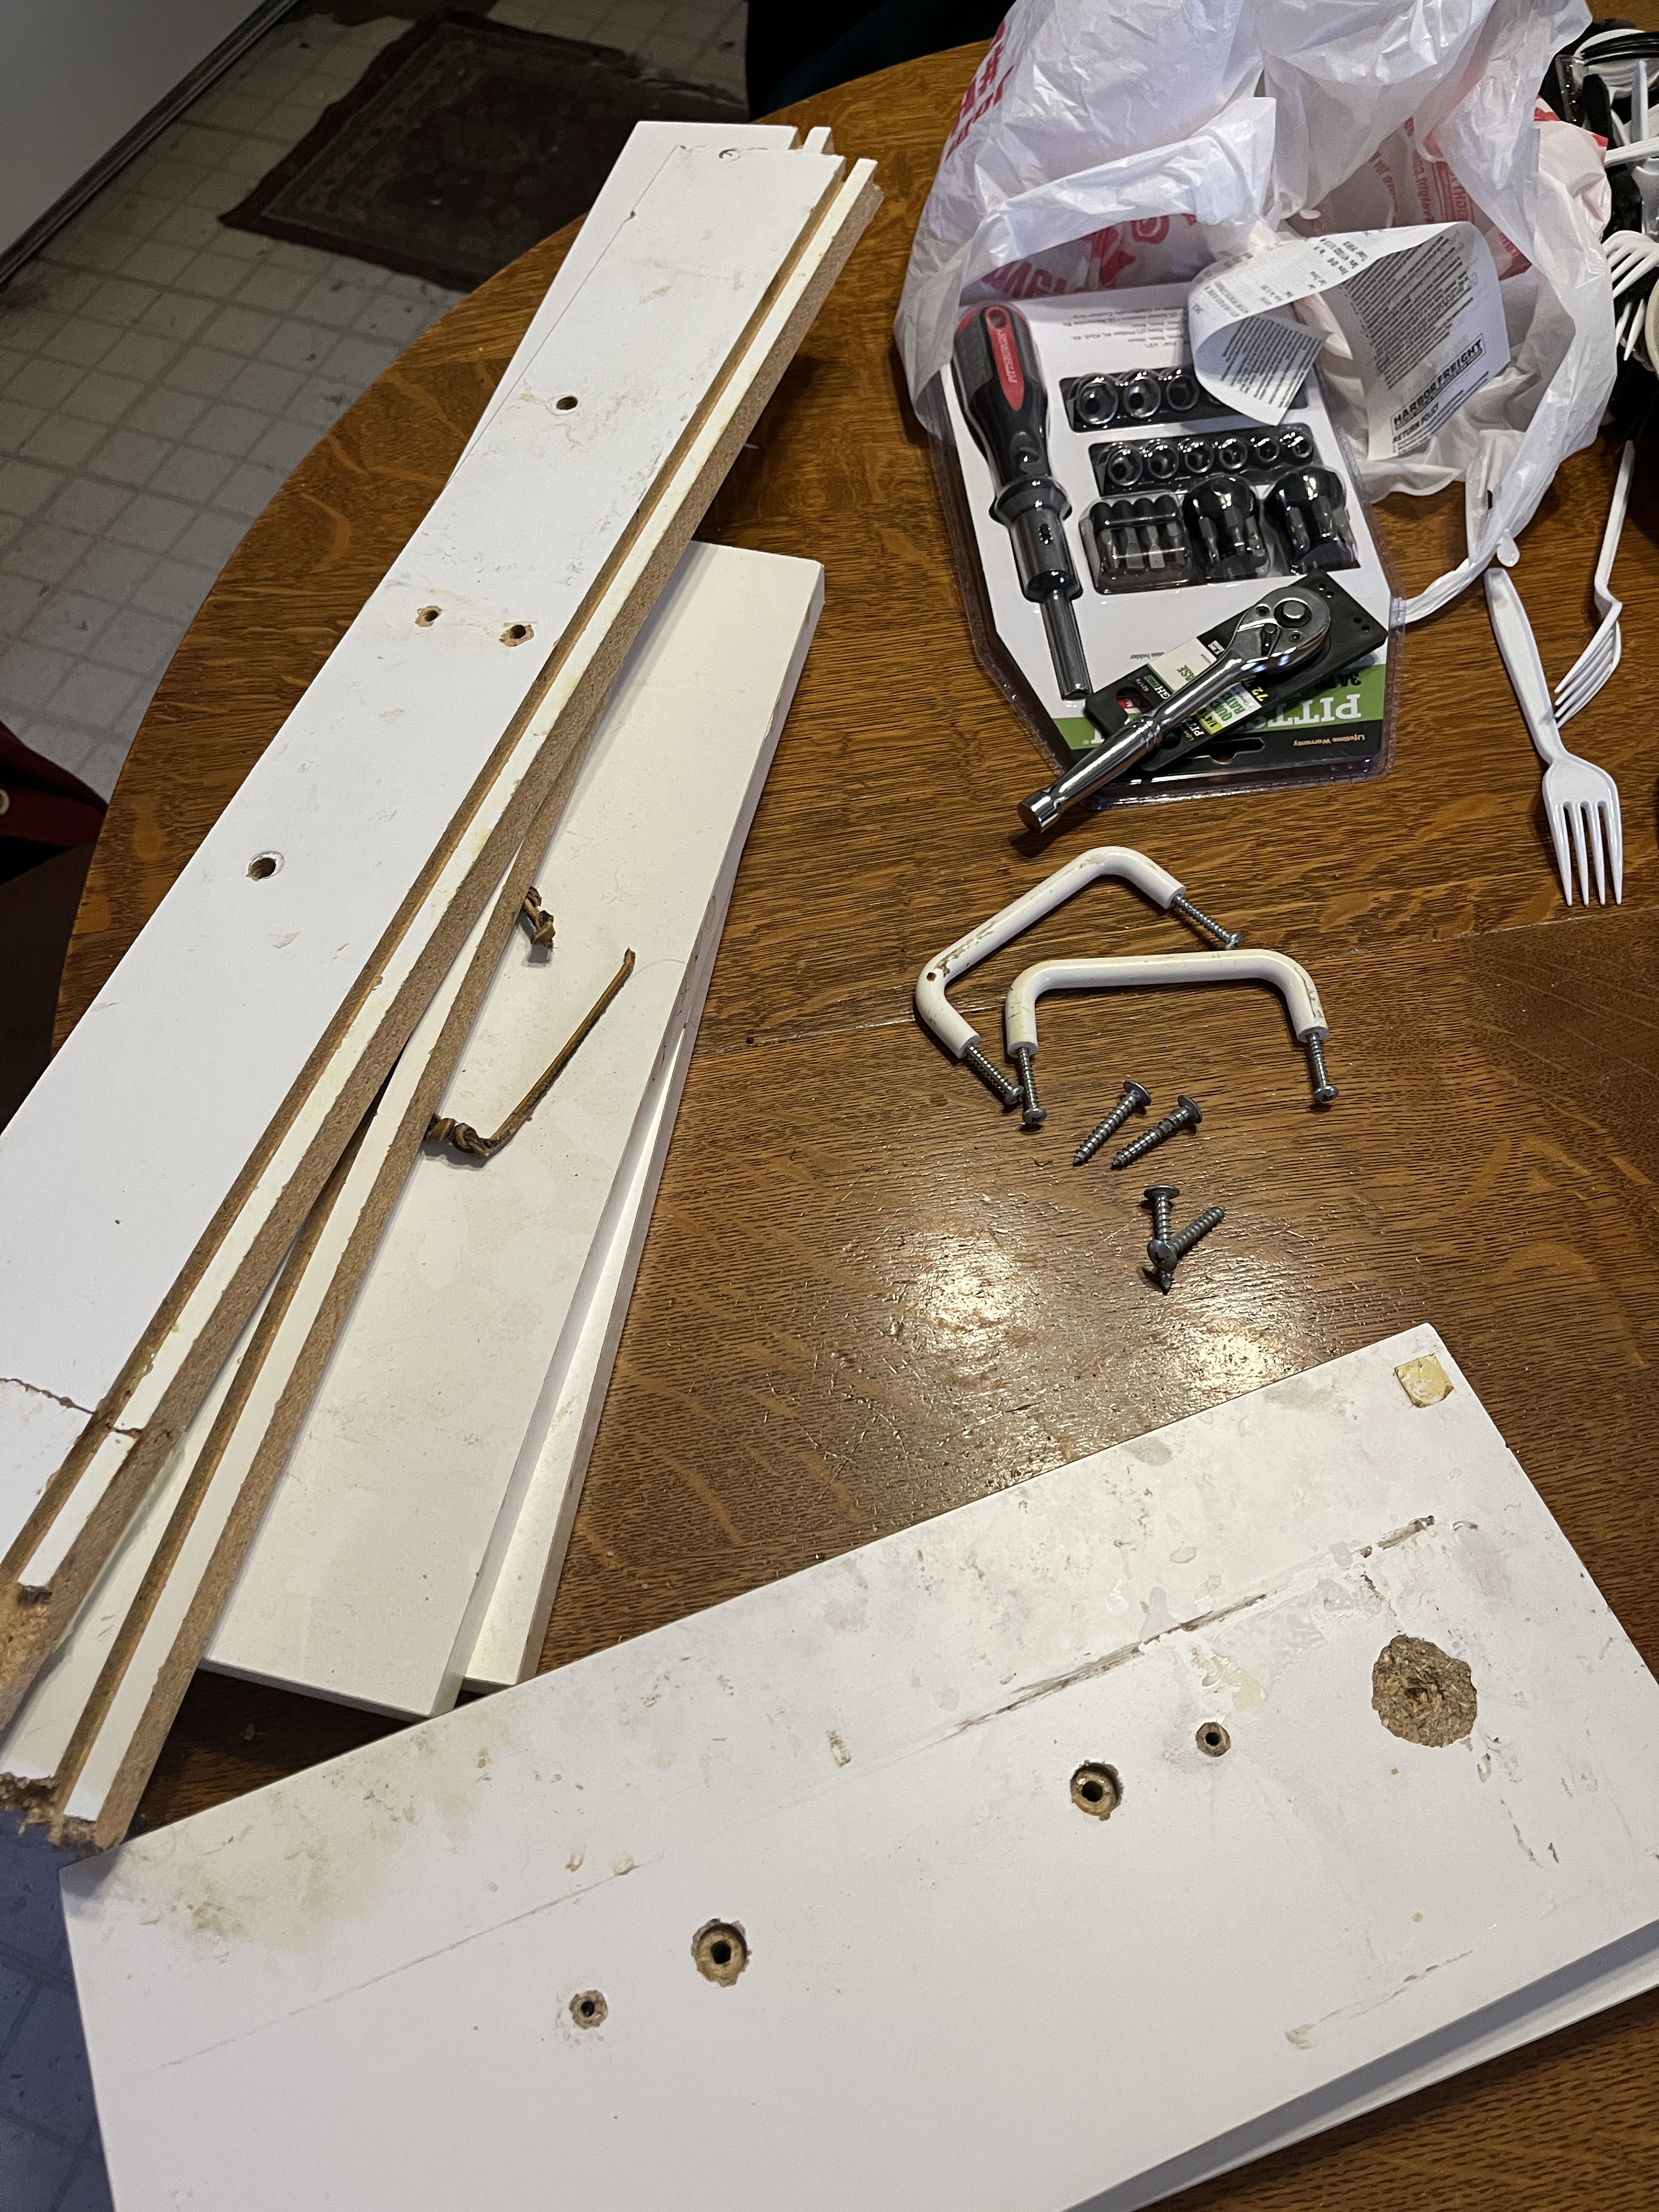
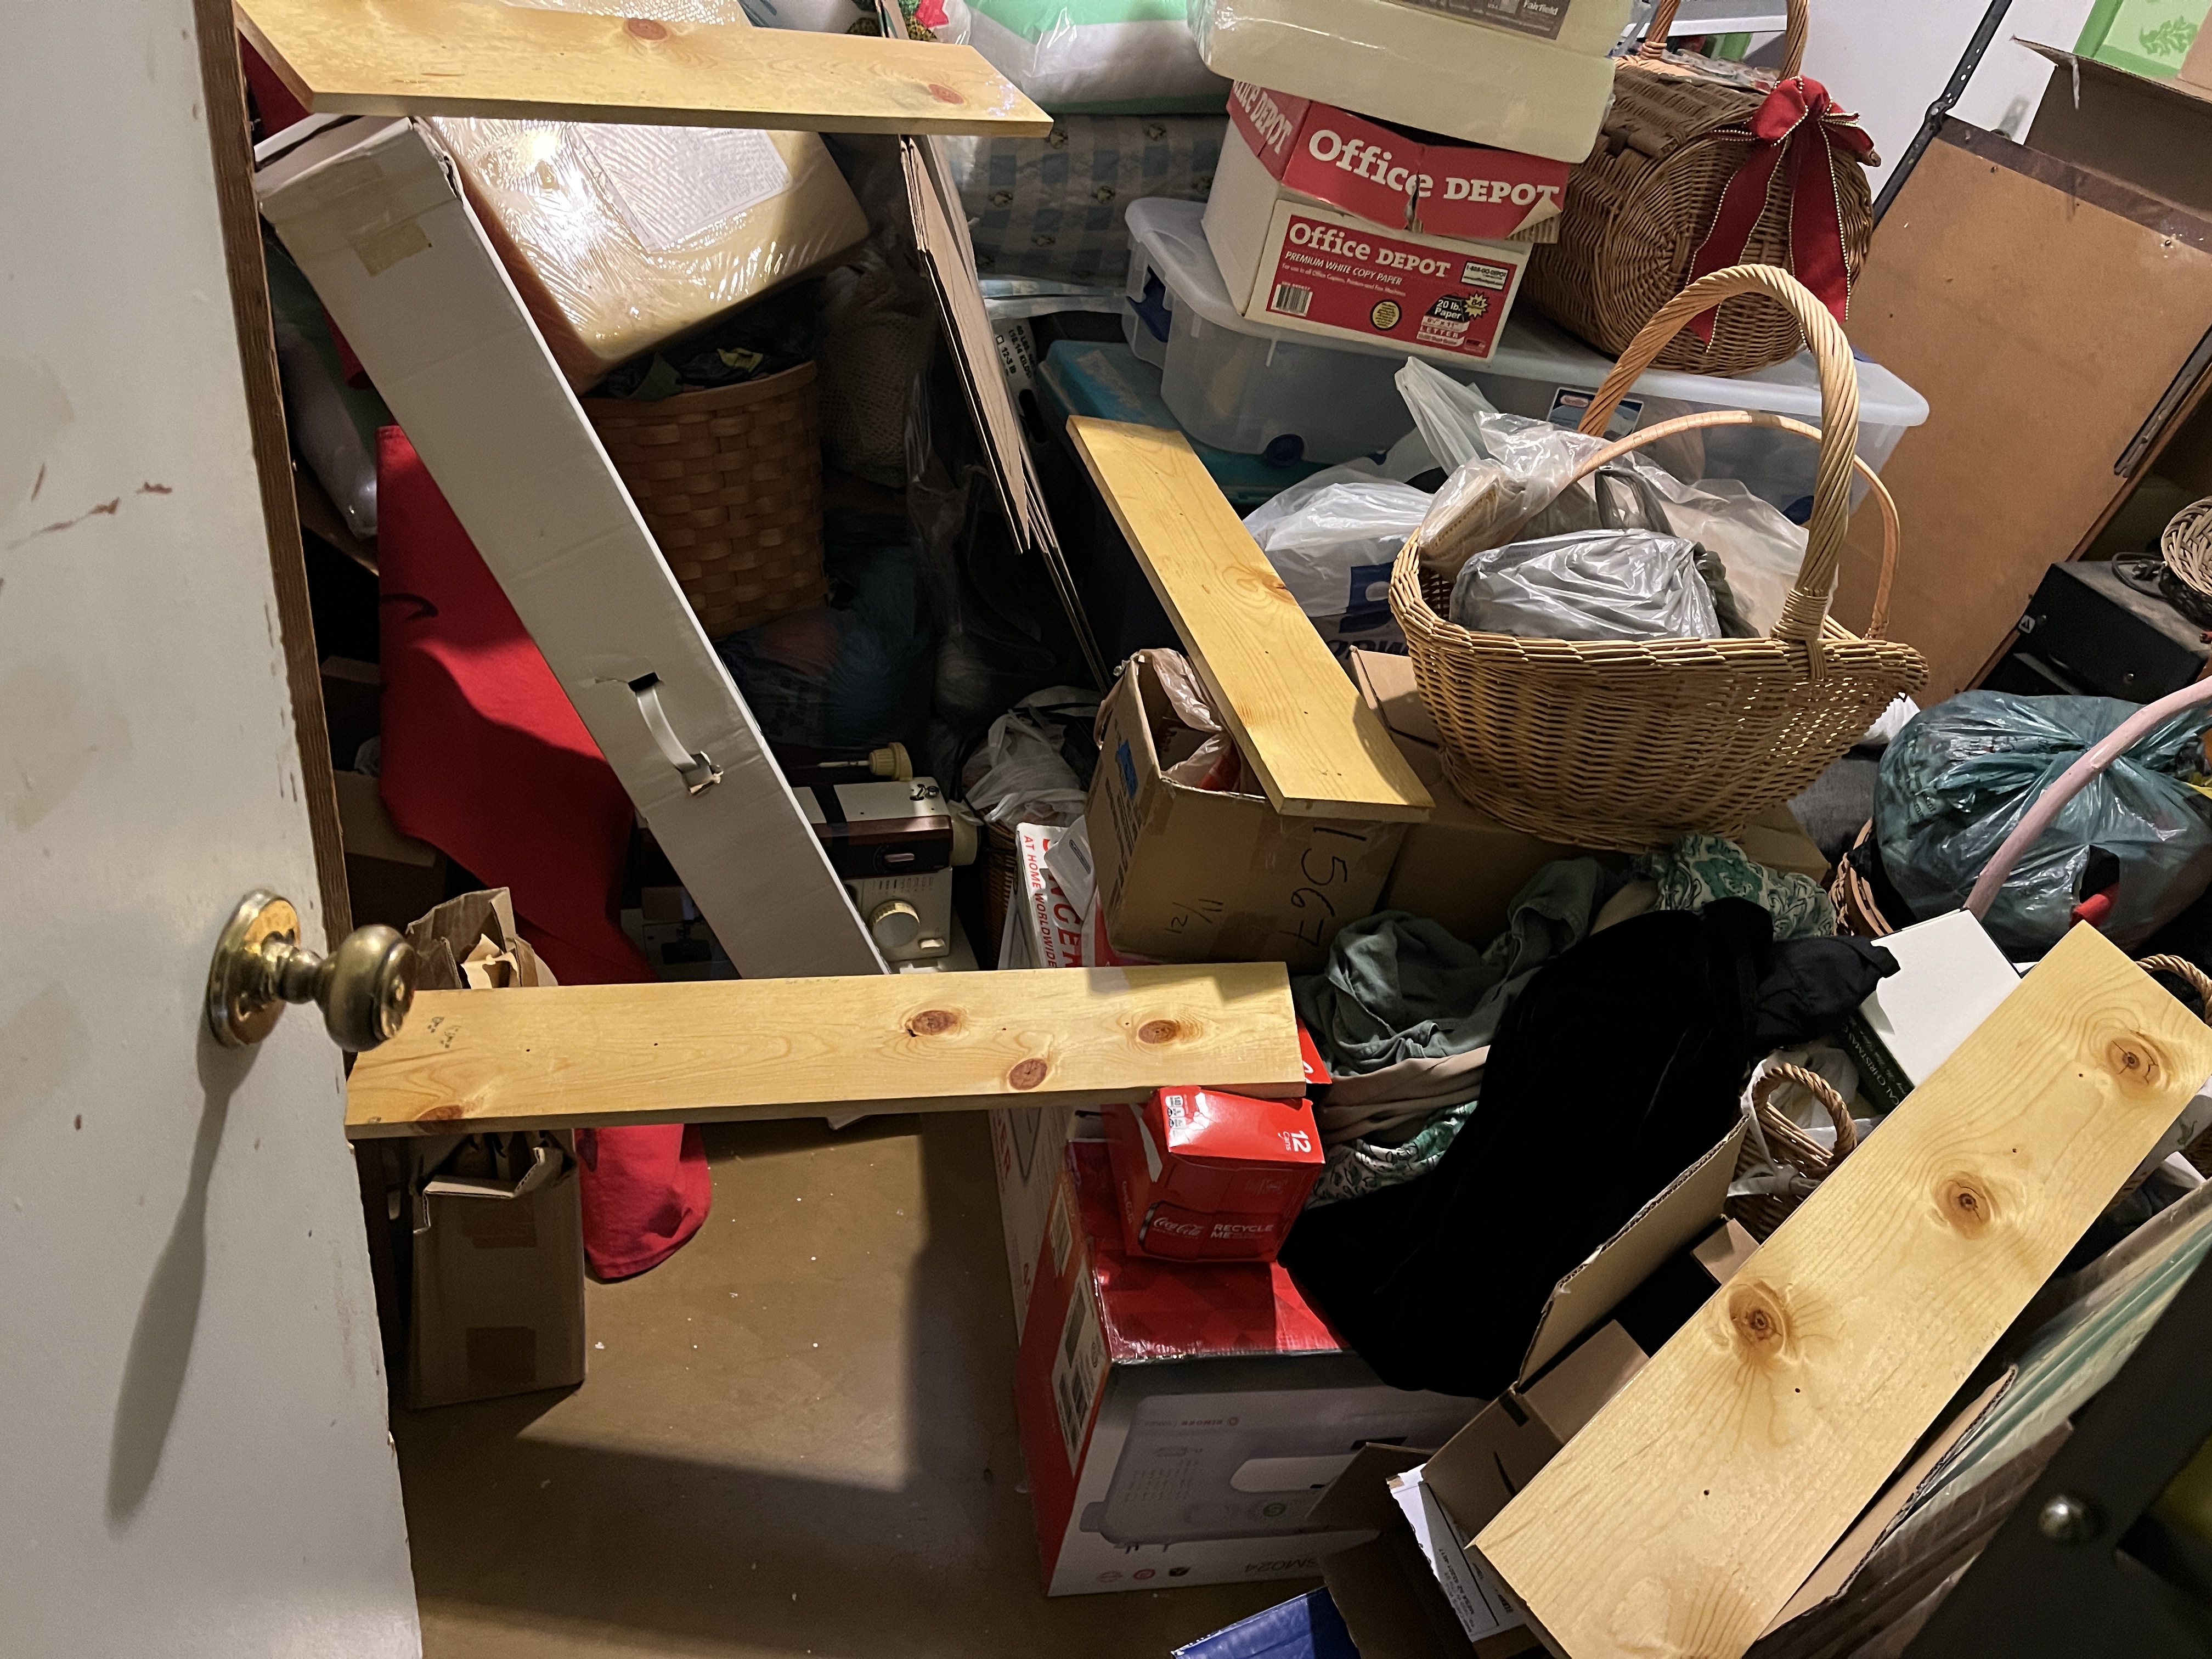
This is what’s left of the old drawers. I have plans to put in a new drawer below the first drawer next to the stove. It’ll hold the lids so they won’t fall all over anymore. I just have to build the drawer and put in the gliders since I already have the drawer-front…but that’s for another day.

I also have plans to replace all the kitchen cabinet doors with shiplap to match the drawers. Can’t wait! Well, I guess I’ll have to wait since there’s so much else to do around here and so little time outside of work. Work does so get in the way of getting stuff done!

Posted by: briellethefirst | January 17, 2023

Dunkelbrot


Dark bread. Yum! See also dinkelbrot. Either way it’s dark bread, but dinkel is also spelt, so for this I’ll just used dunkel for the title because not everyone has access to spelt/dinkel. Today I wanted to make a dark pumpernickel-like bread but I’m out of rye flour so spelt goes in with the cocoa. I didn’t let a little thing like no rye flour stop me, all-purpose and spelt work well enough.

3 c all purpose flour

1 c spelt flour

2 Tbsp yeast

2 tsp sugar

1 tsp salt

2 Tbsp cocoa

1 coffee cup strong coffee with enough milk added to make 2 cups

Mix dry ingredients then mix in wet ingredients.

This turned out too stiff-batter-y so I turned it out on the floured tabletop and kneaded in about another cup of flour til it was a soft dough.

Then I formed it into a ball and plopped it into my bread container to do its thing. I put on the cover and left it on the table for a couple hours to get started then put it in the fridge to bake another day.

OK, it rose so fast today I made a loaf today, pulling a handful of dough out, kneading it into shape and baking it right after the loaf I made earlier. I also covered the container and put the rest of the dough in the fridge. Spreading butter or olive oil over the loaf helps to keep it from drying as it rises and seems to make a nice, delicate crust. Or you can just leave it floury.

It’s not as dark as I expected but tastes wonderful. I buttered a slice of the other loaf before I thought to take the picture, but you can still see the difference. Let’s call this a serving suggestion. Can’t wait to try making this with rye flour.

No matter what shape the loaf, boule, baguette or loaf-pan-shape, you can turn them up on their cut side to keep it from drying out too badly. If you’re going to be using it the same day (say, make it for breakfast, then slice again for lunch and dinner) this works well enough. Buttering the old-cut, dryish side softens it up but if you’re using it for sopping in soups, stews and gravies this doesn’t really matter. If it lasts long enough you can wrap it in waxed paper or foil. I try to avoid plastic whenever possible.

This bread is fabulous on its own just warmed with butter melting on it but is also great with cheese, soups, stews and various spreads you might want to mix up and try with it…even PB&J would be yummy, but then most breads are good for PB&J. Adding sunflower seeds, wheatberries, barley or barley flour, oats or other interesting seeds (caraway is a classic) is fun and adds interest to the finished loaf.

Posted by: briellethefirst | January 9, 2023

Stocking Up, The Heir And A Spare Method


We’ve come a long way in the past few years. The pandemic’s not over but we’ve learned a lot and changed in many ways. One of the issues early on in the pandemic that occasionally pops up is shortages. This sometimes goes with hoarding. Yes, it’s human nature to get as much as we can so we don’t have to go without later, but this also ends up biting us in the behind later as what we bought goes bad or out of date and the feast or famine cycles we create from this mess up supply lines and business planning for production, stocking and shipping. Seriously, how much of anything (cleaning supplies, paper goods, canned food…) can you really use in a reasonable amount of time?

Also, this will in no way get you out of poverty but stocking up on the odd this and that when you can will make things easier in the long run…as we learned during the great TP shortage at the beginning of the recent great plague. If you don’t count yourself among us working poor or impoverished it’ll still make life easier (as even wealthy people found during the shortages in the recent plague).

I feel most secure when I have a full pantry, fridge and coat closet (where I store extra paper goods, A/C filters and such). Some people have a closet for spare stuff or store it in their guest room closet and others have a spot in the garage. Wherever you can squirrel away stuff where it won’t get in the way, won’t get damaged and is easy to access when needed…that works. When we lived in Florida we sometimes stored stuff behind the living room couch. it was out of sight but convenient. Living in Florida also gave us more experience in mindful, useful storing up for hurricanes. We’d start around New Years, slowly buying extras of certain things as they came on sale (cans, packages, whatever) and when the hurricane warnings came along we could quickly inventory our pantry and cupboards and shop accordingly without panicking. The first year taught us to only buy stuff we’d enjoy eating and not to stock up on perishables that would spoil when the power went out. No, we didn’t have a hurricane but we did have stuff we didn’t want to eat (so it got donated to food pantries) or had to use up before it went bad. After hurricane season we’d eat down the extras, saving money for the holidays.

So, what to do? How to get by without dragging the system down with ourselves? Maybe a reasonable solution can be found in the (possibly vulgar) phrase connected with royalty of an heir and a spare. Get one for now and one for later, just in case. This creates a reasonable backup for yourself while leaving some for others, too. No need to be greedy.

While you’re using the first one the other one is insurance against a shortage when the 1st one is used up. As you get short of the first you can start watching the shelves for a new spare. This way you usually only need to buy one at a time, can budget appropriately and worry less about shortages while being community minded and leaving some for others.

My family historically stocks up as a matter of course so I went through the pandemic shortages with a minimum of stress and lack. I did have to watch for things more carefully but since I already had spare *insert things here* it was one less thing to worry about in trying times. No matter what item you’re shopping for you generally have an idea of how fast you go through it, so if you’re just starting this don’t go overboard. You’ll know soon enough how much is too much and how soon is too late.

Make sure you store things properly. Cleaning things should be stored safely from little ones while at the same time little ones should be educated on how things are used and how things can hurt them so they don’t get into them and become sick or injured. Similarly with food you’ve stocked up on, make sure it’s kept at the proper temperature in appropriate containers and free of pests. Anything grain based will benefit from a bay leaf laying on top of it to keep weevils and such out. Yes, it’s an old wives tale but I’m an old wife who’s done this for *mumble* ages and when I don’t weevils happen.

I even tied a few up in a handkerchief to throw in the chicken scratch bin so no weevils there, either. Don’t forget about your fur, feathered and finned family.

A compliment to stocking up is gardening. You can use whatever happens to be ready from your garden. Run out of onions? grab one from the garden!

Having salad? Lettuce and other greens are surprisingly decorative. Some varieties are red, purple or speckled and some are frilly or just interestingly shaped and I’ve even grown Tom Thumb lettuce in the flower bed as a kind of green pearl necklace effect since it grows small heads that can be used as individual salads. Yes, those are nasturtium leaves behind the lettuce.

and carrots make a great border for flower gardens! Sure, the borage is trying to upstage the carrots this year but at least if I need cucumber flavour I can nip off a leaf and use that in a salad.

You can have peas and runner beans climb decorative structures (or even have them dress up plain supports) and enjoy the pretty blossoms (these are mauve but they come in many colours from white to red) and then use the beans and peas in the kitchen. So stocking up provide you with aesthetic appeal as well as a sense of security. Have fun stocking up!

Posted by: briellethefirst | November 14, 2022

Raspberry Sauce


I had raspberries that needed to do something and I had a chocolate pie that was yummy on its own and better with raspberry sauce, so this happened.

1 small basket of raspberries

1/4 c sugar

splash of wine

splash of water

Put the berries in a small pan with the other ingredients. Smash them with a fork.

Bring it to a boil and let it boil for about 5 minutes or until syrupy (if you added too much liquid).

Strain if you want to…or not…(you can be lazy like me) then let it cool.

Drape it over pie, mousse, ice cream or whatever dessert you happen to want to dress up. It’s good warm or cold so if you want to use it right away or heat it up you can do that. It’ll keep a few days in a small container in the fridge unless you snarf it on your breakfast granola or oatmeal. Enjoy!

Posted by: briellethefirst | November 1, 2022

Soul Cakes


Once upon a time Yes, these are mentioned in the traditional tune made popular by Peter Paul and Mary. People, kids, adults, whoever, would go from house to house asking for soul cakes or any “good thing to make us all merry”. Apparently for every soul cake eaten a soul was freed from purgatory so making and eating these could be something of a community service for departed souls. Or they can be just a nice, seasonal treat. I remembered these on Halloween but was too busy to bake so I made them on All Saints Day (Nov 1st) so I could share them at work on All Souls Day (Nov 2nd) There are several recipes, some more like cookies, others more like biscuits and most using grams instead of cups in measurements so I fell back on my old, standard, chocolate chip cookie recipe (because the ingredients and proportions rather resembled it) and went from there. Here goes:

1 softened stick of butter

1 c brown sugar topped off with granulated sugar. If you want a whiter cookie you can use regular sugar.

1 tsp Vanilla

2 eggs (next time I’ll try 1. The other recipes called for 2 or 3 yolks and I didn’t want to store my whites for later)

3 or 4 Tbsp Sack (a fortified wine, not available to everyone so I used a dark lager)

1/2 tsp ea Nutmeg, Ginger, Cloves Cinnamon (mace is good too)

1/2 tsp ea Baking Powder and Baking Soda

3c flour

1 c raisins or other dried fruit. Dried cranberries are good, as are sultanas

Cream the butter and sugar with vanilla. If you use brown sugar you can top it off with regular sugar to easily make an even cup.

Mix in the eggs and sack or lager or port or Madeira or milk

Add the spices and leavening

Mix in the flour

Add the raisins. This is where the stirring gets tough.

Use a cookie scoop to scoop the cookies onto a greased cookie sheet.

Some tried harder than others to keep their cross. The 1st batch didn’t much keep their cross so I added another 1/2 c flour to bring it up to 3 c and it worked.

With a wet butter knife mark each with a cross

Bake at 350 degrees for about 10 to 15 minutes, until they’re golden brown.

Serve with milk, tea, sherry, lager or whatever suits you.

Posted by: briellethefirst | October 28, 2022

Pureed Pumpkin Brains


OK, not the brains. Those are the slimy, stringy bits with seeds that the uninitiated think makes pumpkin pie. This is the body of the pumpkin, the hard stuff that is what we usually carve into Jack O’Lanterns or other arts things after scooping out the brains. If you want to roast the seeds I just did a post on that, too. Yummy. You should do that, too. Pro tip: separating the seeds from the brains is something to occupy the children or men (OK, you can classify them as children for this) and keep them out from under foot while you deal with the real business of cutting and roasting the pumpkin and other stuff.

So now that the children are dealing with the seeds, in another room preferably, you can get down to the business of butchering the rest of the pumpkin. Cut the monster in half and scrape out the brains with a spoon. OK, you’ve already done that and the annoying others are doing something you probably don’t want to know about with the brains in another room. The seeds might or might not get separated for baking but at least they’re not in there with you and the knife.

Now quarter it

If the half is hard to compleatly cut with a knife just pull it apart by hand.

Then it’s easy to cut off or break off the rest of the stem.

Lightly grease a rimmed cookie pan with olive oil, butter, spray something or whatever’s handy and bake at 350 for 1-2 hours. If the playful scary hoard in the other room has done their job you can bake the seeds at the same time…but only leave those in for 15 or 20 minutes.

Toss the scraps to the chickens. Apparently they were less interested in the seed-free brains.

When you can poke ’em with a fork they’re done.

Now they’re easier to cut into strips that are easier to peel.

But if you had cut them into strips earlier there would have been more surface area in contact with the baking pan that would caramelize…oh well…next time…

One way or the other, after they’re baked they’re easier to peel.

Leave the peels on the baking tray for the compost and any scraps you trim off for whatever reason (some are tough and leathery that weren’t in contact with the tray). While you’re at it cut the strips into smaller pieces so they’re easier to puree.

Now for mashing. You can try potato mashers. There were 2 similar ones of this type but I can’t find the other photo! Some might not work so well…

As others…

But the whizzie thing from under the counter worked best.

Don’t fill it too full or you’ll get puree at the bottom and chunks on top, so smaller batches really will speed things up.

As you make puree pour/scrape it into a bowl.

Every time you get 2 cups worth put them in a container to use for pies or whatever later. It seems that 2c is the usual amount to use for pies.

When you get enough for a couple pies and/or you get tired of whizzing it up put the rest of the chunks in a tub (see picture above) because the big bowl of chunks will seem to be neverending.

Anything that doesn’t fit in the tub (look for stuff that’s not as baked as the rest) can go to the chickens. They’ll like it. Really. You really don’t want a picture of the compost. It’s just boring, trust me.

Tuck the tubs into the freezer until you have time to make pies, cookies, muffins, pumpkin bread, soup or whatever. Have fun making stuff this holiday season!

Posted by: briellethefirst | October 28, 2022

Roast Pumpkin Seeds


Every year the traditional pumpkin sacrifice happens. Carving, for better or worse, before the obligatory candy and goody hunt. Then there’s the pumpkin brains…with all those seeds. The easiest thing to do is just throw them out, but why? Sure, the seeds are a bit of an inconvenience to separate from the rest of the brains but they’re so yummy! It’s worth the time (it really doesn’t take long) to get the seeds ready to make a nummy nom for holiday snacking. Better than popcorn (which, BTW, they go well with), so pick out your favourite viewing, get the carving, roasting and popping done, then snack away.

And if you make pumpkin pies from scratch on Thanksgiving and other fall/winter holidays this is a good way to occupy the kids or even the guys then, too.

Cut open the top of the pumpkin (unless your design calls for a different approach). Scoop out the brains, seeds and all, into a bowl. Do whatever it is you’re going to do with the pumpkin. Carve, bake…whatever.

Give the pumpkin brains and random bits of rind that came off with the stem to the chickens. They may or may not like the stringy brain bits but the rind is interesting to peck at…at least for a bit. If there’s still seeds in there the chickens won’t mind.

Pick the seeds out of the brains and put them in a colander. This is a good thing for the kids to do while you deal with the rest of the pumpkin, keeps them out from under foot, lets them get their hands all ookie-gooey and they’ll probably get noisy so be prepared for fun. Rinse well and drain. You can save a handful to plant next year if you want. Don’t forget where you store them, it should be a cool, dry place and including a bay leaf with stored seeds helps keep bugs from getting to them.

Put cleaned (they don’t have to be perfect) seeds in saltwater, bring it to a boil, boil for about 10 minutes then strain. 1 Tbsp salt to 1 pint (2c) water…or a little more water to cover the seeds. Oops…I forgot to do this this time…I’ll remember and update with a picture next time.

Strain, dry and season for roasting. Start with olive oil, butter, bacon fat…whatever you have handy that sounds good. Then sprinkle with pepper, garlic, paprika, curry powder and/or any other things you think might be good, including more salt.

Bake until golden, about 15 or 20 minutes more or less.

When done put in a nice bowl and nosh.

These are, BTW, Paco approved.

But he doesn’t like posing for me. And yes, I’ll be cleaning his cage tomorrow.

If you want to go sweeter with cinnamon, sugar, honey, maple syrup and pumpkin pie spices then try that, too. You could even boil the seeds in sugar instead of salt first.

Posted by: briellethefirst | October 22, 2022

Meatloaf


Seems simple…and it is! But it’s also versatile and can be very upscale as well as scaled up or down depending on how many people you need to feed.

Ingredients: Ground meat, bread or cracker crumbs, chopped onion, 2 eggs, seasonings, wine/beer/milk, catsup for topping.

Start with 5 lb of ground meat. Usually beef, but if you want to add ground pork for richness or ground turkey to make it leaner or lamb for character, go ahead! It’s your creation! OK, you can just go with 1 lb of ground beef if that’s all you have, work with what you got. I usually go with 3 lb but tonight I had 1 lb.

 Put the meat in a large bowl, big enough for you to easily mix by hand and not make a huge mess. If you’re using 3 lb meat or less just use 1 egg. Add the egg, crumbs, seasonings, liquid and schmoosh it all together with your hands.

Seasonings are whatever you think will taste good, just remember that more is not necessarily better. Seasonings can include salt, pepper, garlic (fresh or dried) paprika, curry powder, 5-spice, chopped onions, chopped celery or celery seed, caraway, cumin, Worcestershire sauce, teriyaki, salsa…make it taste good for you. No, don’t taste it raw! Just remember that discretion is the better part of valour. Moderation is good. Next time you an add more if you want to and if it’s not flavourful enough there’s always steak sauces you can pour on after the fact at the table.

Put a bit of wine, water or beer in the bottom of the loaf pan then form the meatloaf into a loaf shape an put it in the loaf pan, too. Top with catsup and bake at 350 for about 30 minutes per pound or until it’s not pink in the middle anymore.

No, you don’t have to top with anything but catsup is traditional. No, you don’t have to use catsup, you can use BBQ sauce, sweet and sour sauce, Hoisin sauce, mustard, salsa or a mix of whatever sounds good to you. Have fun, it’s your meatloaf. I used one pound of ground beef here and fed 3 people. More poundage would have turned out a larger meatloaf and fed more people or the same people more meals.

If you’re preparing for a banquet or potluck you can make individual meat cupcakes in muffin tins. If you ‘ice/frost’ them with mashed potatoes and decorate with green beans, carrot sticks, peas and parsley the presentation can be spectacular! Or at least interesting and comment-worthy. You can even make appetizers by making them in mini-muffin tins.

Or you can just make it a normal shape and serve with whatever is in your pantry. Tonight we had a ton of fresh bread we made in a marathon baking spree. Mashed potatoes is traditional and rice or couscous is good, too. You can serve peas, green beans, corn, carrots, broccoli or any veg your heart desires along side.

This is also a good, basic meal to teach the kids.

If/when you have leftover meatloaf you can be boring and just reheat it with the leftover mashed potatoes and veg on the side…OR… you can make something else out of it. Like meatloaf sandwiches. Or strogonoff (cut the meatloaf into meatball-sized cubes), or tacos (slice to fit into tortillas), crumble it up into spaghetti sauce, slice it to use on home-made pizza, cut it up to fit inside stuffed grape leaves or cabbage leaves with rice, cut it up to use in fried rice, scramble it up to use in chili, use it in the casserole of your choice or invention…whatever you can dream up. Have fun with your meatloaf leftovers.

Posted by: briellethefirst | September 12, 2022

Making A Wreath


I had to prune my grapevine today so I made a wreath. Any viney or long, pliable plant can make a wreath. I’ve used evergreen prunings like junipers and confederate jasmine. You can try anything, some are easier than others. Grapevines seem to almost want to cooperate.

Take a handful of prunings and start with the longest one. It doesn’t take much room to do this so my pottery bench is handy.

If the thick end is a but stiff just bend it a bit in the direction of the curve to loosen up the fibers. Then bend it in as close to a circle as you can and start twisting it around to hold the circle in place. Weave it back and forth around any branches, leaving them for later.

Winnie the Chicken is hoping for a few dropped leaves.

Once it’s all twisted pick up the next longest one and twist it around from the lightest part of the circle. Bend the big end in a few spots if you have to. Weave it back and forth around the any branches, again leaving them for later.

Winnie got tired of waiting for dropped leaves or whatever and went off to pay with the other chickens.

Repeat with the 3rd. Aggie and Chimie (pronounced Kimmy) came looking for Winnie…and any dropped leaves or whatever. If it’s full enough at 3, you can stop there. Up to you and your prunings.

and 4th longest trimmings, starting at the lightest spot each time. When you get to the end of the 4th trimming, start twisting in the branches. If it looks good to have one or 2 branching out, leave them. It’s your wreath, so make it artsy the way you want. If it’s still too thin for your liking, add another pruning.

Now let it dry for a few days. The leaves will get dry and crumble off easily then you can leave it as is to hang it or decorate it with whatever you want from the house or garden. Bows, stars, cloven citrus, nuts, candy…have fun!

Ignore the mess the chickens have made on the other end of the bench. They’ll be cooped in another week or so. I can’t wait to get my porch/workshop back in order! Yes, I like their company but chickens do make an horrendous mess!

Posted by: briellethefirst | August 29, 2022

Stuffed Mushrooms


Mushrooms were on sale last night, so I grabbed a basket. Lately I’ve been getting sliced mushrooms because they’re faster for whatever I want them in and usually I just saute them with onions anyway, but I haven’t had stuffed mushrooms in SO LONG! I got the original recipe from a 1960s paperback vegetarian cookbook (something like Apples to Zucchini Vegetarian Cooking of something like that) but it’s been misplaced (I’m hoping it’ll show up at my daughter’s place?) but I made it so many times I’ll just wing it now.

As a side note, I’m experimenting with organic wheat flour to see if it’s the wheat or something else (glysophate used when harvesting) that’s bothering me. Couldn’t hurt anything but my pocketbook (it costs twice as much as regular flour). I made some bread last week so I’ll toast the last of it up and make some breadcrumbs.

I’m also making organic pita bread today to have for dinner with leftover chicken and home-made tzadziki sauce. I made brownies earlier and pasties at the same time so I figured why heat the house up later and just kept cooking. While one thing is cooking you can be prepping another.

Ingredients:

Mushrooms, large enough to stuff their caps

Butter, olive oil, bacon fat, schmaltz or whatever is handy

Finely chopped whole shallot or onion (about 1/4 onion, depending on the size)

Garlic

Salt, pepper, thyme, basil, dill, mint or whatever seasonings you have in the pantry or garden that sound good

Chopped nuts

Bread crumbs

Grated Parmesan, Gouda, Swiss, mozzarella, cheddar or whatever cheese is handy

Beer, wine, lemon juice, teriyaki sauce, Worcestershire sauce or whatever to moisten as needed

Brush the mushrooms clean (it’s OK to briefly rinse them), take out their stems and finely chop the stems.

Finely chop a shallot or 1/4 onion then melt 2 Tbsp or so of fat (I’m using butter and some olive oil this time) and saute the mushroom stems and onion til soft.

Mince the garlic.

Add the garlic and seasonings.

Whizz nuts in a little blender or food processor and set aside then break down some bread for the blender/processor.

Whizz the stale to dry bread or crackers in there too to clean out the nut bits that stick to the sides.

Turn off heat and add chopped nuts and breadcrumbs.

Add cheese. If the mix is too dry add Worchestershire, teriyaki sauce, wine, beer, lemon juice or whatever sounds good. Keep in mind that the mushrooms will add moisture as they cook, too.

Use a spoon and your fingers to fill the mushroom caps.

Oil a pan or tray and arrange the mushroom caps on it. Spray oil is fine but so is olive oil, butter or whatever’s handy to quickly spread a thin layer on with your fingers. You can also sprinkle Parmesan on top if you want to.

Bake at 400 degrees Fahrenheit for 5 to 10 minutes (I took the 10 minutes today because they went into the oven as it was heating up for the pitas).

Serve with other appetizers or alone with wine, beer, or the beverage of your choice. Enjoy a snack while waiting for the oven to heat up so you can bake the pita breads you made today. Also, ignore the small bags of hardware in the background, I still need to fix the kitchen drawer fronts.

« Newer Posts - Older Posts »

Categories