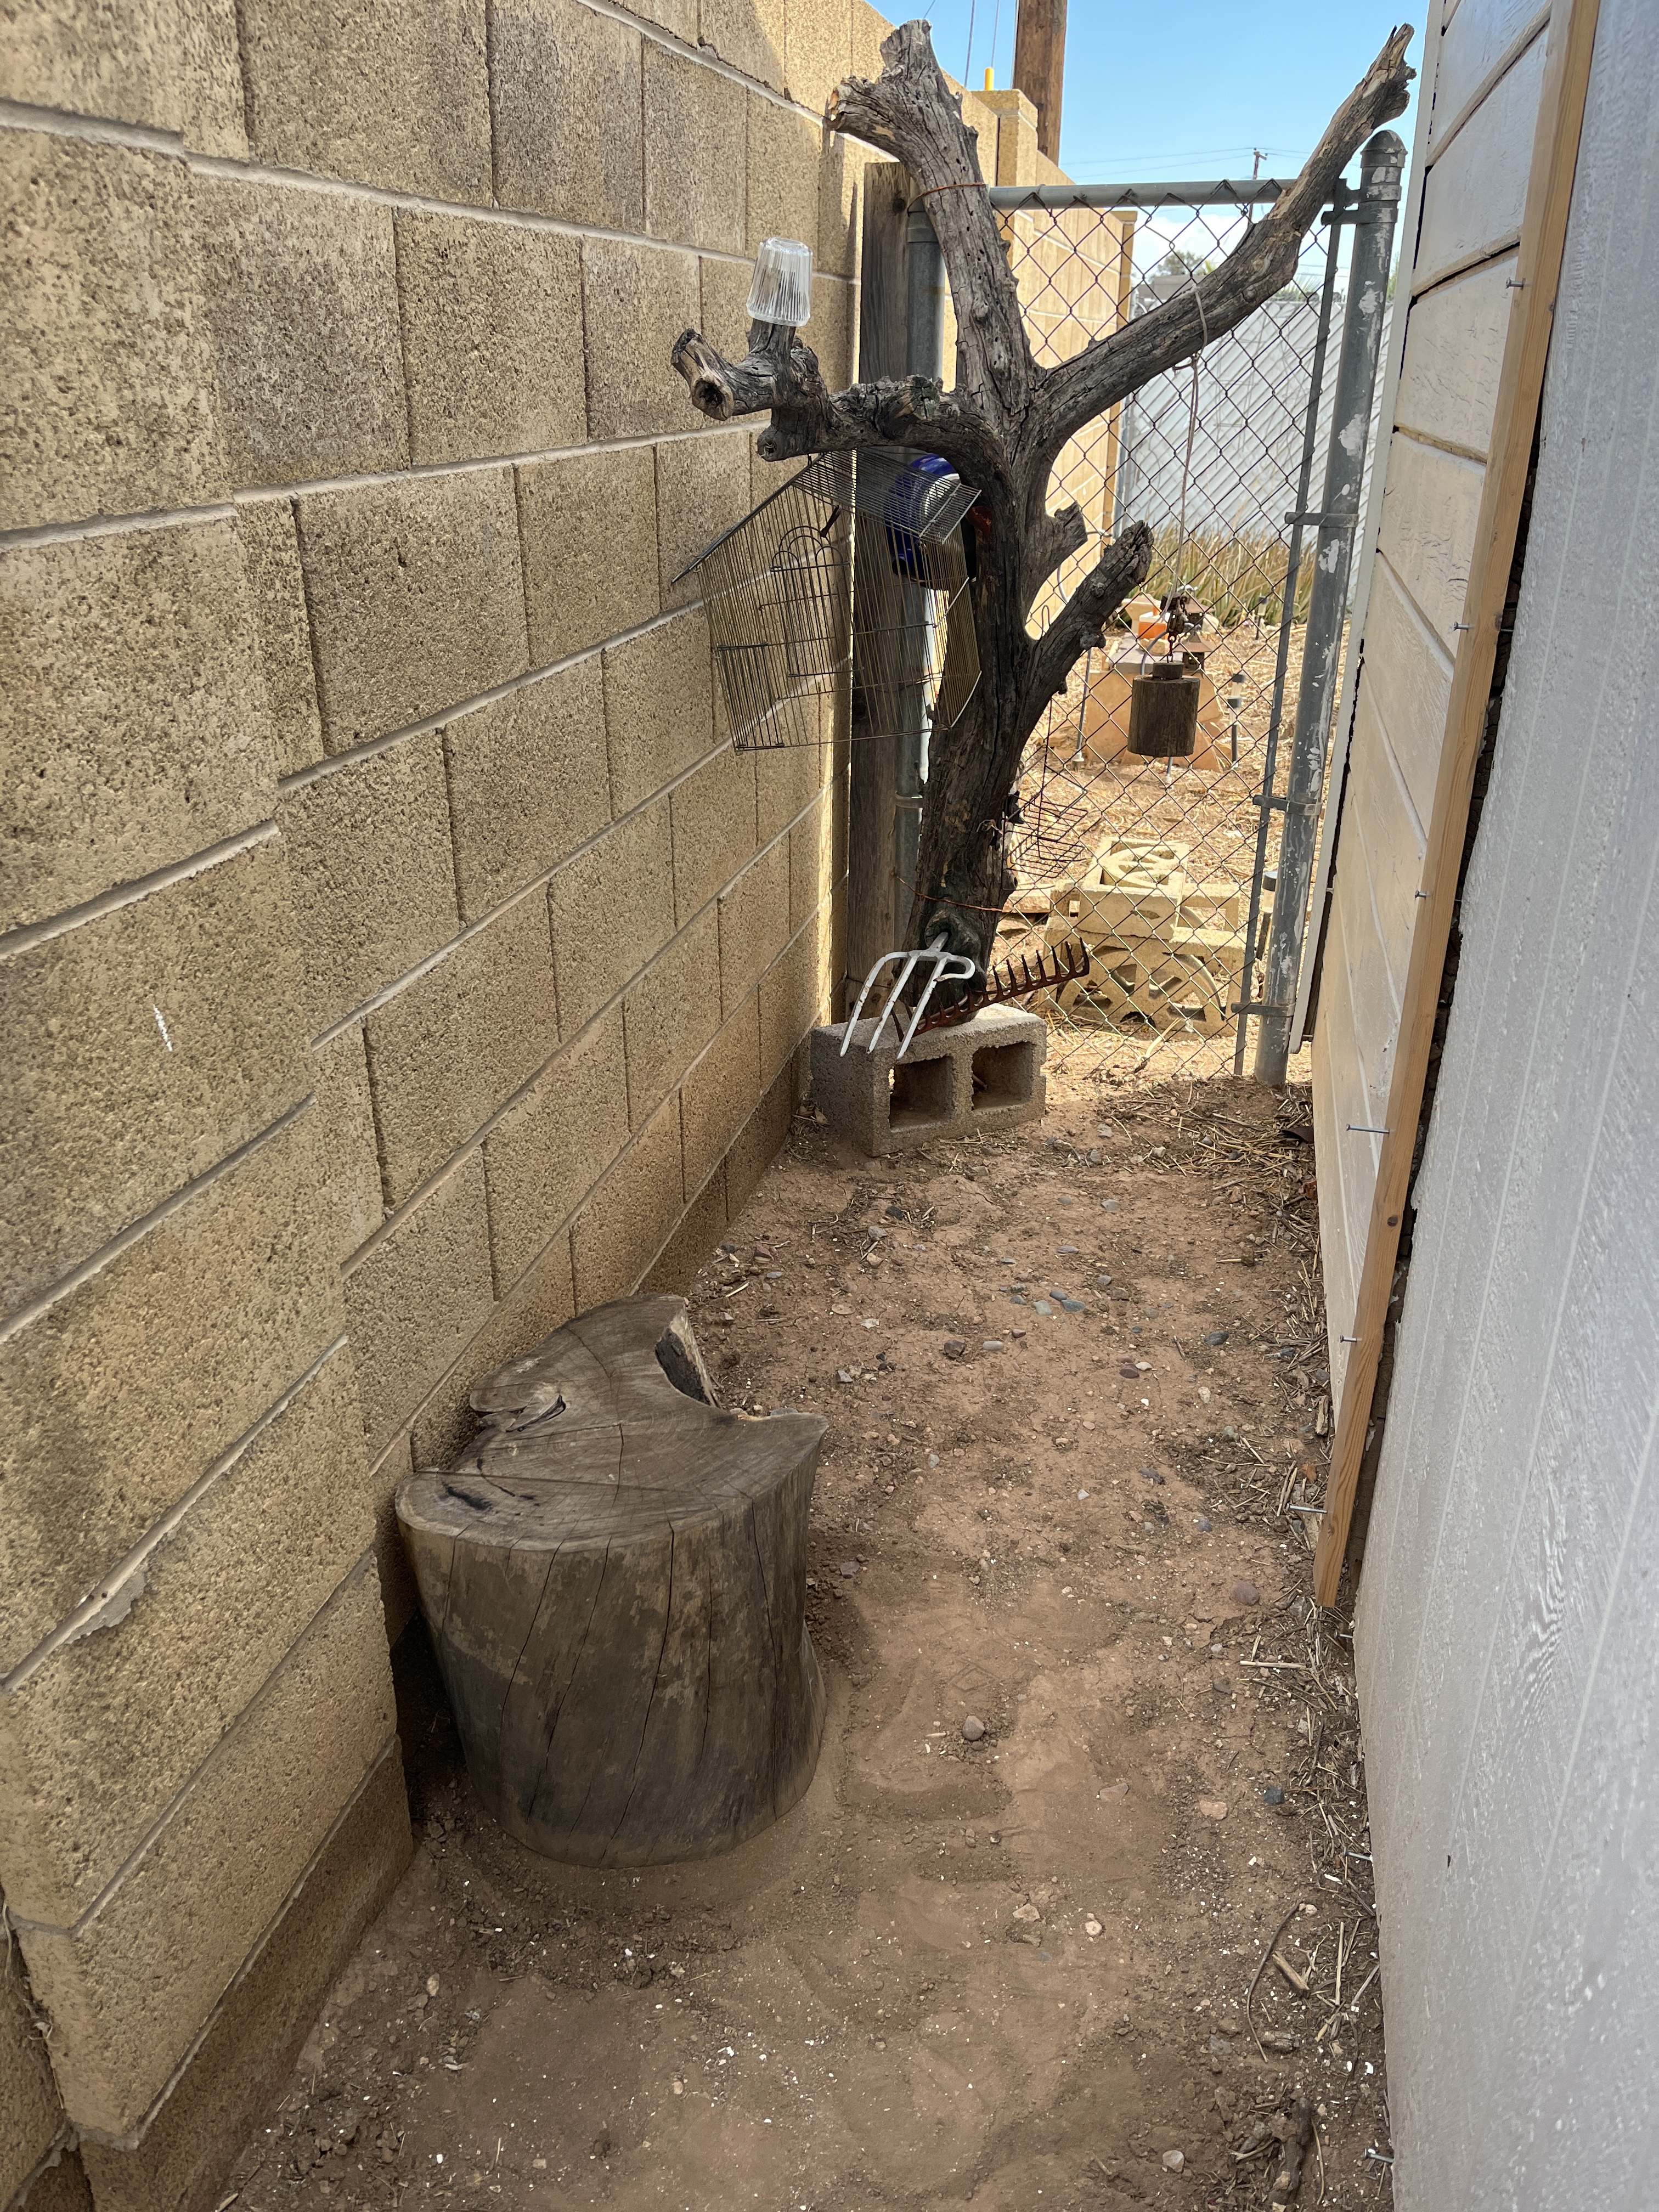
I needed a bit of a spot or two in my evolving Zen-ish garden to have a cup of tea or something when I sit and enjoy the spot and contemplate whatever my mind wanders to. This isn’t the finished garden (is any garden ever finished?) but it is as far as I’ve gotten today. This side of the house and yard is dry, narrow and not a good place for growing anything, at least not if you want to walk around the 3’x18′ space. It’s only use before now was access to what used to be the phone service and the local cats were using it as a privy. We’ll see how pleasant I can eventually make this area.
I started with a rummage through the woodpile for seating and table ideas. Yes, I do need to re-stack the woodpile.
I found a stump that’s just about level and just right for a low seat up against the wall.
Now for a place to put a cup of tea or something. More rummaging through the woodpile turned up one option but since I bumped my head on the feature art tree while placing it, it’s going to the front seating spot. The highest spot is level and I might later attack the other one or two to make them level too.
Then it hit me (thank you tree)! I can hang something from the tree branch to be a table! I have clothes line, I just have to find something…something…more rummaging through the woodpile…more rummaging through the lumber pile…wander back through the porch and there it it! A bit of plywood board, slightly warped but perfectly aged!
I grabbed the drill and bits and chose the biggest bit to match the clothesline size. Yes, I’ve been keeping my extra clothesline on one of my pottery greenware shelves.
Drilling was easy enough from the top. I eyeballed it since this is kind of an overall wabi-sabi project anyway. No hard and fast measurements needed since the clothesline will do the leveling.
The poor board was so well aged I had to drill from the bottom as well to clean up the scrappy bits that wanted to catch anything coming through the holes. This side looks a bit ragged but that’s OK, it’s the bottom.
Now to put away the power tools and accidentally take a self portrait.
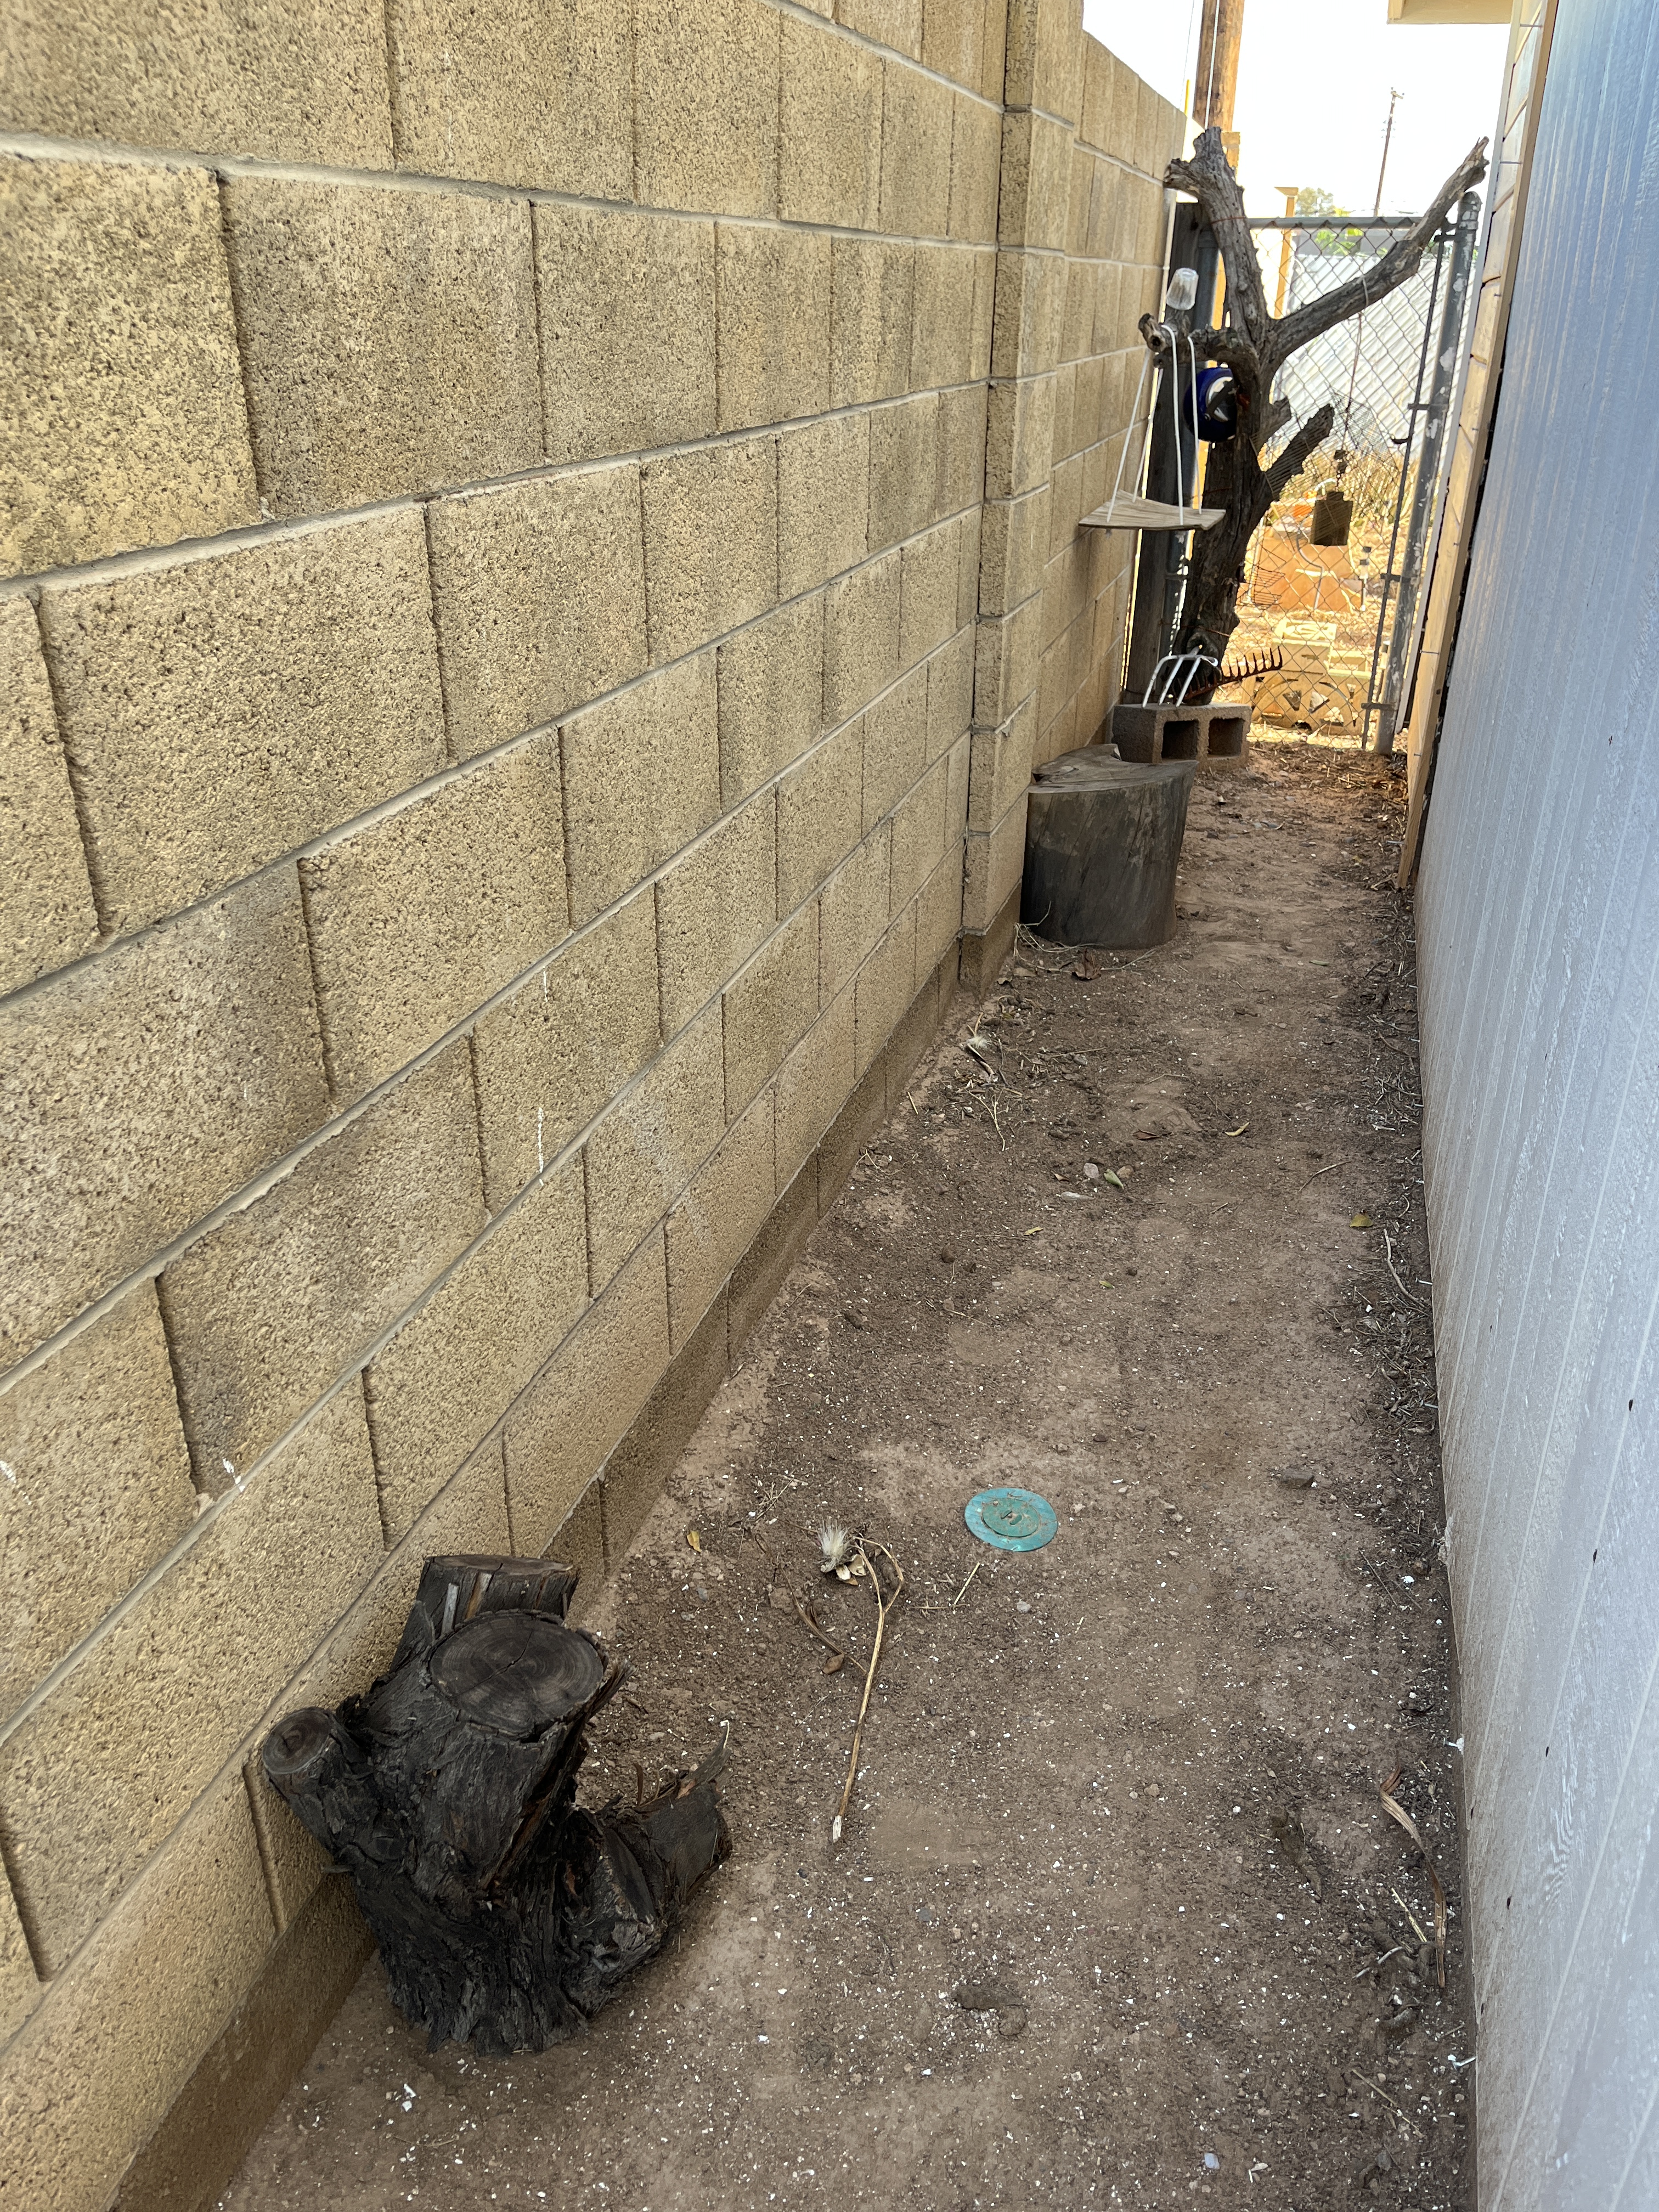
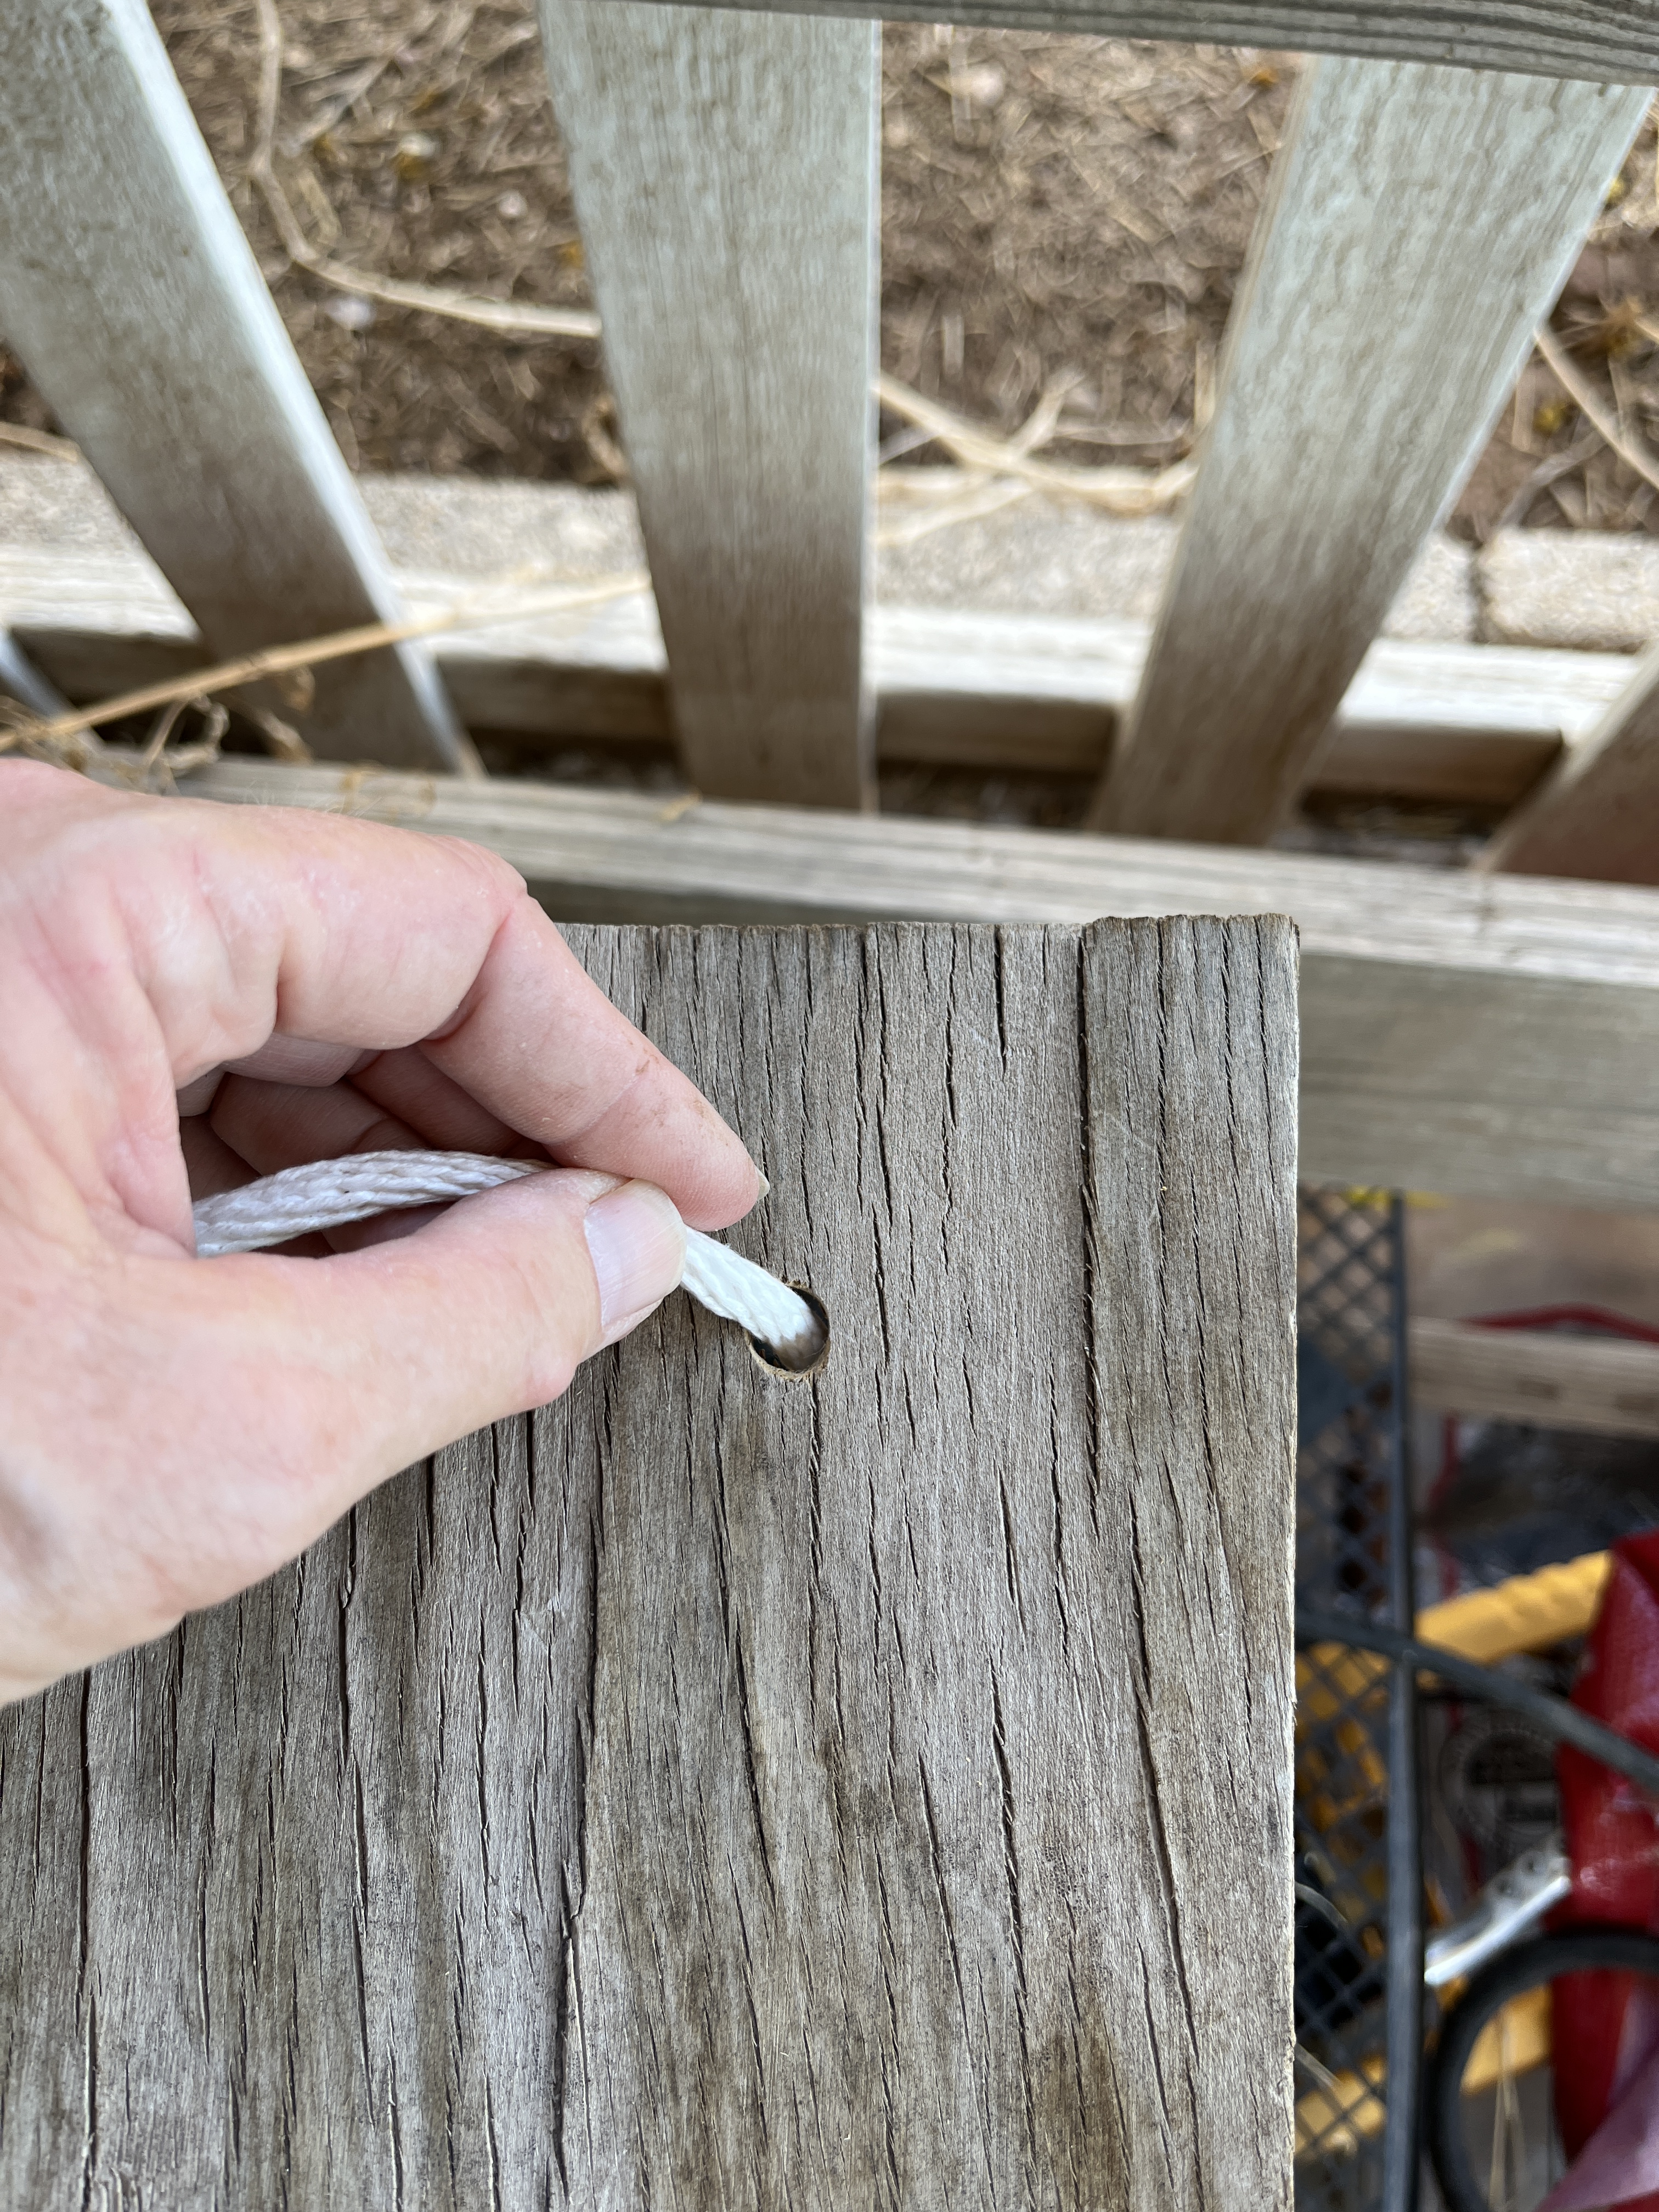
Time to hang the table! Put the end of the clothesline through a hole,
Tie an overhand knot
and pull it tight to keep it from coming back out of the hole.
Now decide where the table needs to be to so I can cut the line and tie another overhand knot.
Push the end of the line through another hole (the back hole was easier for me), tie an overhand knot and pull it tight before figuring out how long the next bit of line needs to be. Since the branch curves it won’t be the same length as the first line. Yes, that is a shower handle on the knob of the tree. It fit so it sits. Turn it to adjust whatever needs adjusting.
Ta daaah! Done and ready for tea. Of course I need to do a lot more work, like rake the ground, put down sand or pea gravel, make a Torii Gate and some lanterns, plaques and maybe figurines to artfully scatter around. Maybe I’ll have time for that after I put in the vegetable garden on the other side of the fence in a couple weeks. Of course, this whole project will take time and I’ll probably keep adding and subtracting and tweaking things for as long as I’m here (side note, this house is being left to my Great Grandkids who aren’t born yet).
I started this Noren thing earlier this summer and spent a month making it while blogging about it. One new sewing machine, a trip to the art supply store, a rainstorm and couple meltdowns later I got to…what I thought was the end of the project. Nope. I had run out of space on my free WordPress site. Nothing for it but to wait for the next payday and upgrade so here I am with a Premium Plan (best for freelancers) and a post to finish my Noren story. I may also end up with a Patreon site to help pay for this (and maybe other crafting/cooking adventures) and I hope to be more active in providing you all with my adventures in food, crafts and whatnot. This means I’ll have to blog more regularly so I’ll need y’all to be a bad influence on me to do just that.
Now for the end of the Noren post.
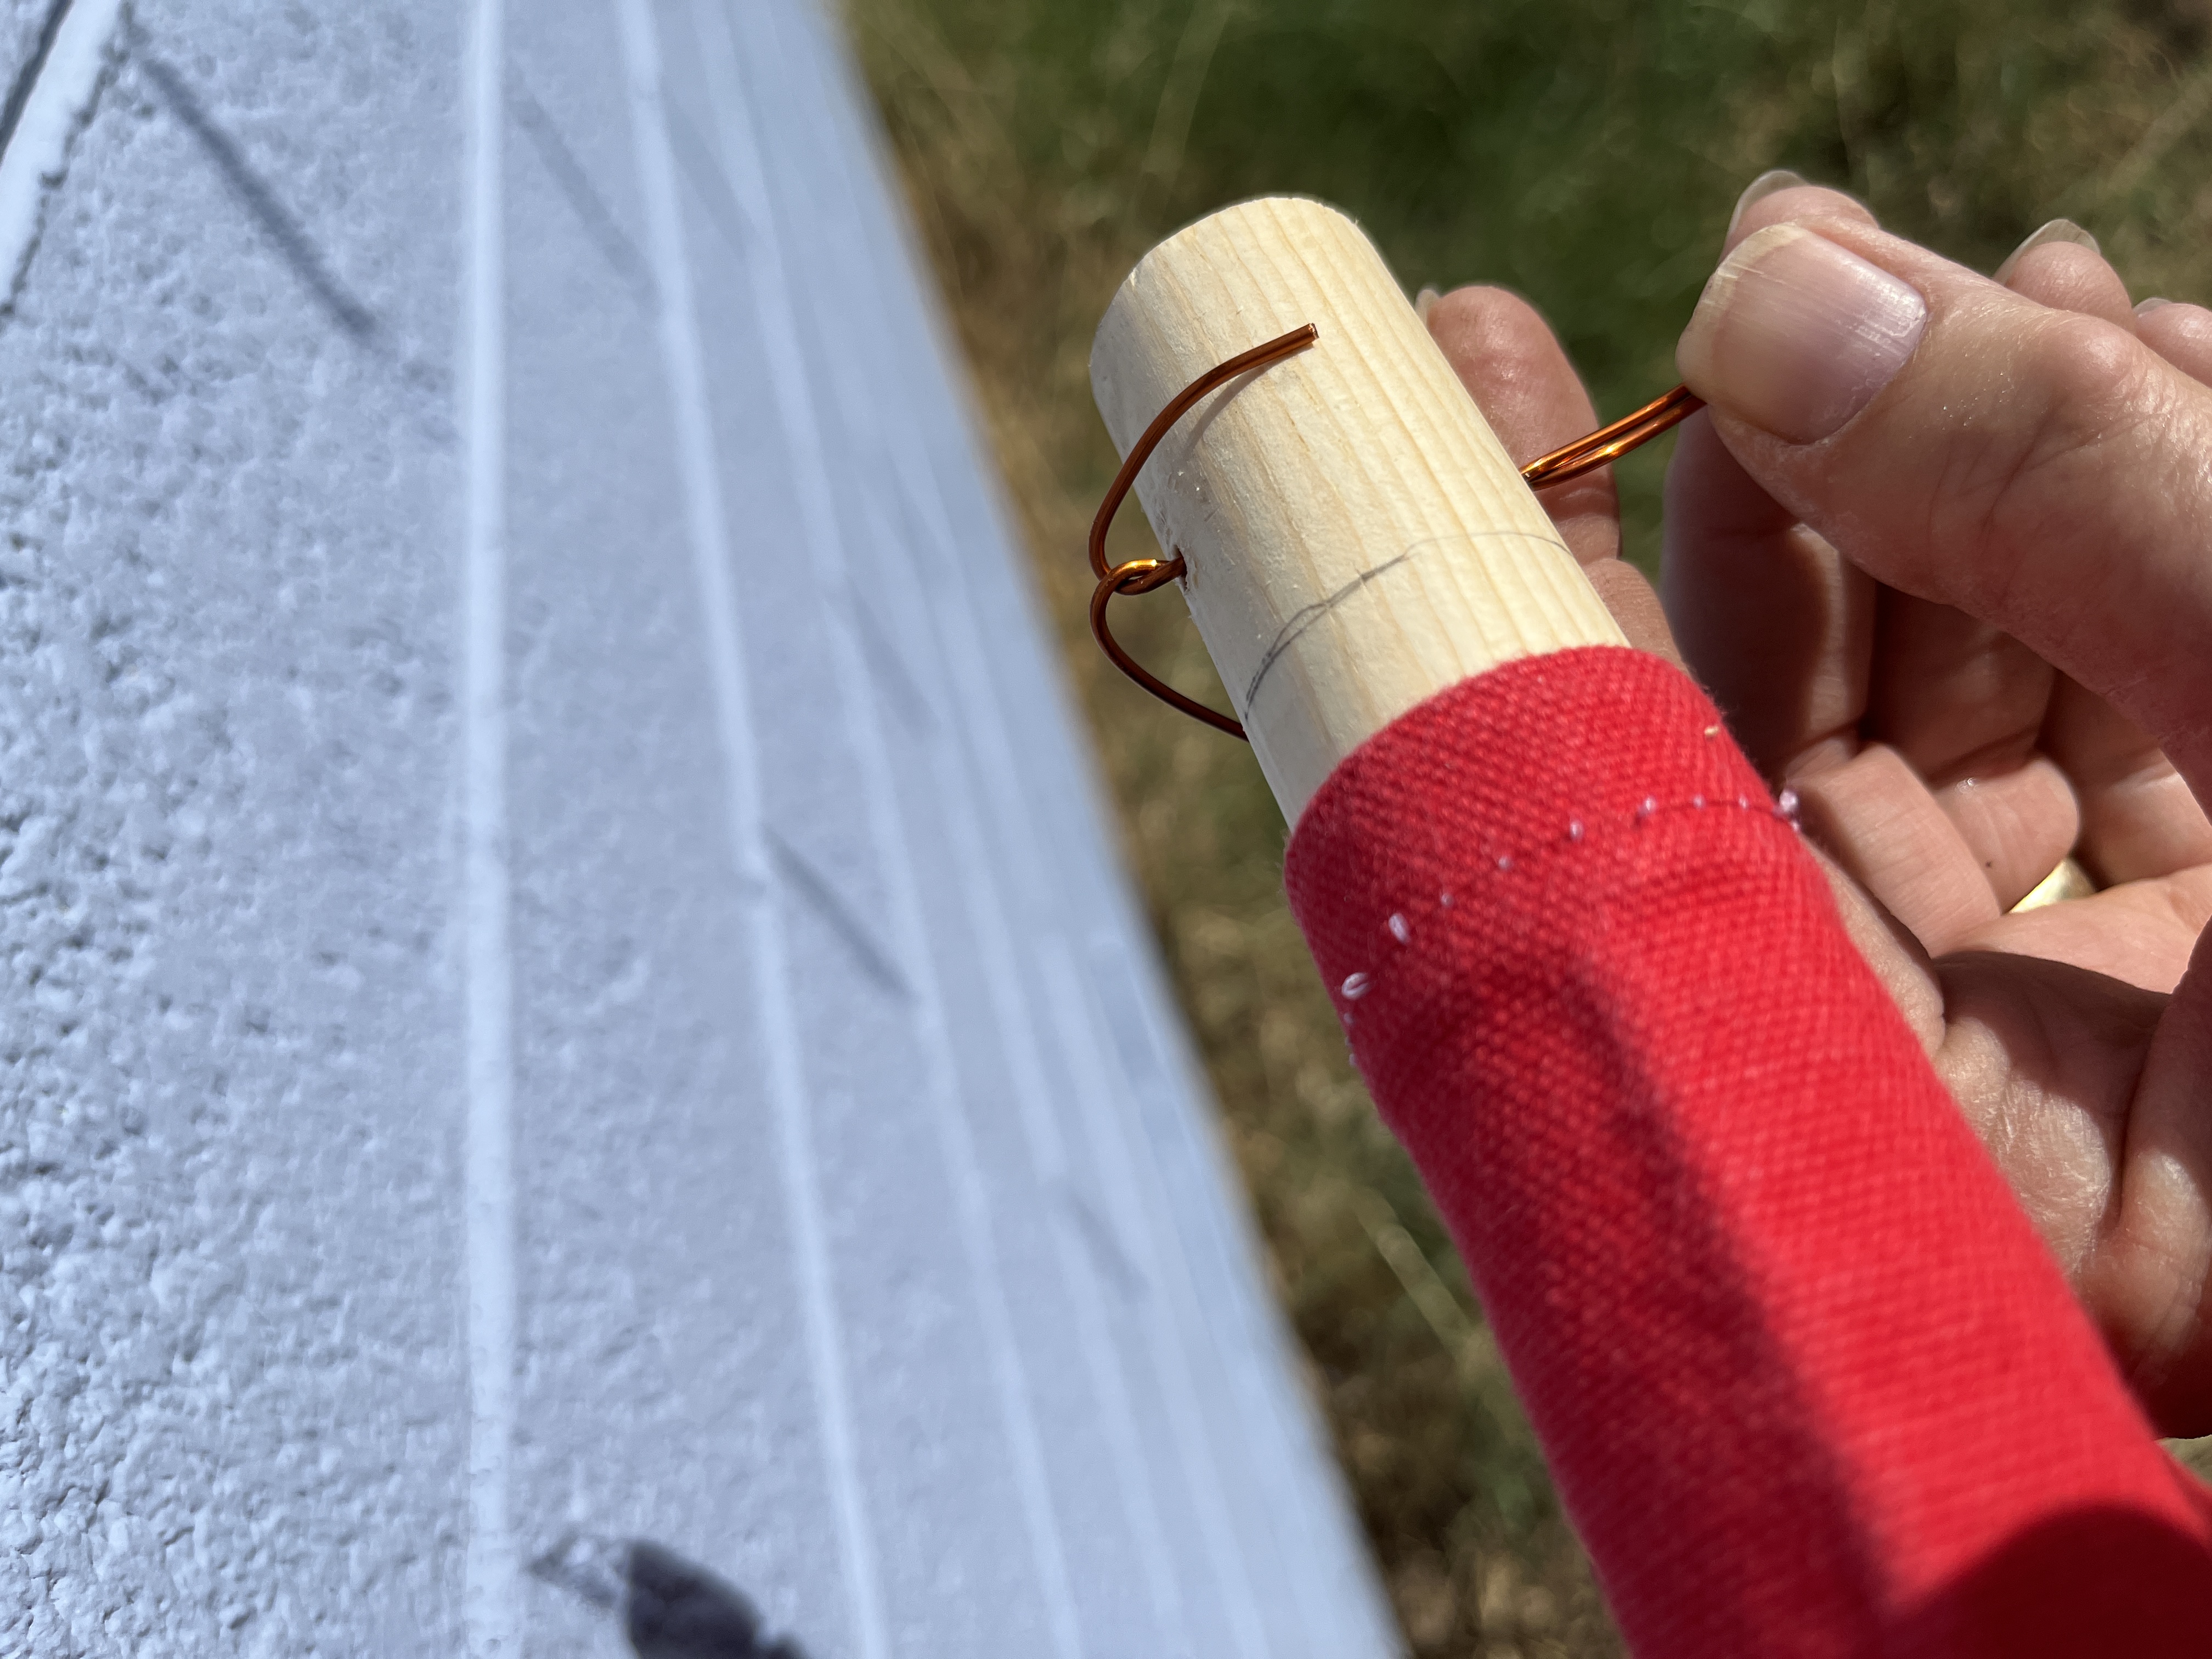
All sewn, dyed and ironed so now that I’ve put the rod in I have to drill the ends, I put the whole thing in the vice,
I twirled the bit in my fingers on the rod to make a seat so the bit wouldn’t dance off as I started to drill.
Then I drilled the holes, making sure they’re parallel.
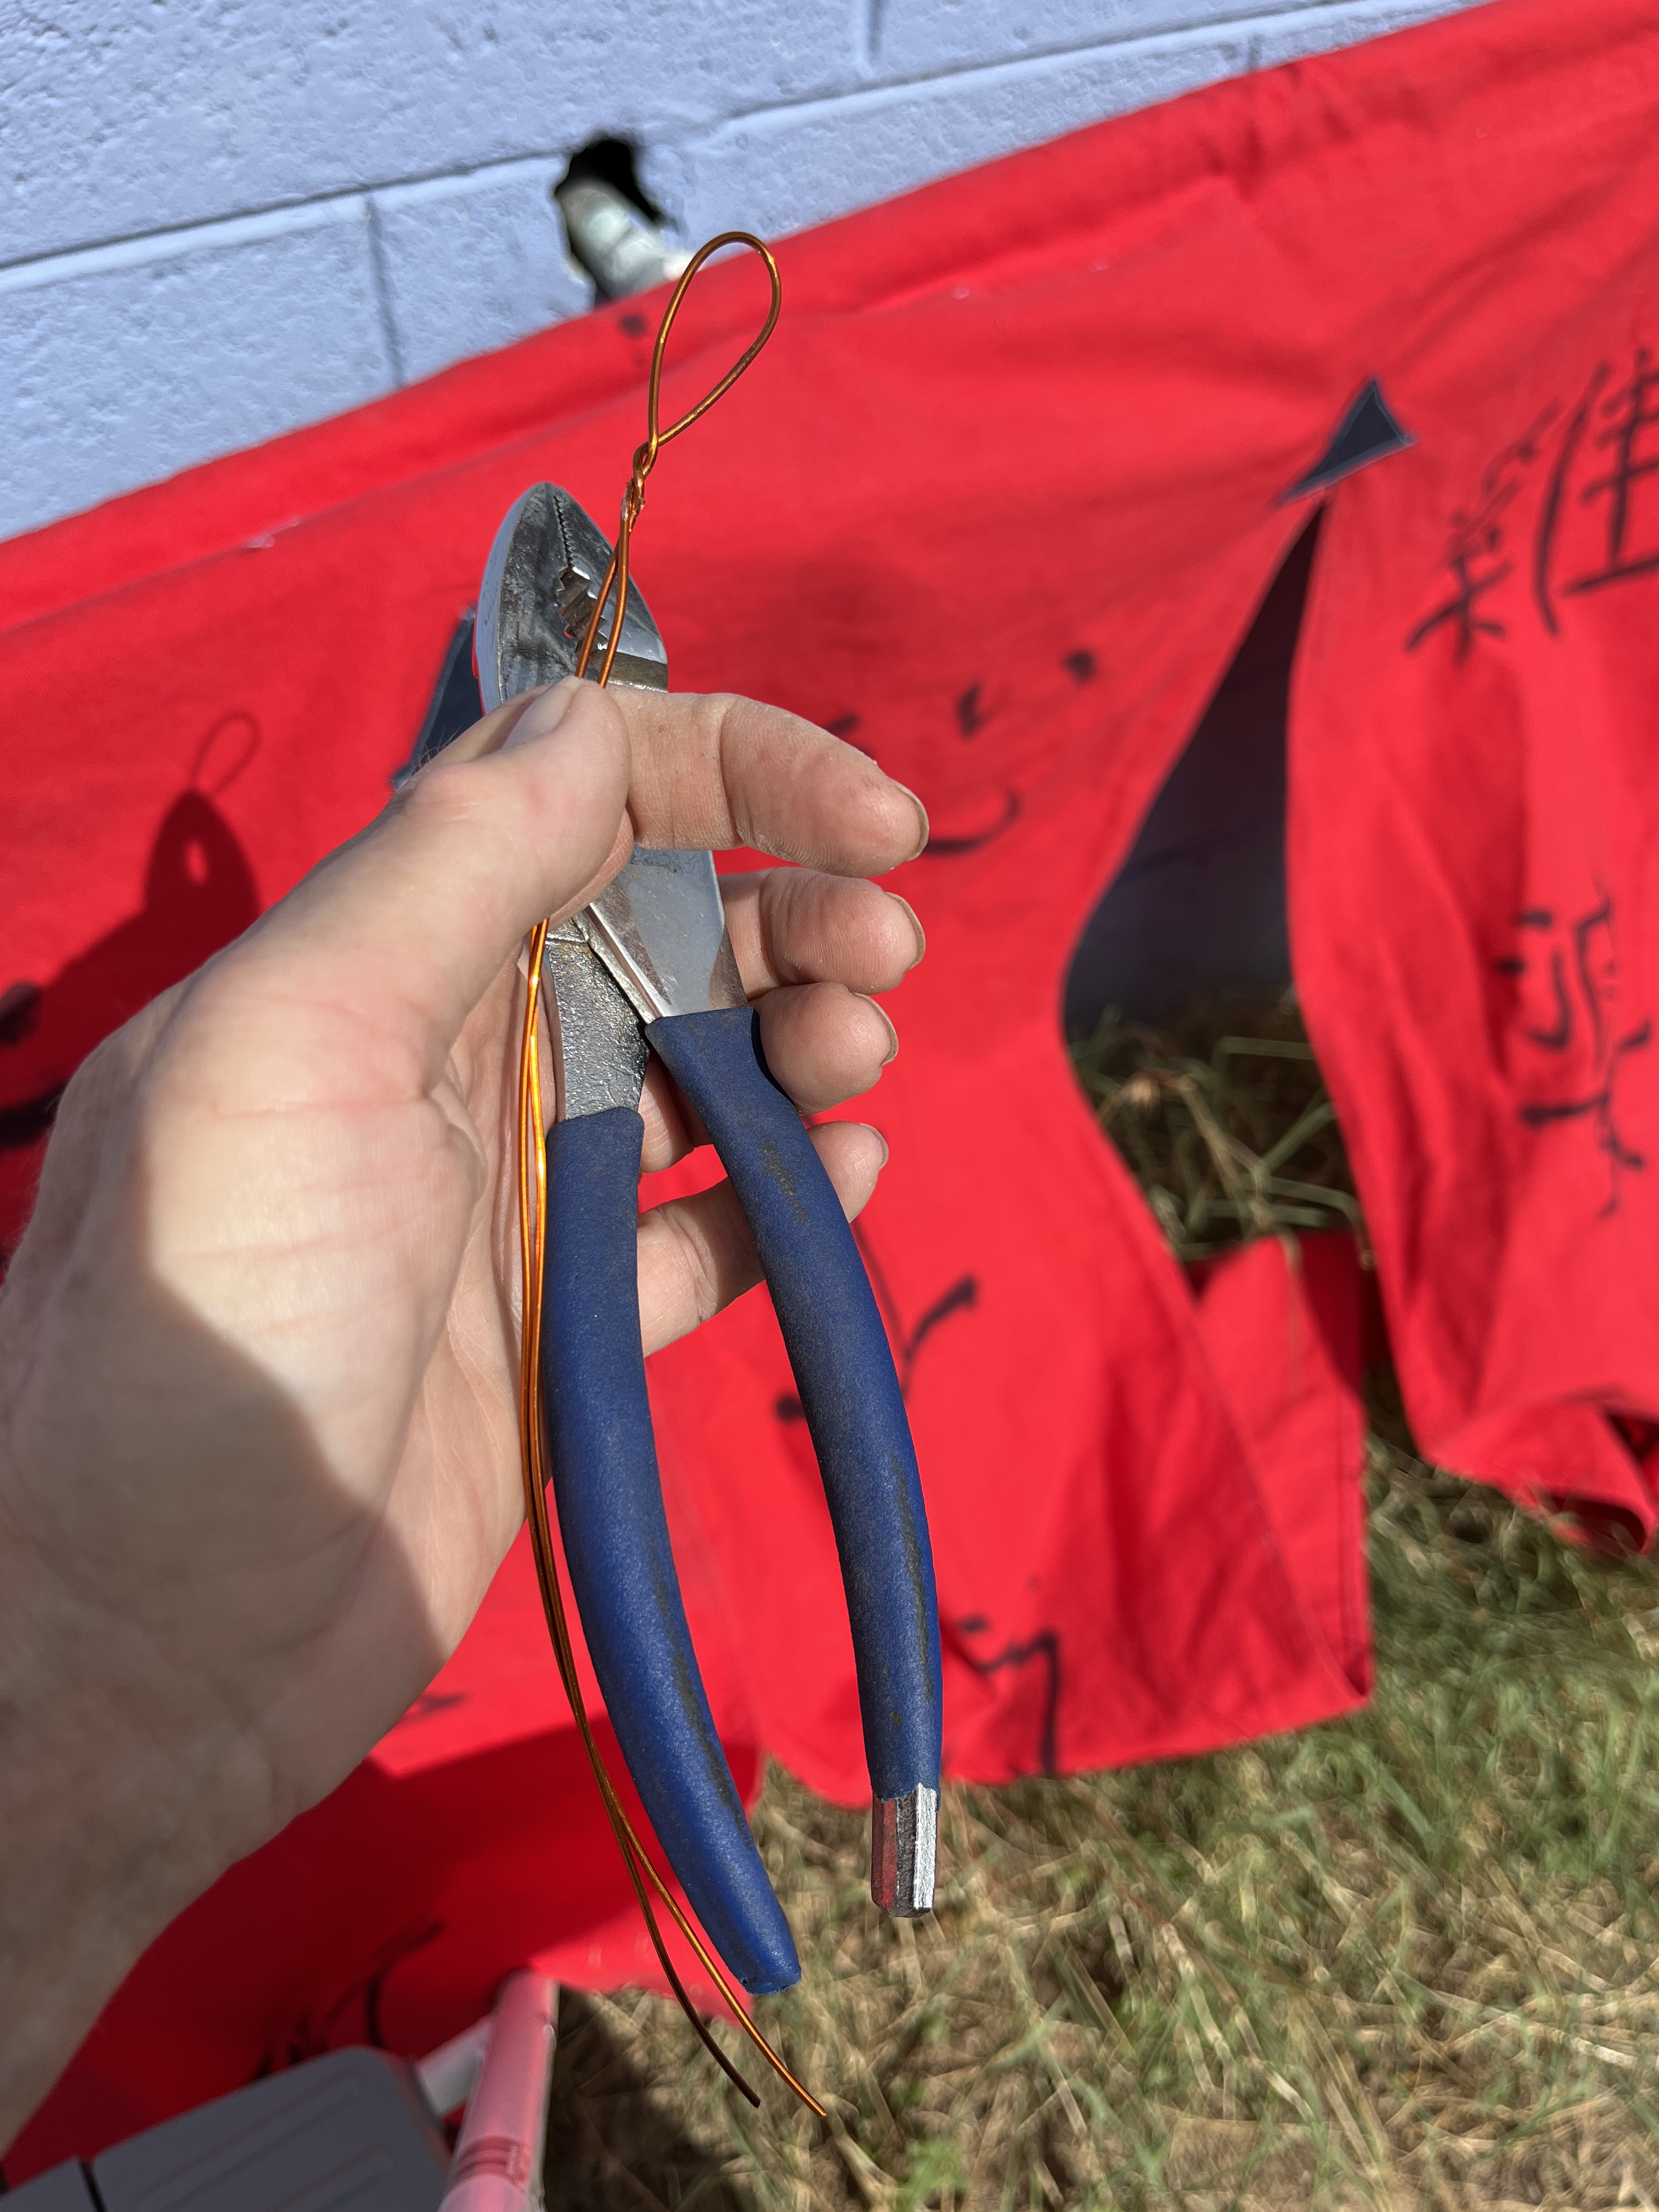
Once drilled I took it out of the vice and put some copper wire (I’m using it because I just happen to have copper wire) through the holes,
twist and hang.
It works well in everyday conditions and most winds but Arizona monsoons are not your average storms. It did, however, react differently than the other shades I’ve tried. The sheet I hung ended up on the roof right away. The blind I hung was heavier and let wind blow through a bit, but it also ended up on the roof. The tarp I hung and staked to the ground shredded. I figured that the nature of the Noren would allow it to move differently in a wind, preventing shredding and make it less likely to end up on the roof. It didn’t shred or end up on the roof, it saved itself and allowed one side to be lifted off the nail and hung safely from the other nail. Good thinking, Noren! I saw it when I got home from work, took it down, rolled it up and brought it in until I needed it again. Fortunately this has been a mild summer, mostly under 110 degrees Fahrenheit. Now to make another one to shade more of that wall.
Since making this I have considered entering it in the State Fair. I just have to figure out if there’s a category it fits into. If this works out I’ll let y’all know with an edit on the end here.
State Fair Edit: I took 2nd place in Fabric Painting! So chuffed! This was a fun experience and I have a useful thing when I bring it home.
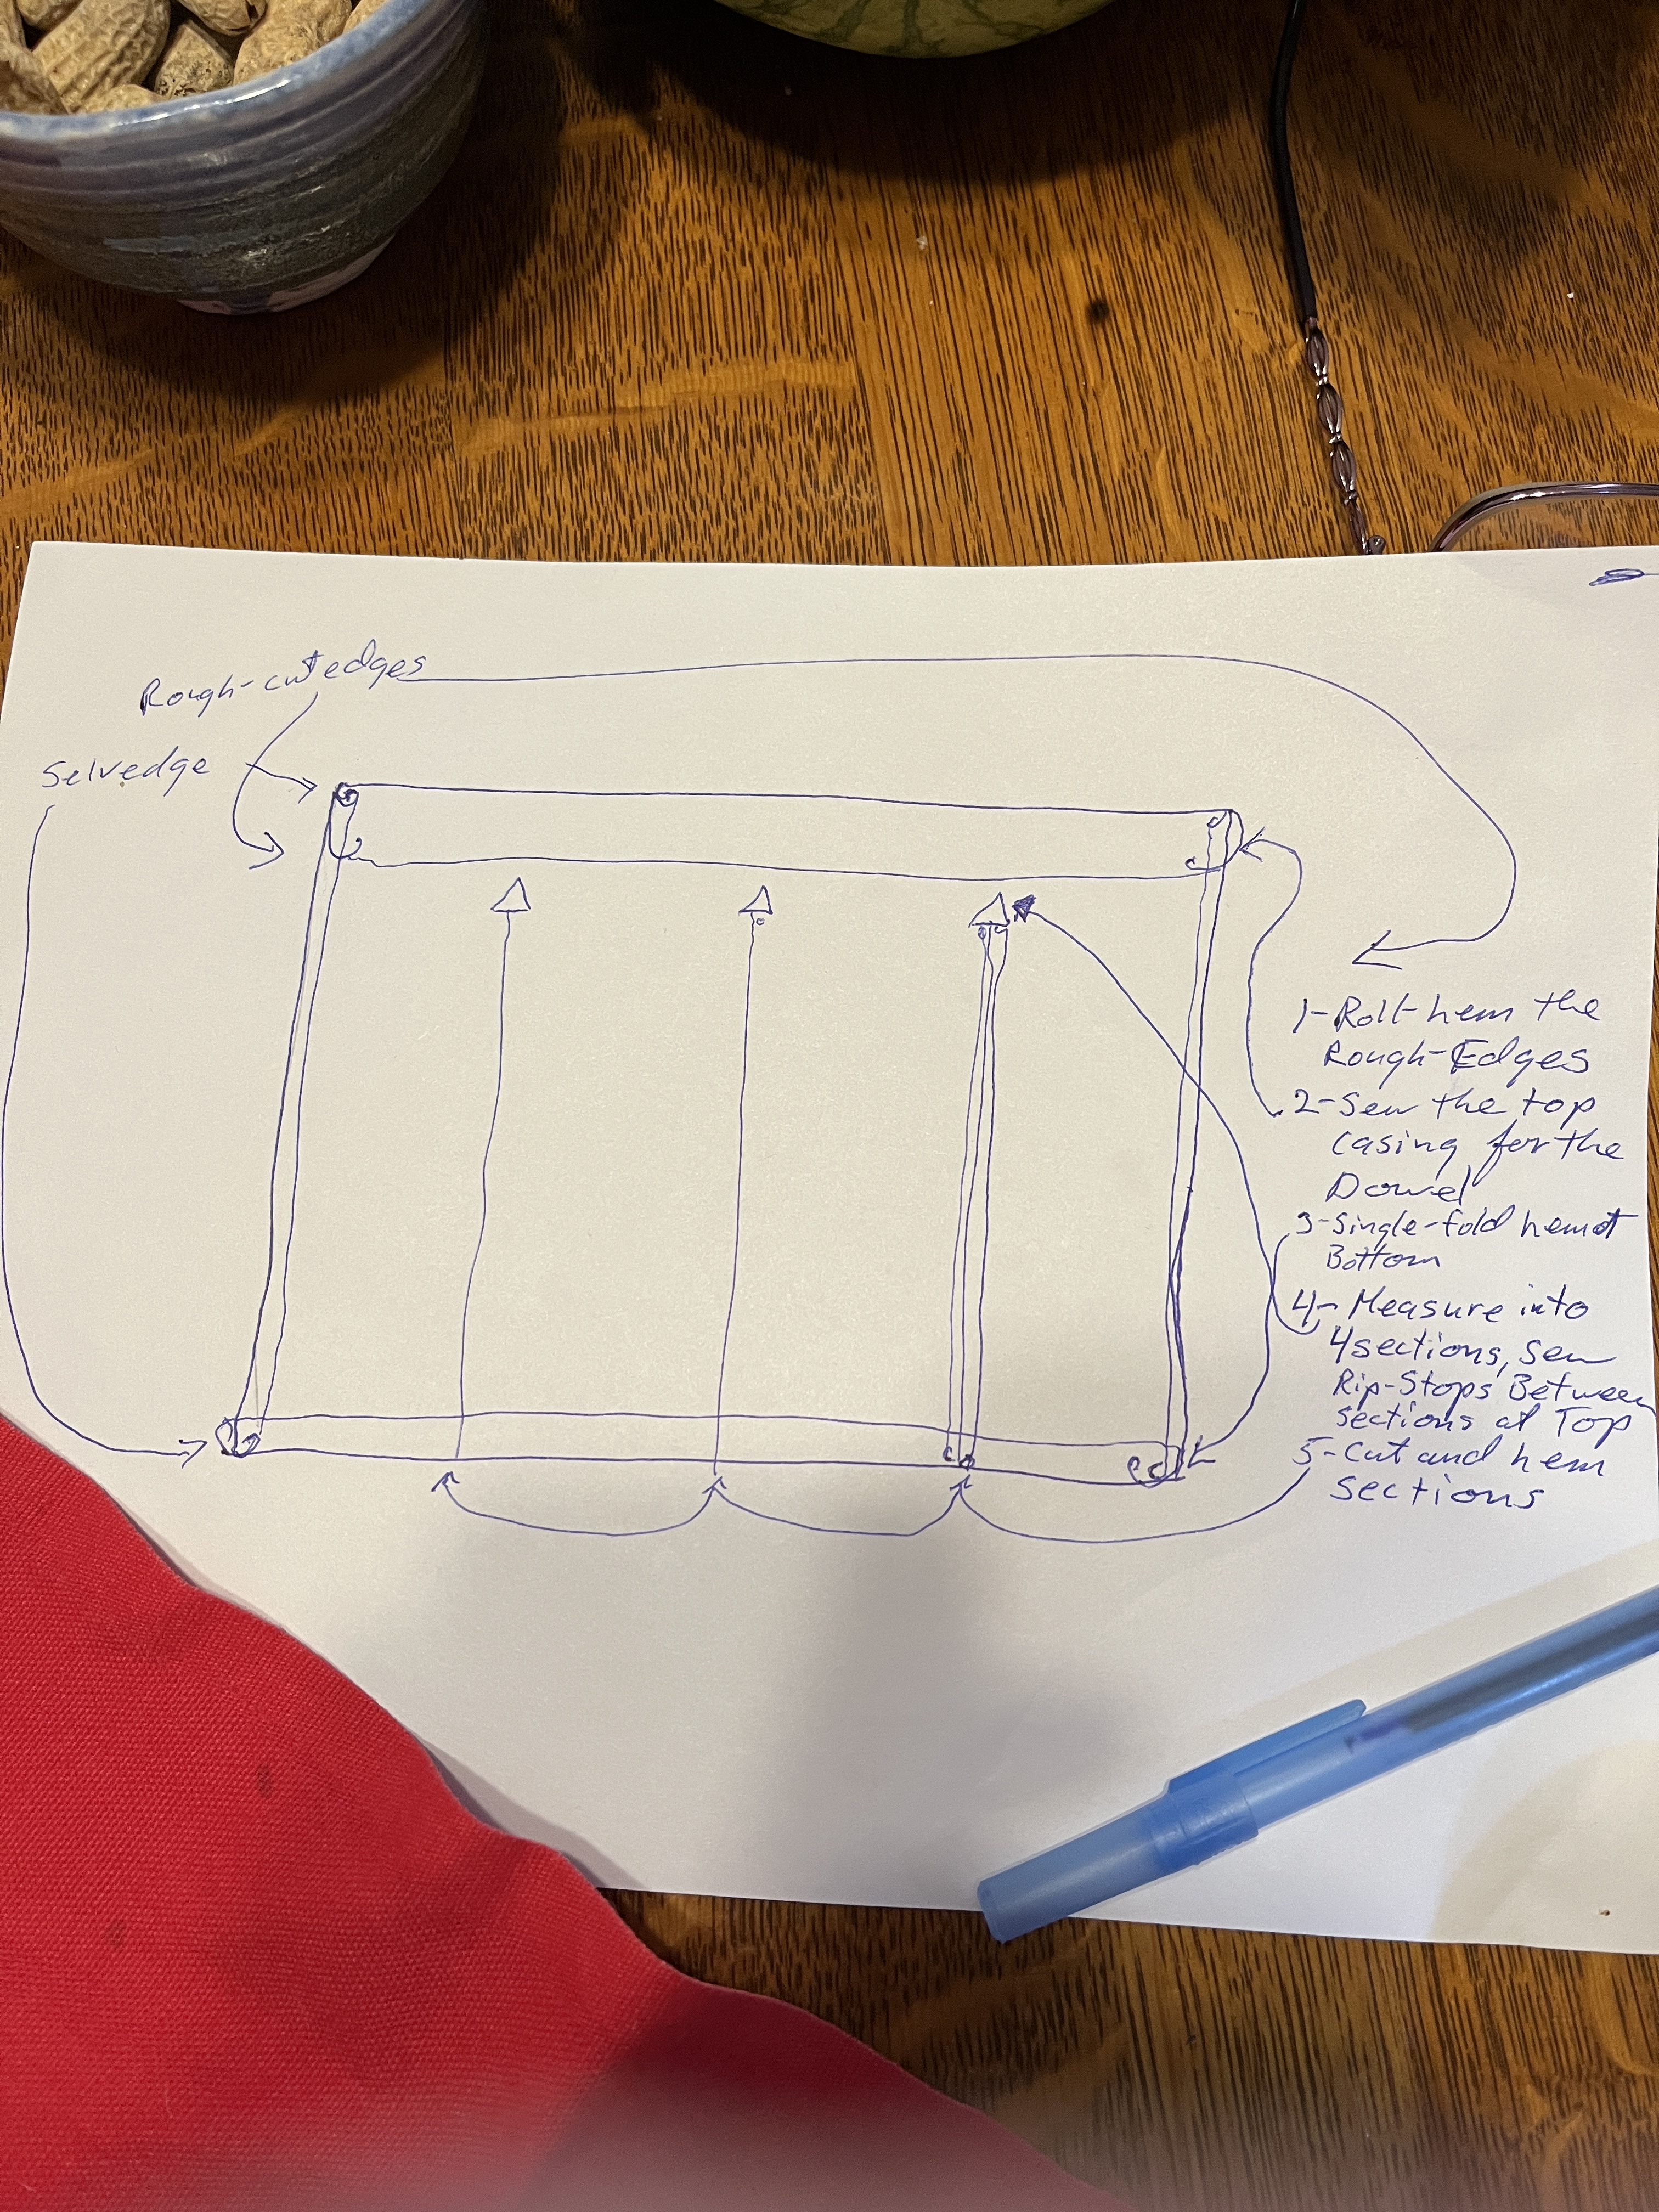
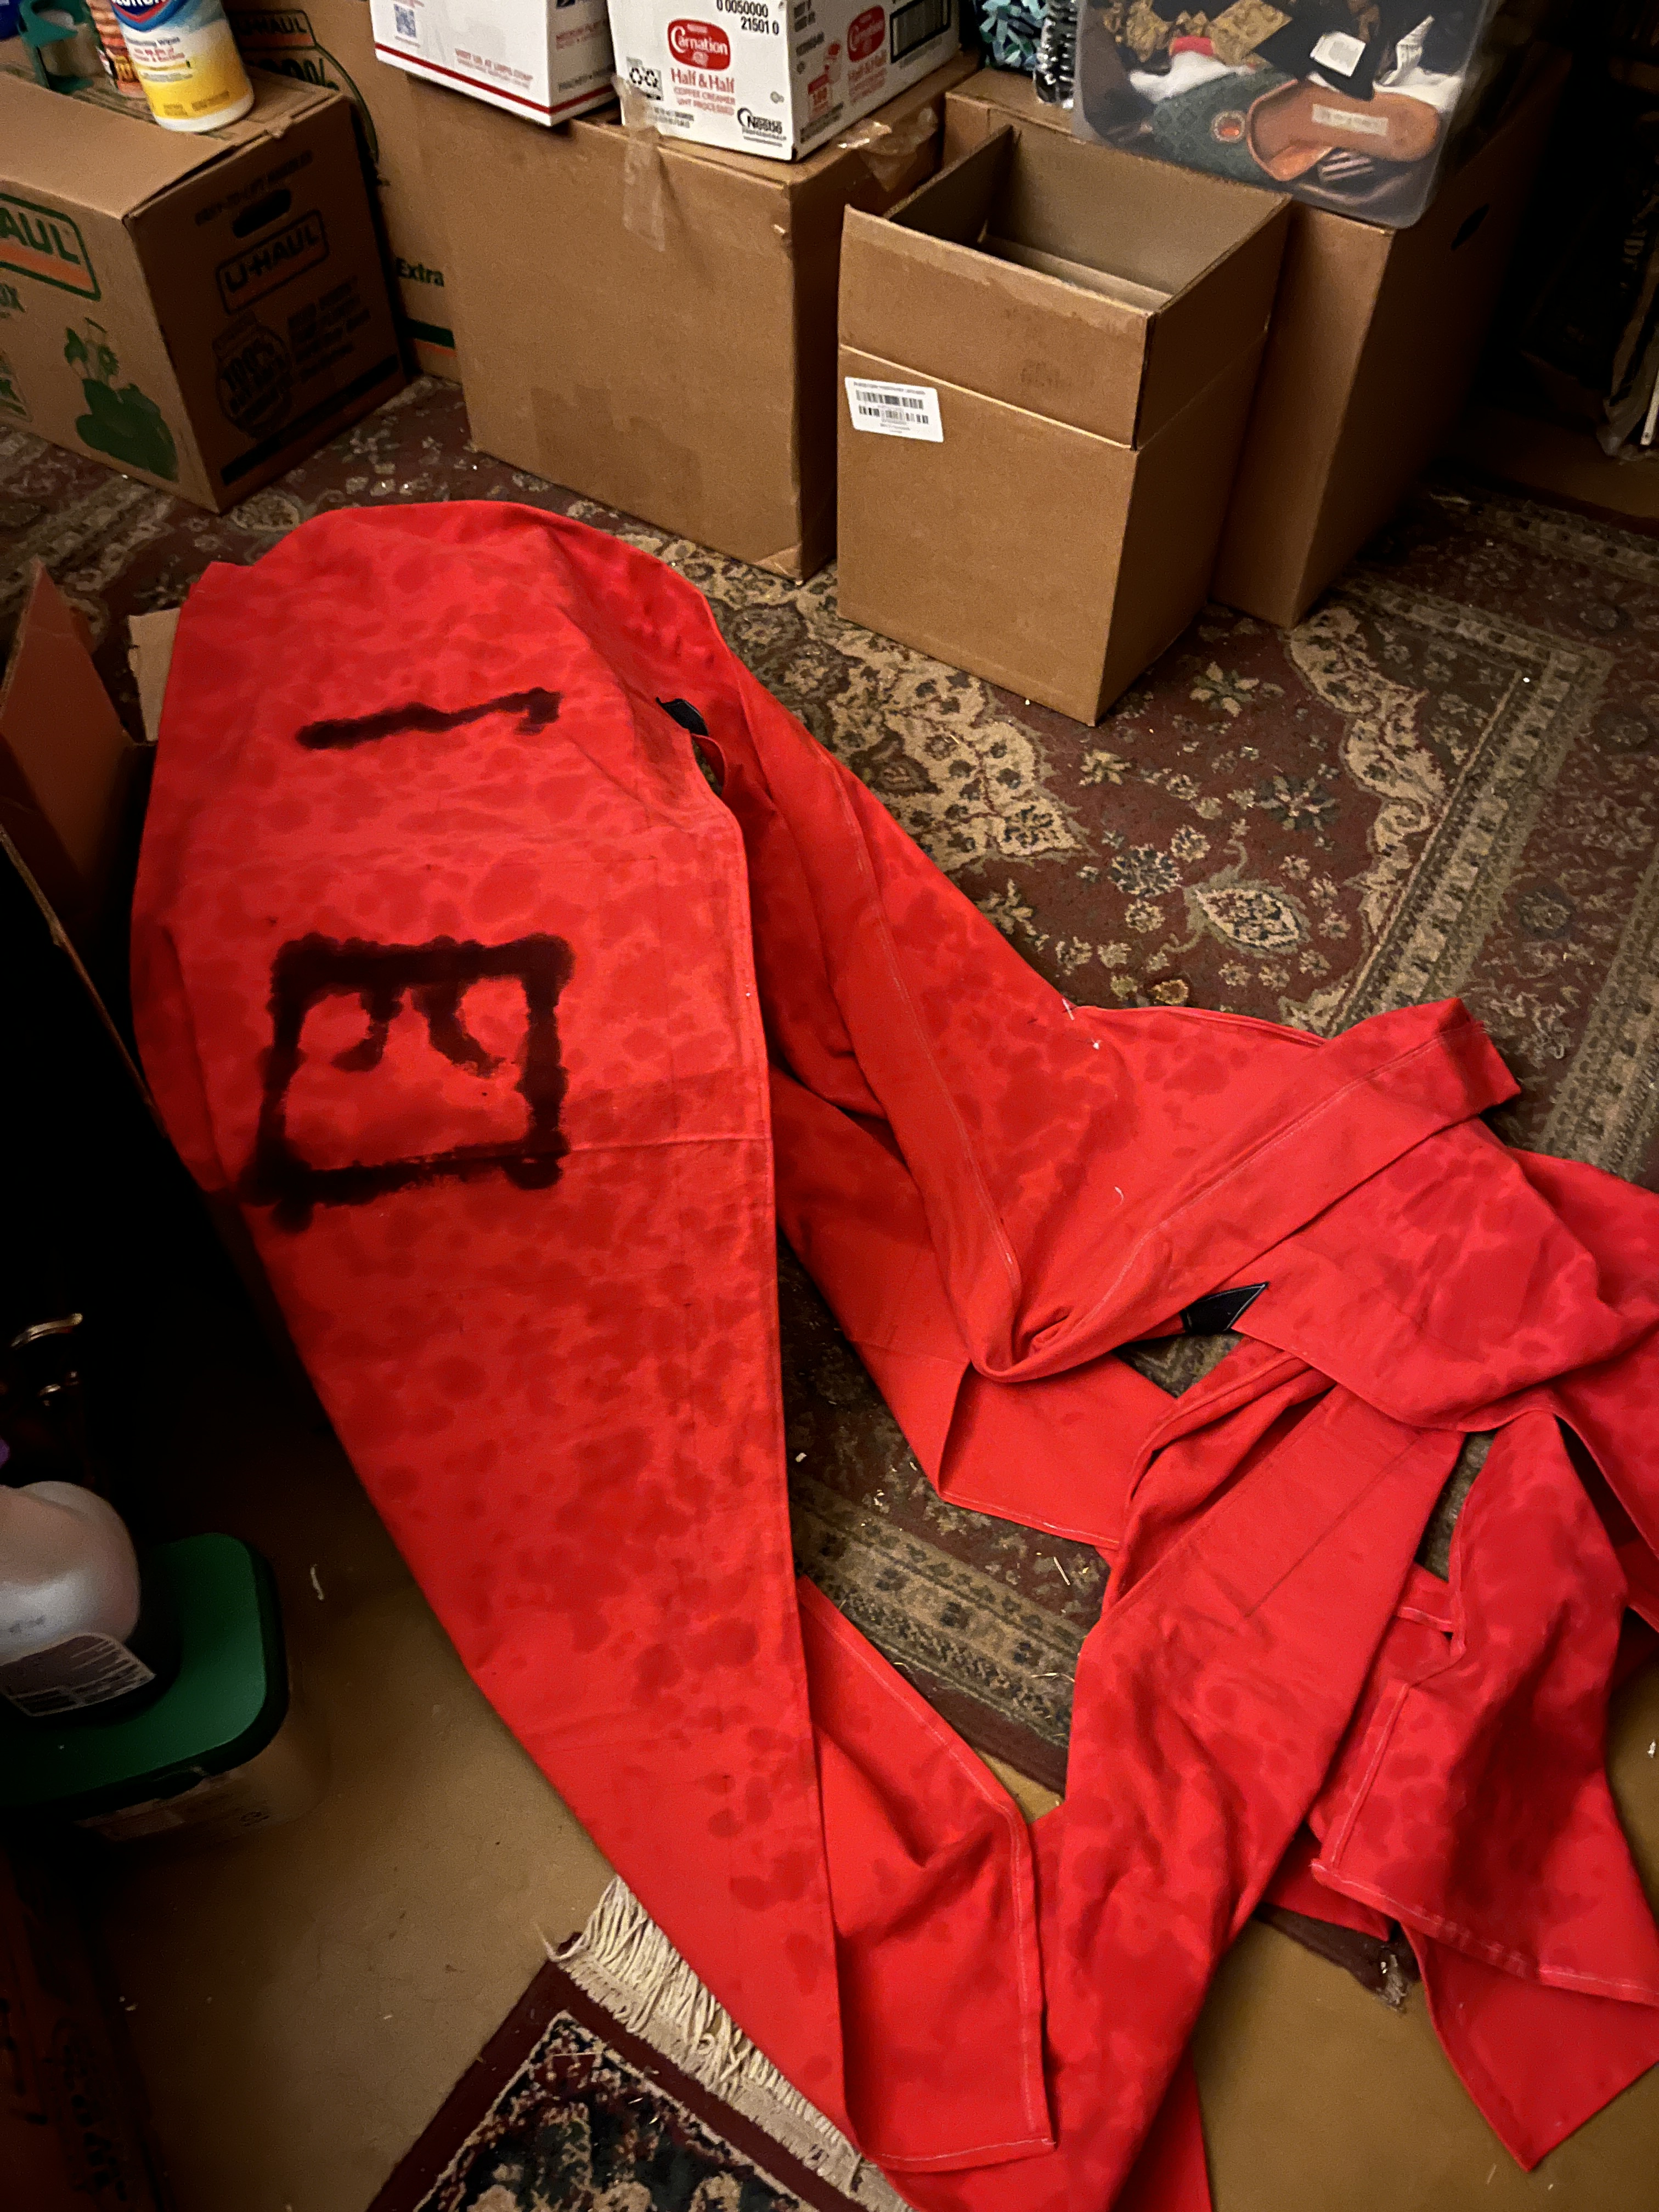
Japanese shop curtains. I’m making some to shade the west wall on my house, hoping to keep things cooler. OK, they’re my version of Noren-style curtains, since I’ve never been to Japan and have only seen them in pictures. I’ve tried a solid piece of cloth staked from the eves to the ground. It tears. I’ve tried a screen and a blanket. They blow up onto the roof. I’m hoping the nature of the curtain anf the cloth it’s made from will prevent these problems, at least most of the time.
So, I found about 2 yards of 60″ wide canvas in my cloth stash. It’s a nice red so I can paint stuff on it. I also found some dark blue canvas scraps to use as reinforcing at the tops of the segment separations.
To start with I used a square to even it up.
I cut a bit off each end.
I folded it in 1/2 then in 1/2 again to find out how wide the segments will be. Then I could plan the decoration.
~~~~~~~~~~~~~~~~
I took the opportunity of a trip with a friend where I’d have to be waiting for a bit to plan things out, so here’s the plan:
Fold-hem edges so the edge inside the casing would be finished.
Sew the casing for the dowel to run through.
Sew a simple hem in the bottom, too.
Measure the segments, cut and hem the edges of the segments.
Sew on contrasting rip-stops at the top of each future cut, over the top ends of the cuts to strengthen them.
~~~~~~~~~~~~~~~~~
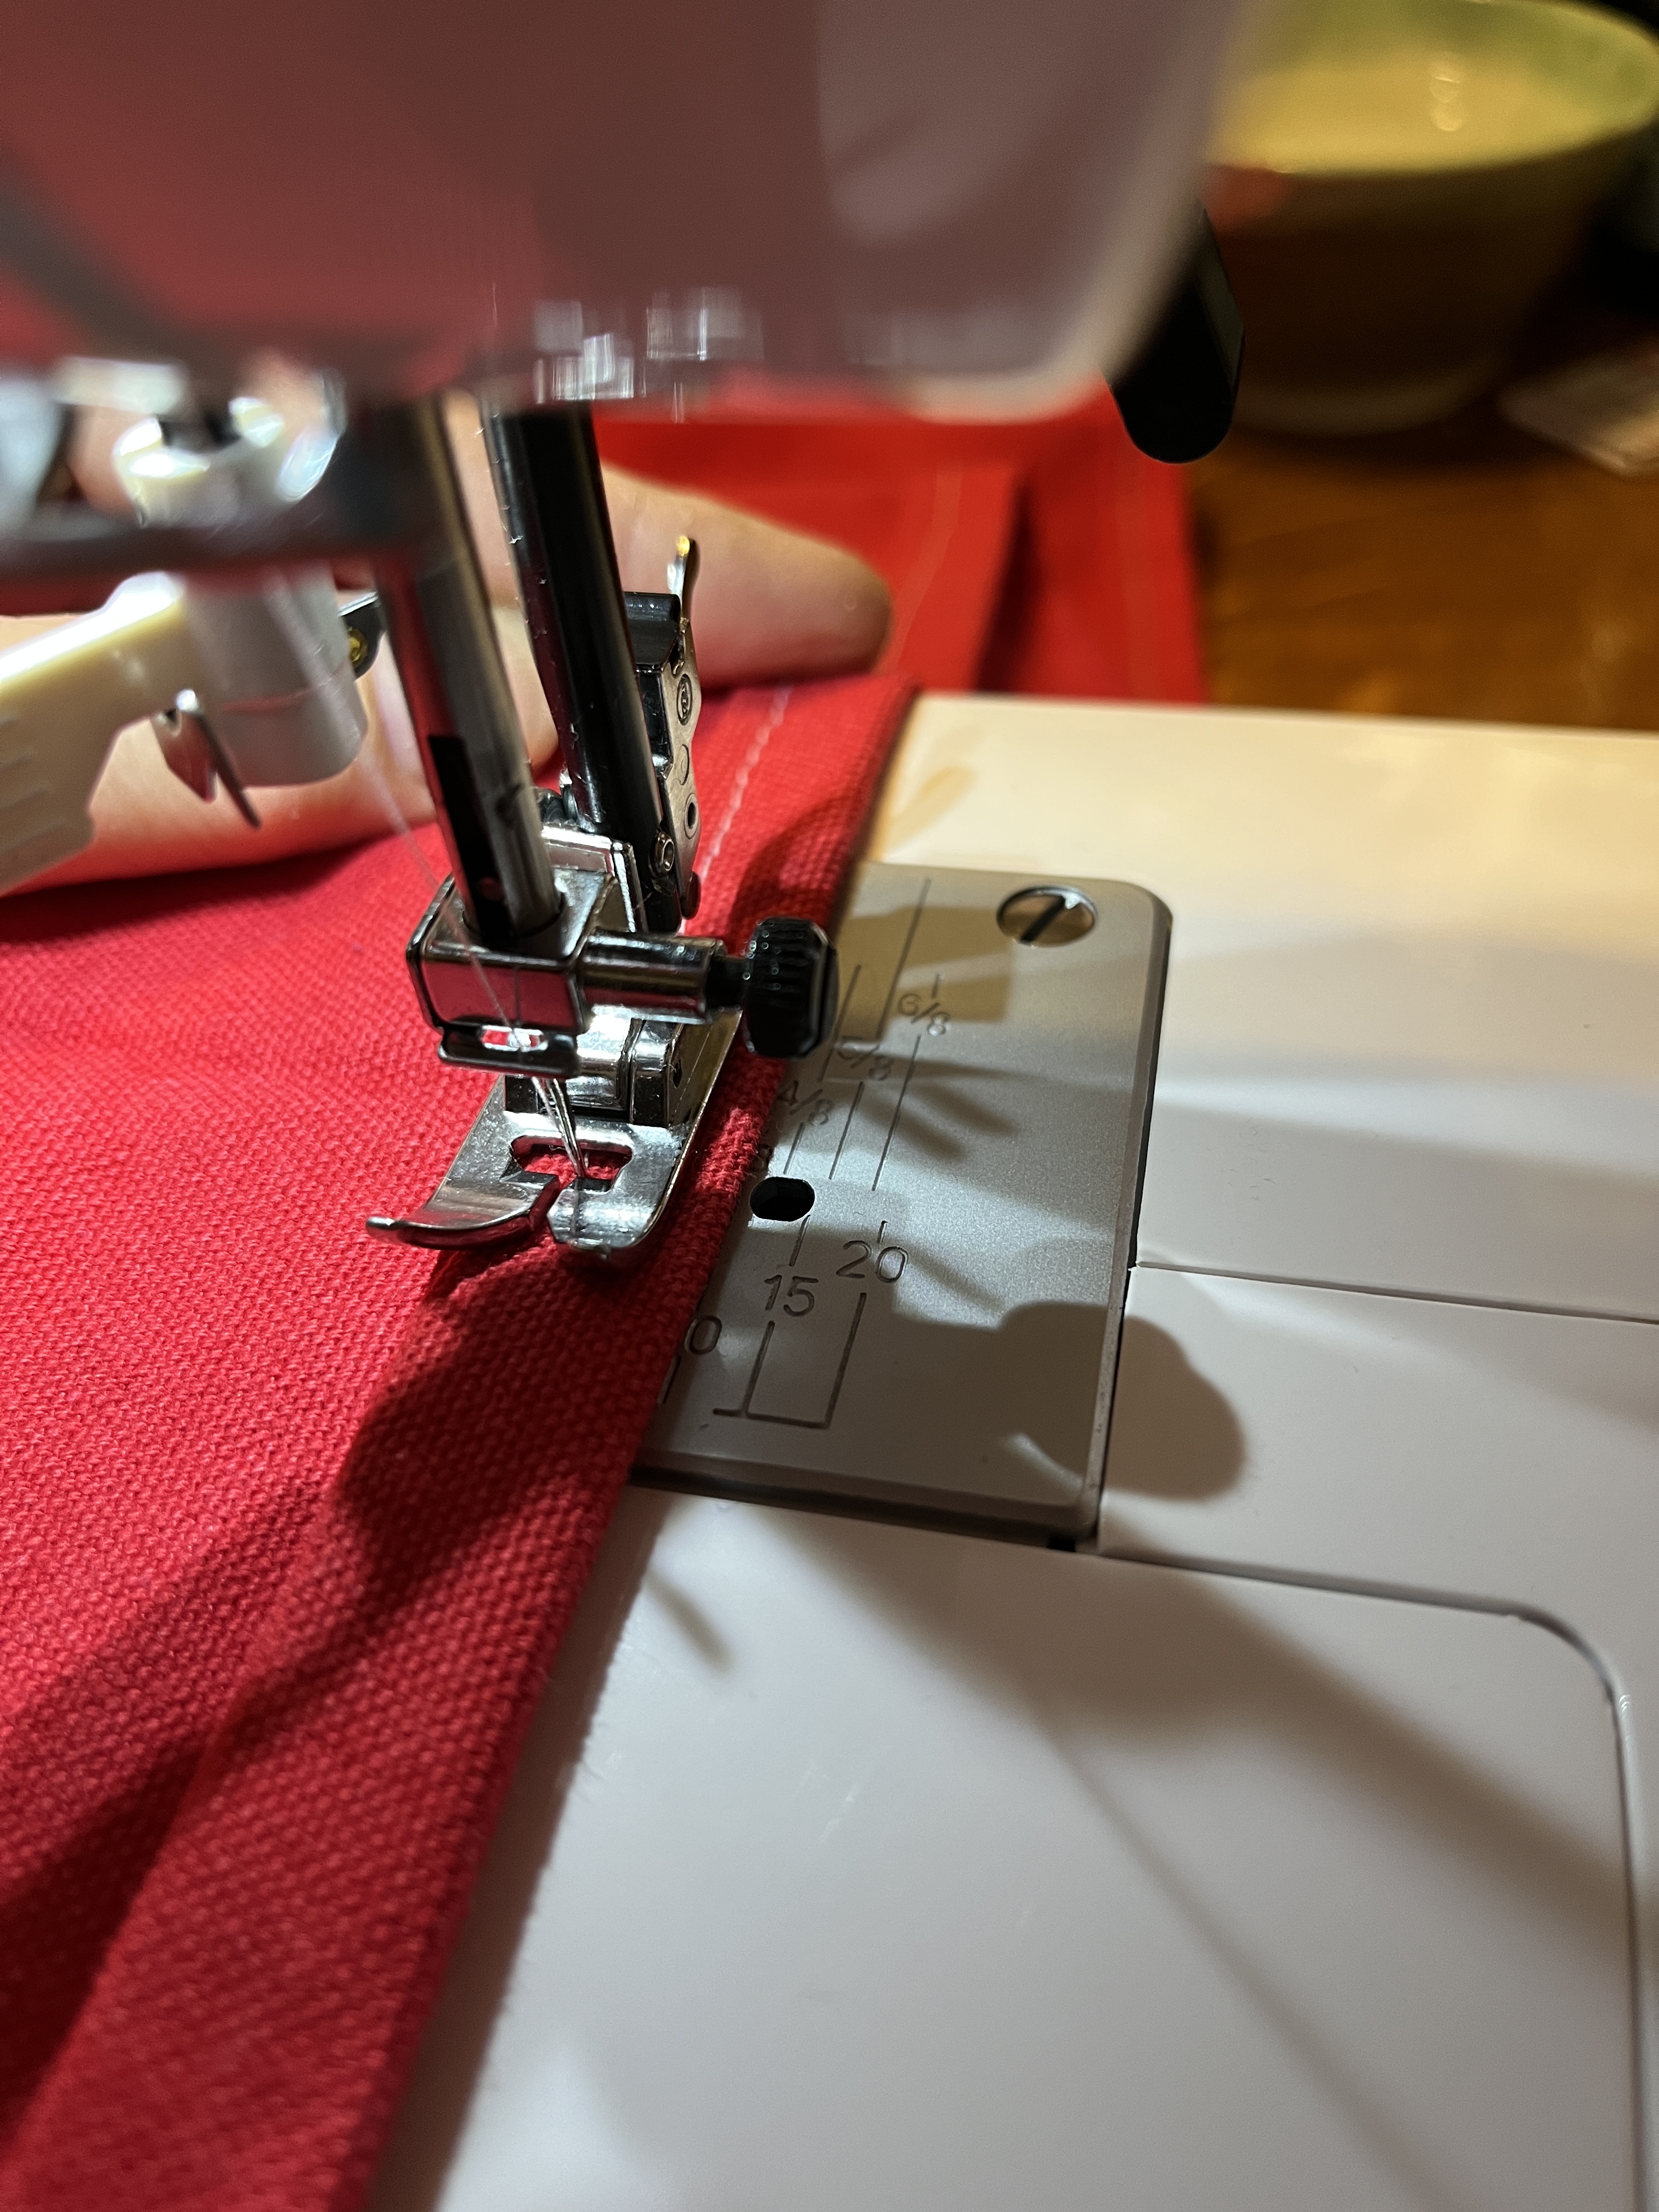
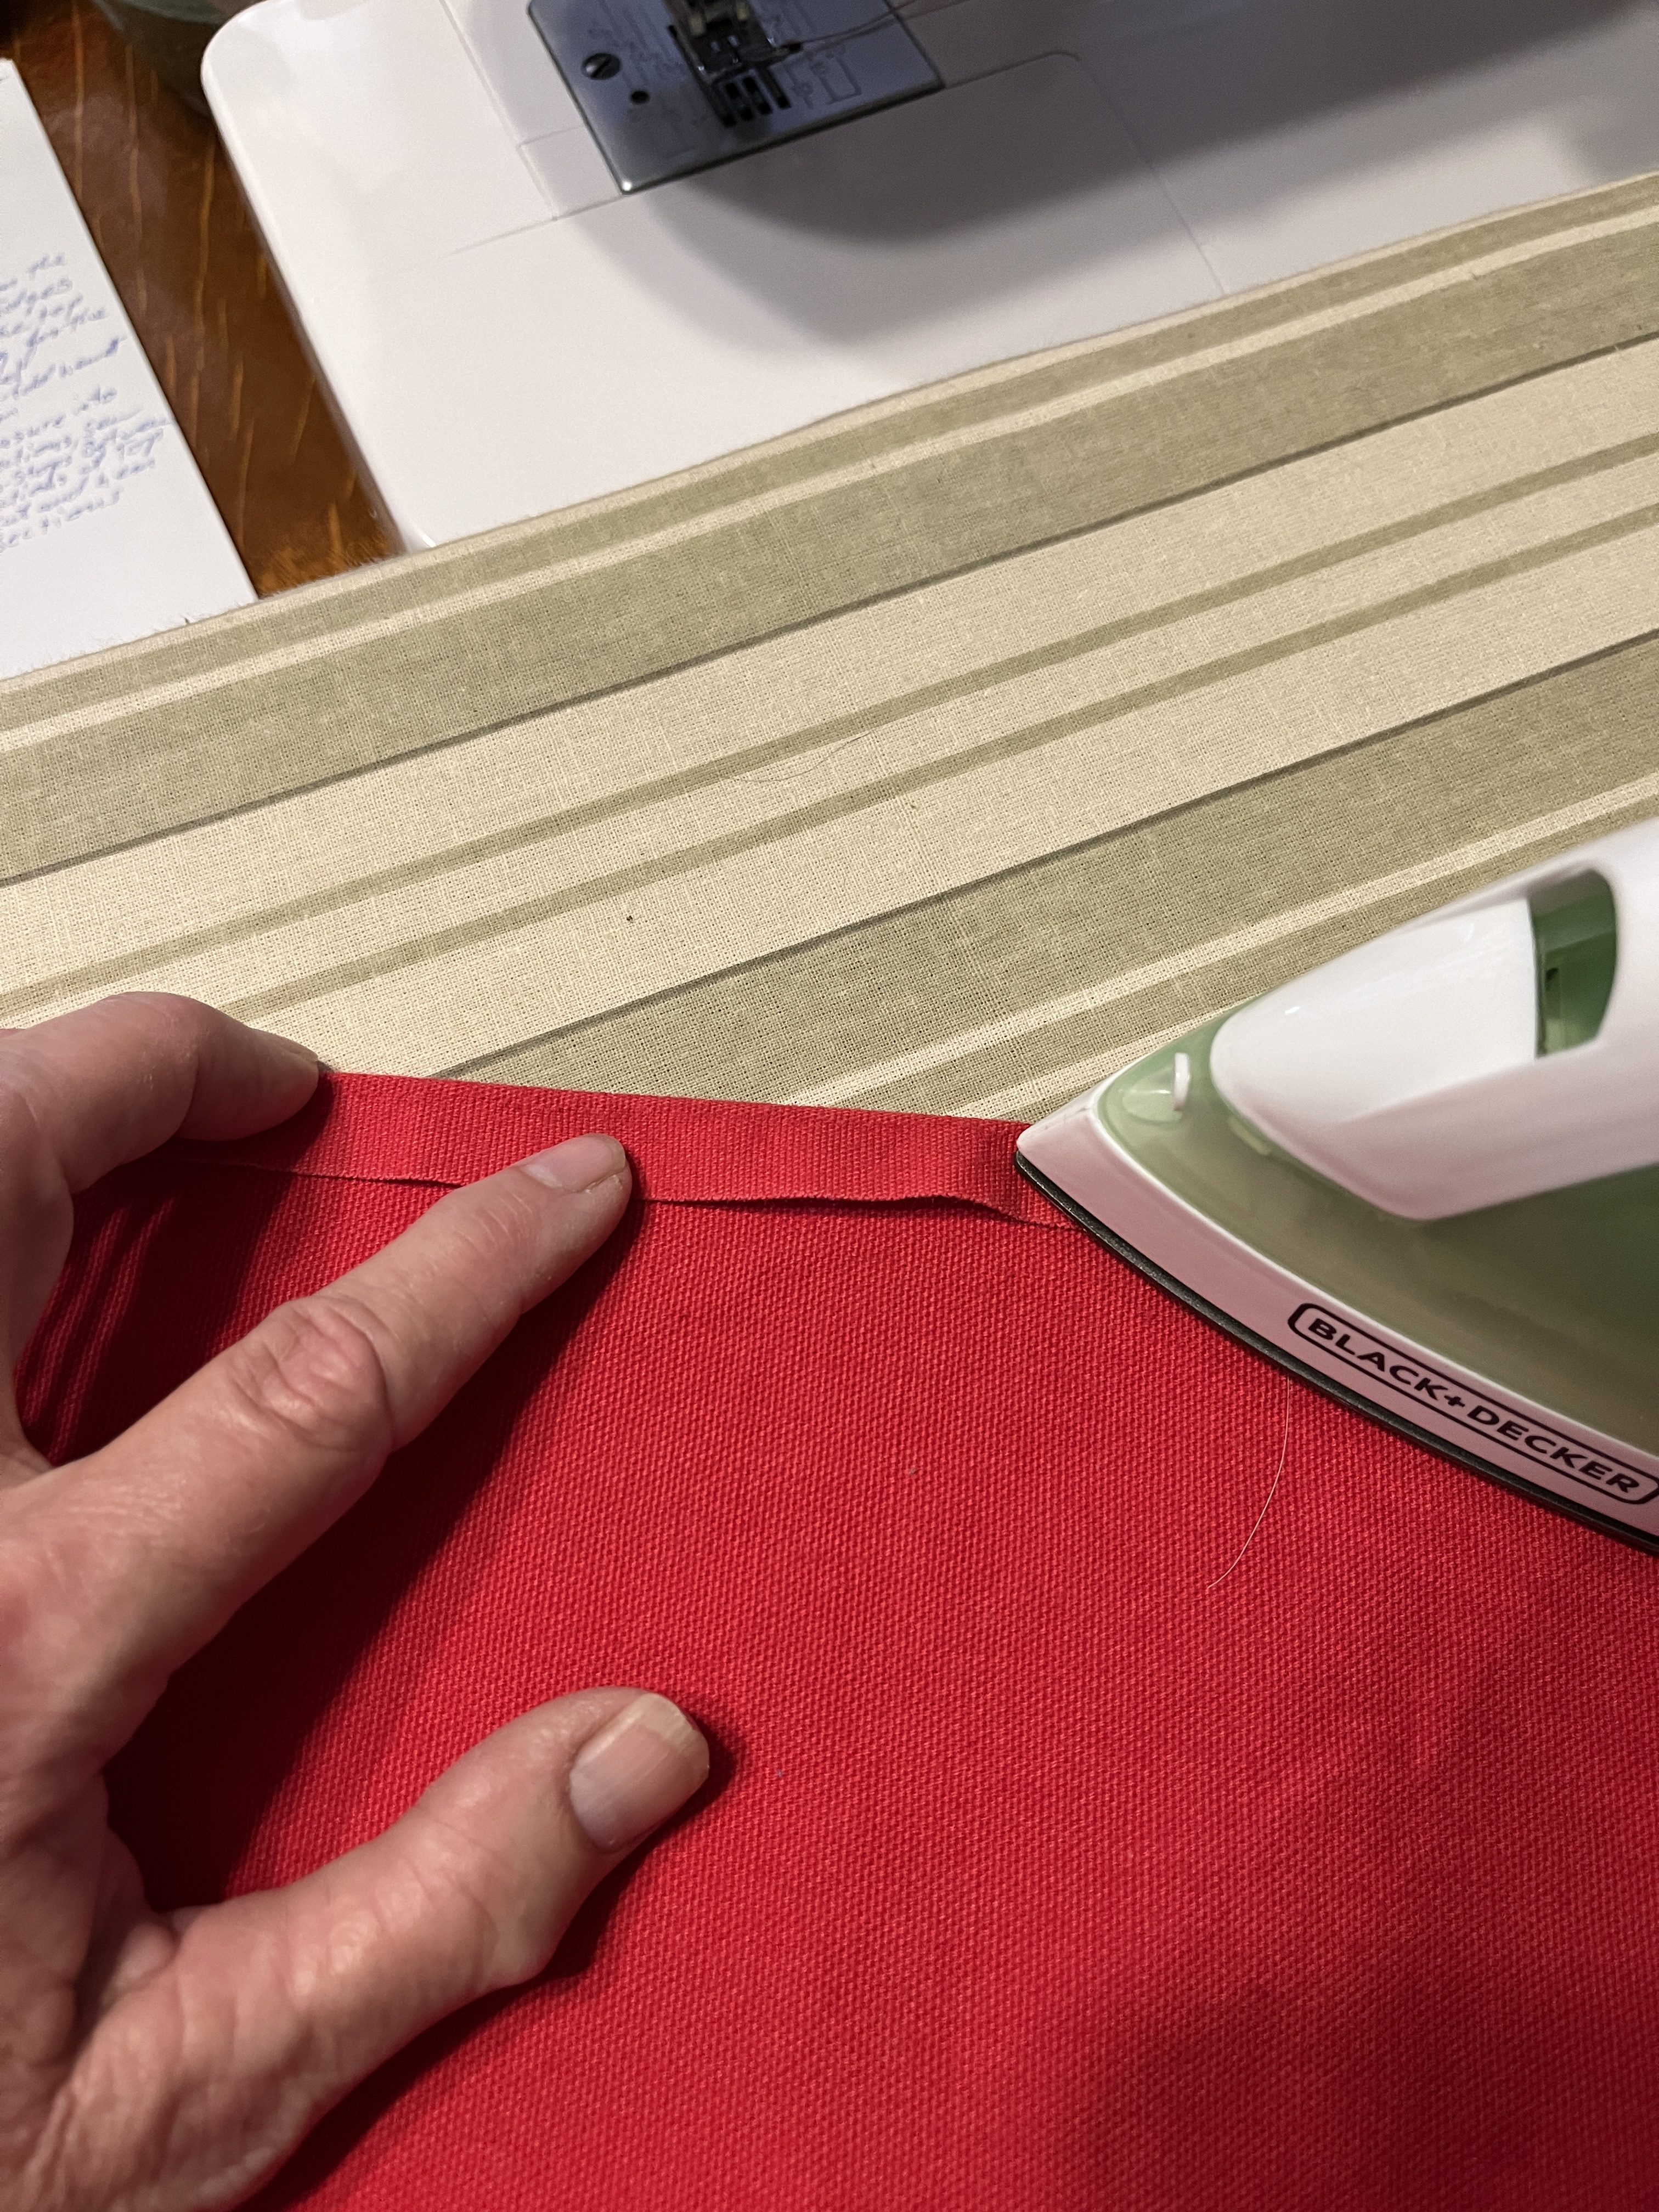
So, I got out my iron, ironing board and sewing machine to get the edge hem folded and sewn. First I ironed a single fold along the edge.
Then I ironed it a double fold. No, you don’t have to iron it first, but it does make it easier to manage, as do pins but they get in the way and you have to keep stopping to take them out. It’s bad to sew over pins.
And then I sewed the hem flat. OK, my machine wouldn’t sew more than an inch or so before breaking the thread. Did all sorts of things, cleaned, bought new needles. Almost bought a new machine but that’s another fiasco story. Many loud bad words, 3 trips to a big box store and a few hours later I gave up, had dinner and did something else before heading to bed. Better luck tomorrow.
This morning I had a good night’s sleep and 2 pieces of cold pizza so I was able to venture out on the great sewing machine quest. After 2 hours, a stop at the bank for a deposit, 1 Scottish-named fast food drive through, 3 big box stores (initials WM) and 1 big box hardware store (initials HD) I triumphantly came home with 1 large drink (the real thing and hey, it’s hot in Mesa in the summer! dehydration is bad), 1 new low-end but adequate Singer sewing machine and a 6′ dowel. Paco approves and the flowers are just because.
After unboxing and thoroughly reading the manual (all sewing machines are basically the same but each individual machine has its quirks) I started sewing. And promptly bent a needle after about a foot of sewing. And dropped it into the machine as I took it out of the holder! Doing better now. Got the first edge hem done.
Now repeating the ironing and sewing on the other rough edge, making sure I folded the hem in the same direction so there would be a front and a back. The hems are folded toward the back so the front looks smoothe.
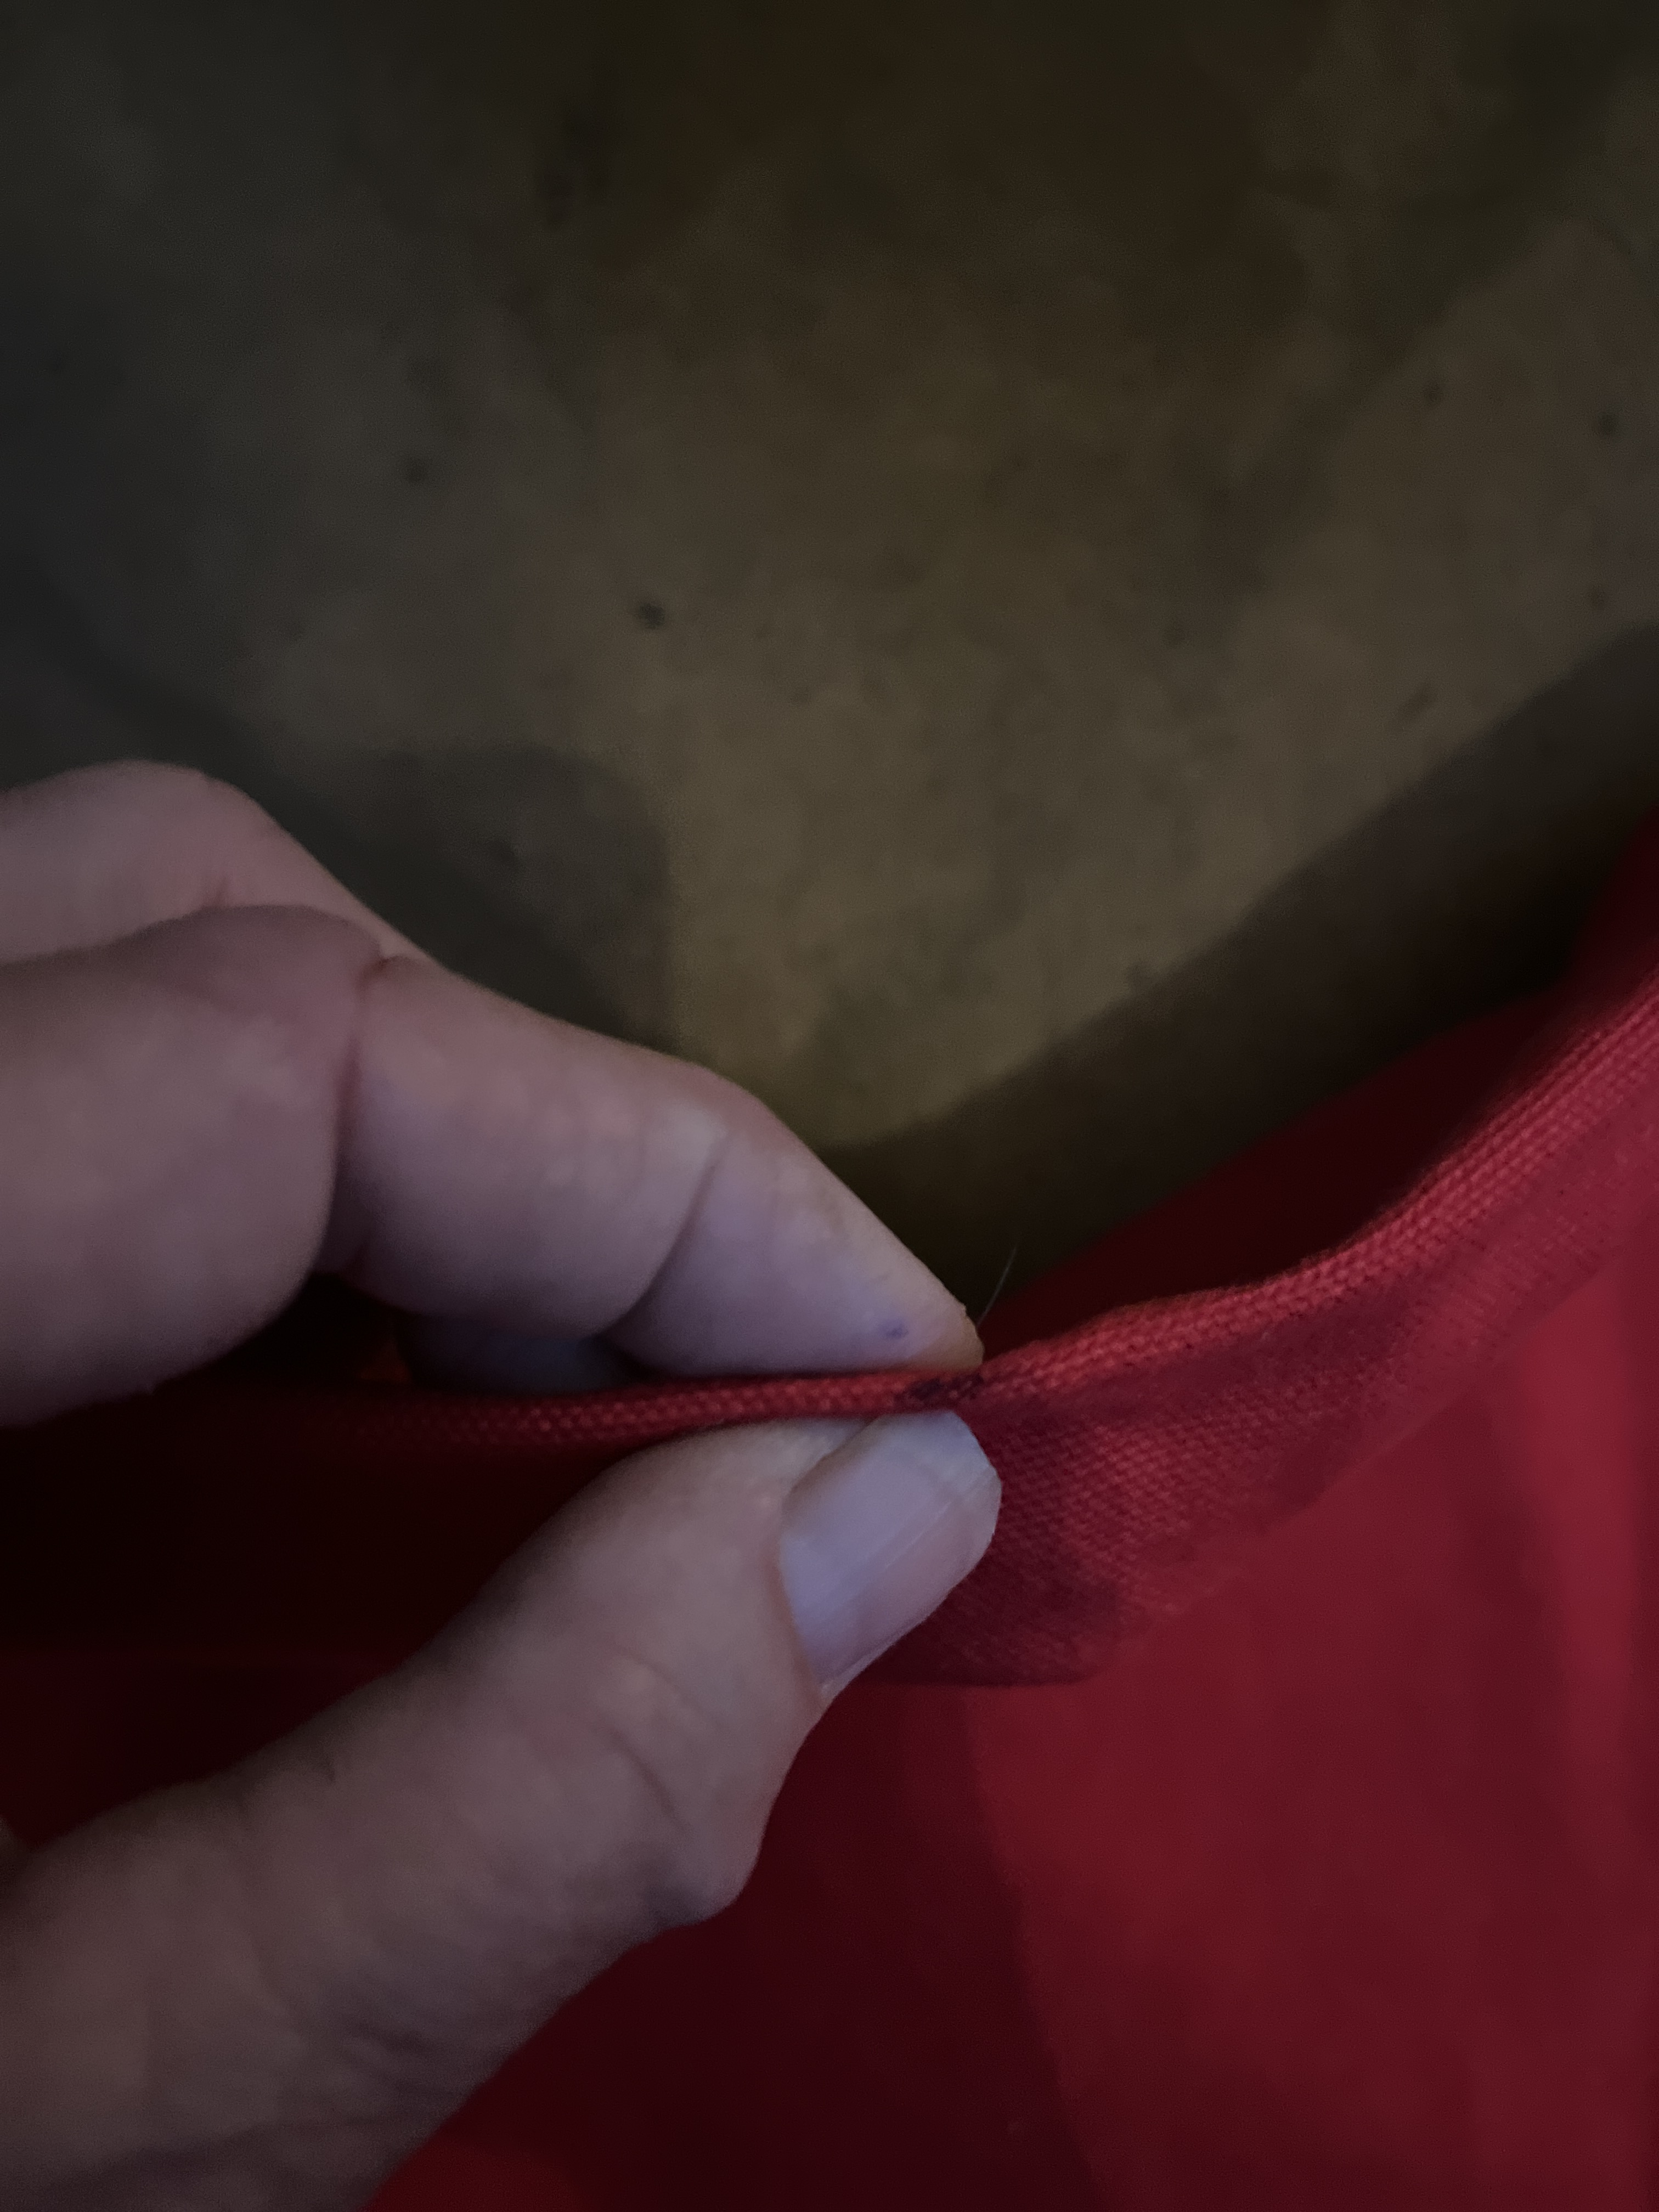
Now to do the dowel casing. Iron the selvedge (the ‘finished’ edge of the cloth). This is the part of the weaving that was on the sides of the loom as it was being woven. It doesn’t fray (come apart) like the cut edges do. Just a simple single fold will do when ironing this.
The casing just has to be folded over wide enough for the dowel to go through easily and not too loosely. If you’re confident you can keep the space consistent go ahead and do it freehand, otherwise pin it. Using your fingers to measure helps.
Making marks along the way helps, too, although it’s easier to use pins. I can’t find mine and I don’t want to run out to the store again, so I’m winging it with discrete marks at 2 3/4″. Besides, it’s on the ‘wrong’ side (back side) of the piece so it won’t show.
Now sew the casing. At both ends, where the cloth is really thick, carefully hand-crank the machine so you don’t break anything. When you get safely past the end then you can sew normally. I’m trying to keep the left edge of the pressure foot at the left edge of the fold.
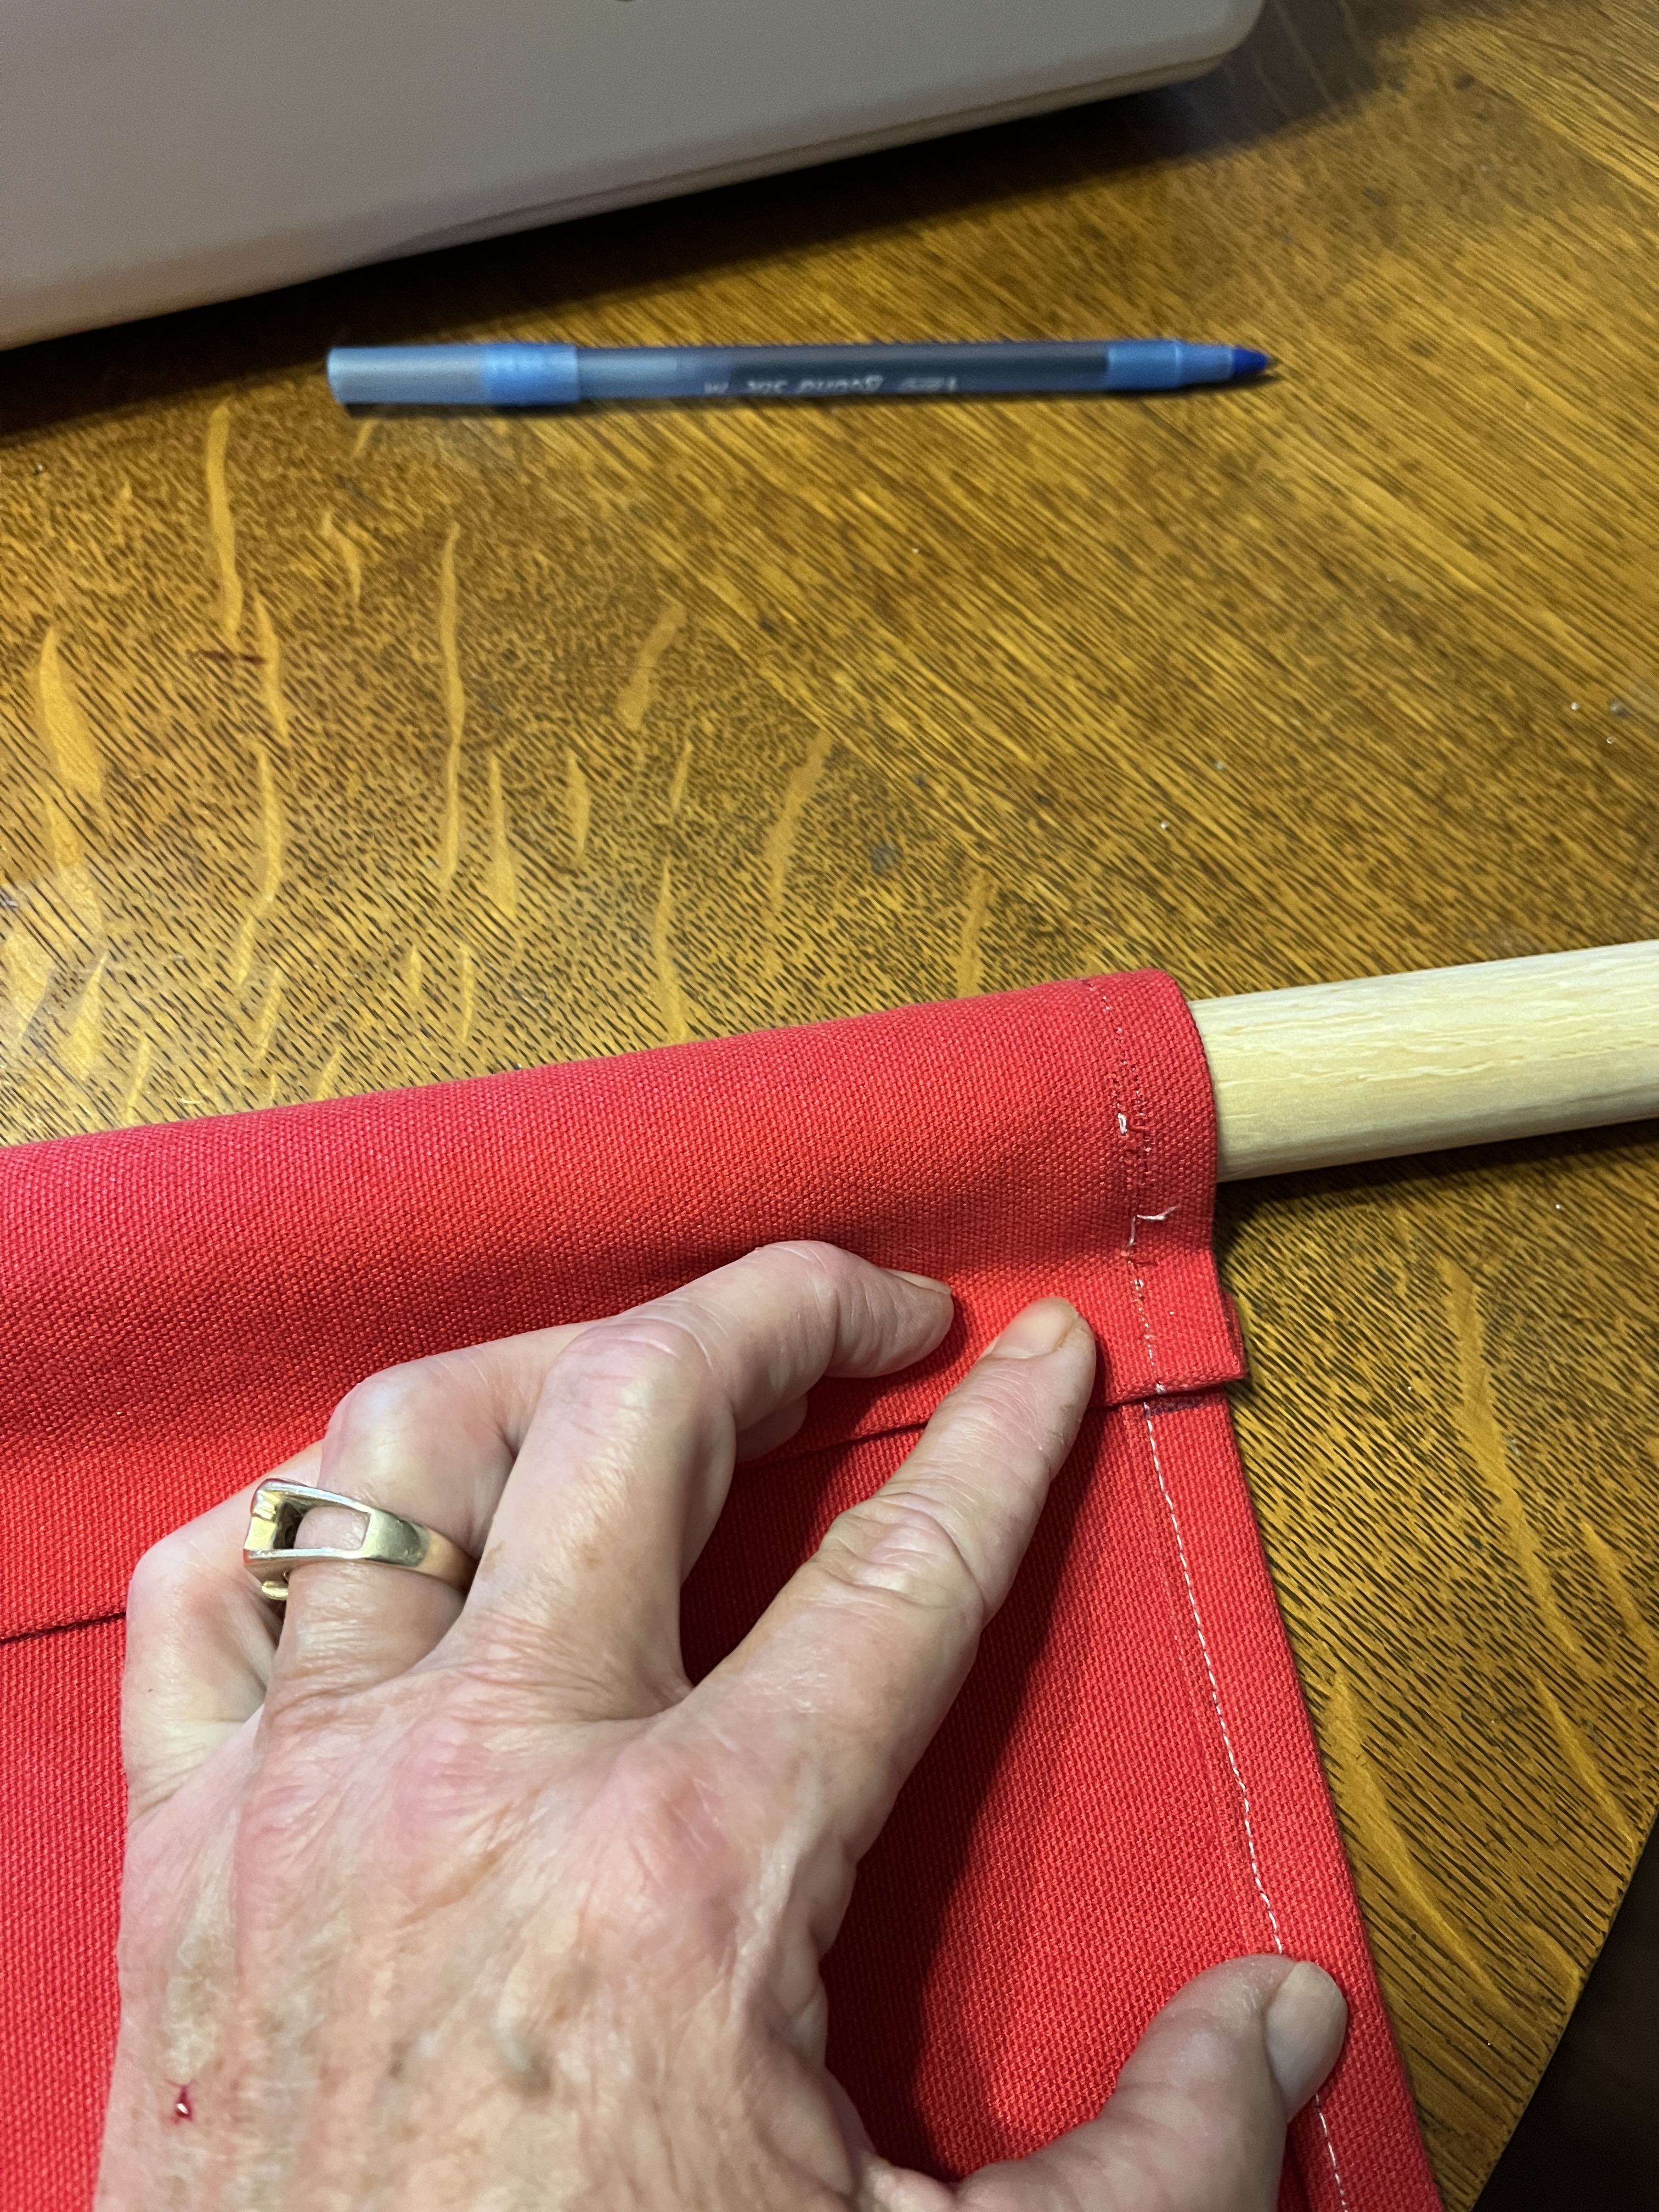
Now check that the dowel fits properly. Ripping a seam is a pain, so no point in ripping 2 seams if it doesn’t fit. Yes, that’s a watermelon on the table.
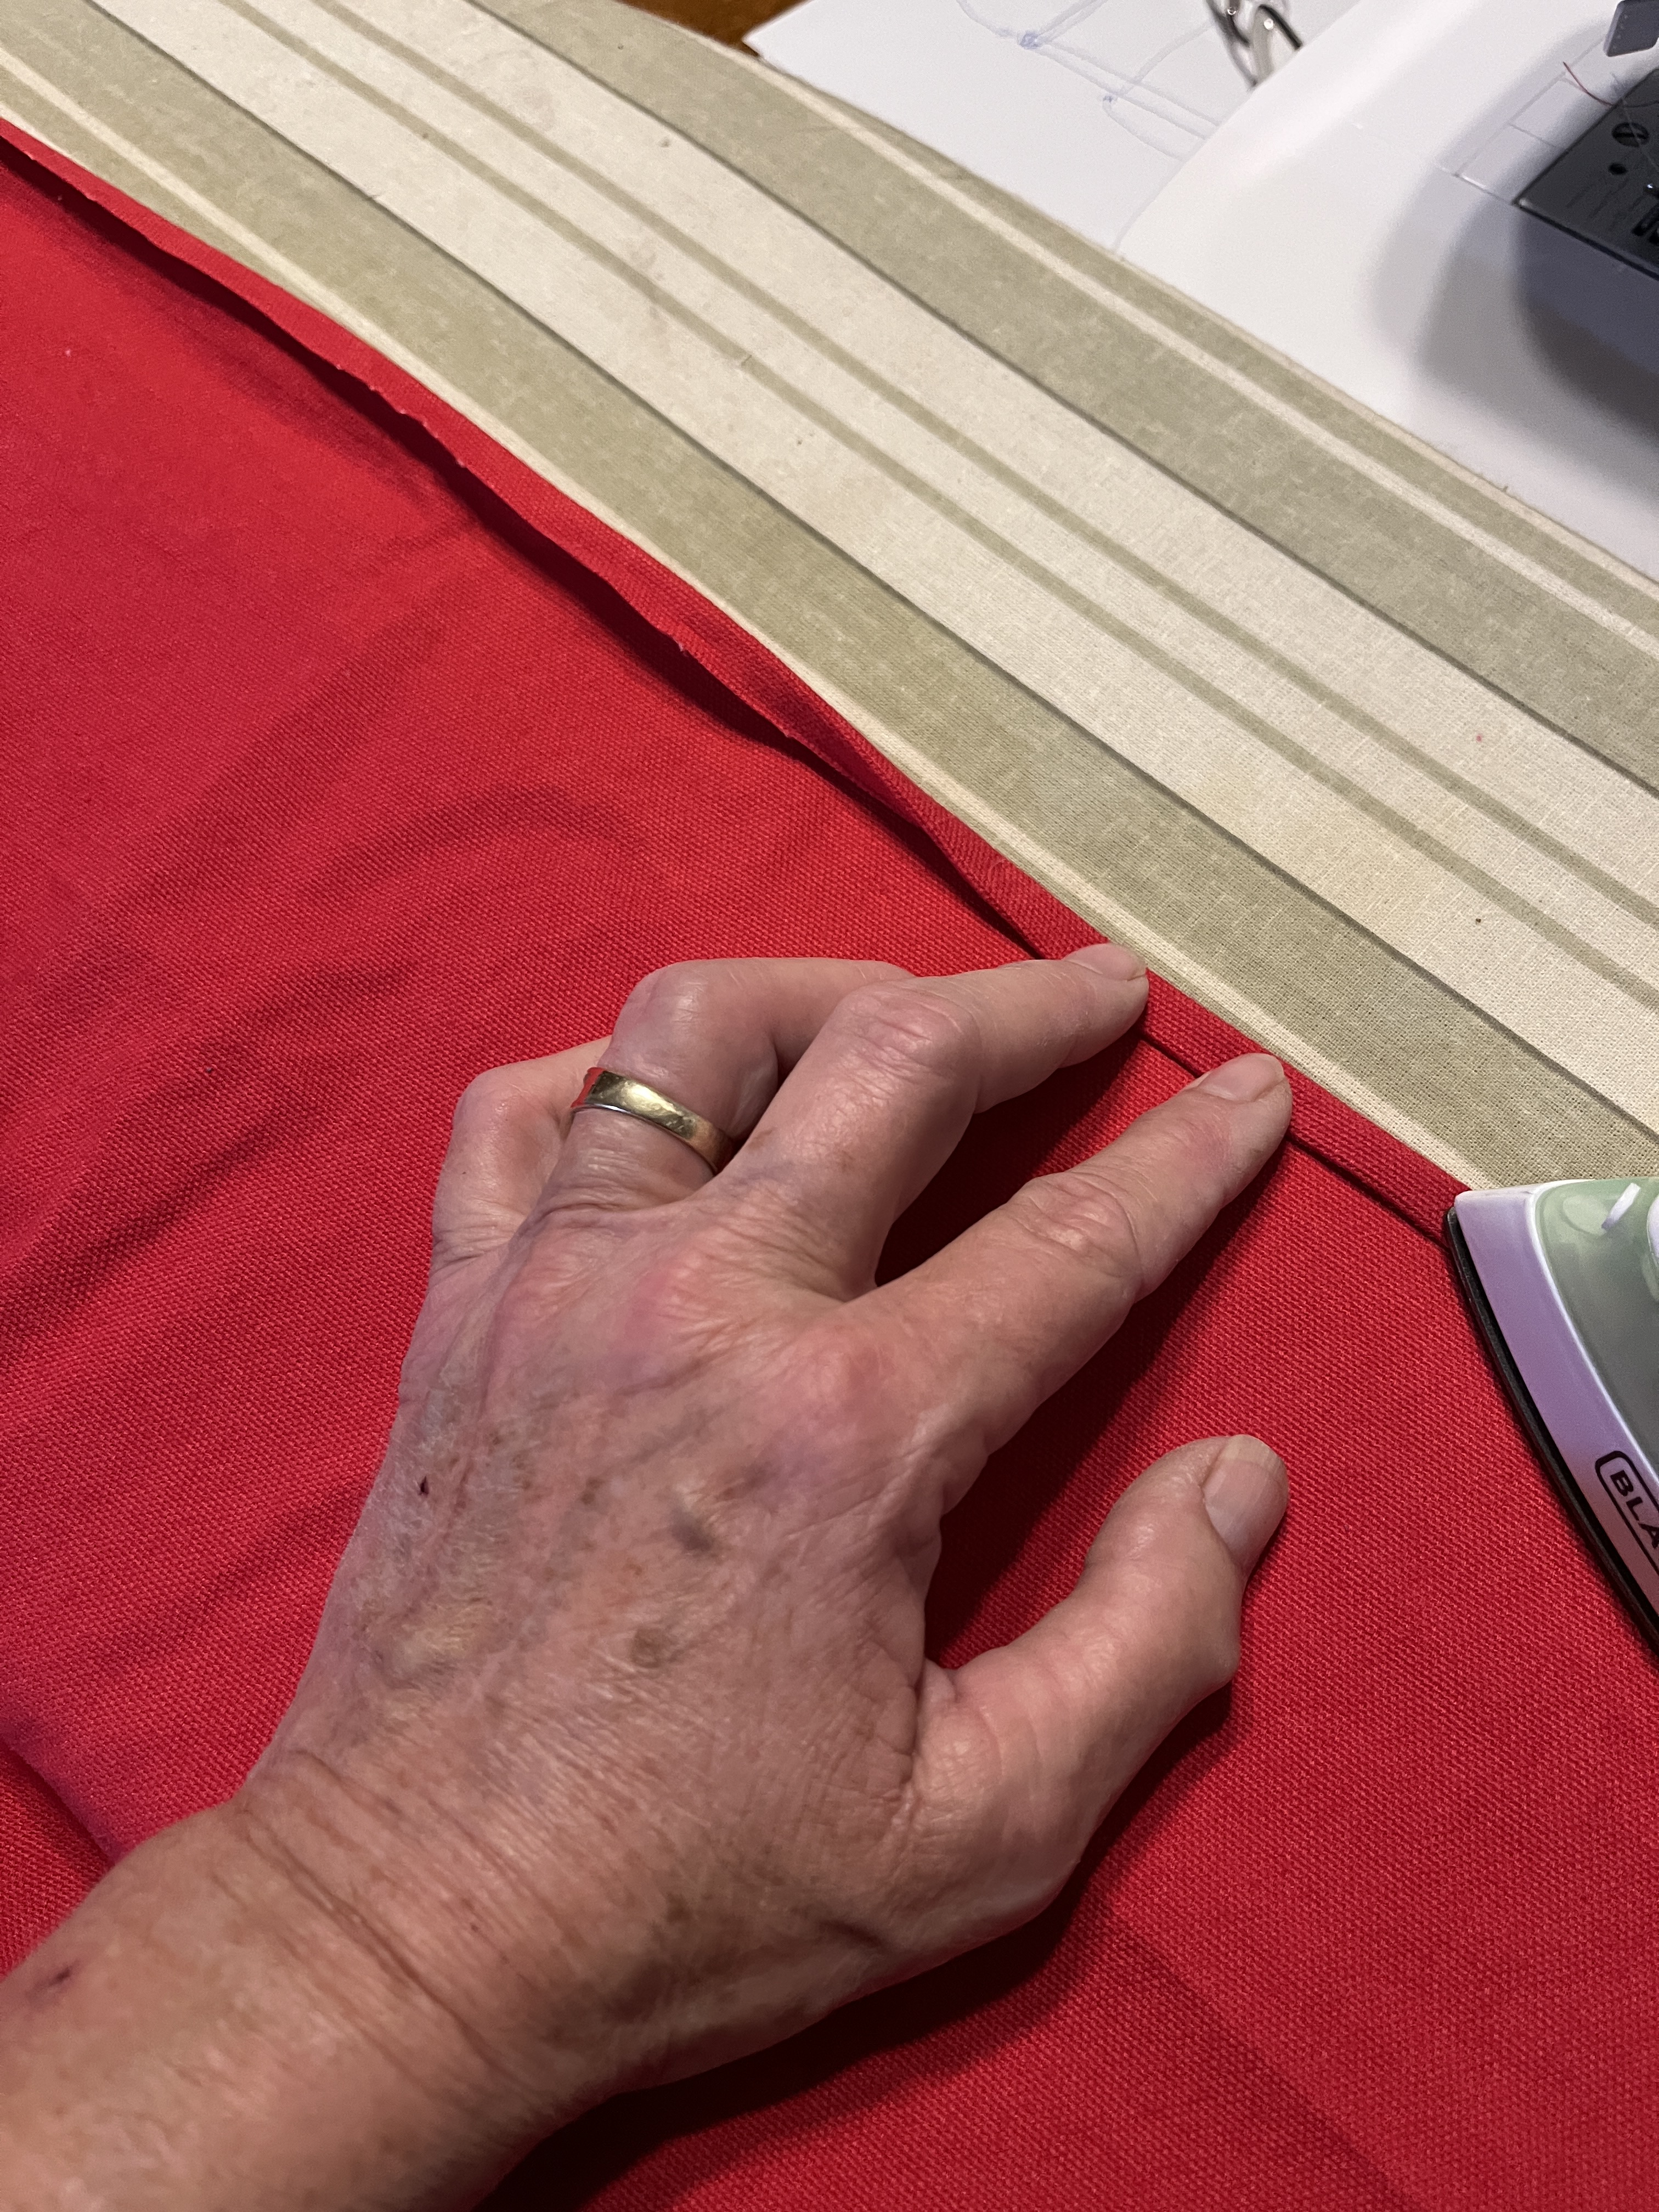
Now do that again. I’m thinking a double seam will strengthen the seam. Don’t want stress to tear open the casing and let the dowel out.
Since the bottom is also a selvedge edge it can probably go without a hem but I think giving it at least a single turn up will both make it hang better and protect it from wear and fraying longer, so iron it then sew it.
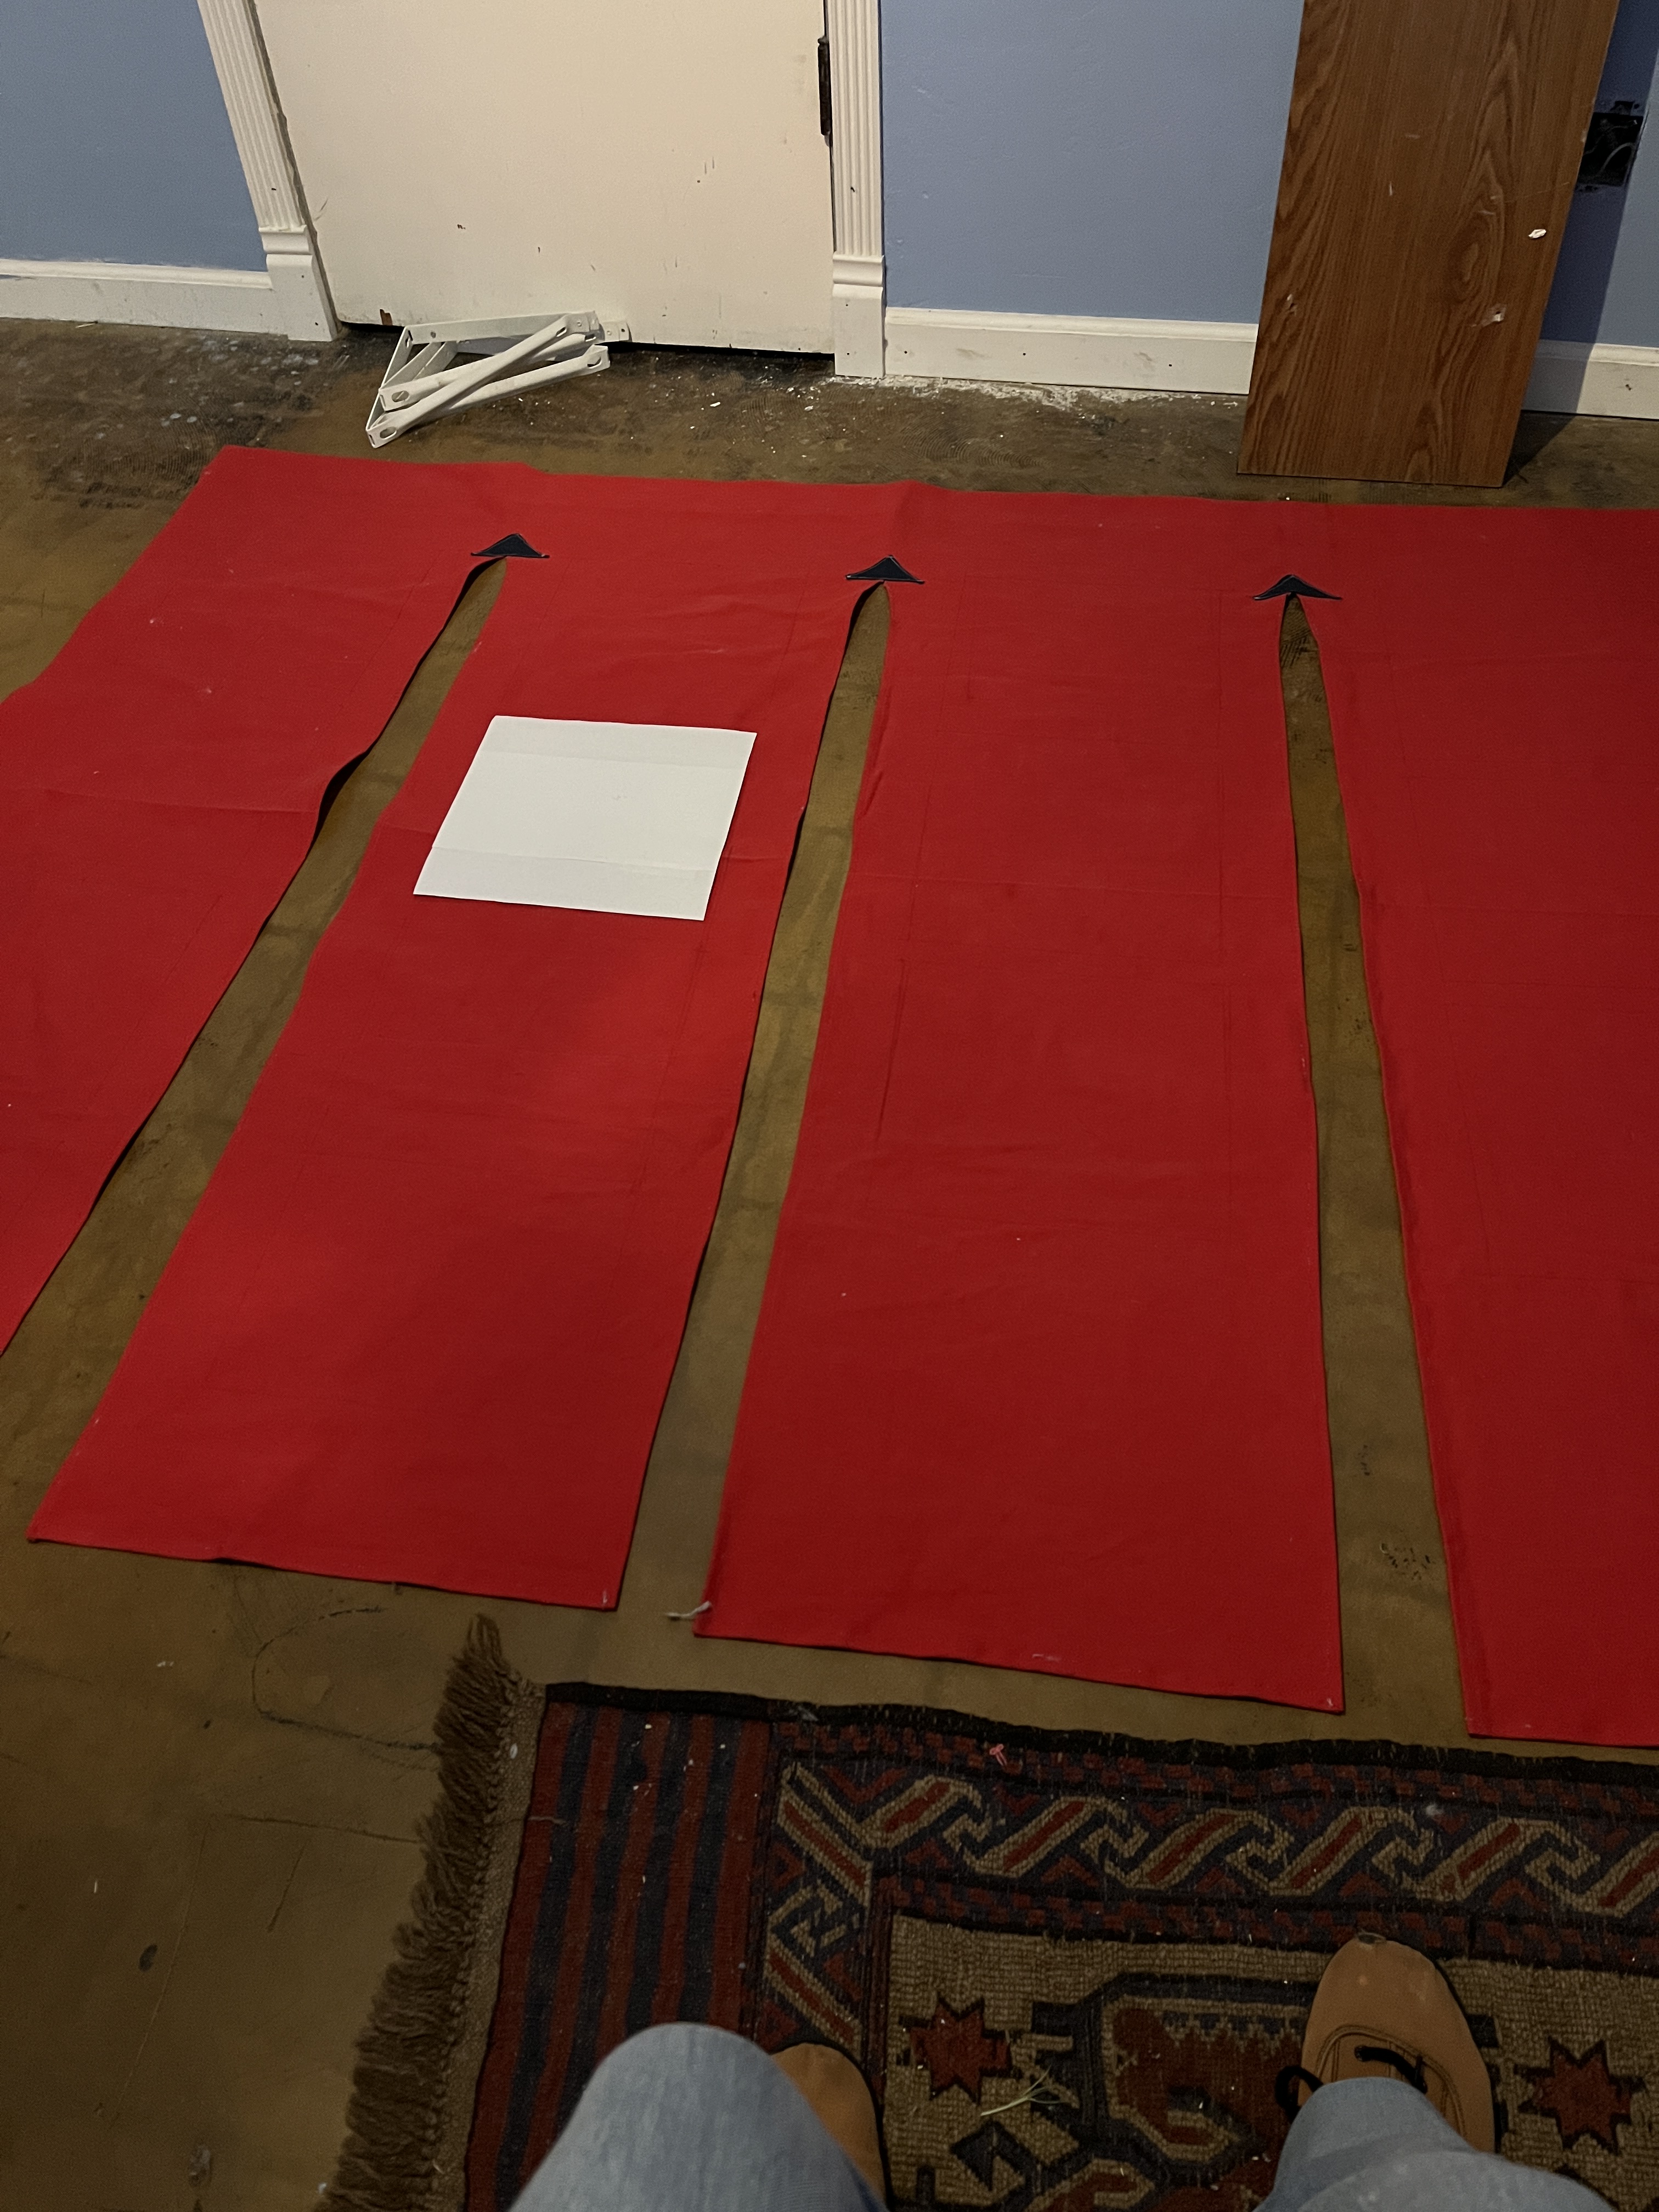
Now all the edges are taken care of it’s time to figure out where the divisions will go. I want 4 panels so I folded it in half and found a bit of floor to lay it all flat.
I marked the edge of the fold,
folded the rest in half again to get an idea of the panel size and measured to find where the top of the divide should be.
14″ is 1/4 length but 14″ was too far down. 7″ looked better so I marked there.
I unfolded it all enough to lay the center flat and joined all the marks.
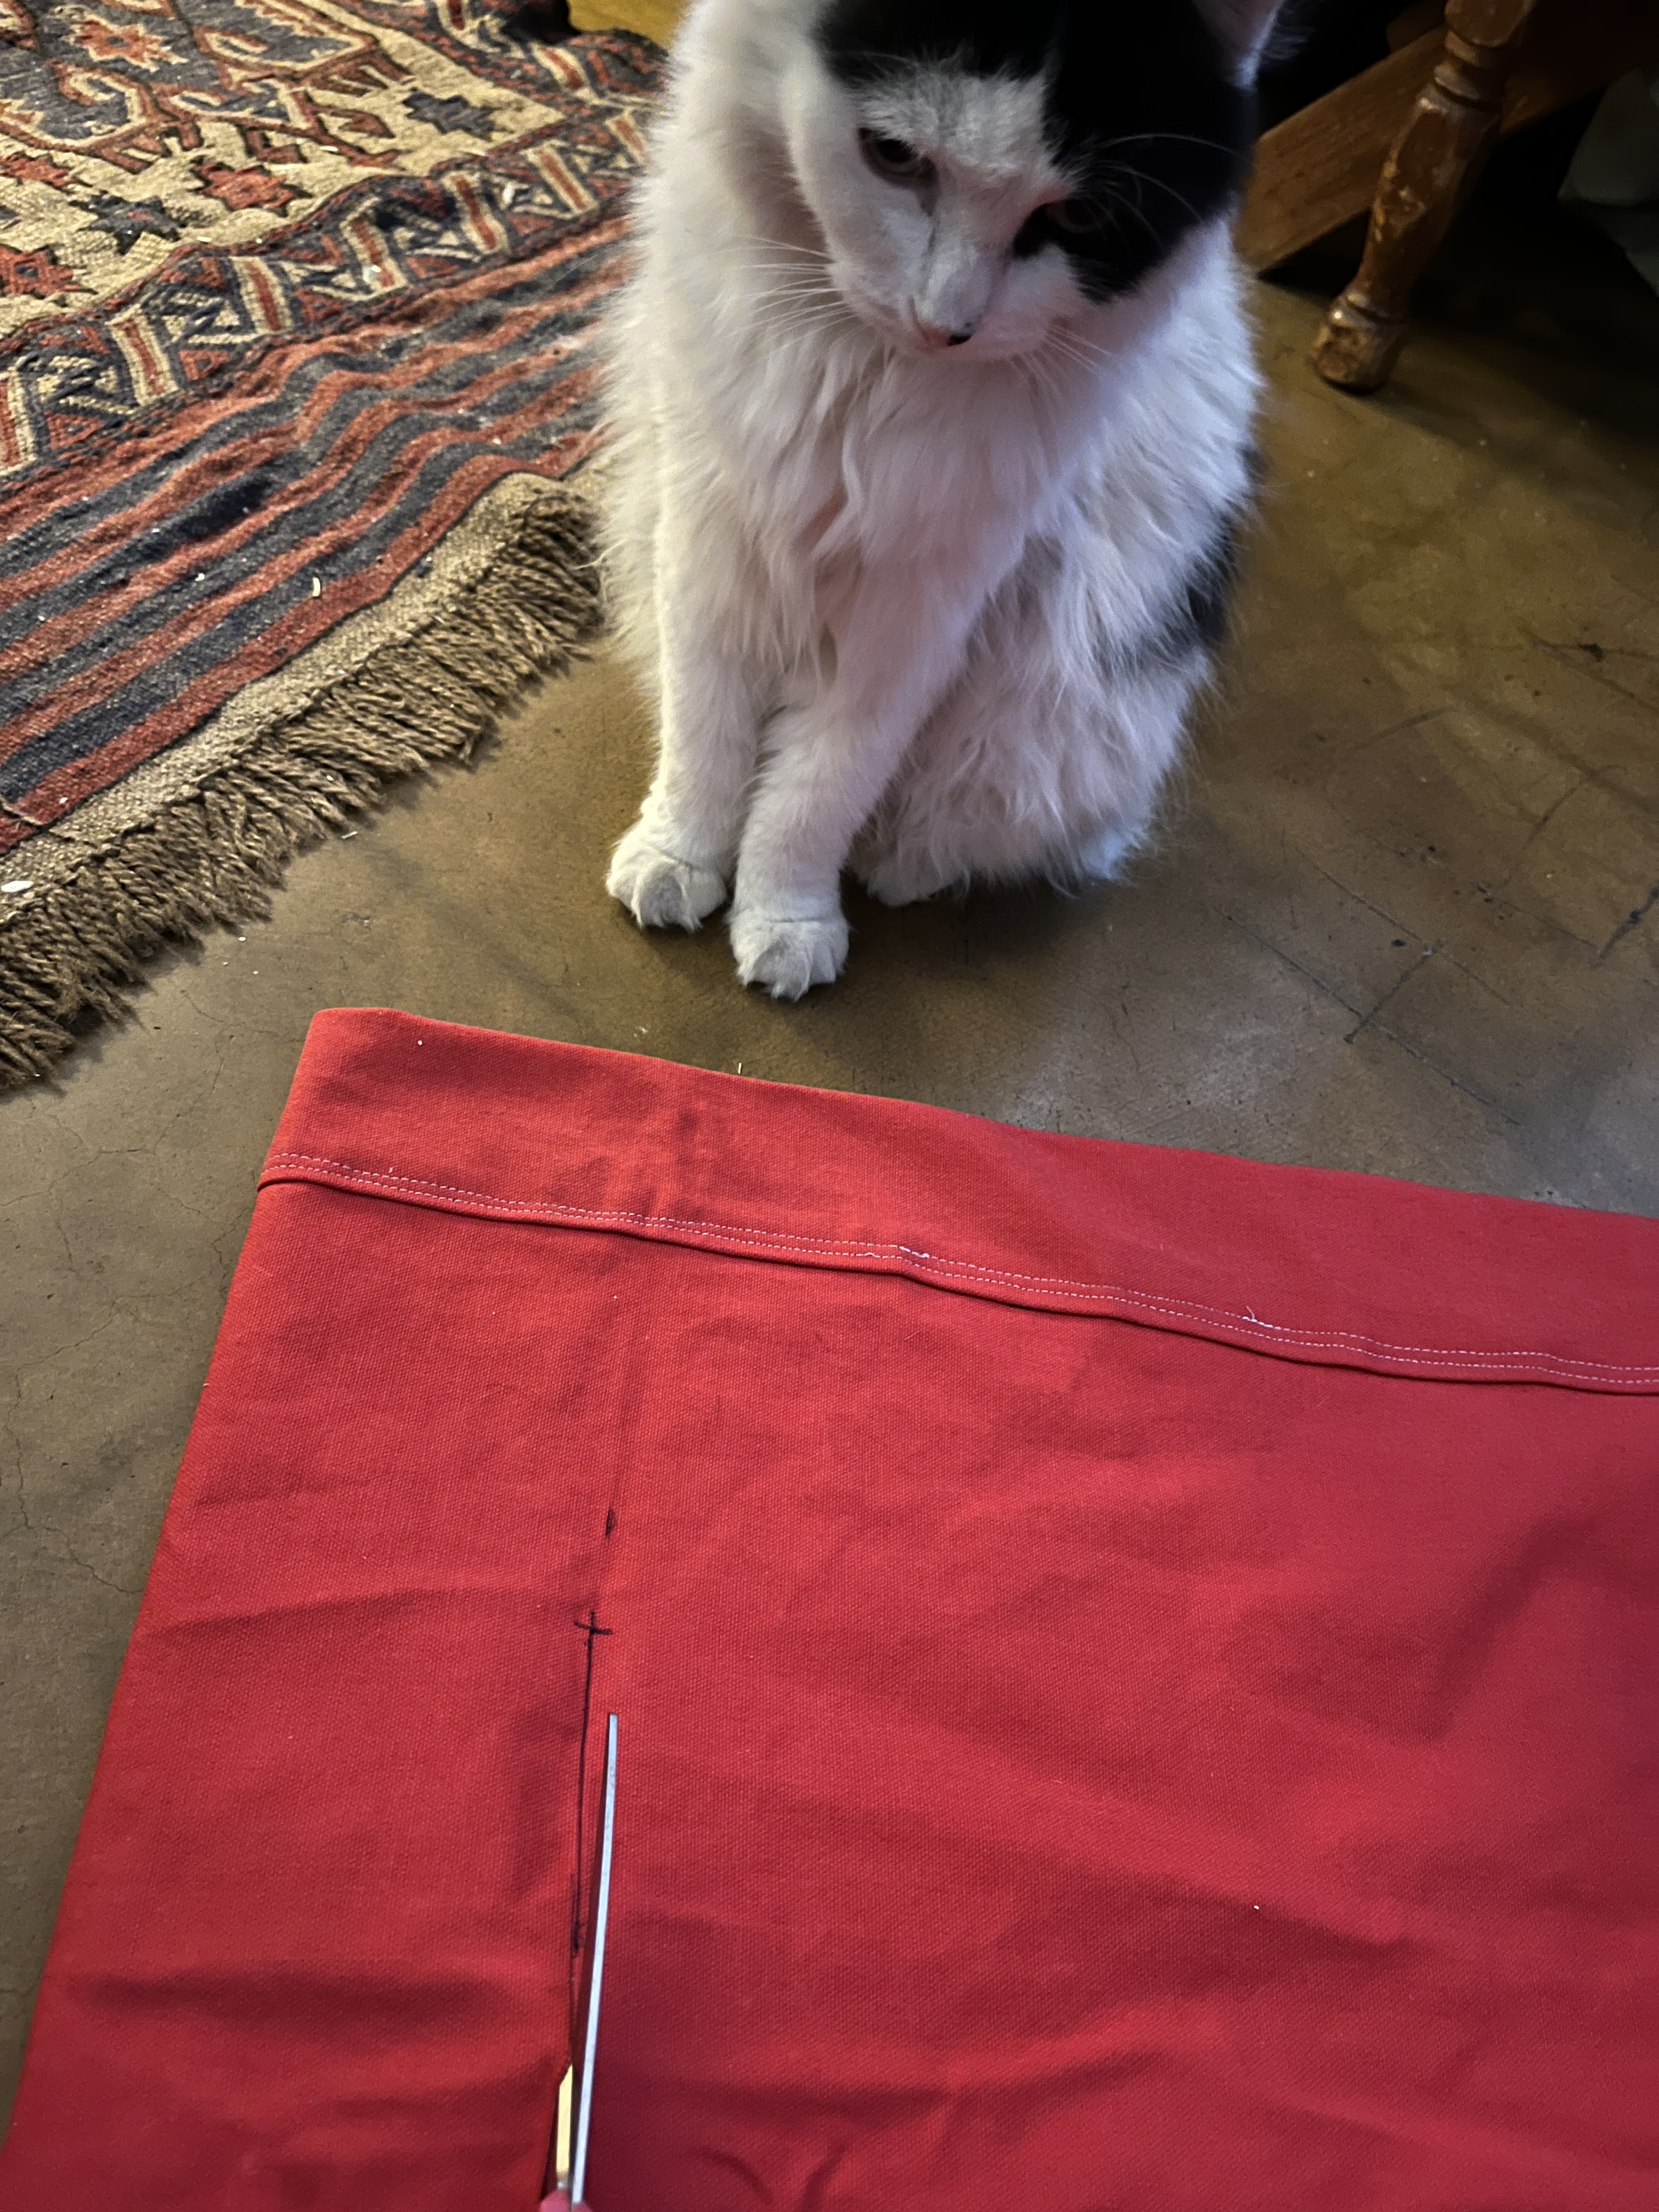
Then came the nerve wracking part. Cutting! With Sophie’s encouragement I made it through!
Now to get back to folding, ironing and sewing again. You know the drill, pausing only to feed our feline overlords.
Fold, iron, up both sides so you don’t have to stop sewing when you need to turn at the end of the cut, but at the end of the cut ease the fold to no fold.
Sew until you run out of bobbin thread just before the end of the cut. I know I have a ton of thread somewhere, including red, but can’t find it at the moment so I’ll have dinner, buy some thread at work during lunch (why I have so much thread) and call it a night.
When you get back to the project on the morrow after work (because this has taken all your spare time over the weekend). OK I didn’t get back to it on the morrow or even the ‘morrow after that. I got back to it the next day off, Monday, but in the mean time I did find my box of thread.
Now wind the bobbin and finish the center panel cut.
When you get to the end of the cut, keep sewing to just past the end, turn the work, sew back and forth at the end of the cut to strengthen it and start back down the other side.
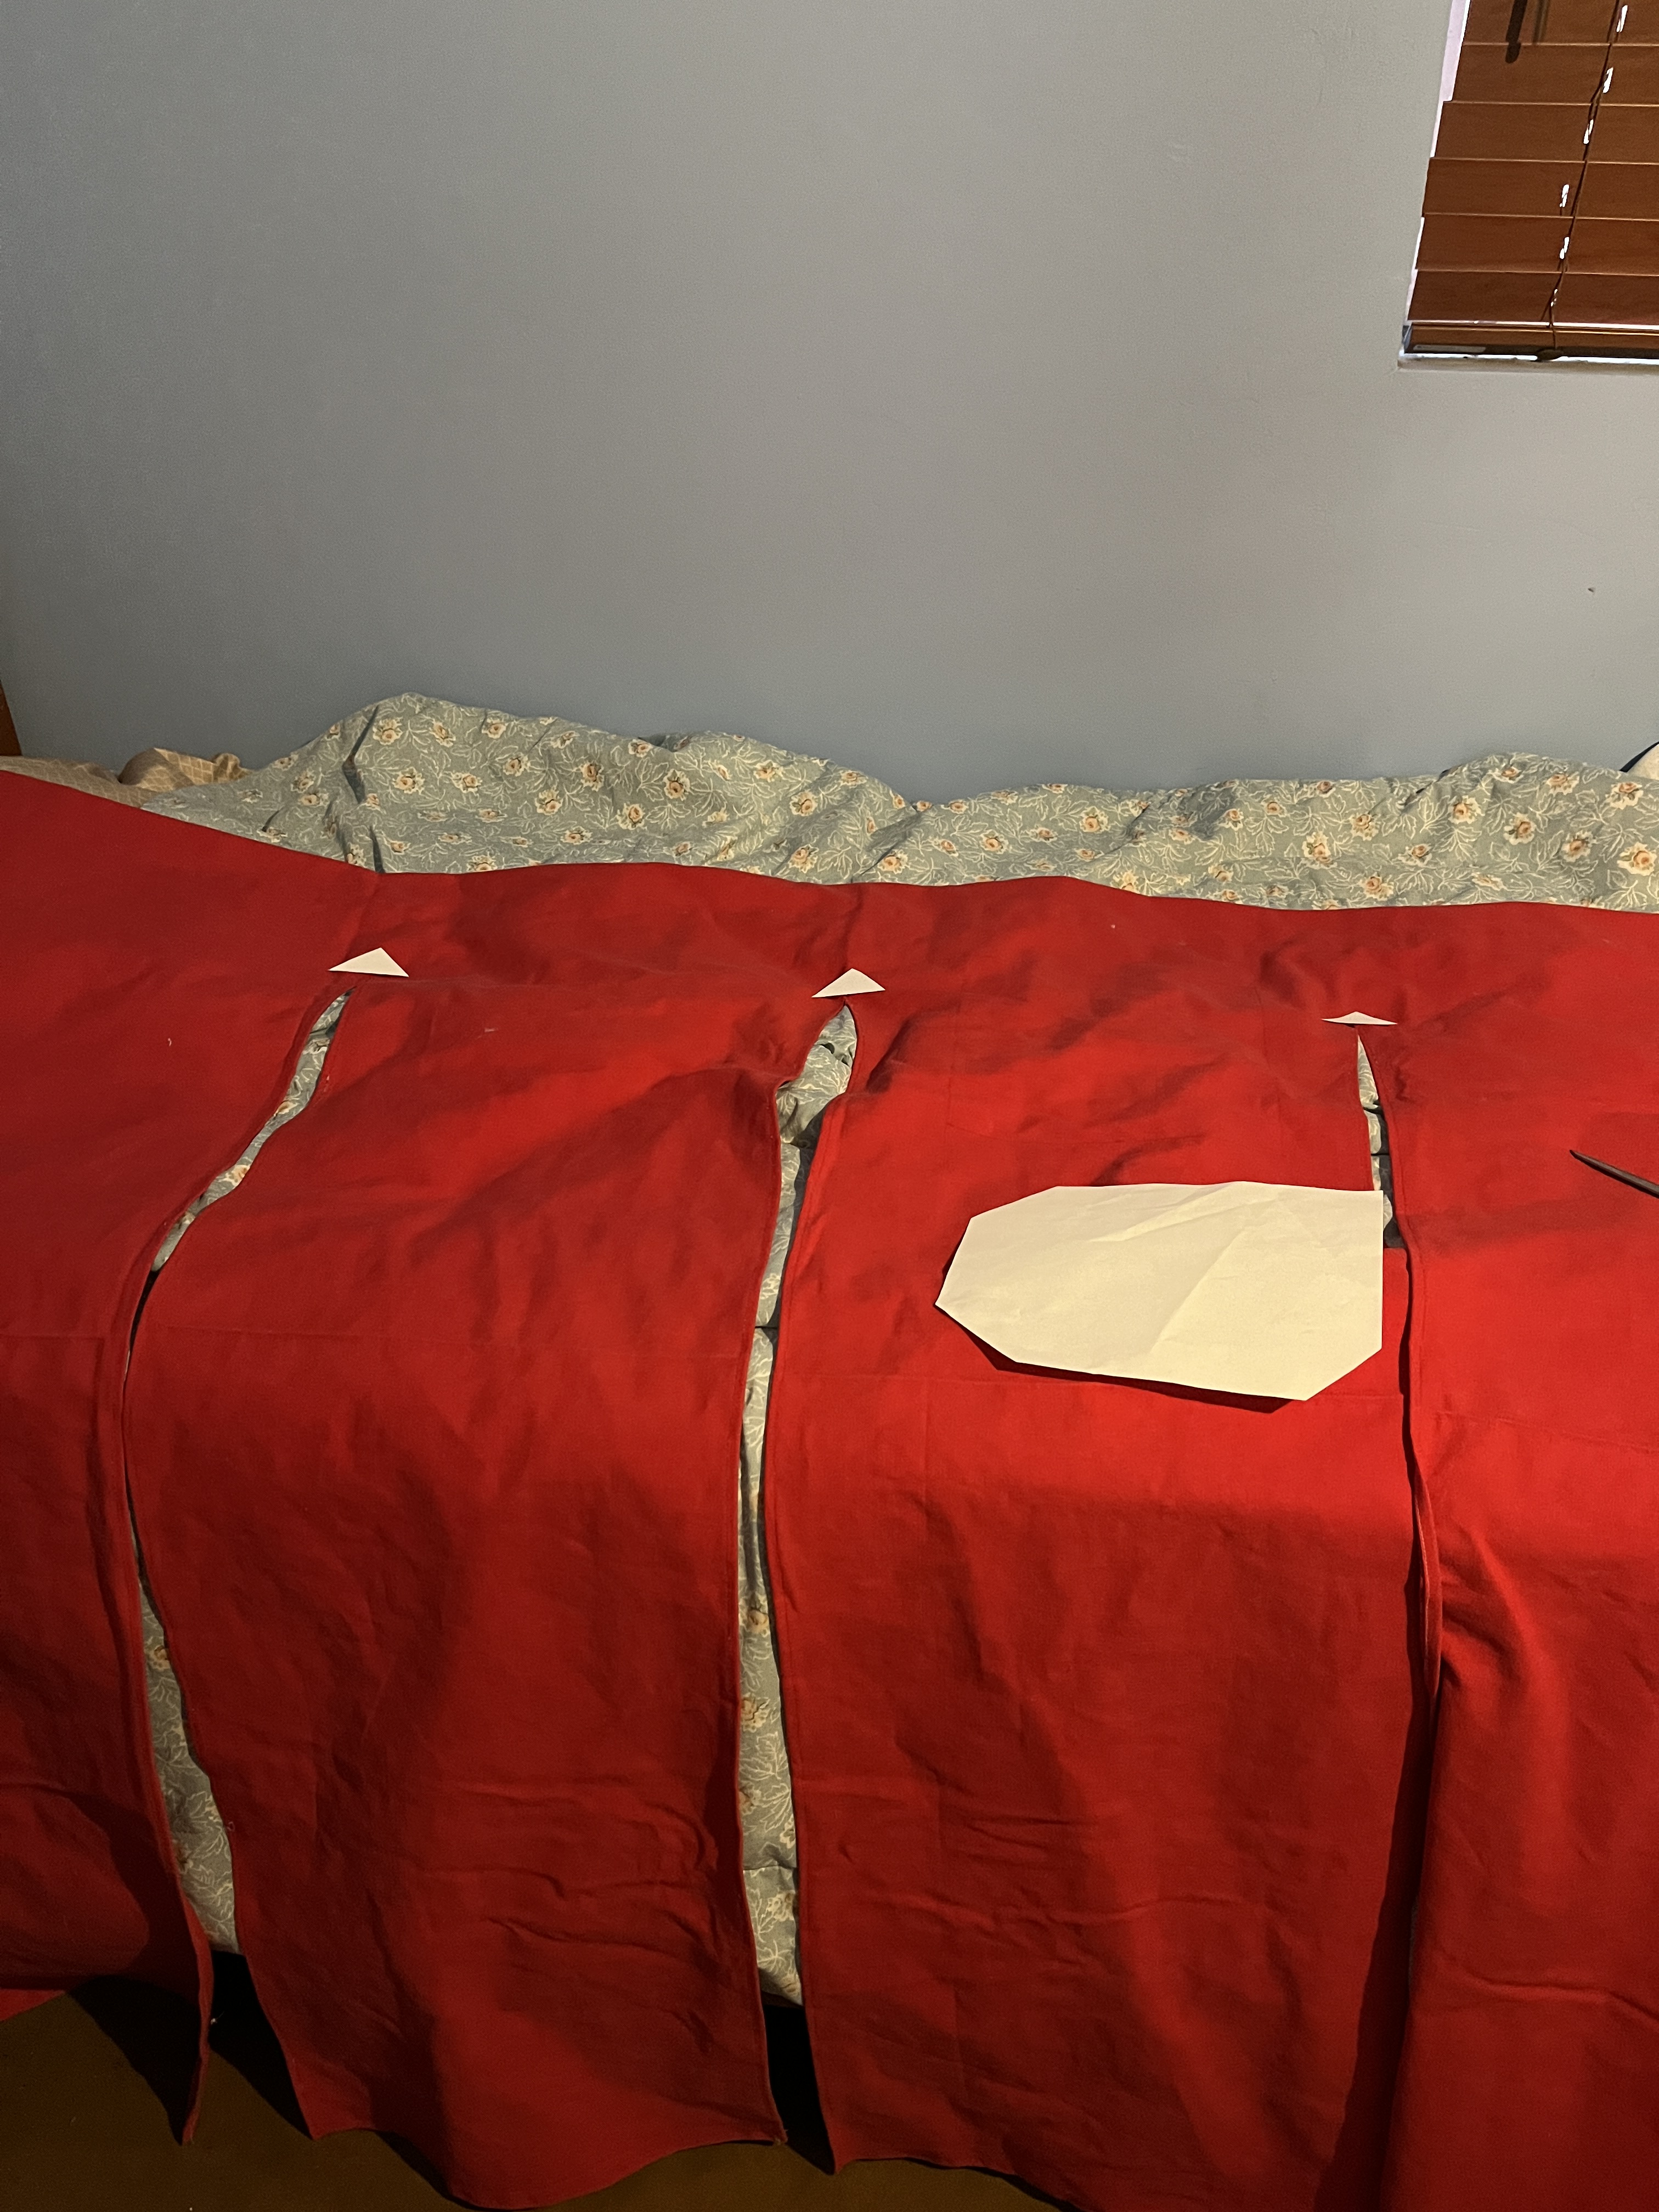
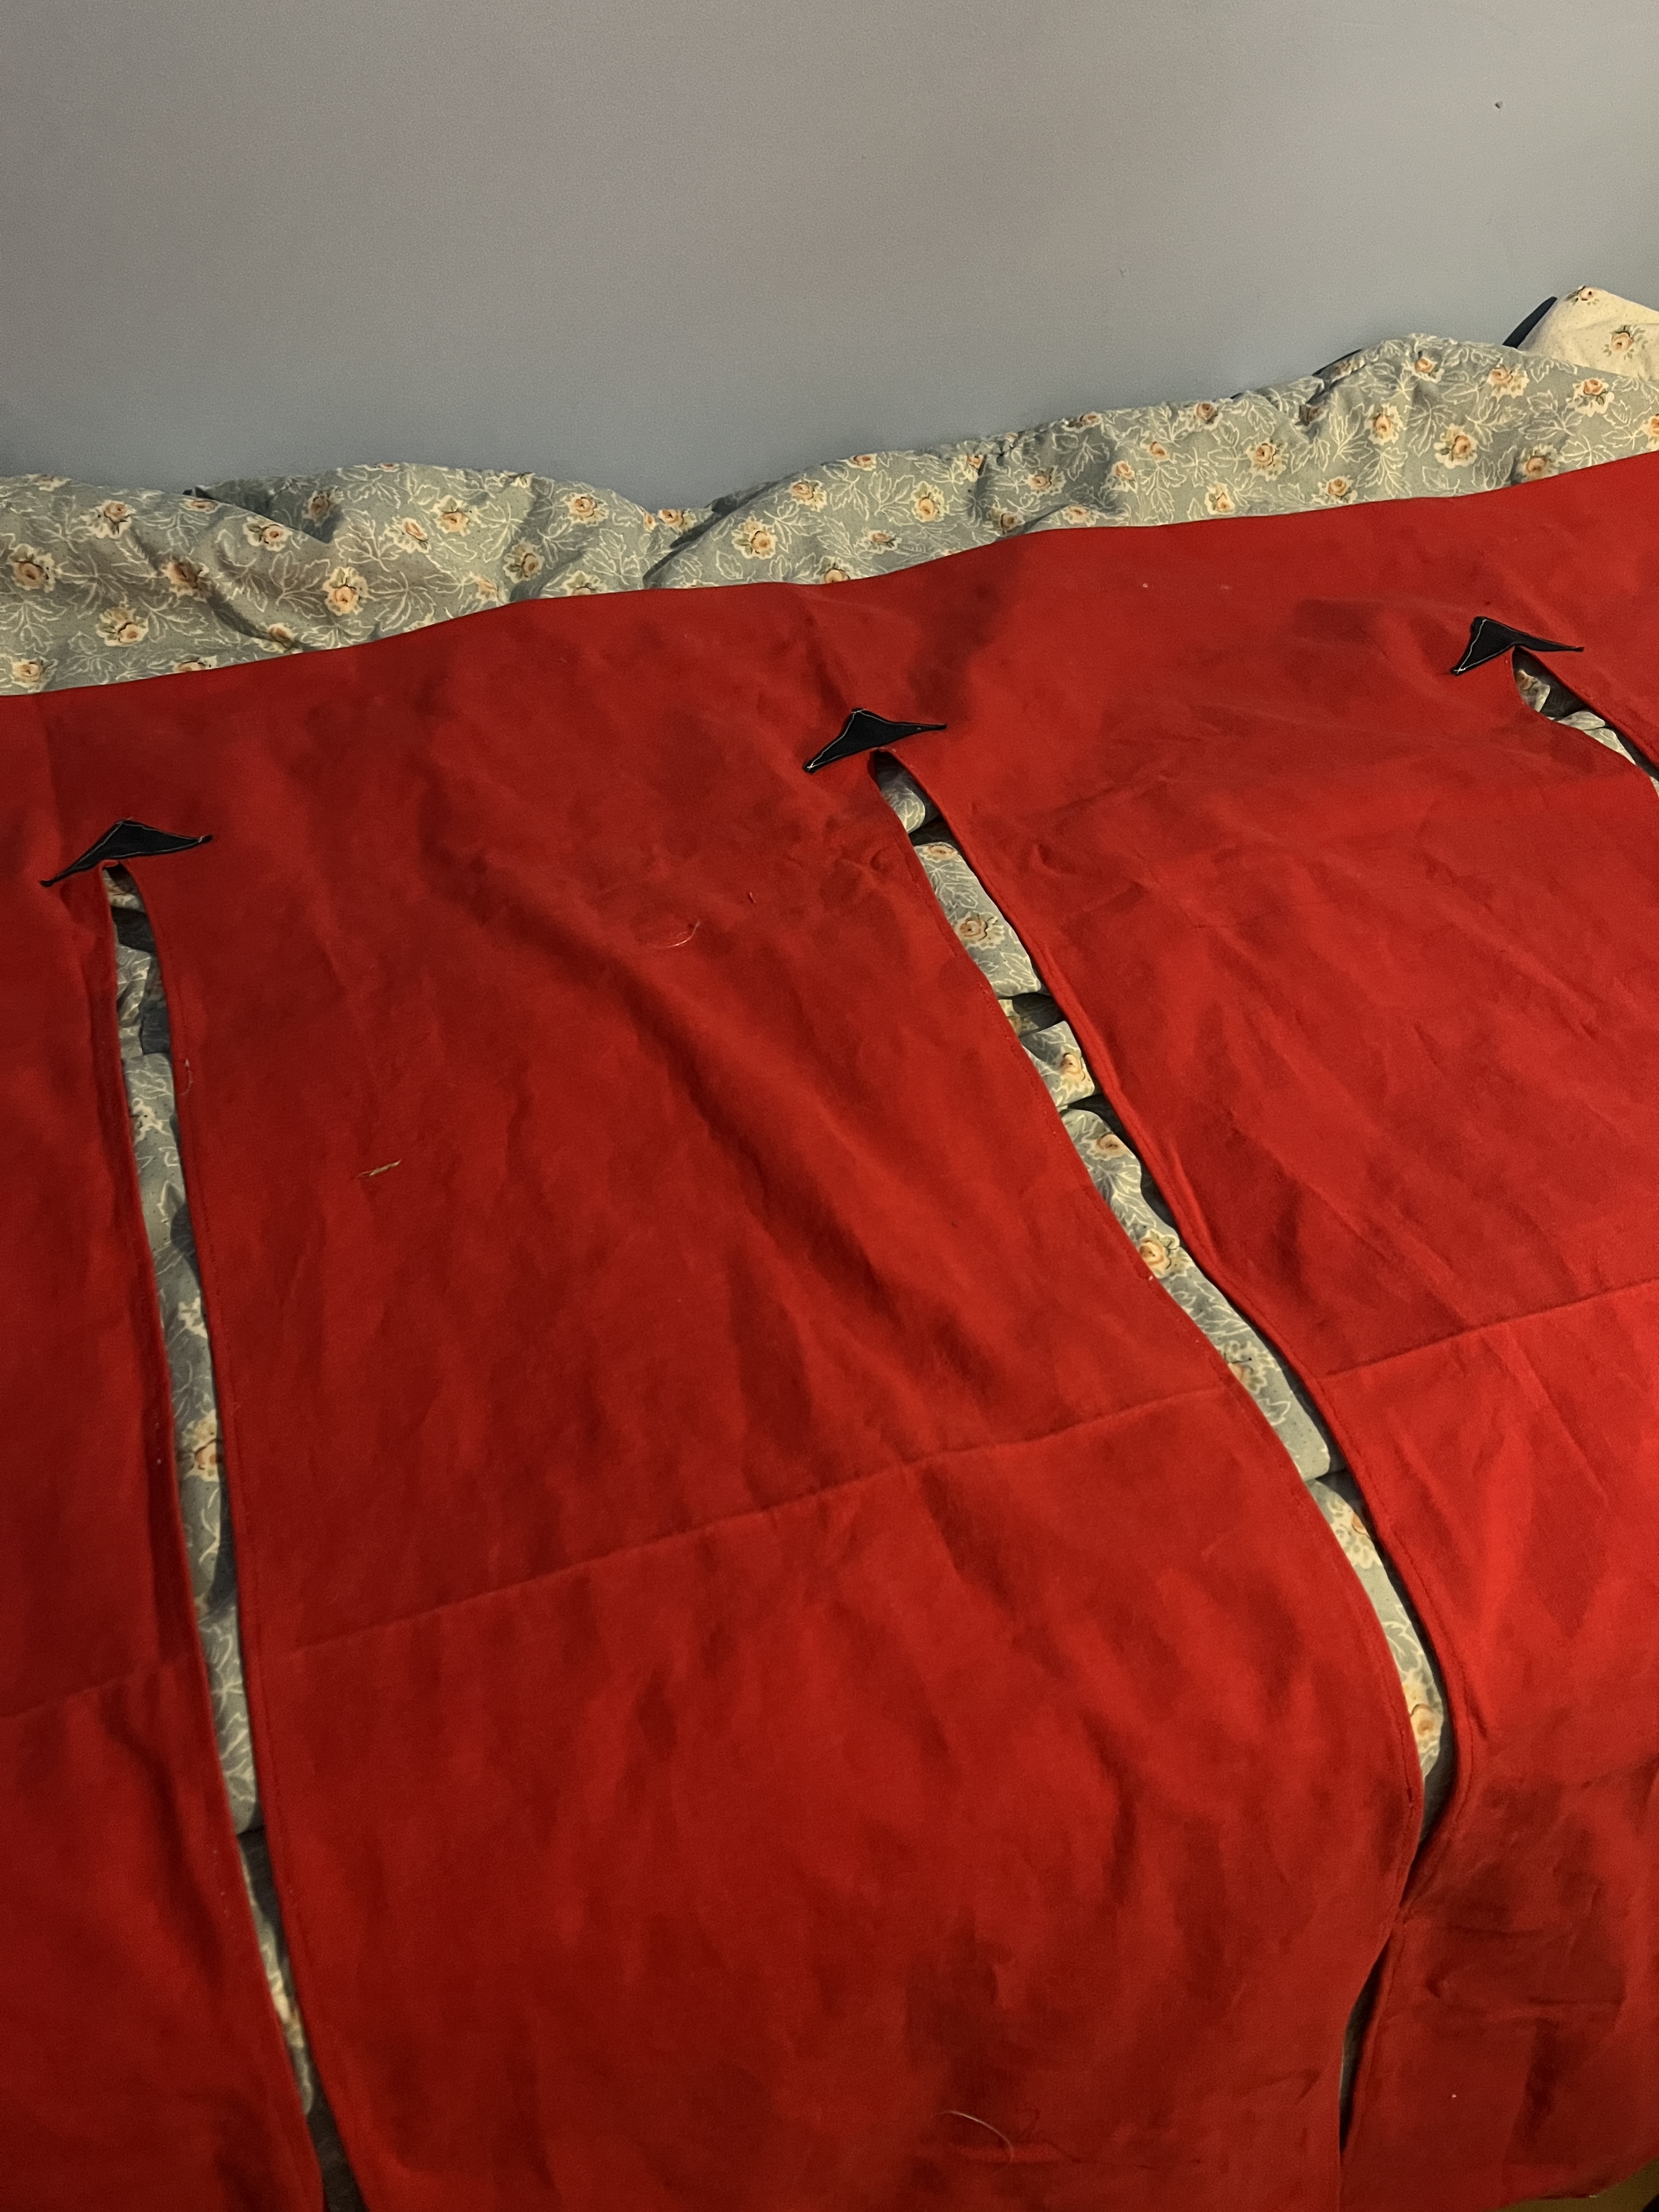
Repeat this for the other 2 cuts to make all 4 panels.
Now make the rip-stops for the top of the cuts. First cut some shapes to see what you like, then try them on for size. I decided on triangles this time.
Then make a nice pattern for the rip-stops, leaving room for a turn-under so they don’t fray.
Cut them out
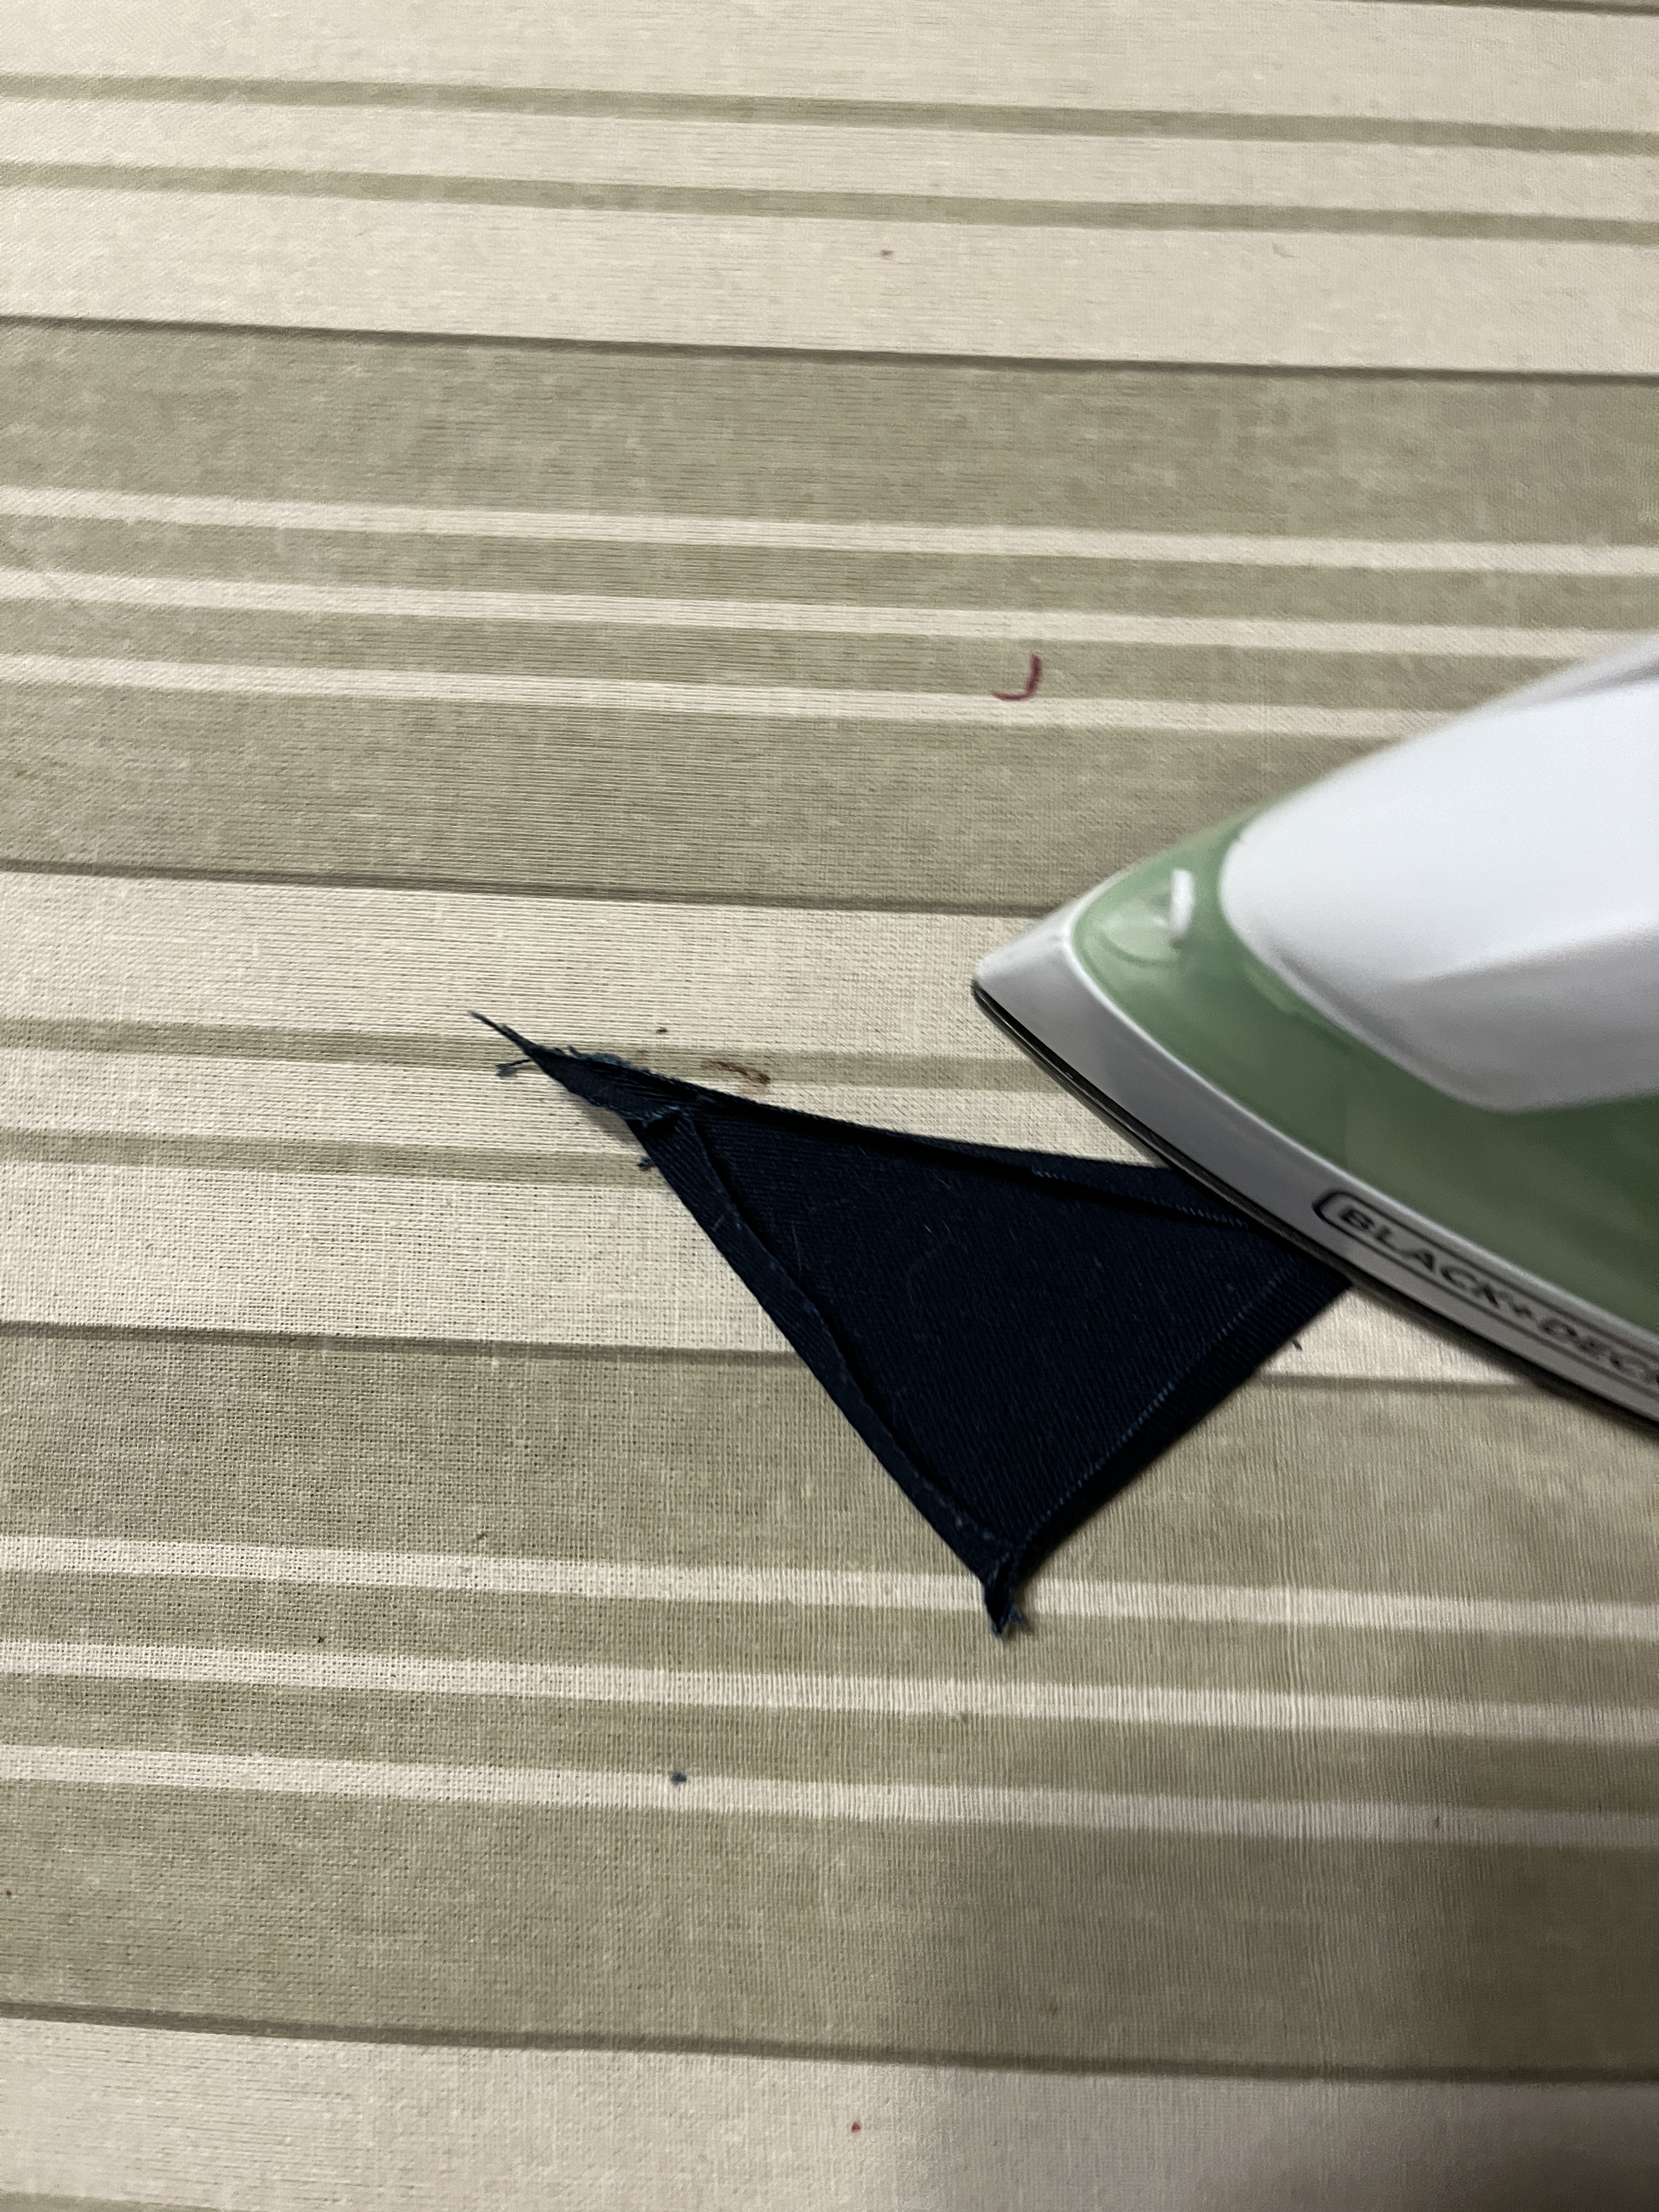
Iron the fold-overs and trim the corners to make them less bulky
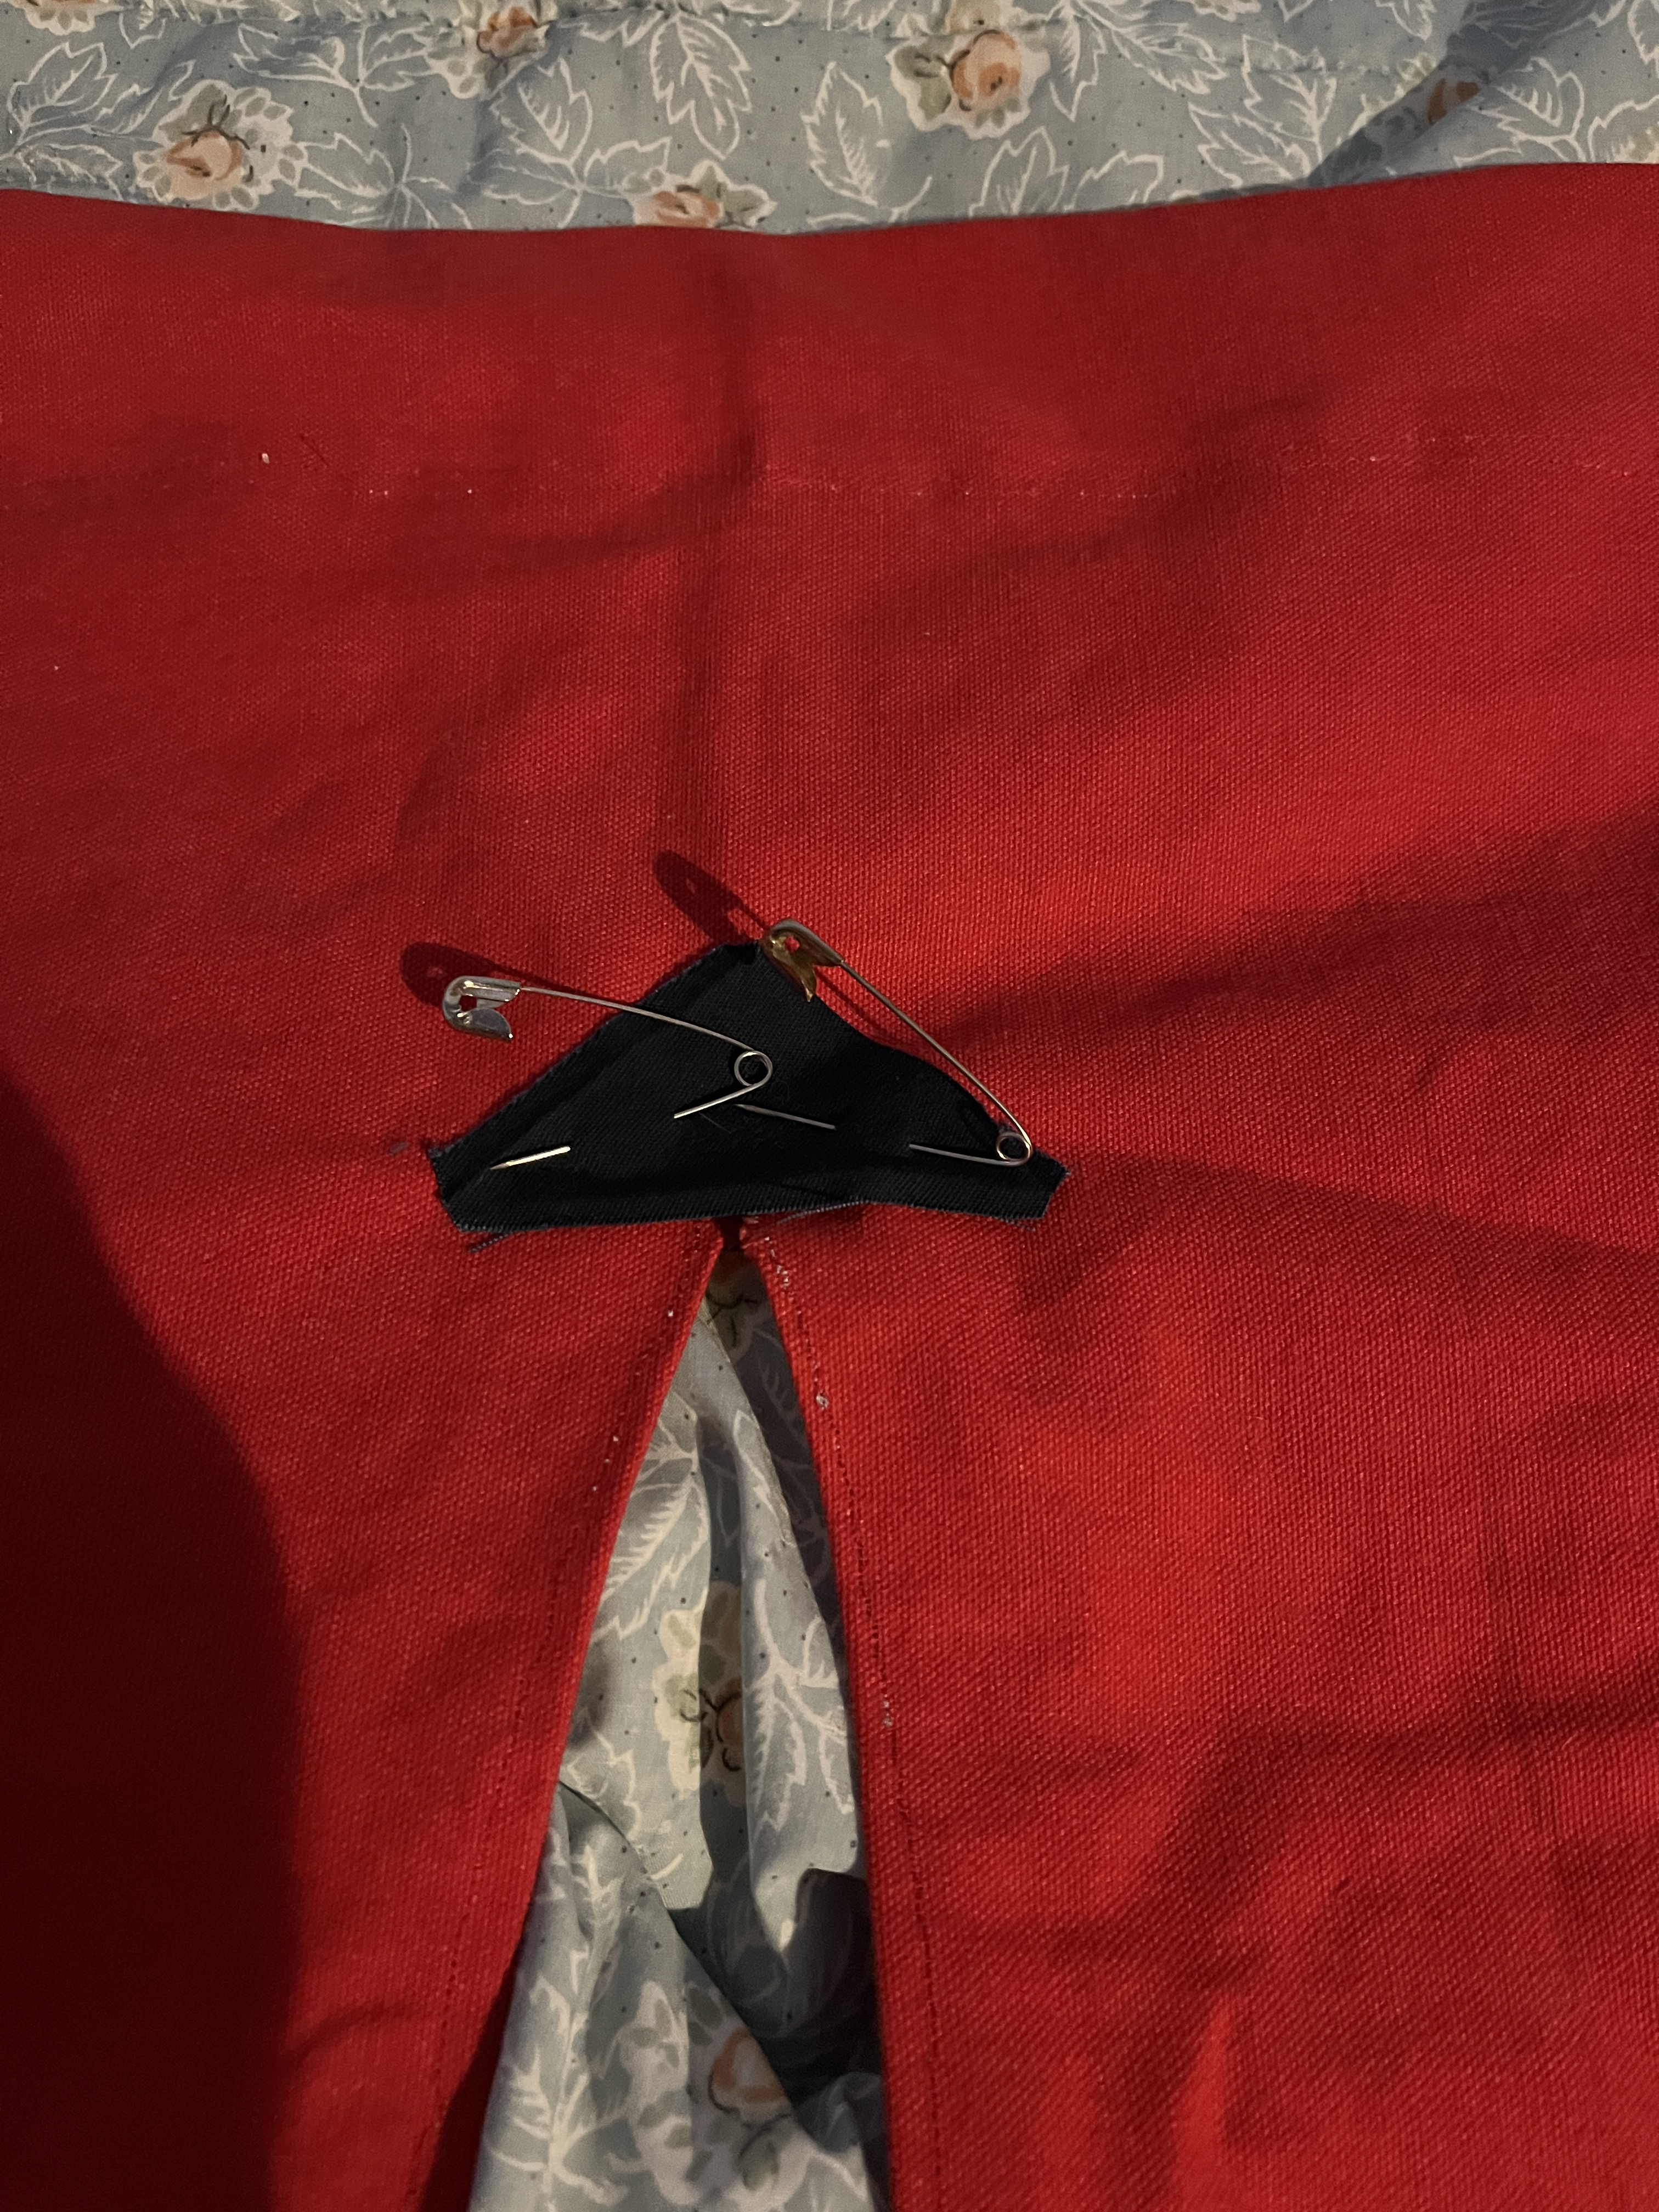
Pin them and sew them on. Straight pins work better but I still can’t find mine. Since I forgot to buy more (which would guarantee that I’d find the pins as soon as I got home) I used what I could find. Safety pins are not the best choice but I had them handy and they worked. I only stabbed myself a couple times. Also, a larger turn-under would have been easier to work with.
Close up of a finished rip-stop sewn on.
Now it’s ready for decoration…or not. Of course I’m going to decorate them! Anything worth doing is worth over-doing, but that can wait til tomorrow. The crew of the Enterprise is now a band of Merry Men and I figure a good night’s sleep is needed before the next part.
Now that you’ve had a good nights sleep it’s time for the fun but nerve-wracking stuff. Fun because the art is finally happening, nerve-wracking because if it goes wrong I’ll be devastated and don’t want to start again after all this!
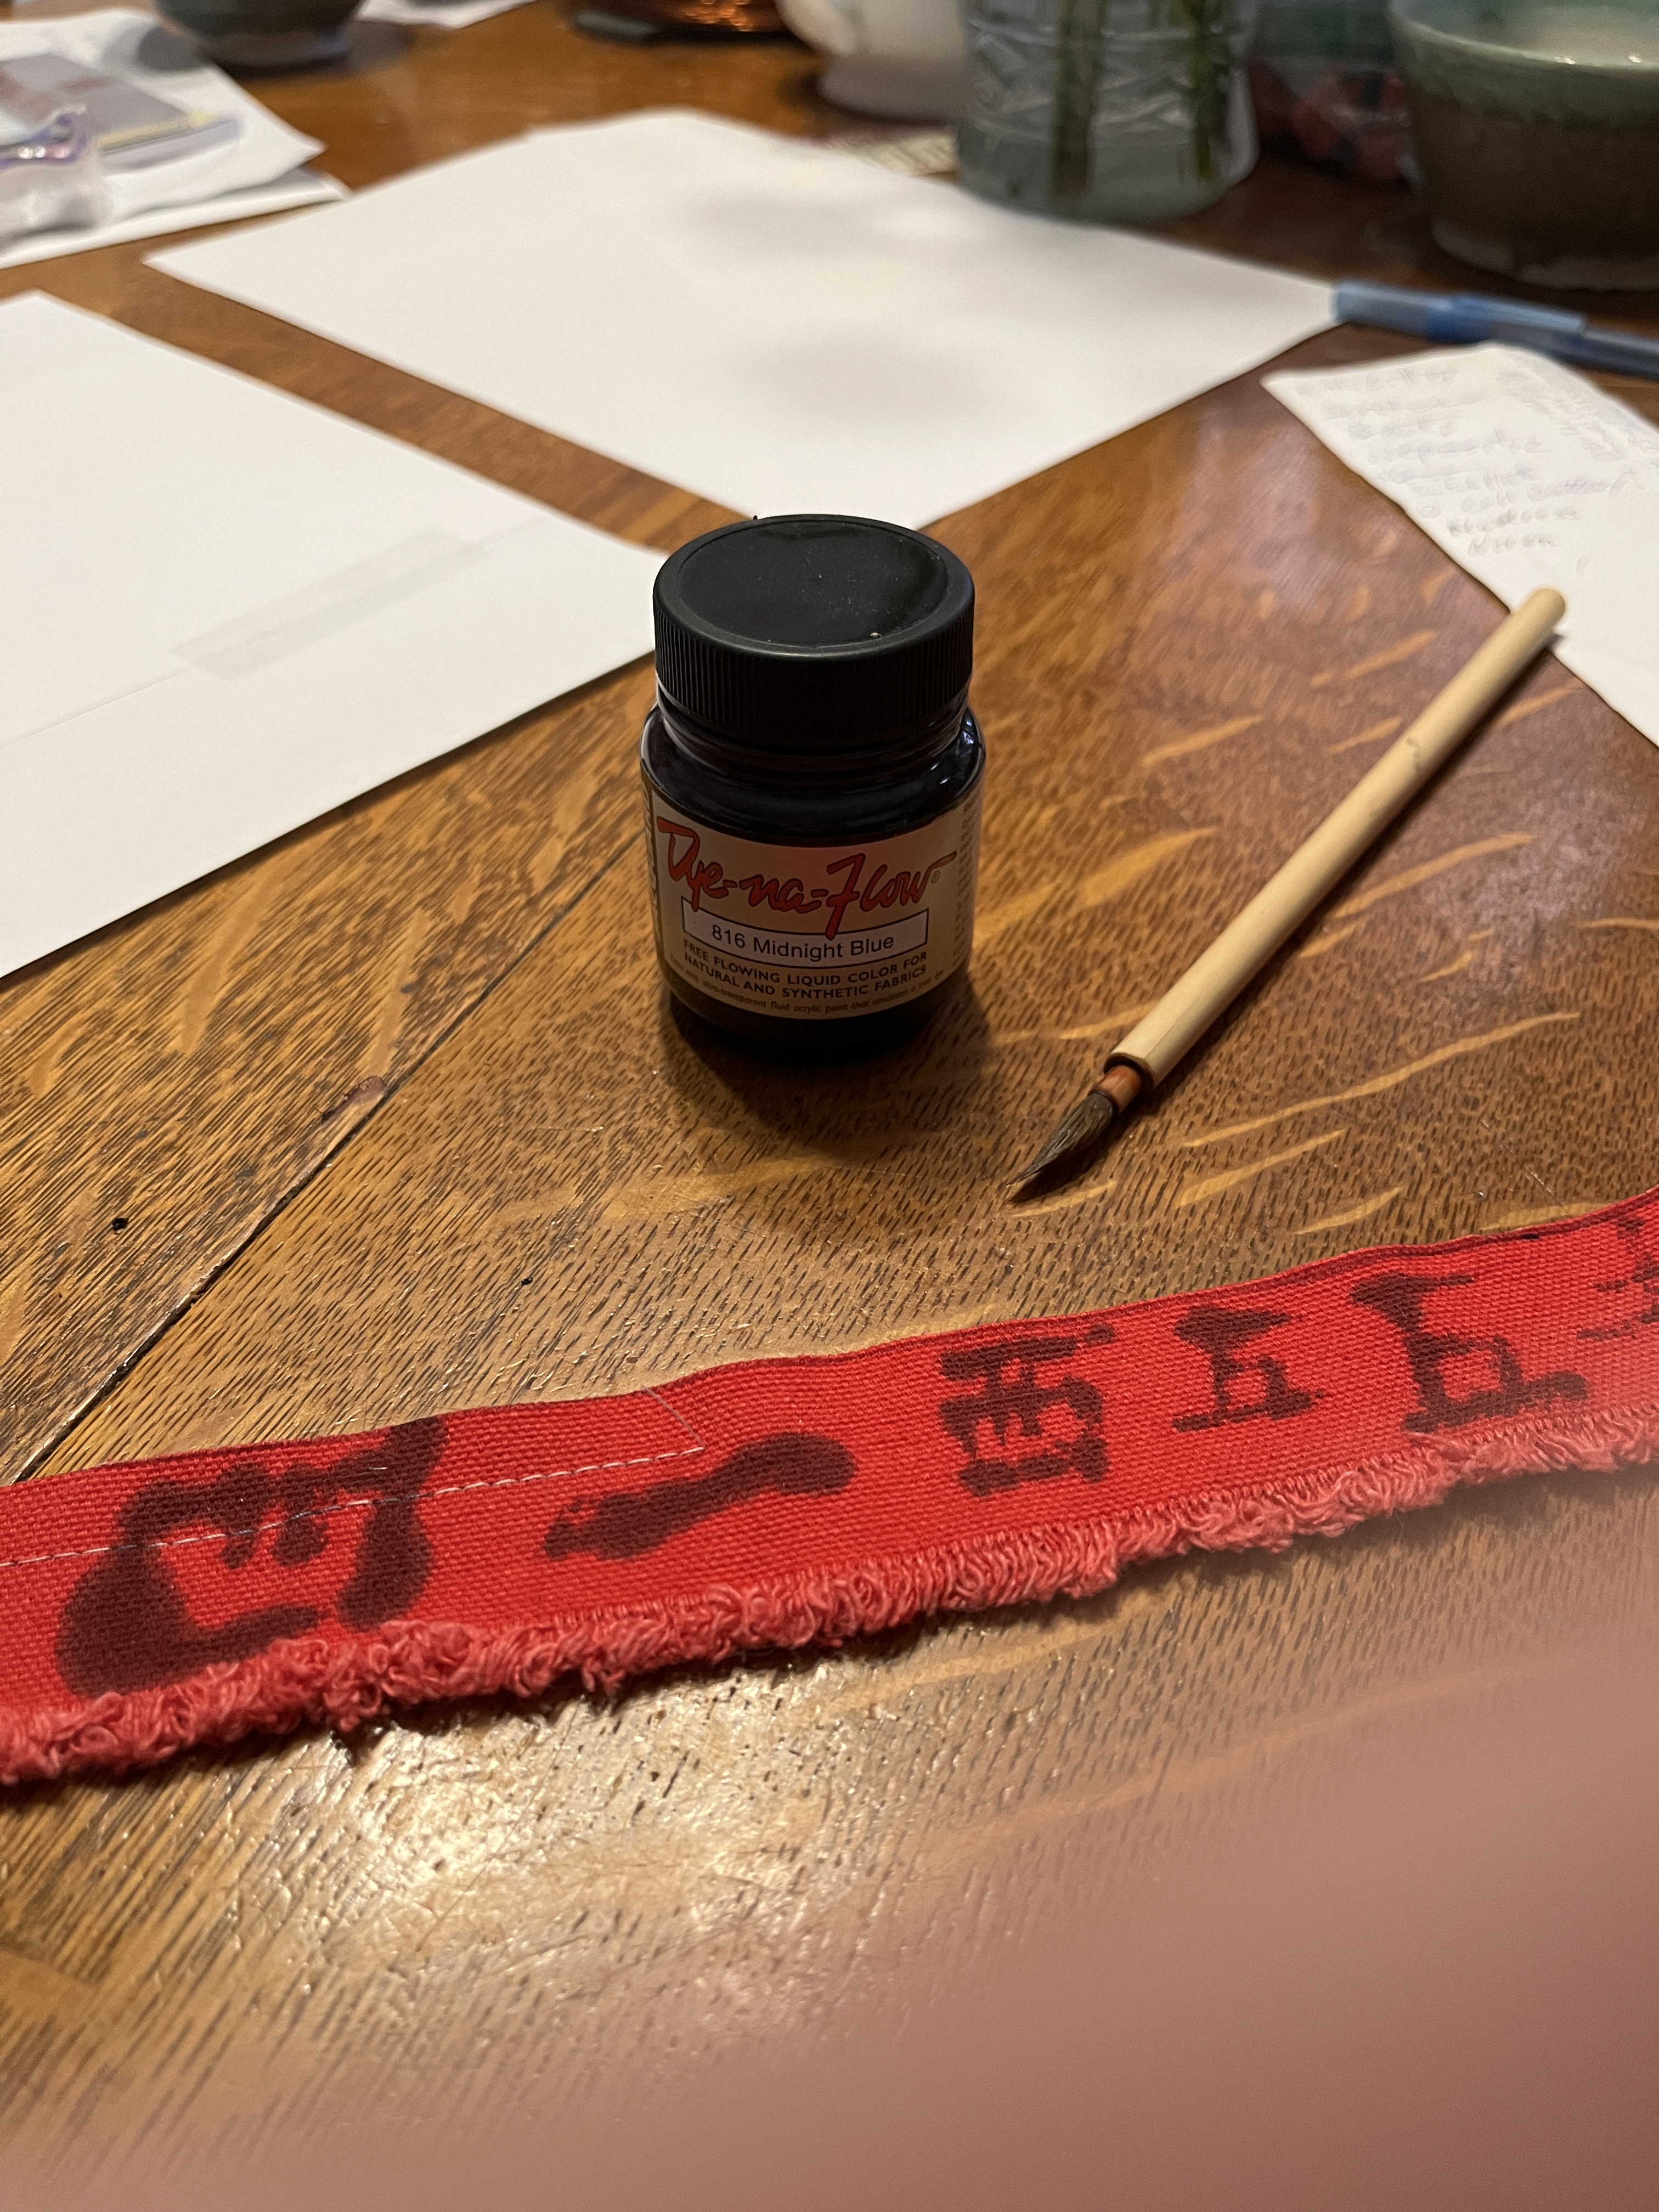
So, try the fabric dye on a swatch of spare fabric. I’m using Dye Na Flow 816 midnight blue.
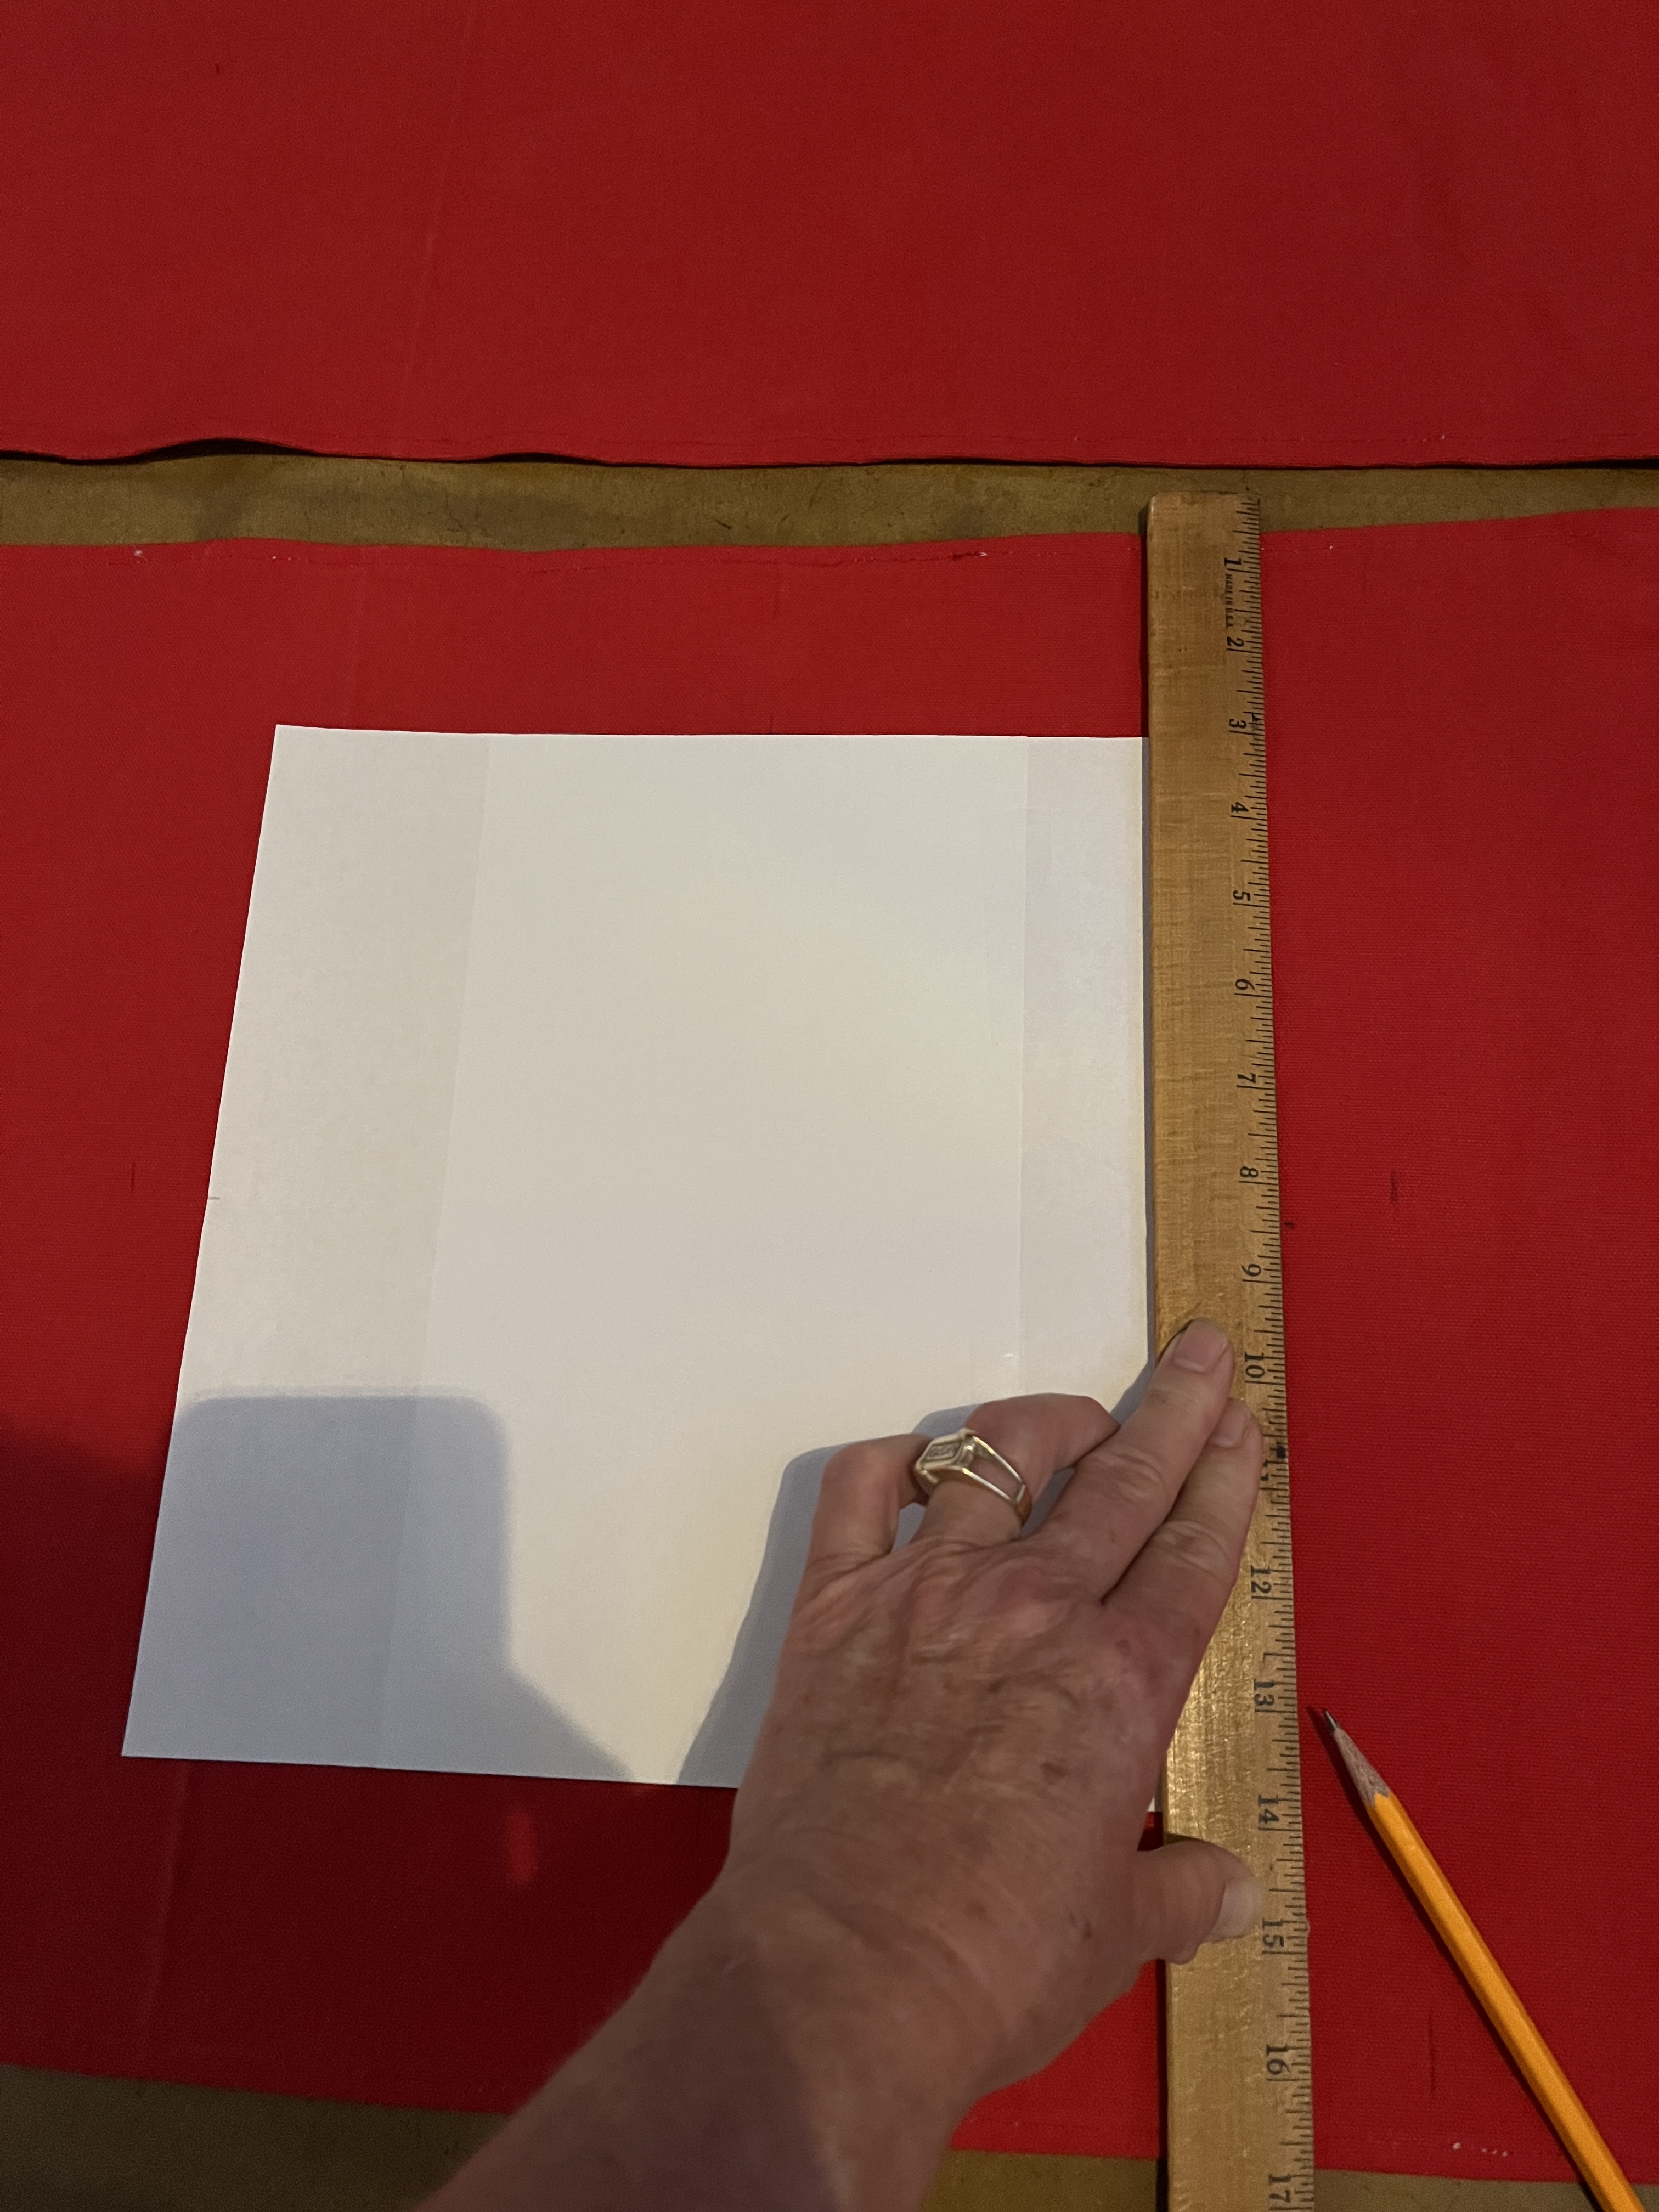
Make a template for spacing the characters or whatever you want to paint on, if it’s something that’s space-specific. If it’s just art go for it freehand (well, maybe do a bit of sketching with light pencil marks so the overall design doesn’t get out of hand).
I’ve measured, found the center of each panel and lightly marked the areas to paint in the characters I want.
You can hardly see the pencil lines and they’ll eventually wash out. It’ll work but I got too much else done today and ran up against the end of the day so the actual writing will have to wait another couple days. I have to pop over to pick some stuff up at a friend’s house tomorrow.
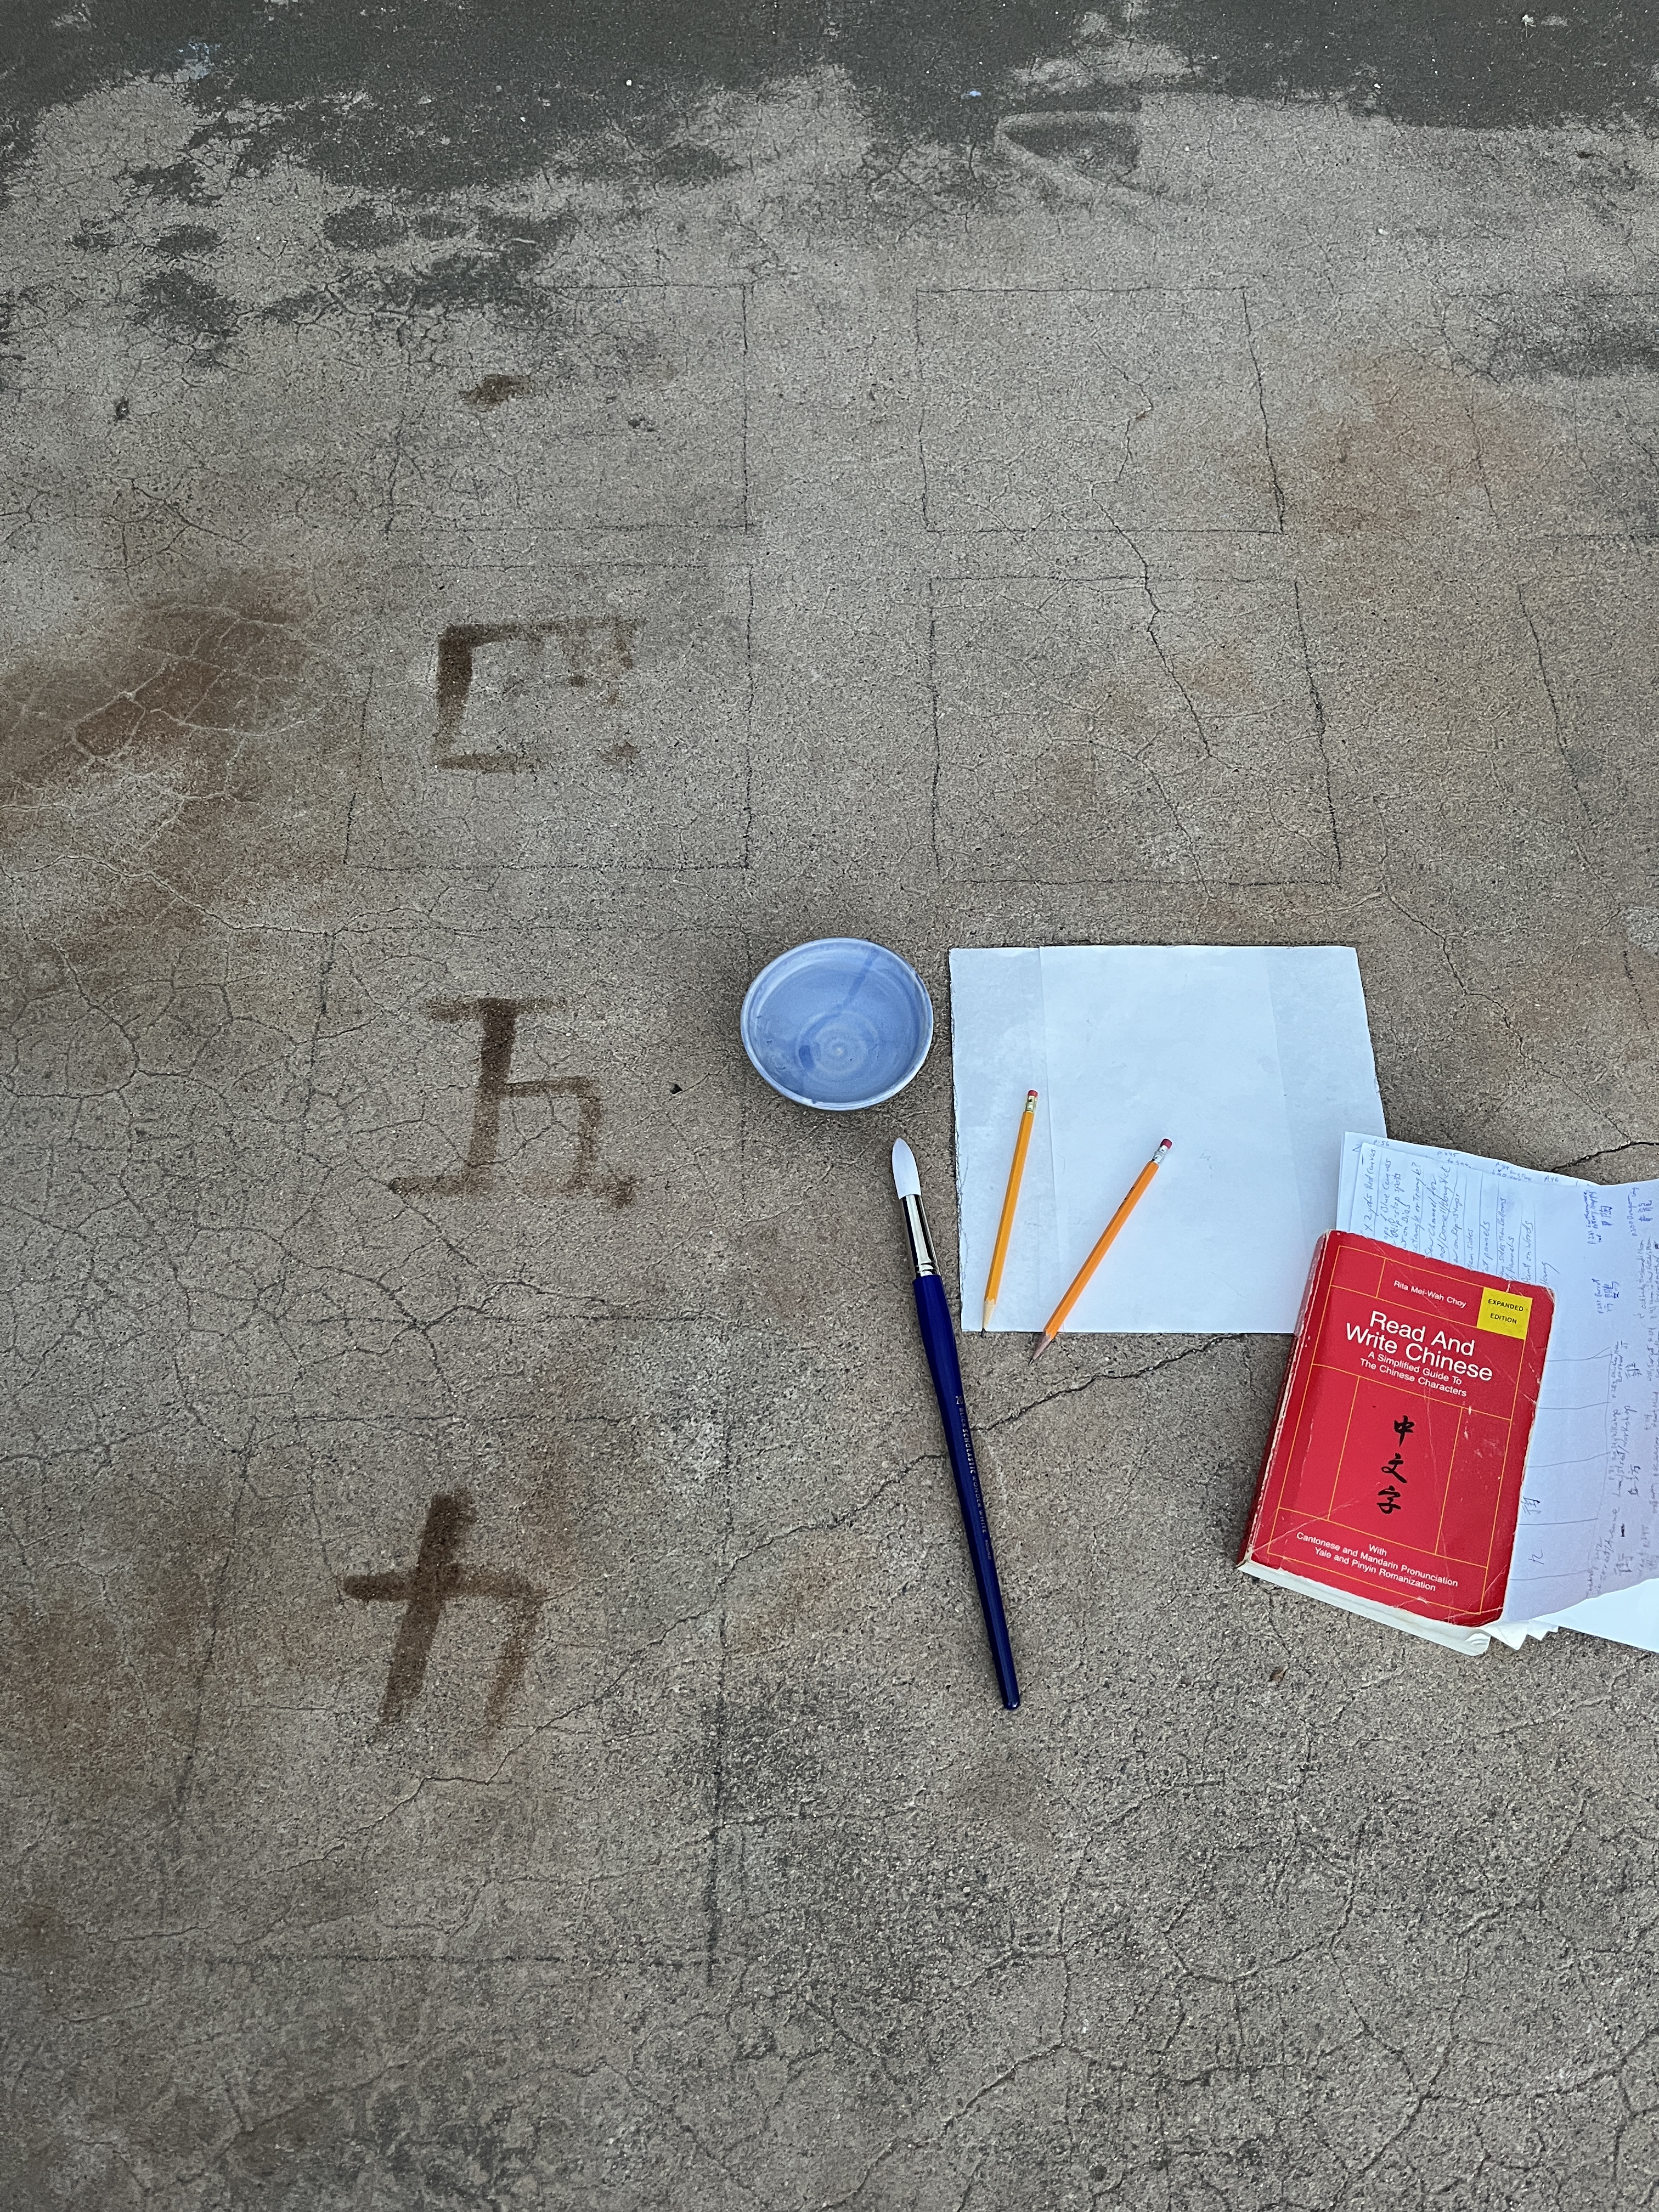
Before doing the actual writing on the cloth I’m practicing on the driveway. First I drew faint squares roughly matching the Noren. Mr Grey, the outside cat got bored and walked away.
Then I used water to practice on the driveway and make sure the characters would be balanced. When I was a kid Mom used to find things for us to do. It made us happy, sometimes we learned something and it kept us out from under-foot. Sometimes she’d give us each a bucket of water and a paintbrush and tell us to go paint the driveway and sidewalk. We’d paint to our hearts content, it would dry and be none the less for wear. Then we’d get bored and do something else, maybe climb a tree or make a fort.
I had hoped to get much of it done before losing the light at sunset, maybe do the rest in the morning. As I started the second character (4) I felt the first drop. Then a few more. I grabbed the book and stuff, put them under the porch, tried to finish 4 and had to grab and run as the skies opened up! Apparently big raindrops make the dye run a bit. The project is now spread on the bed in the back room to dry. I’ll finish in the morning.
This is the cloud that got me. He wasn’t there when I started. Now I know another way to make it rain here: do a project in the open that shouldn’t get rained on! You can even see some blue sky still up there! If we didn’t need the rain so badly I’d complain, but I’ll just try to touch it up as I finish in the morning. Now to get a decent night’s sleep since outside stuff, except for watching the lightning show, is not happening tonight.
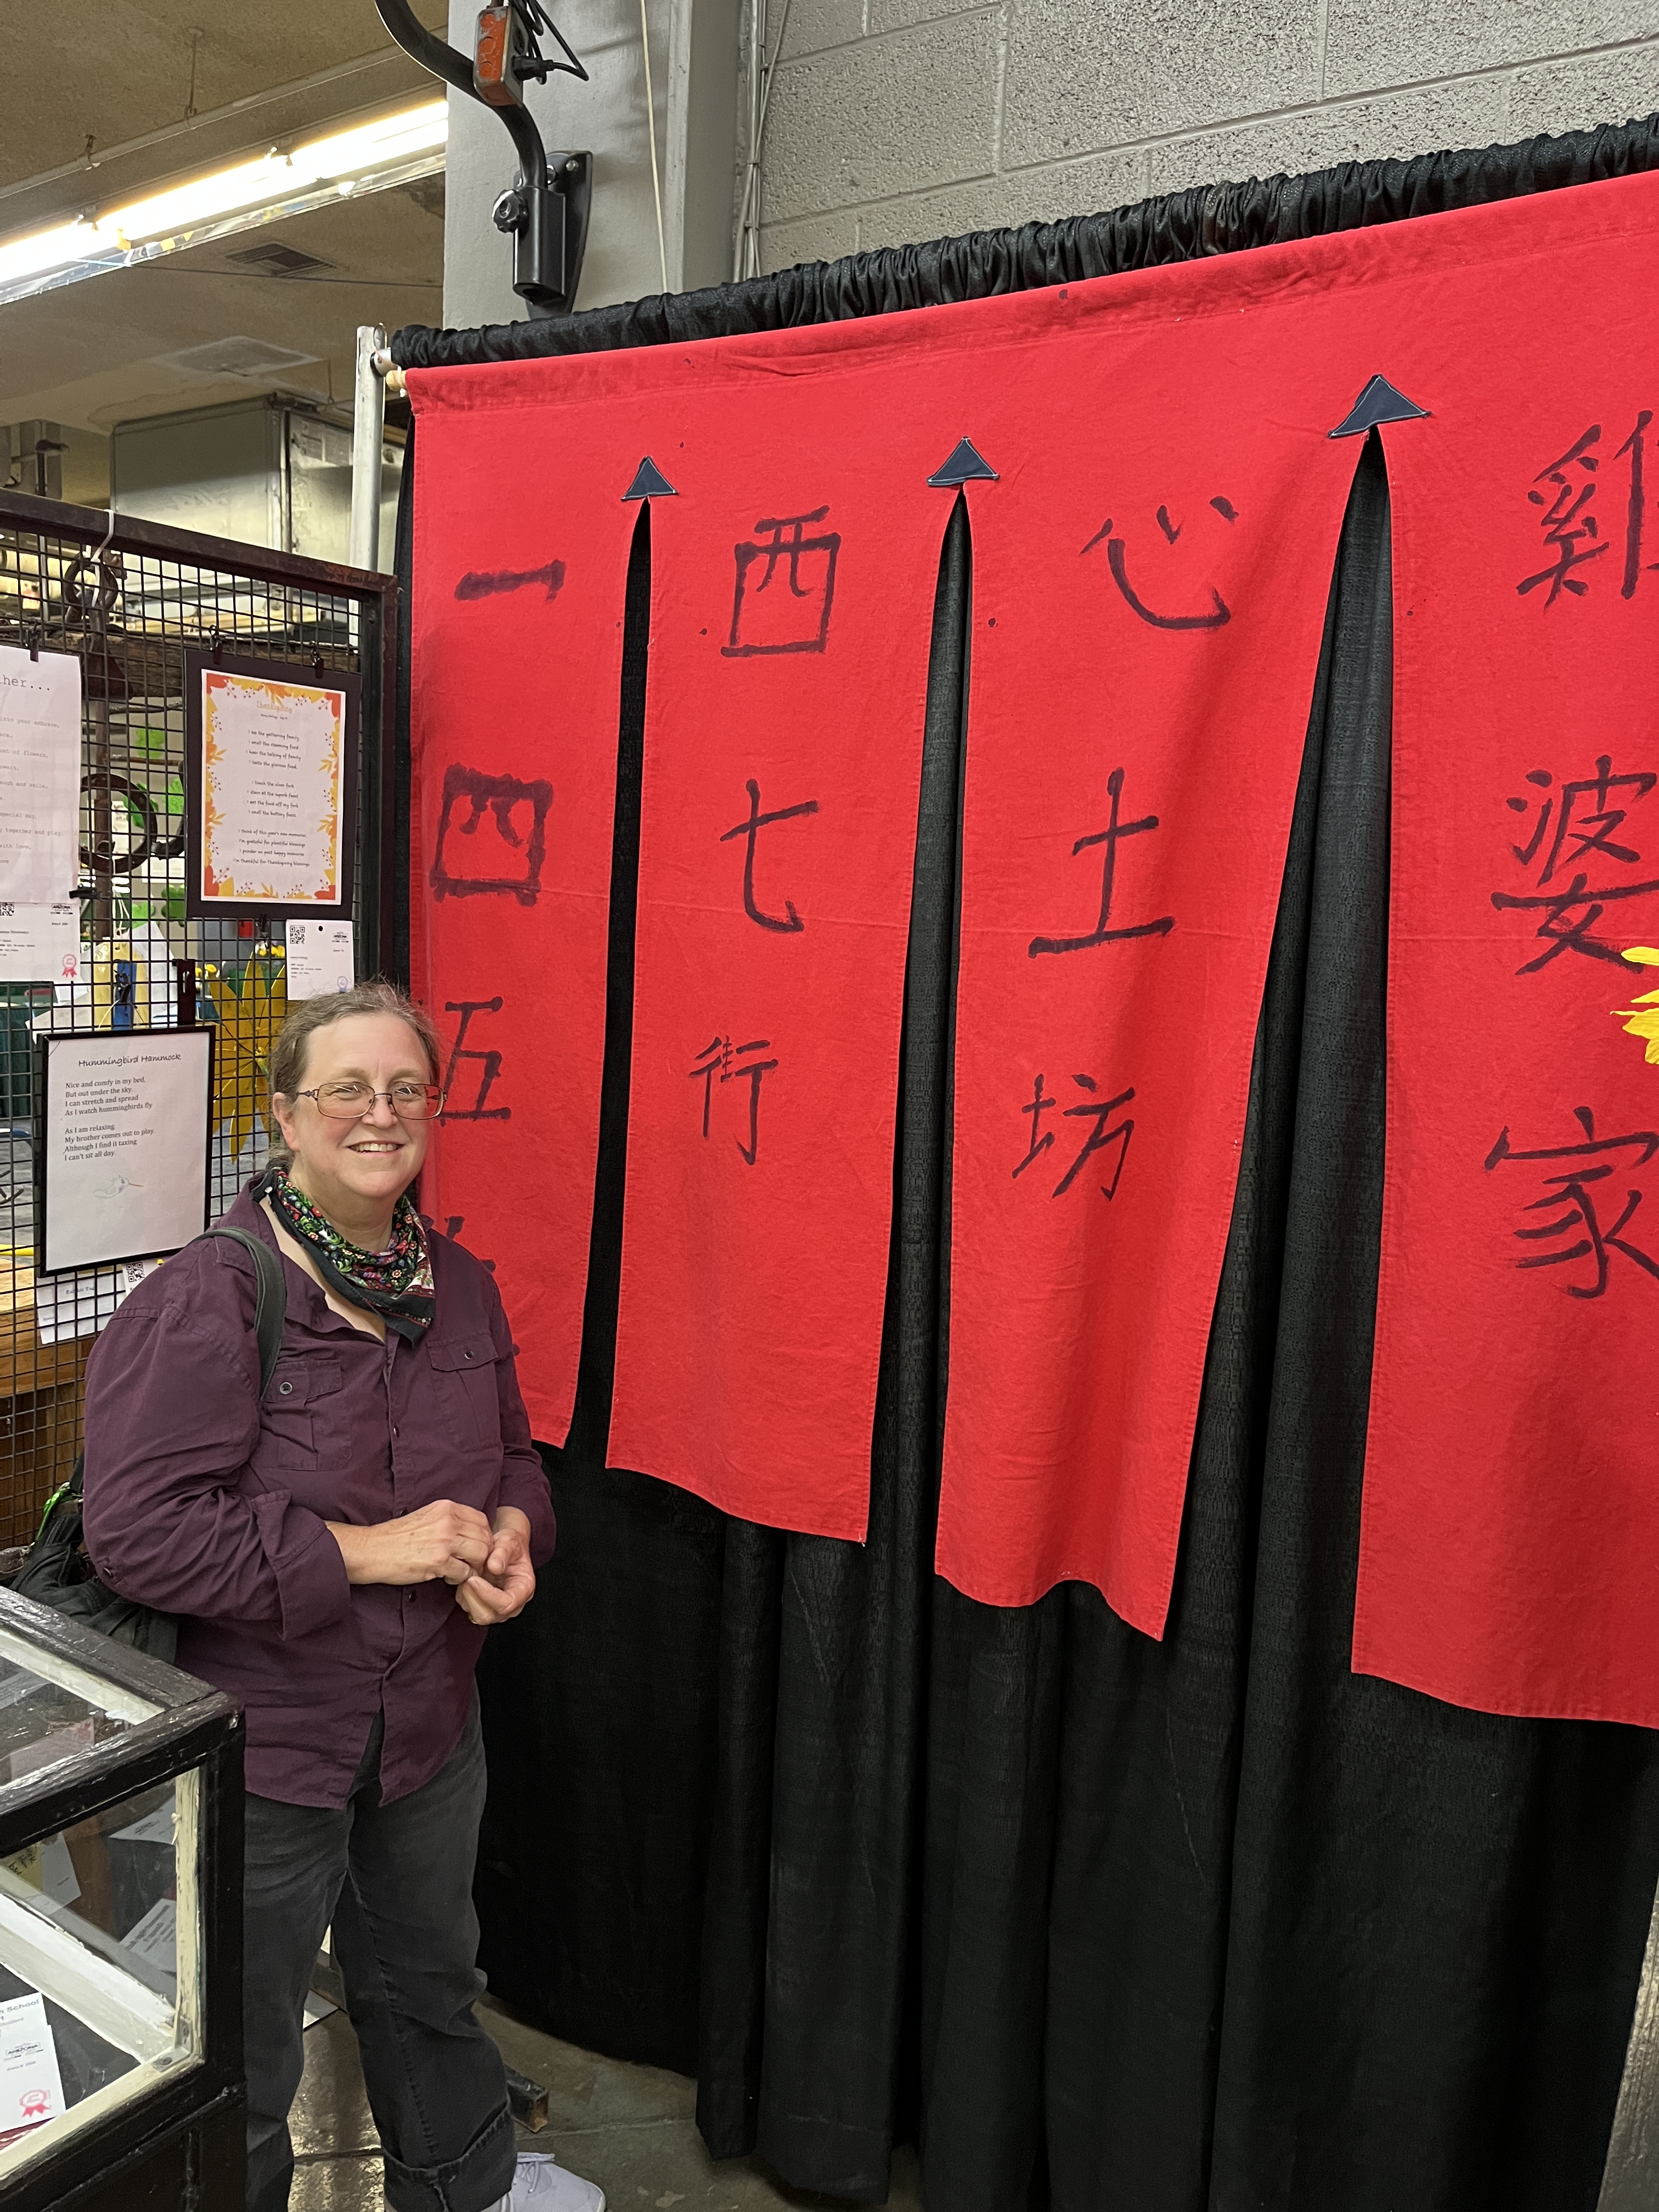
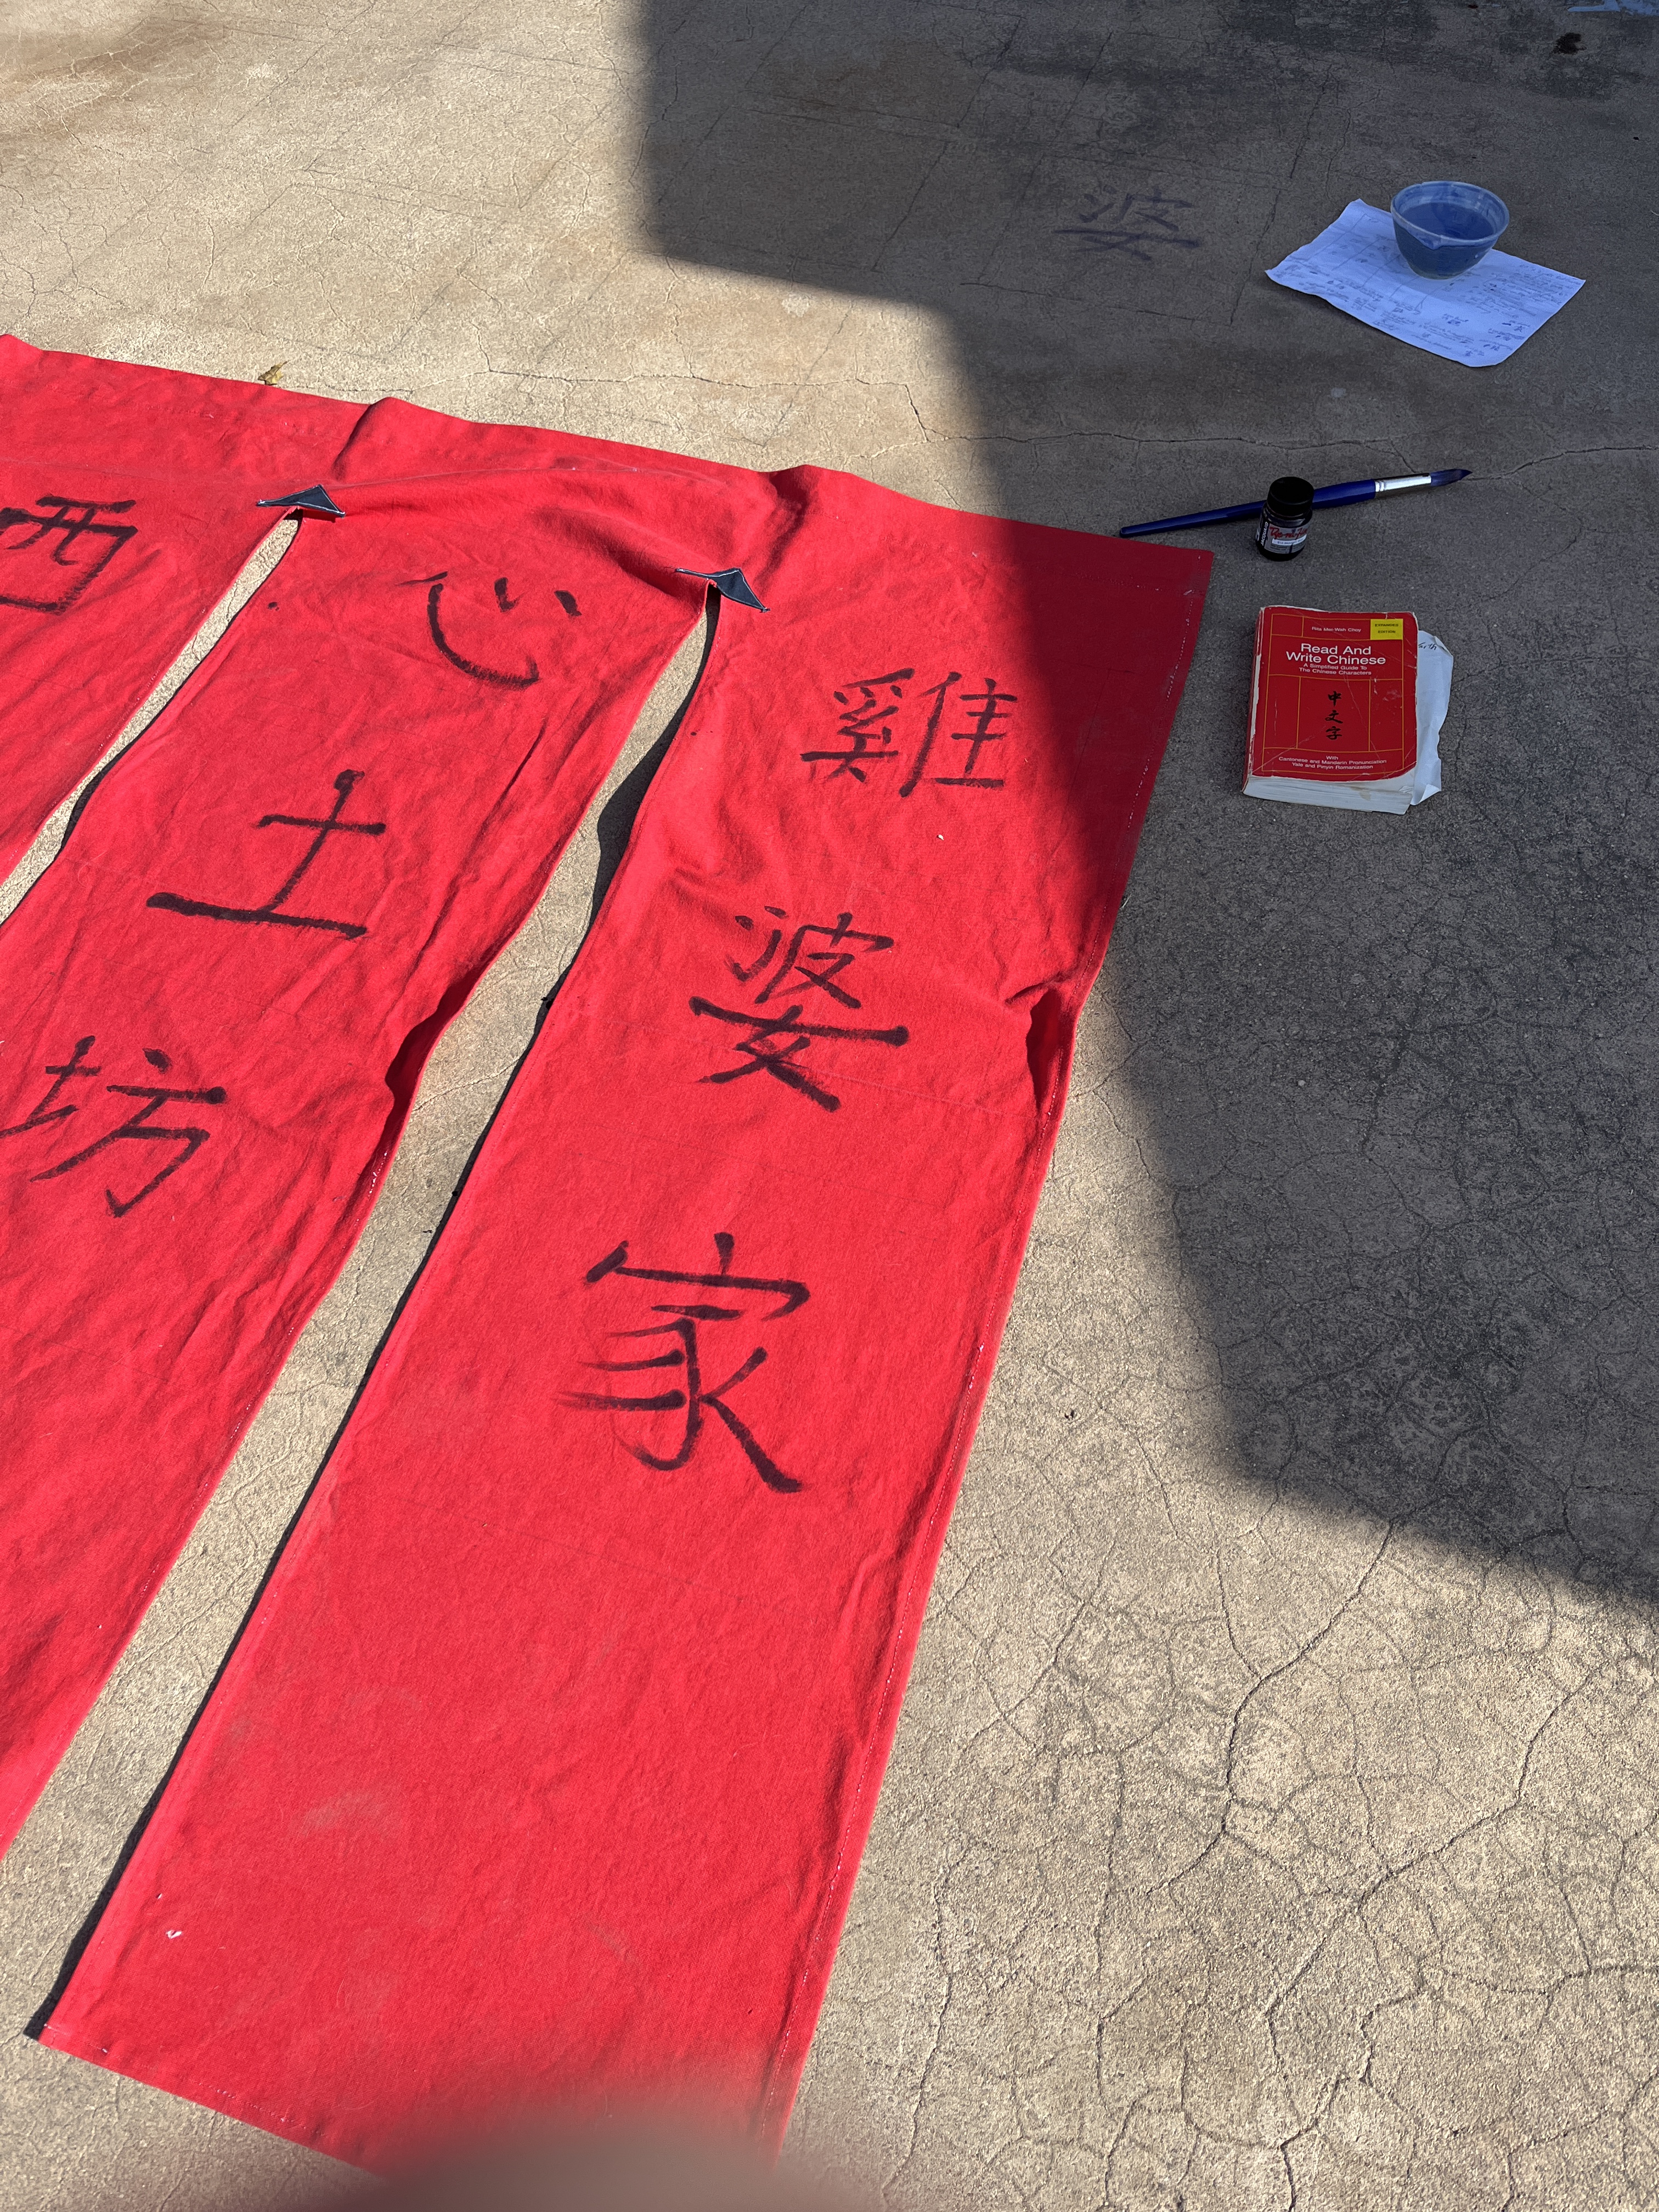
What am I writing? My address in Chinese! Why not? It’s going on the side of the house. But that takes up only 2 panels, so the other 2 panels will be my potter’s mark (earth-mind/heart) and pottery/stoneware and the last panel will probably say Chicken Grandma House. Just because. If I ever get back to selling pottery I can put it up at the front of my shop when it’s not needed for shading the house. I put this picture up on Facebook as a teaser on my project. A friend commented “Pie are round, cake are square” and now I have a way to remember how to write ‘west’ in Chinese!
Another 7 days, another weekend for me to work on this. YAY! A little practice on paper before heading back out to the driveway. Grapes make an easy snack, too.
Graphite comes off concrete easily so I had to draw the squares on the driveway again before practicing new characters for the Noren. Then I started again. Turns out concrete gets hot in 100 degree heat so I grabbed a pillow from one of the porch chairs to kneel on. No, it’s not quite finished. I had to pop inside for water, Gatorade and a salty snack before the last bit.
The last bit of writing is done! No rain so far today but I did learn that even drops of sweat can make the dye run! Now back inside for more water.
After a bit of touch-ups and tea it’s time to set the dye. Following the instructions I’m ironing from the ‘wrong’ side of the cloth with the iron on as hot as possible for the cloth. This is 100% cotton, so that’s pretty hot. I used the scrap denim from the rip-stops as a backing to make sure the dye doesn’t run onto the ironing board. Boy. 3 minutes is a long time! Especially when you have to do it 13 times! Then again for any spots I didn’t see from the back side, so 15 times.
Now to wash in cold water and pray real hard that I did this right.
Success! It worked! I tossed it into the dryer to fluff it and start the drying then ironed it to finish drying.
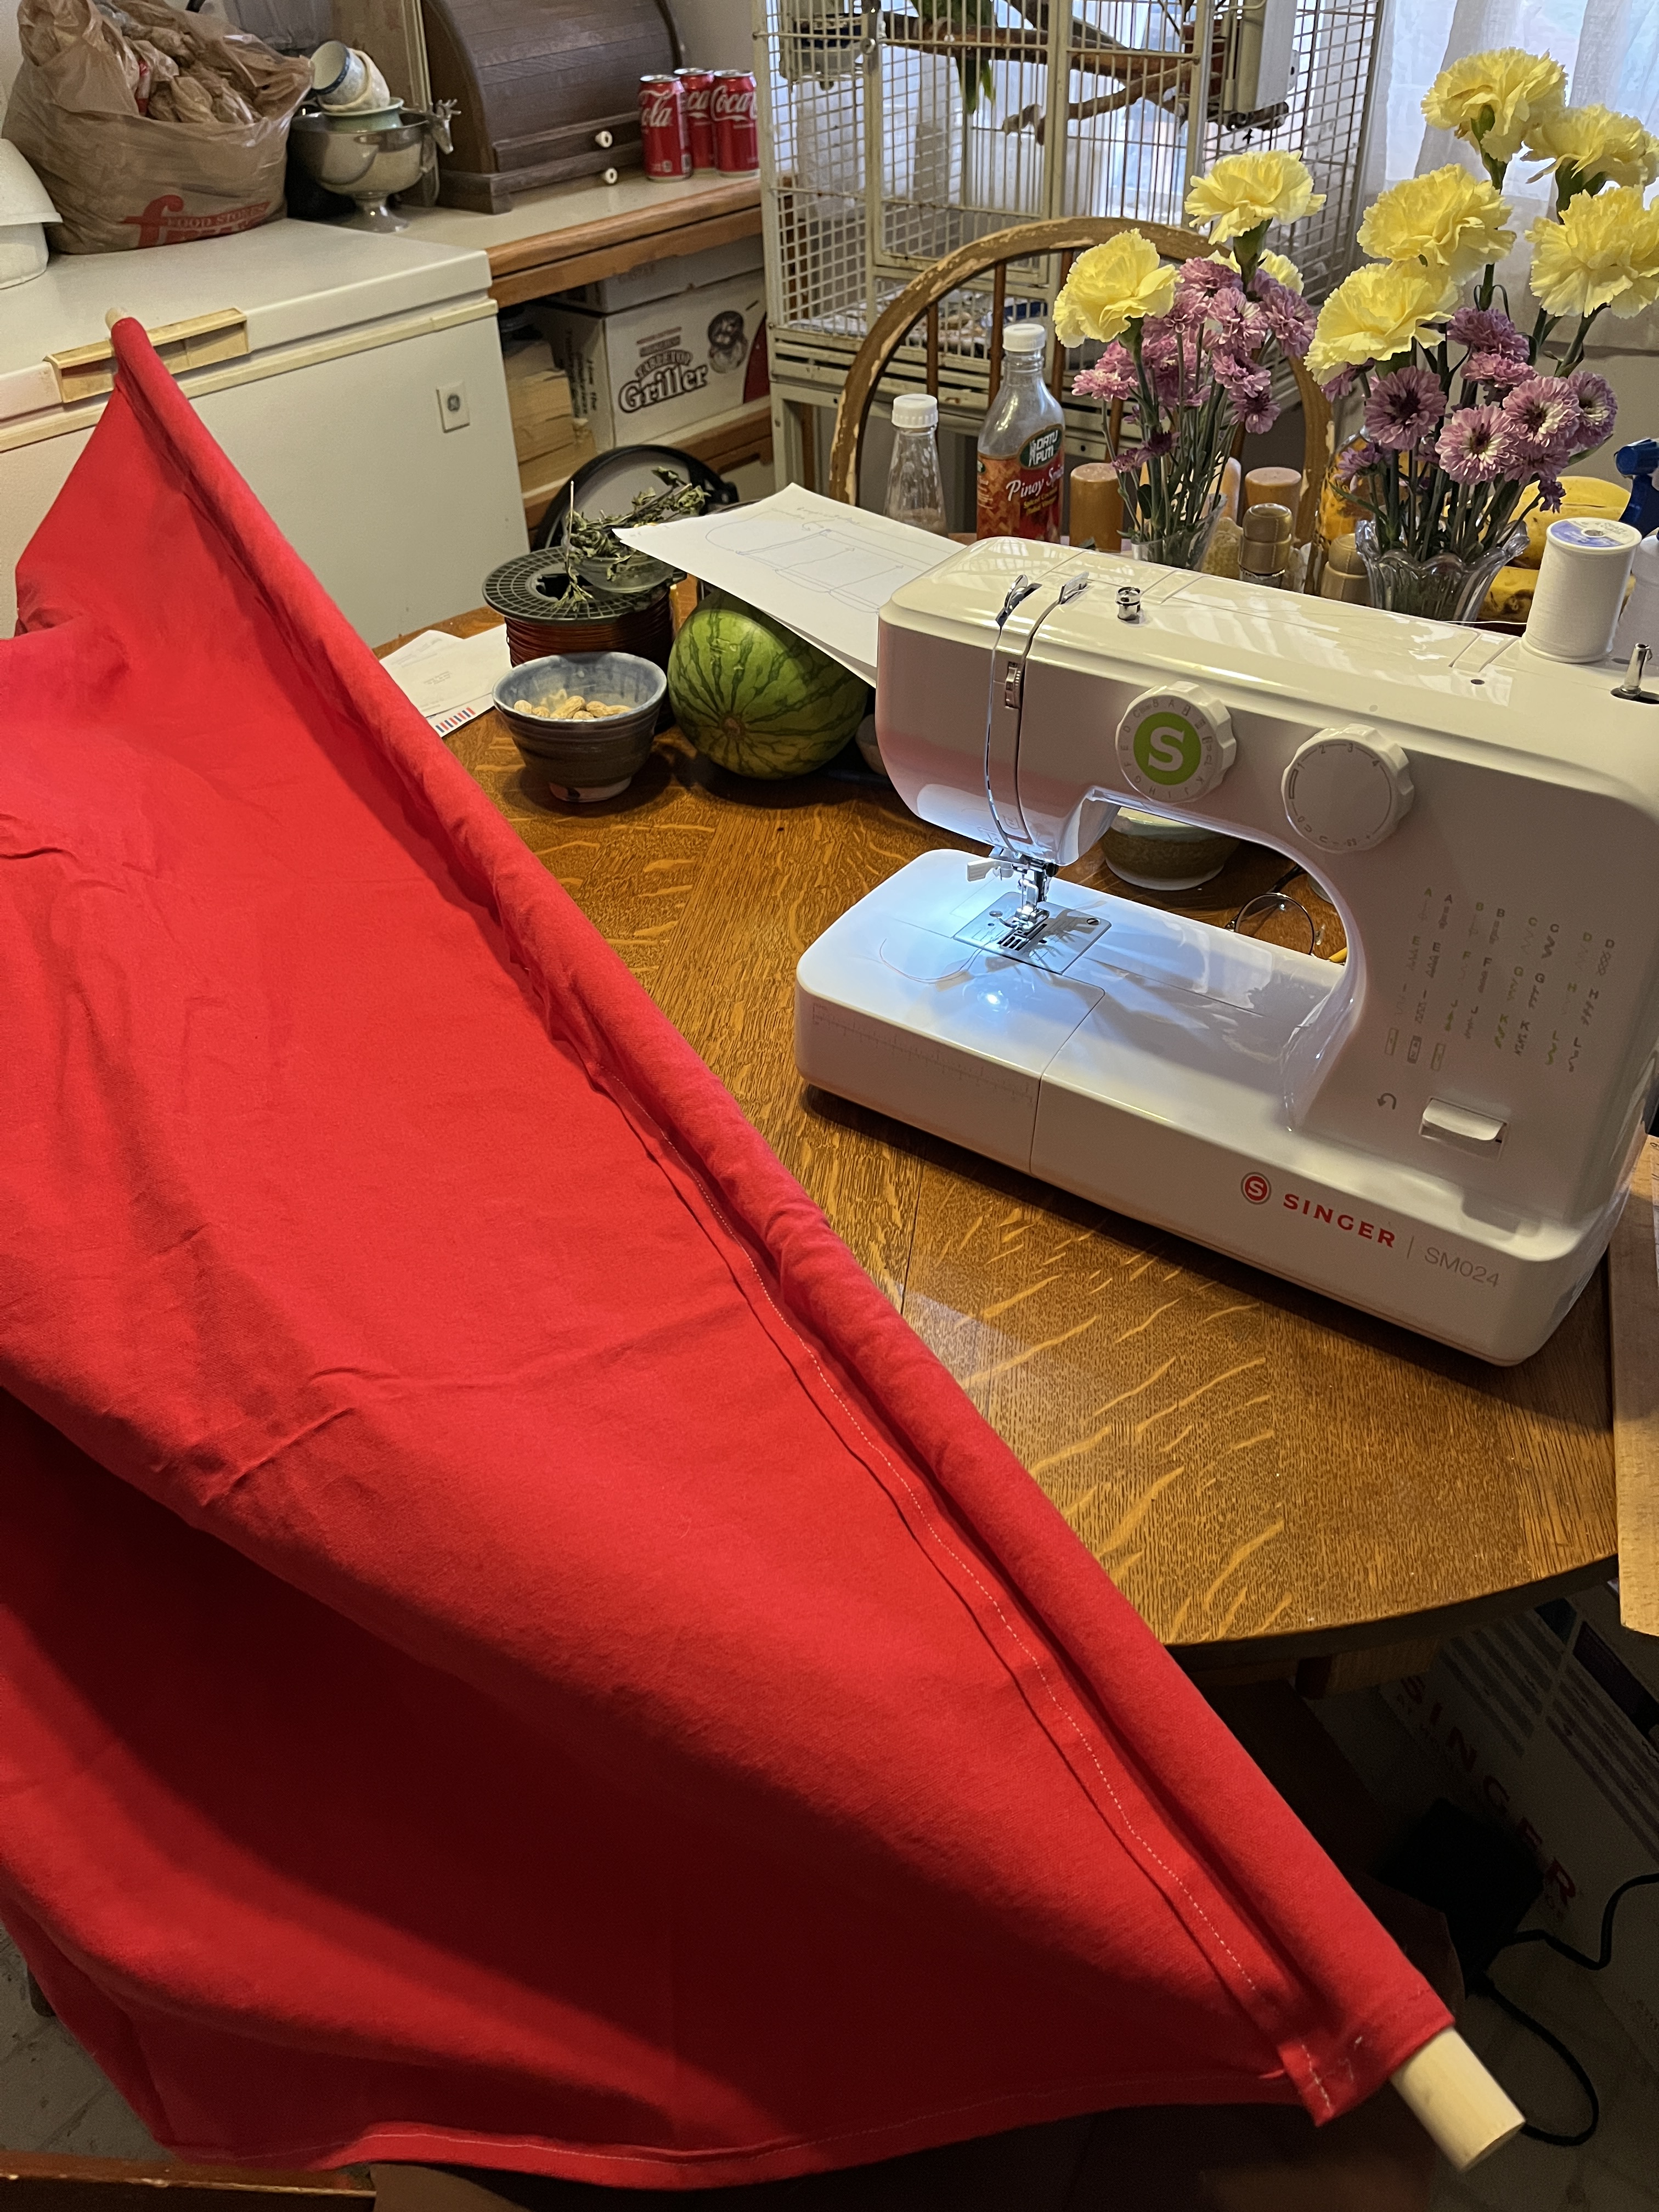
Inserted the dowel and draped it to inspect. Paco approves. Too late and dark to hang now, I’ll put it out tomorrow. Stay tuned for the final chapter.
What to have for dinner…? I’ve got potatoes I need to use! I stick ’em in the microwave and nuke them for about 5 minutes while I rummage through the fridge. Leftover roast pork. A smidgen of cottage cheese. Some spaghetti sauce leftover from making a pizza and some chopped olives. Well. I guess this, again, isn’t so much a recipe as a set of directions on how to use stuff you have around to make other stuff. Yes, I’m being a bad influence again and of course you’ll try this because who wants to follow a good influence? That’s no fun. So what next?
Slice an onion (we always have onions!) and peel and slice the potatoes. Well, you don’t have to peel the potatoes, but I needed something to feed the chickens so I did this time. I prepped 4 small spuds in the microwave but only needed 3 so the chickens got the extra. I cut it up and let it cool, first, of course.
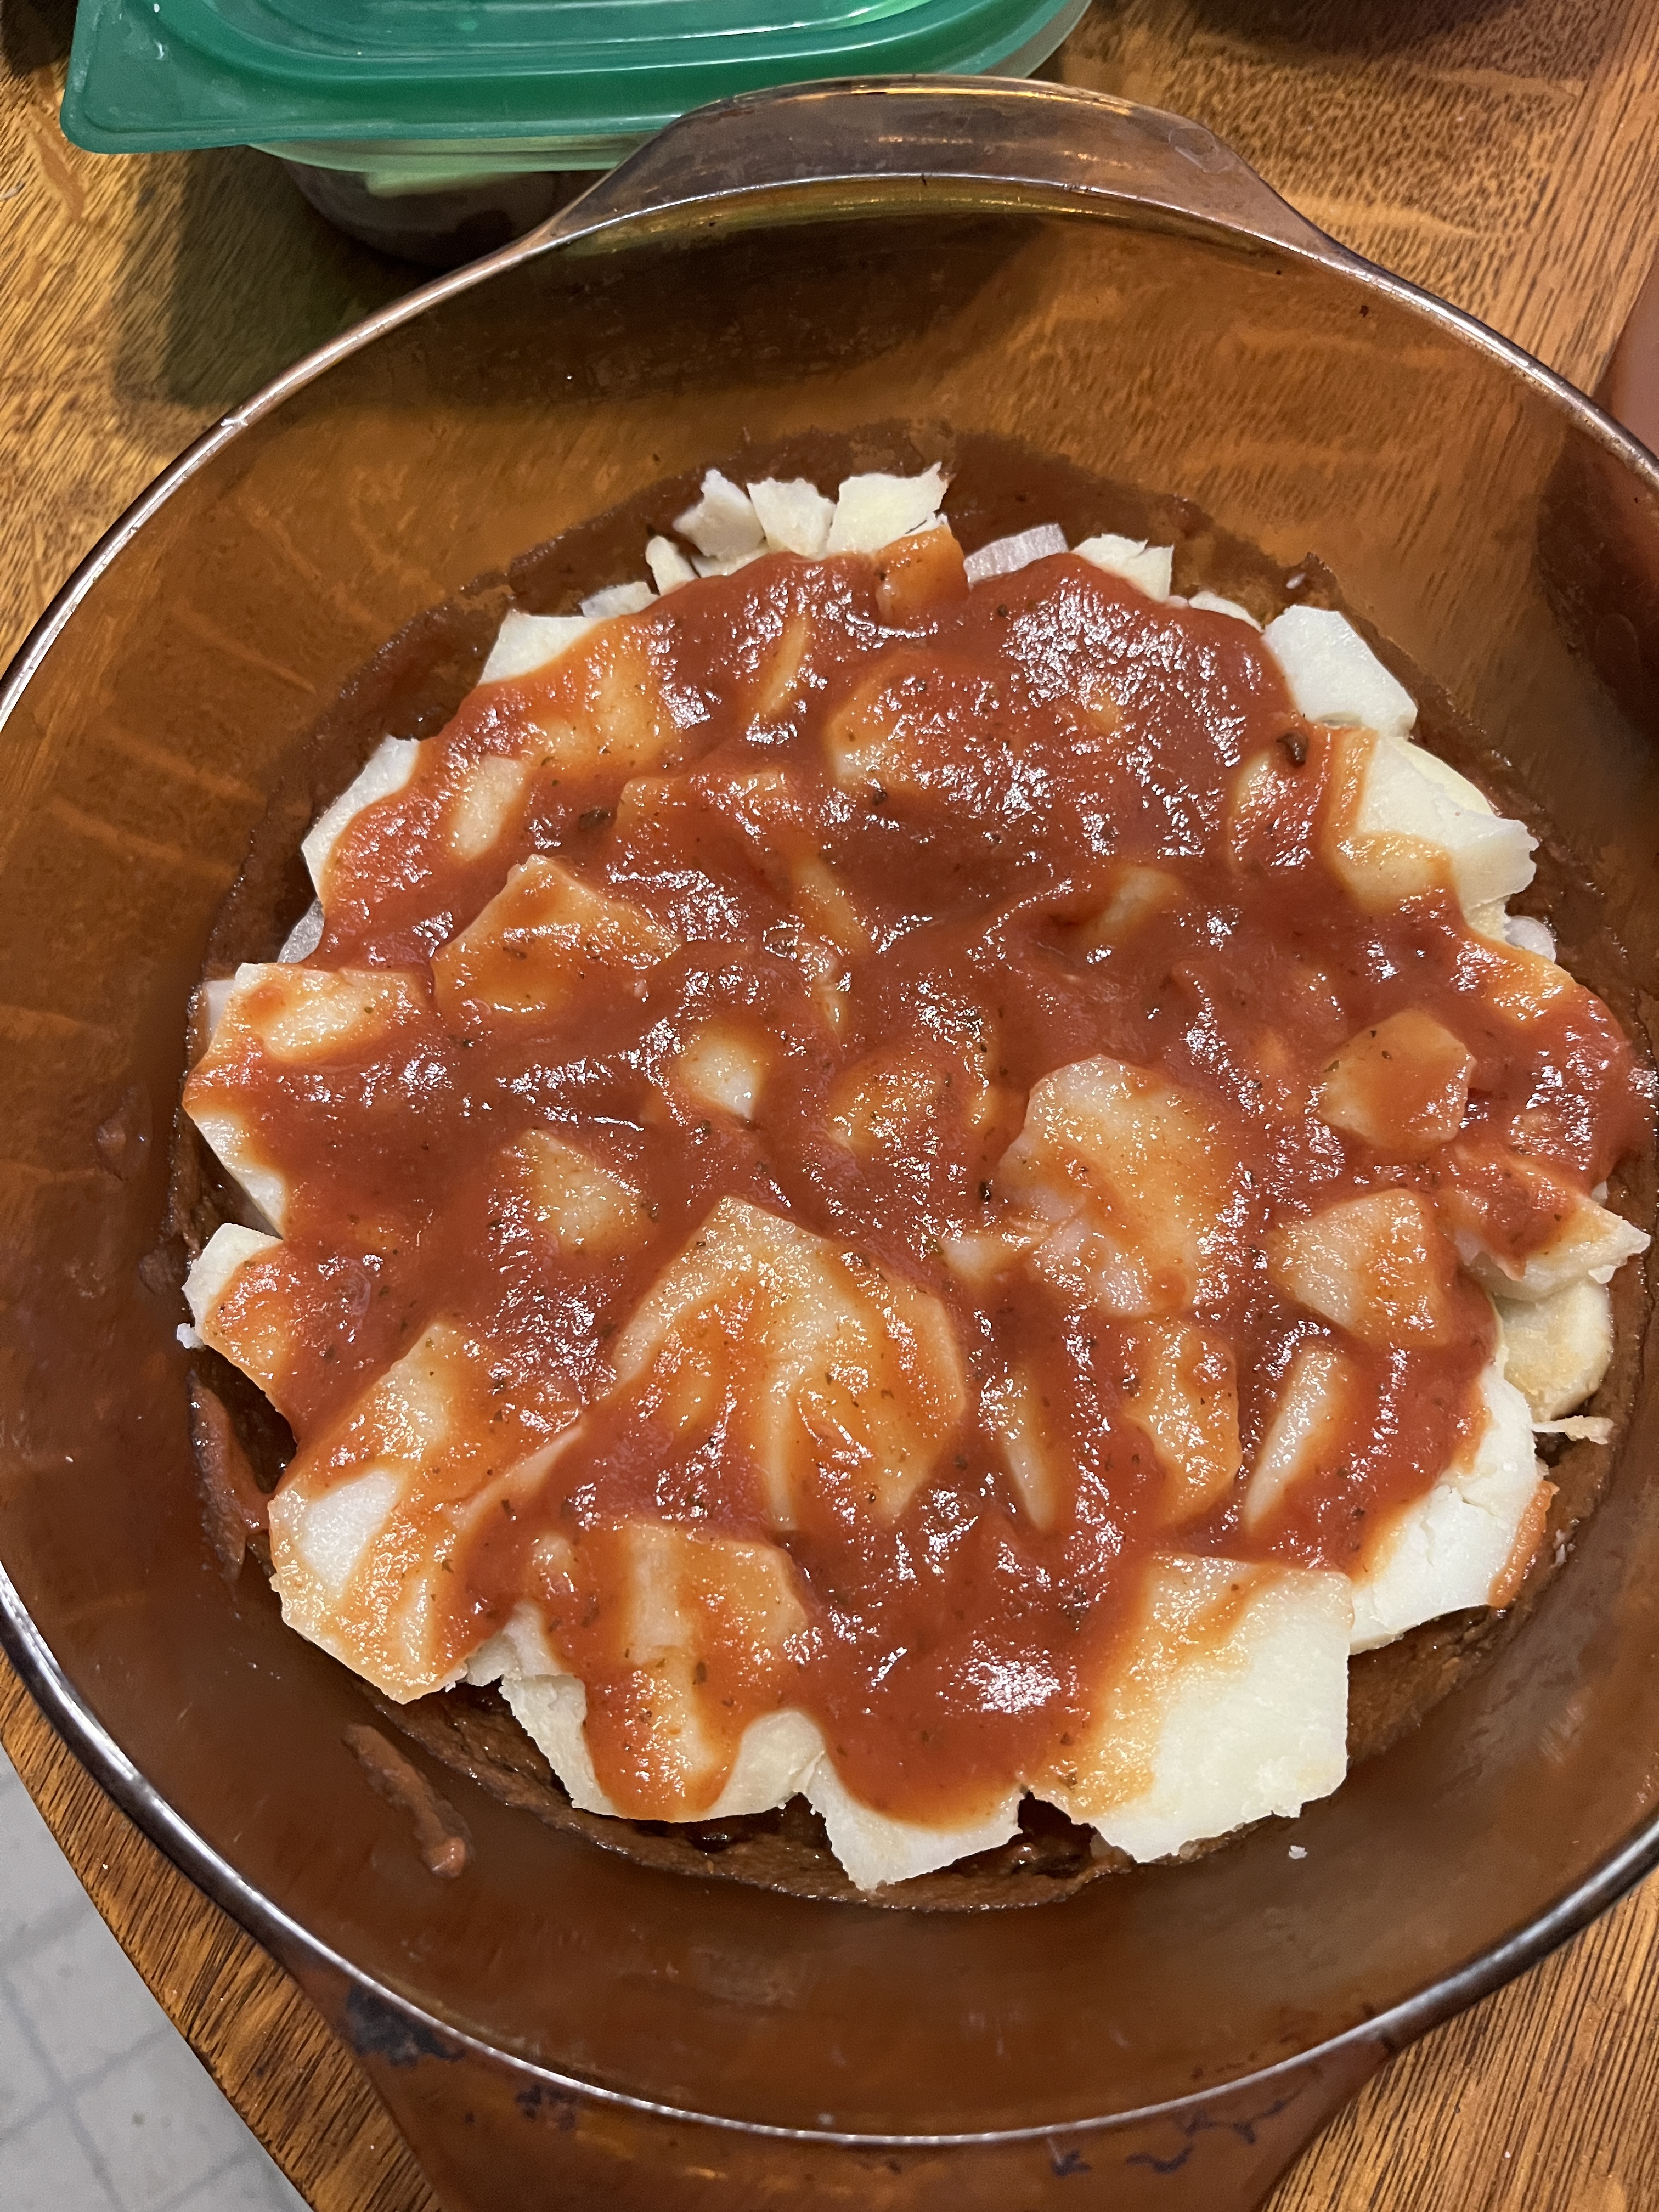
Put some sauce in the bottom of a casserole. Layer 1/2 the onion on the bottom, then start laying the potato slices on the onion.
Some potato slices are nicer than others and they’re hot, so be careful. Just use the little bits to fill in here and there.
Pour more spaghetti sauce on top
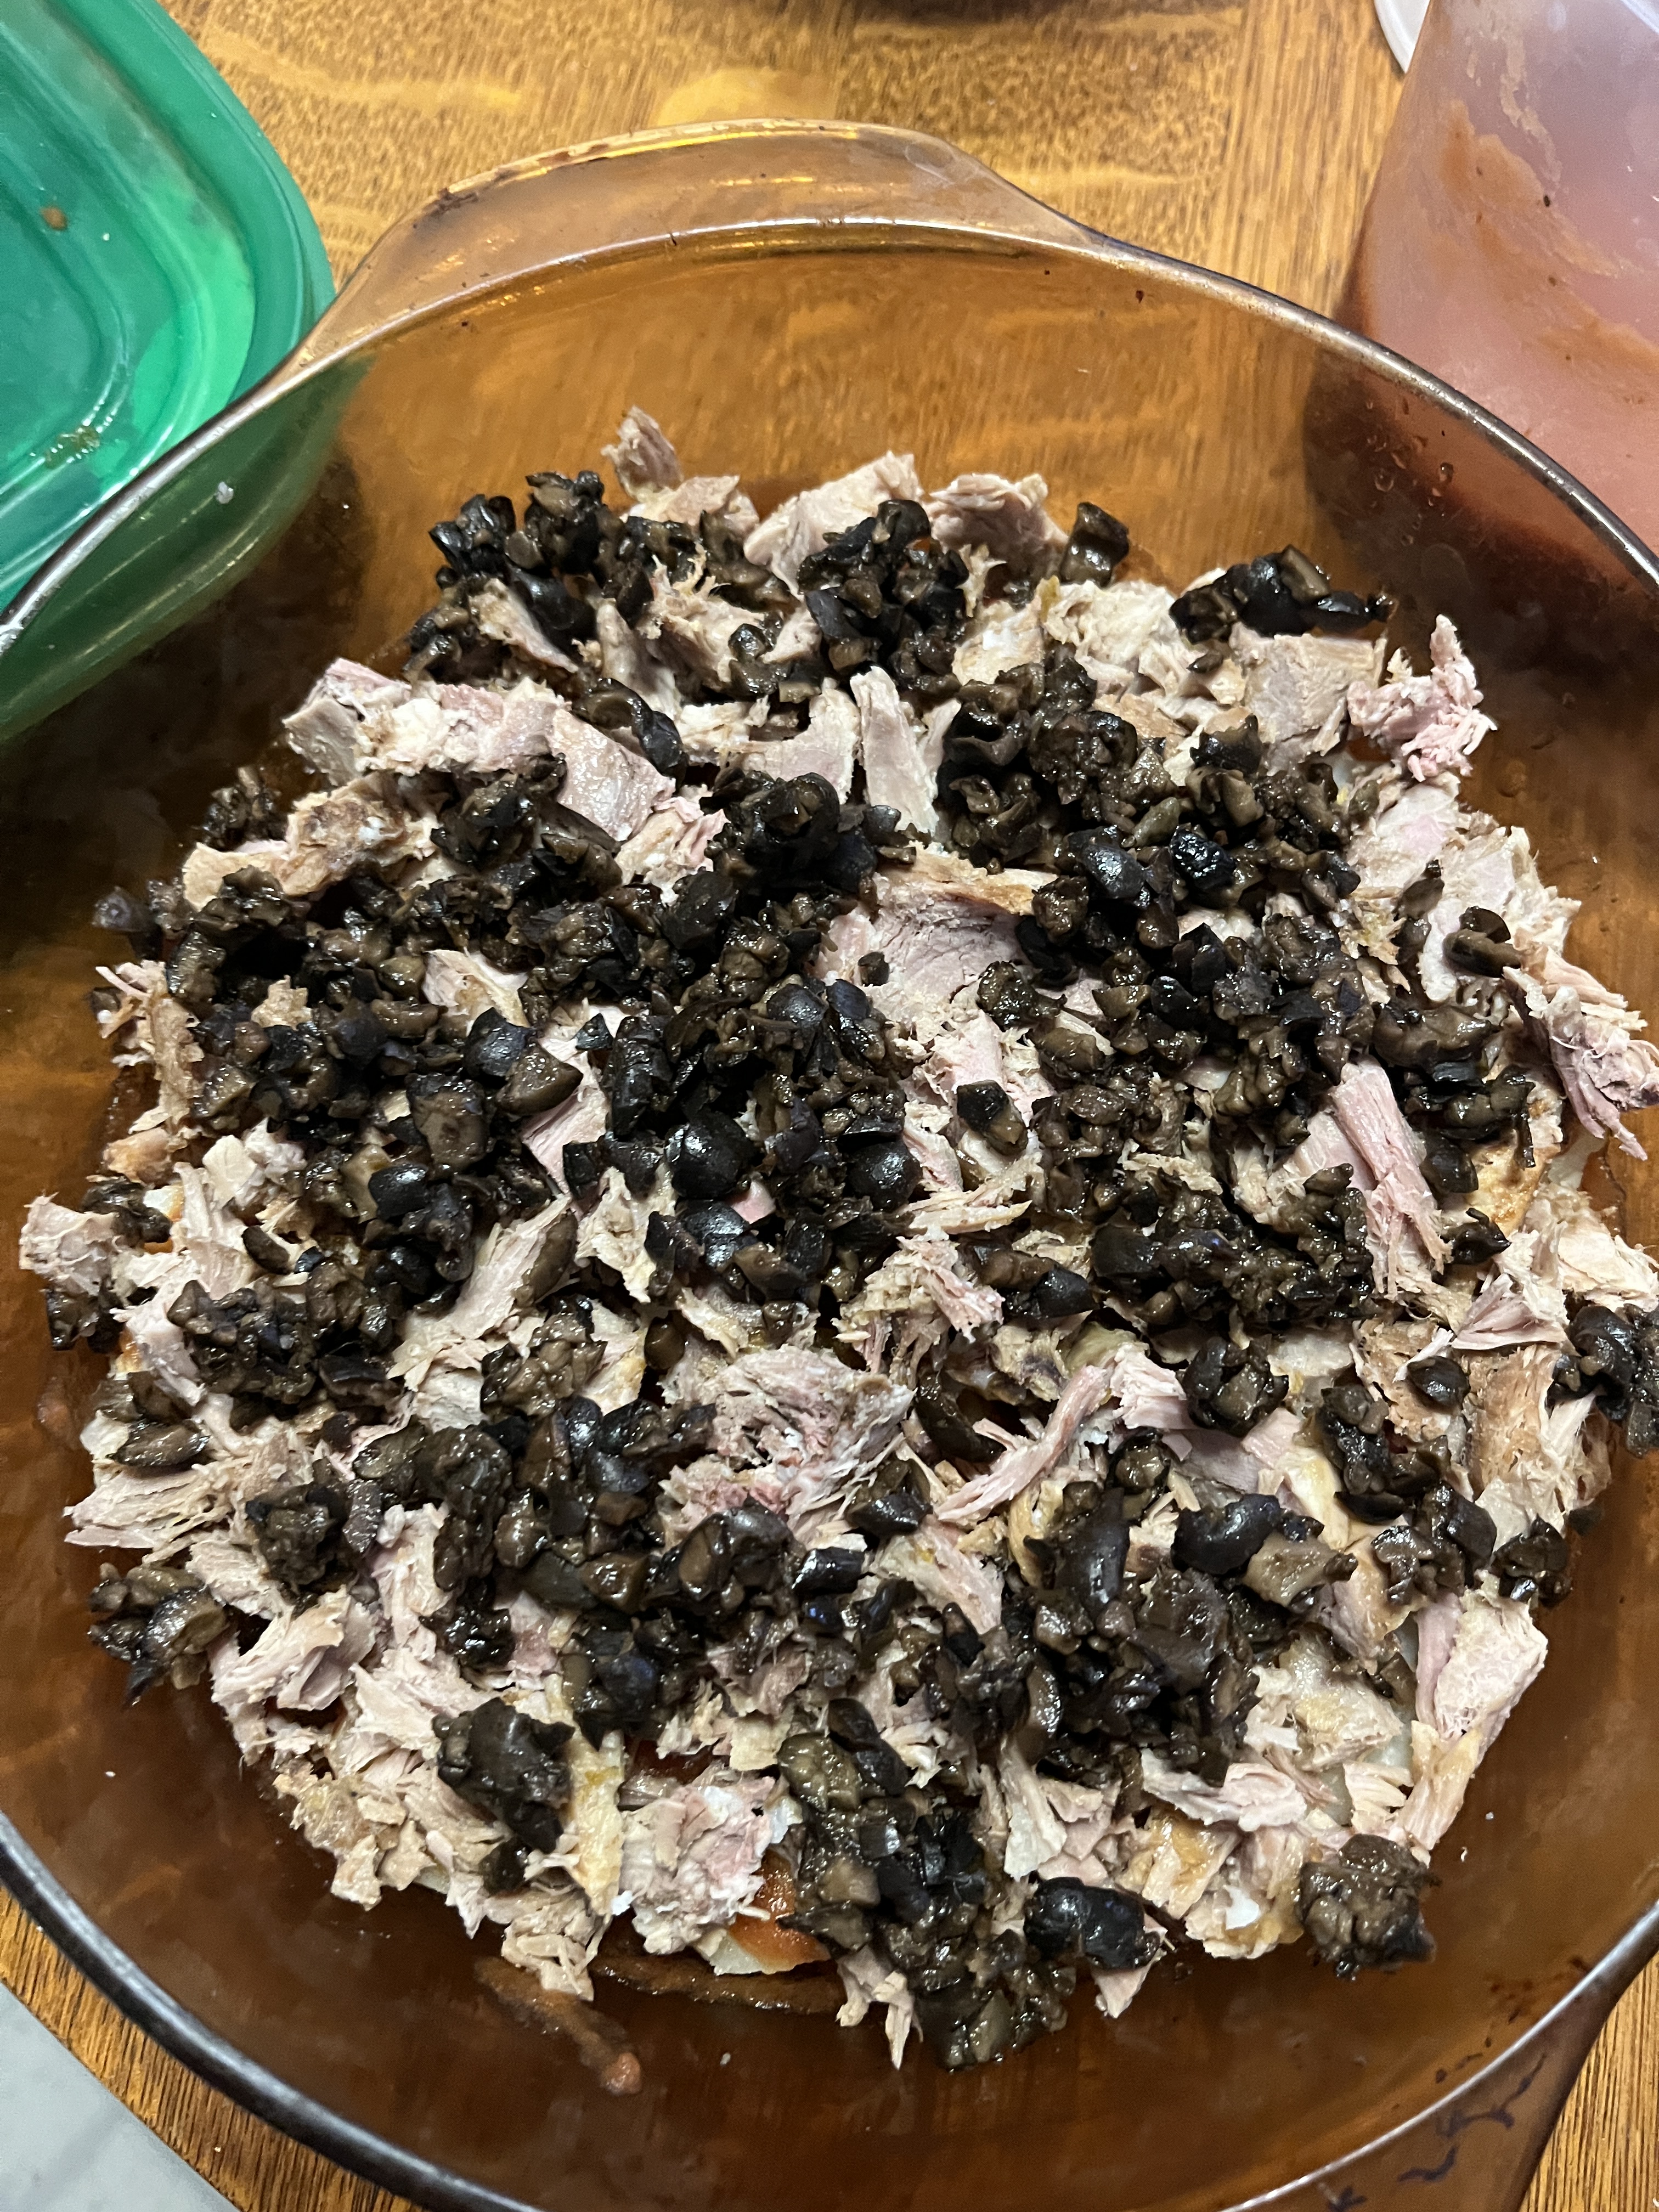
Cut up and spread a layer of pork on top of that. Since I haven’t had tome to make tepenade out of the olives I’ll toss them on, too.
Then spot on the remnants of the cottage cheese. Yes, if you happen to have ricotta you can use that. Or feta or any cheese that suits you. Yup, even provolone, but I forgot I had it so I didn’t use it. Oh well.
Lay on the other 1/2 of sliced onion.
Pour on the last of the spaghetti sauce (I forgot to take a picture) and smother the whole thing in mozzarella.
Bake at 350 for about 30 minutes or until everything’s hot and melty. If you want the cheese to be brown around the edges (yum!) let it go a bit longer.
While you’re waiting you can put together some good bread or garlic toast and a salad while also letting whatever nice red wine you have breathe. You can also cut up some strawberries to work down into their own sauce with sugar to spoon over cake or ice cream for dessert. I’d wait til after dinner to whip the cream, is is summer and we wouldn’t want the whipped cream to collapse while waiting for dessert. You might also want to let it set a bit before you tuck into the piping hot casserole. Set it on a trivet, set the table and enjoy your salad before dishing it out. If you harvested your first bunch of grapes or basket of berries you can show off and put them on the take to nibble while waiting for the casserole to cool enough to serve. Any excuse for another story and pleasant conversation over dinner time!
If I’d had regular brown gravy I could have used that instead. Different flavour but nice. No mozzarella? Use cheddar or jack cheese or even Swiss, Gouda or blue. Need to use up leftover peas, carrots, spinach, broccoli or whatever? Layer those in, too. This is more about cleaning out the fridge, making do and using up leftovers. Yes, it’ll taste different every time you make it but that’s part of the adventure of cooking.
White table cloth and silver candlesticks? Sure, why not? Red check table cloth with a candle in a Chianti bottle? That’s nice, too. TV trays in front of the TV and your favourite movie? Sure. It’s your dinner, enjoy it however you want.
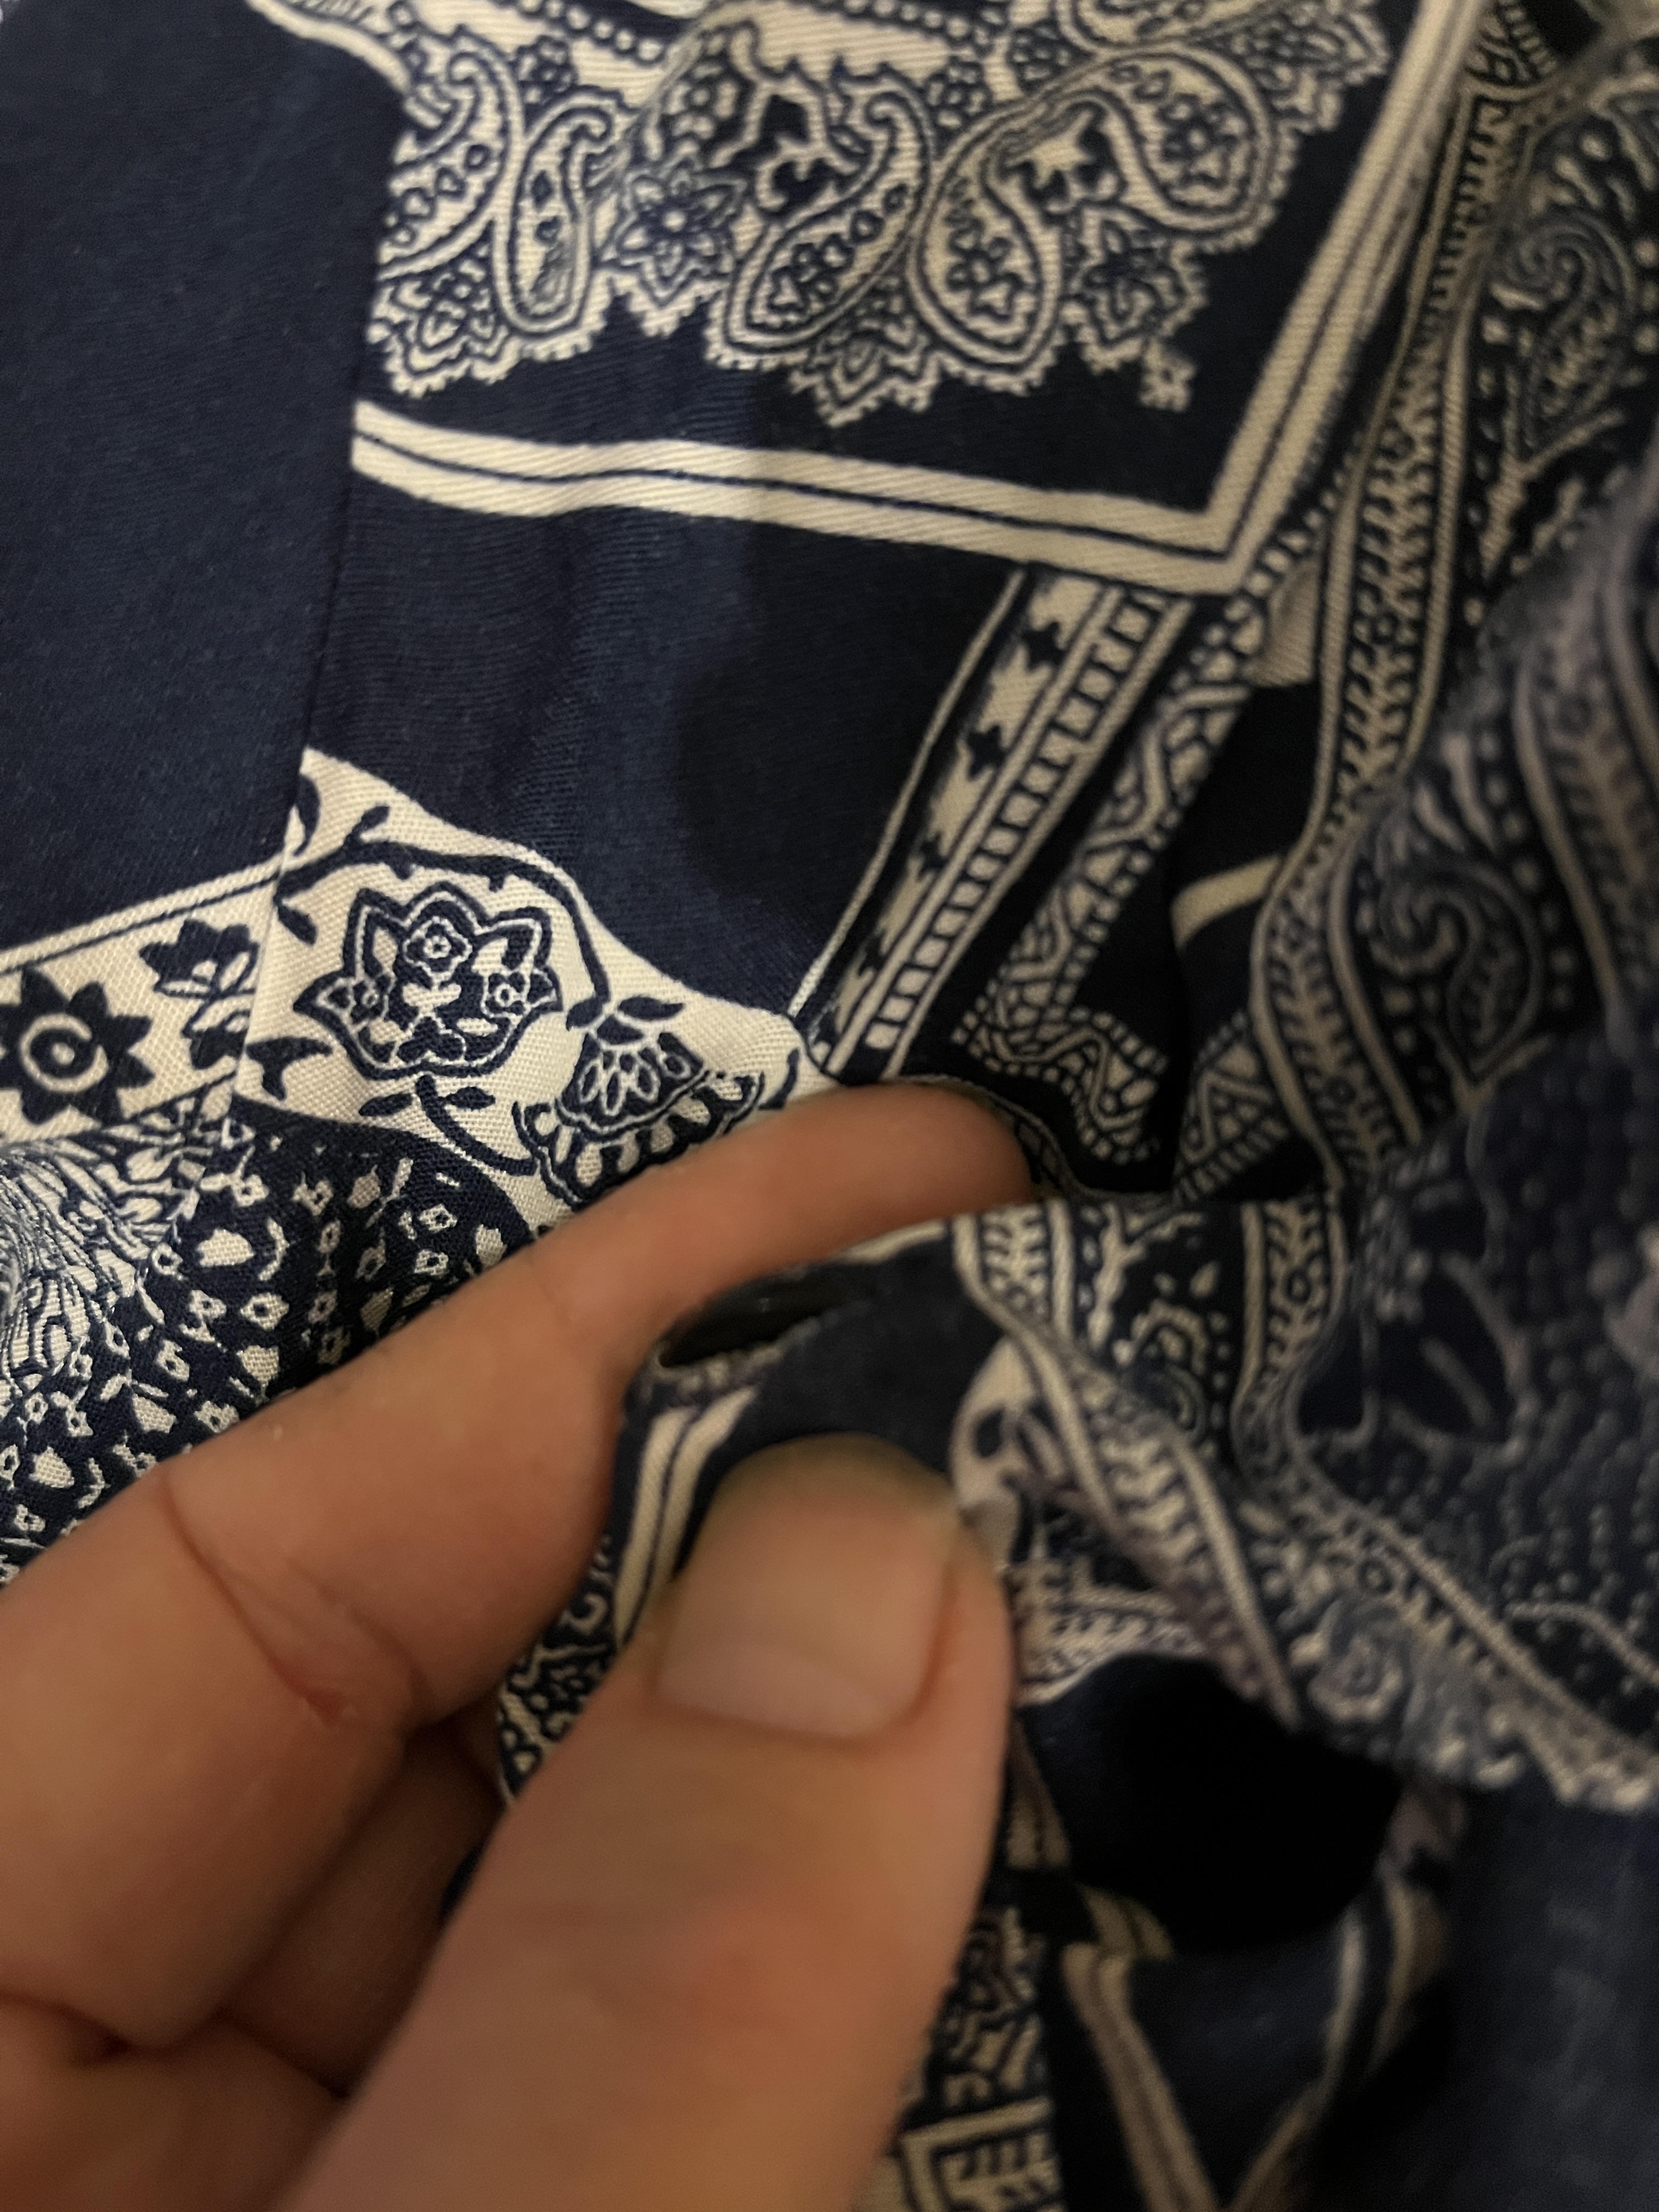
I’ve recently found out that a lot of people don’t know how to do a lot of simple things, including sewing on a button! It’s so easy I figured I’d do a quick blog post on it, considering I have a blouse that needs a couple buttons.
So how long does it take to sew on a button? Just a few minutes if you have everything you need. If you have to run to the store to buy needles, thread, scissors and/or buttons, it’ll take longer, especially if you find other things to buy for other projects while your at it. If you do those other projects before sewing on the buttons, it’ll take longer still. This time I expected it to take 2 days while writing this blog post around work. Then I had to work overtime. Then I ended up in the hospital for 3 days with a painful but minor something. Then more overtime, so it’s taken me about 3 weeks to sew on these buttons.
So yes, it’s a long post with a LOT of pictures, but it really is easier than it sounds. If you do it once you can do it again and again as much as you need to. Simple as sewing on a button.
So go to your sewing box/basket/footstool and pull out what you need. If you don’t have one then go to the store, buy a tin off cookies, eat the cookies and then you’ll have a place to put a few things to start your sewing box. If you don’t have sewing things, then stop by the area where the store sells sewing stuff and get a pair of scissors, needles, thread (maybe a few basic colours like black, white and any colours you commonly wear) and maybe a thimble.
You’ll need a needle, thread, pair of scissors to sew on a button.
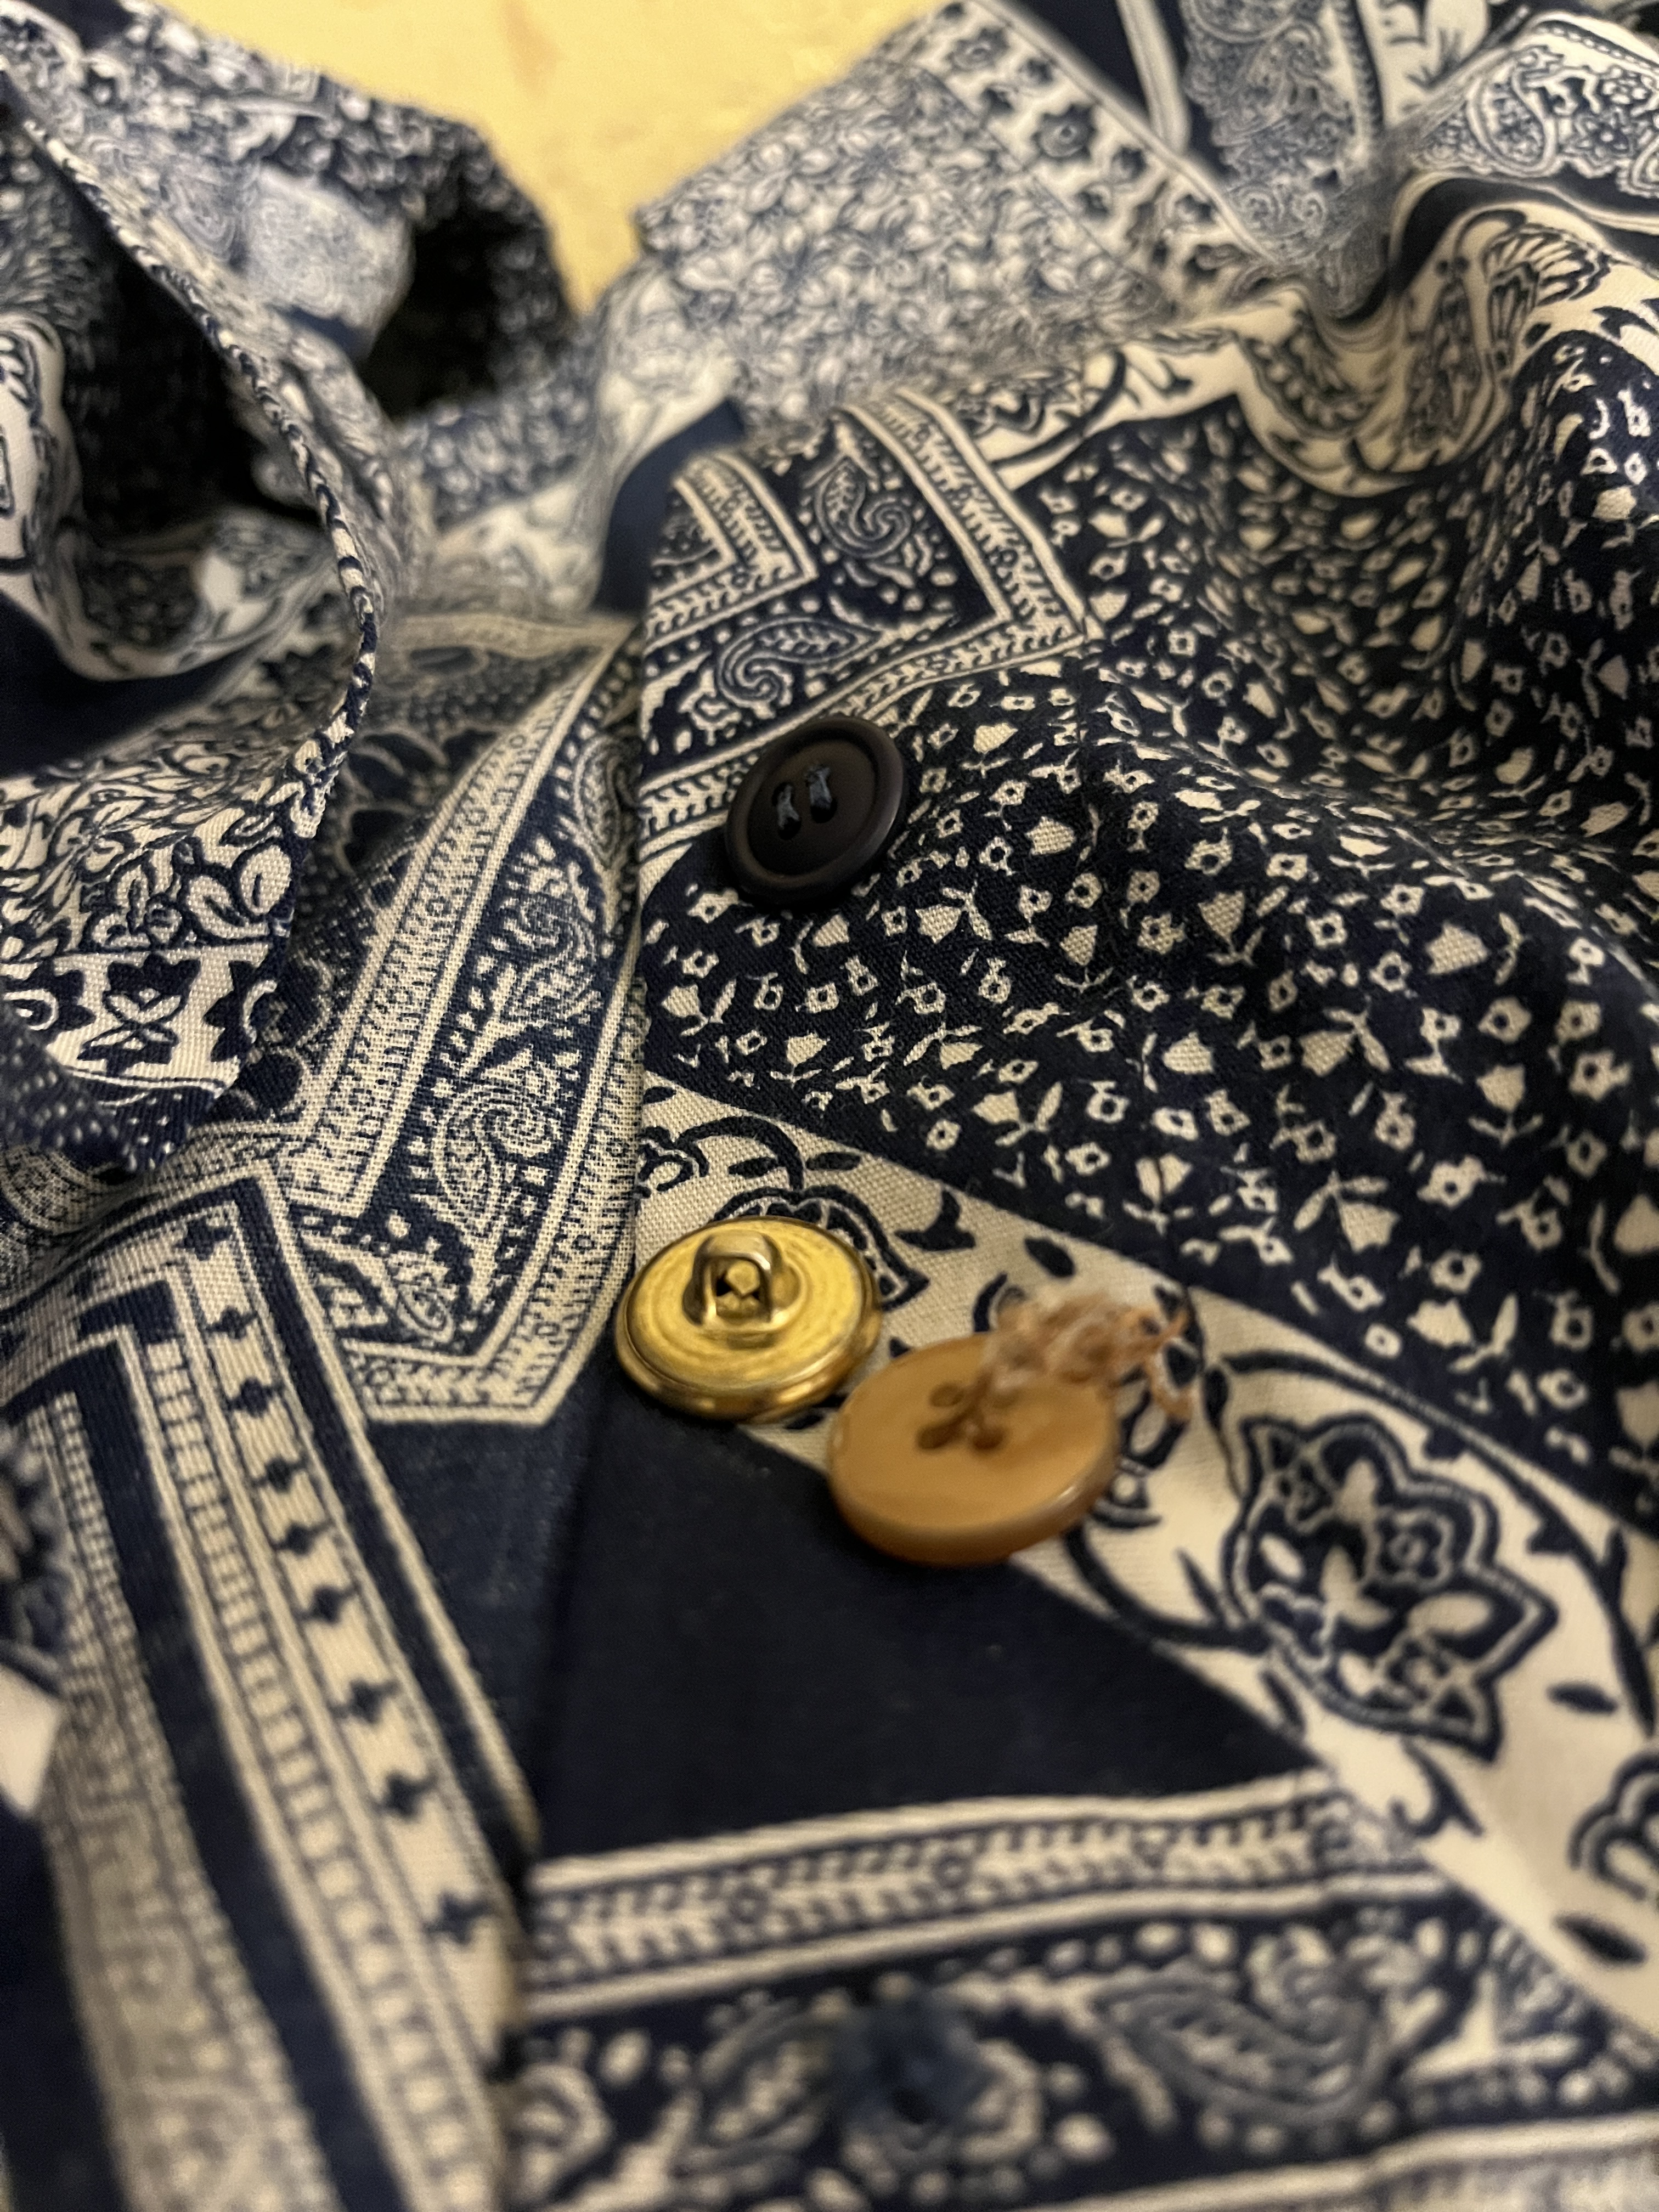
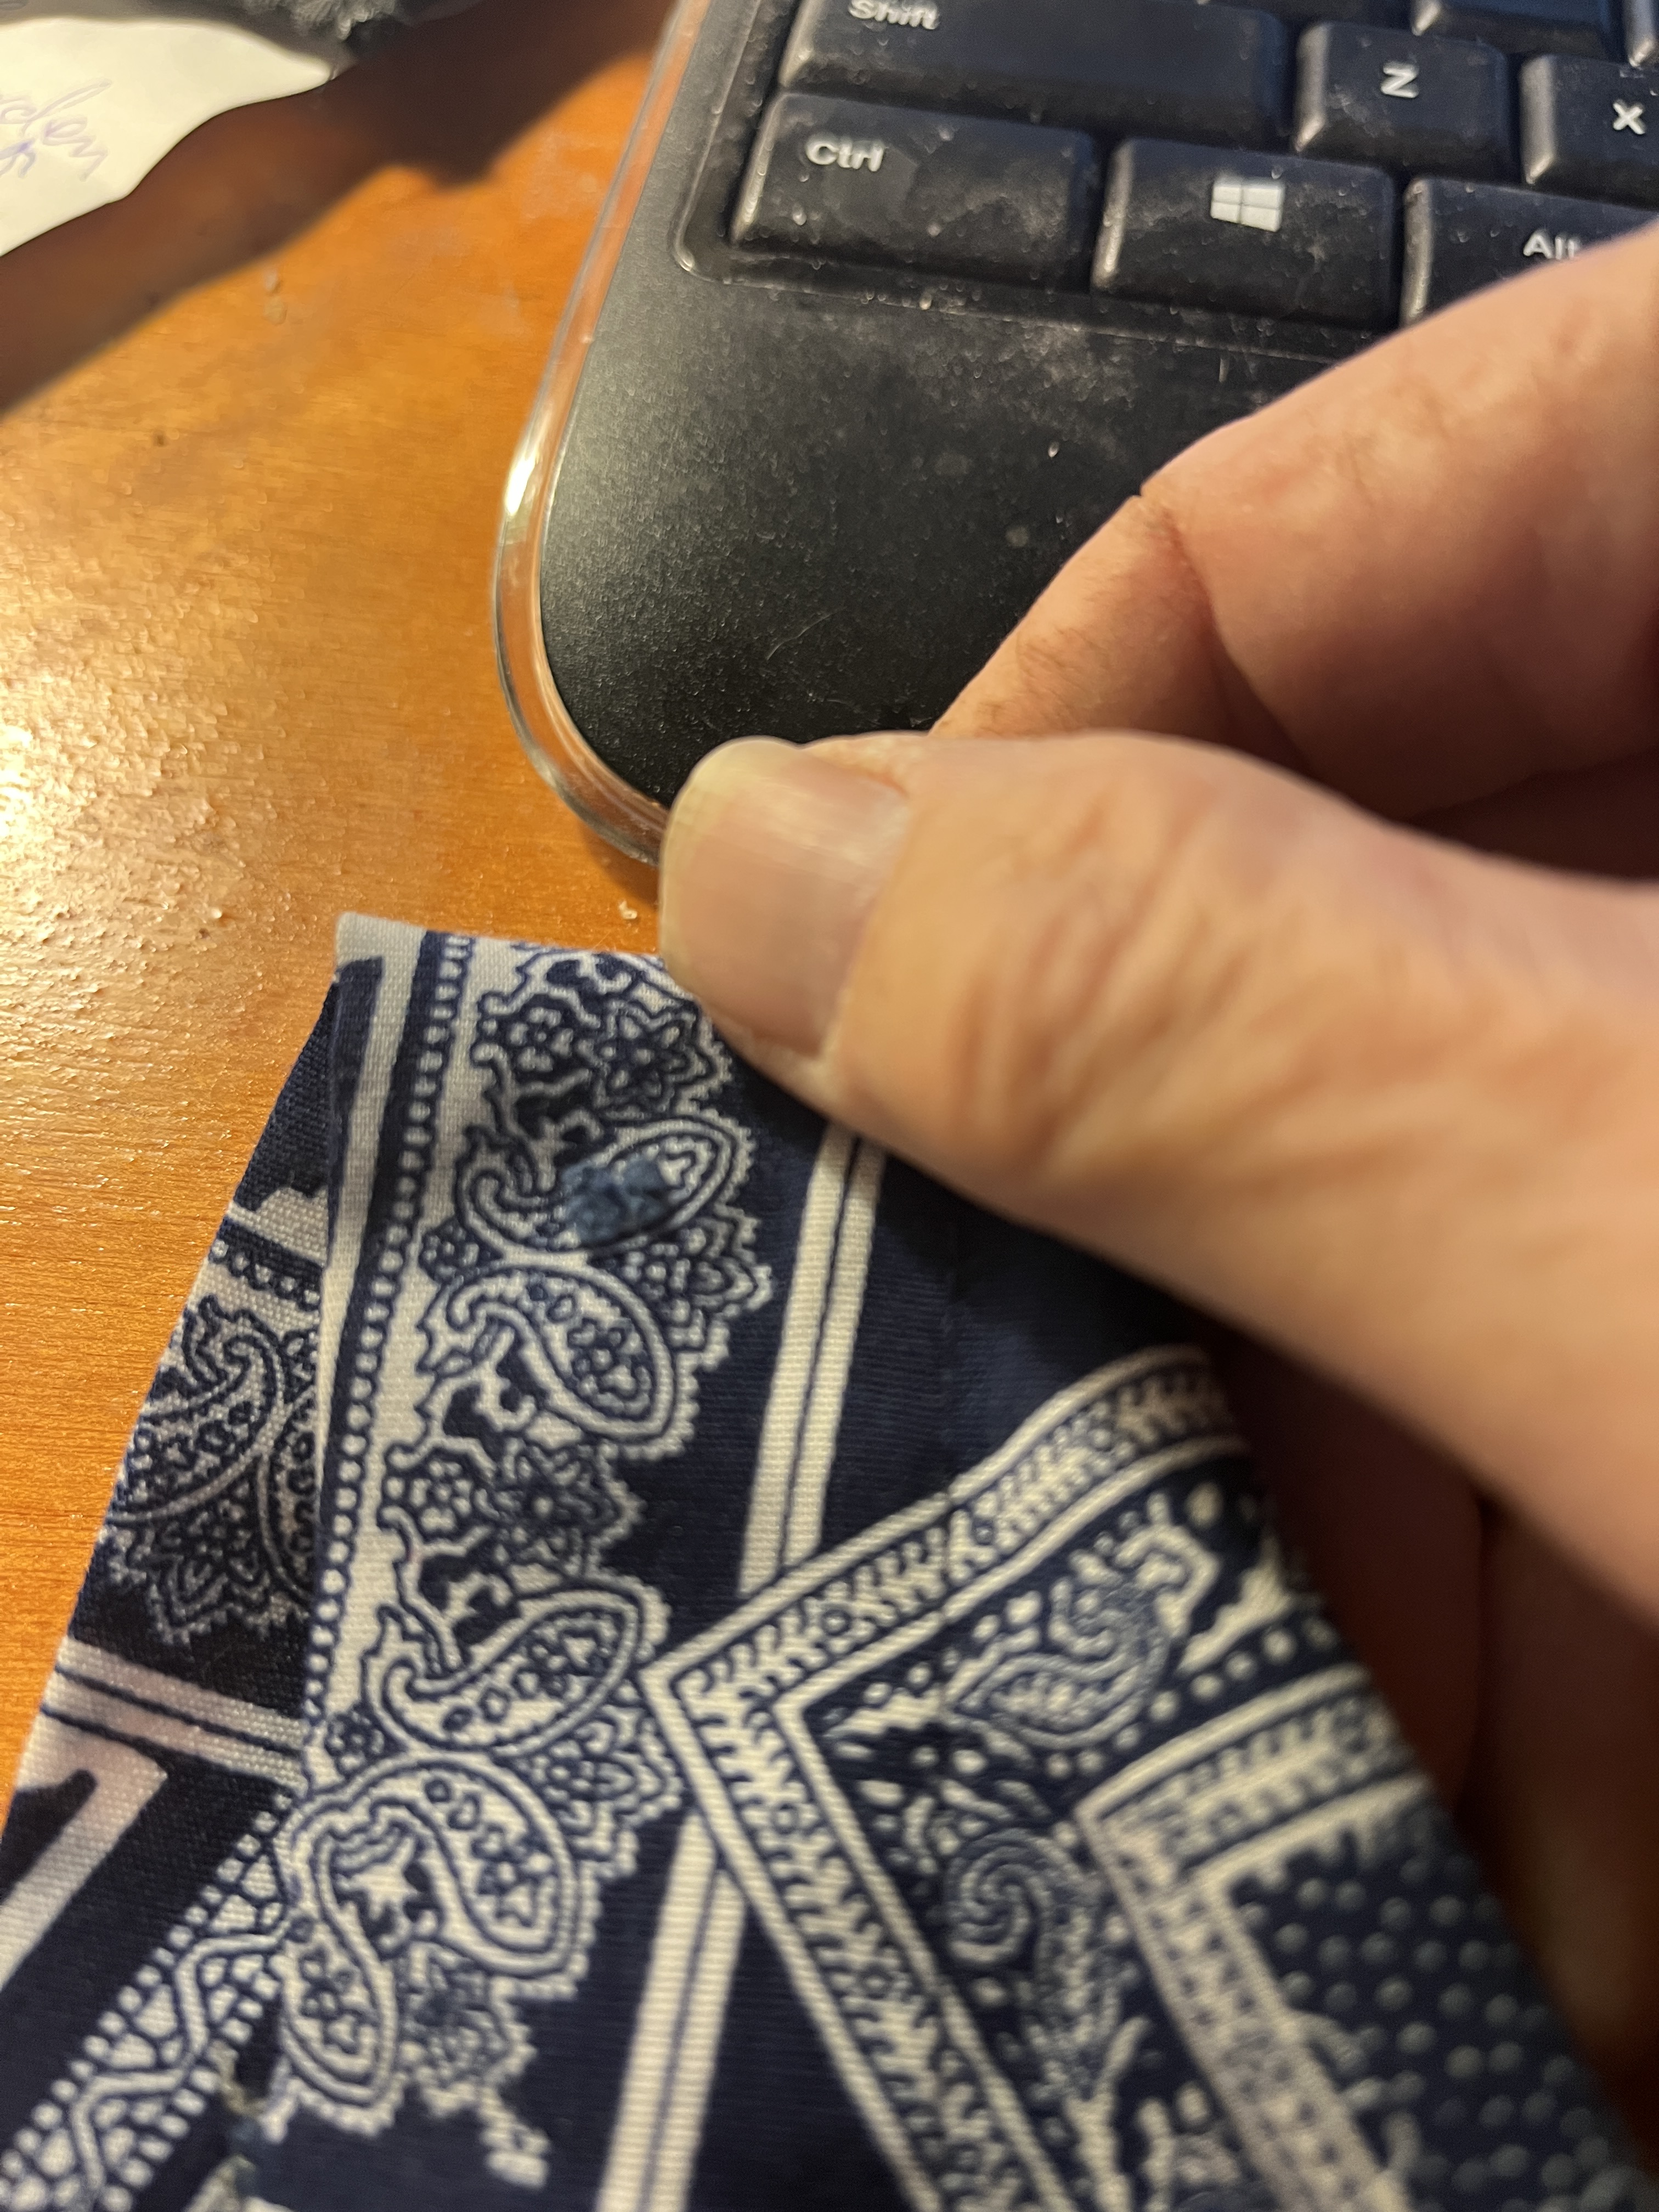
And some buttons. Well, as many buttons as you have missing. I had other buttons but they were obviously too small. If the button isn’t big enough it’ll keep coming unbuttoned and that defeats the purpose of buttoning and could get you talked about.
What? You don’t have a stash of buttons in your sewing box or a random cookie tin!? For SHAME! You must correct this immediately! Quick! Buy a cookie tin, eat the cookies (you do have a fair supply of milk, right?), then have it ready to collect any random buttons that pop off of clothes or buttons that you cut off pieces of clothing before you toss them. Waste not want not, after all. You can also keep other fasteners in there, like snaps, hooks and eyes, zippers…just in case you need them. The extra benefit with this is that when someone opens the cookie tin in the not-kitchen-room expecting cookies you can giggle at their reaction. OK, maybe it’s an old auntie or grandma thing, but you can get a kick out of it if you want to.
Since this blouse is kind of patchwork-y I didn’t worry about the buttons matching, but if you want them to match you can use an old set cut from another blouse or 2 (sometimes clothes use standardized buttons) or you can go buy a few that match (this might be hard to find, depending on the buttons) or you can cut off all the buttons and buy a whole new matching set. Just make sure they fit through the buttonholes. This one’s obviously too big.
This one looks similar to the original buttons but it doesn’t fit through the buttonhole.
The light one doesn’t match the others but it fits.
The shank button fits, too, so I’ll use it as well.
Oh, what’s a shank button? It’s a button on a shank instead of just a round piece of something with holes (usually 2 or 4) drilled in it. The shank can be just a loop attached to something you want to use as a button or a hole drilled in one end of a roundish object used as a button. They can be made of metal, stone, glass, wood, leather (usually knotted), cloth, chord (knotted) or any number of things creative people come up with in a flight of fancy creativity or out of sheer desperation to keep their clothes on.
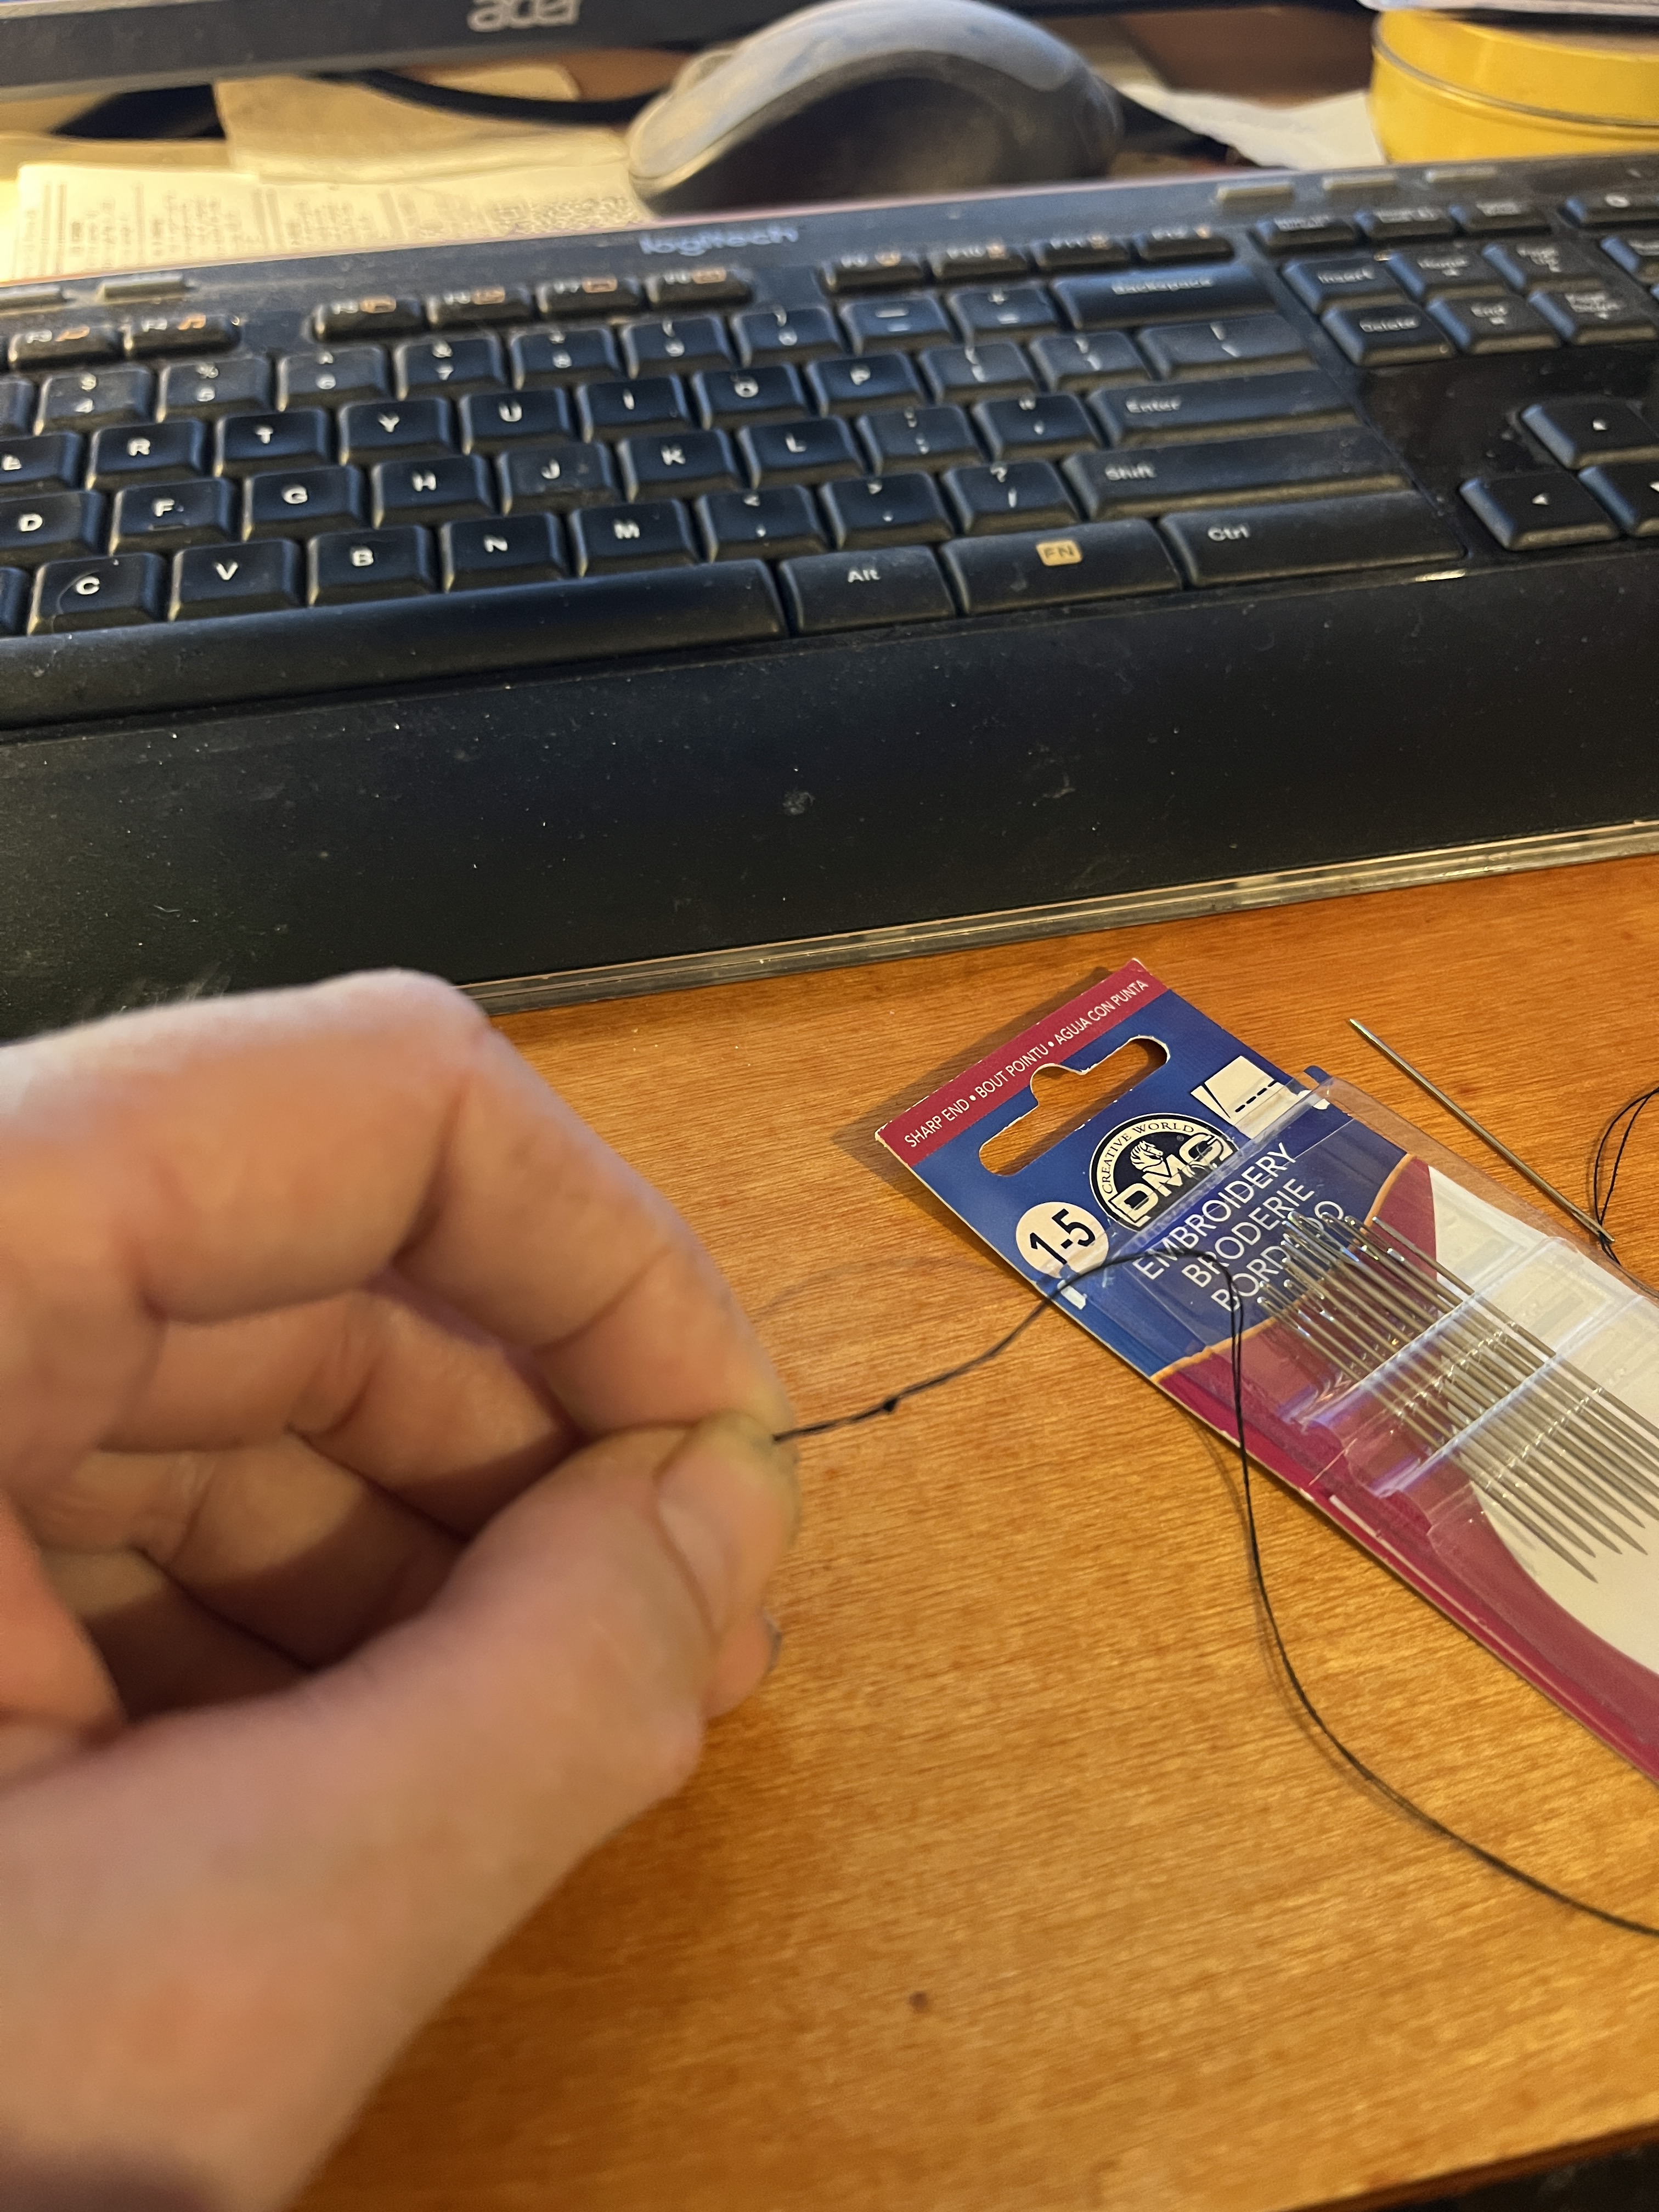
Now that we have our needle, thread, scissors and buttons we can get on to sewing on said buttons. Cut off about an arm’s length of thread.
Double the thread, hold the ends together, moisten with your lips and thread through the eye of the needle.
Make sure there’s a nice ‘tail’ so the thread doesn’t come unthreaded from the needle.
Tie a knot in the folded end of the thread. Wrap the folded end of the thread around the end of your finger.
Roll the thread off the end of your finger.
Pull the knot tight. This might take a time or 2 to get the hang of it, but it really is easy.
Cut the tail off the knot. Now we’re ready to sew.
Find the spot where the button goes. Usually there will either be a tuft of thread or a tiny hole. Leave the tuft of thread until you’re ready to sew, it makes it easier to find the spot.
When you’re ready, pull out the tuft of old thread, at least as much as is easy, and put the needle through the spot. Pull it through to the knot. You can see how hard the tiny holes are to spot & why I suggest you leave the tufts of thread in as long as possible.
Put the needle through the spot where the old thread was.
Pull the thread tight, bringing the knot to the back of the cloth.
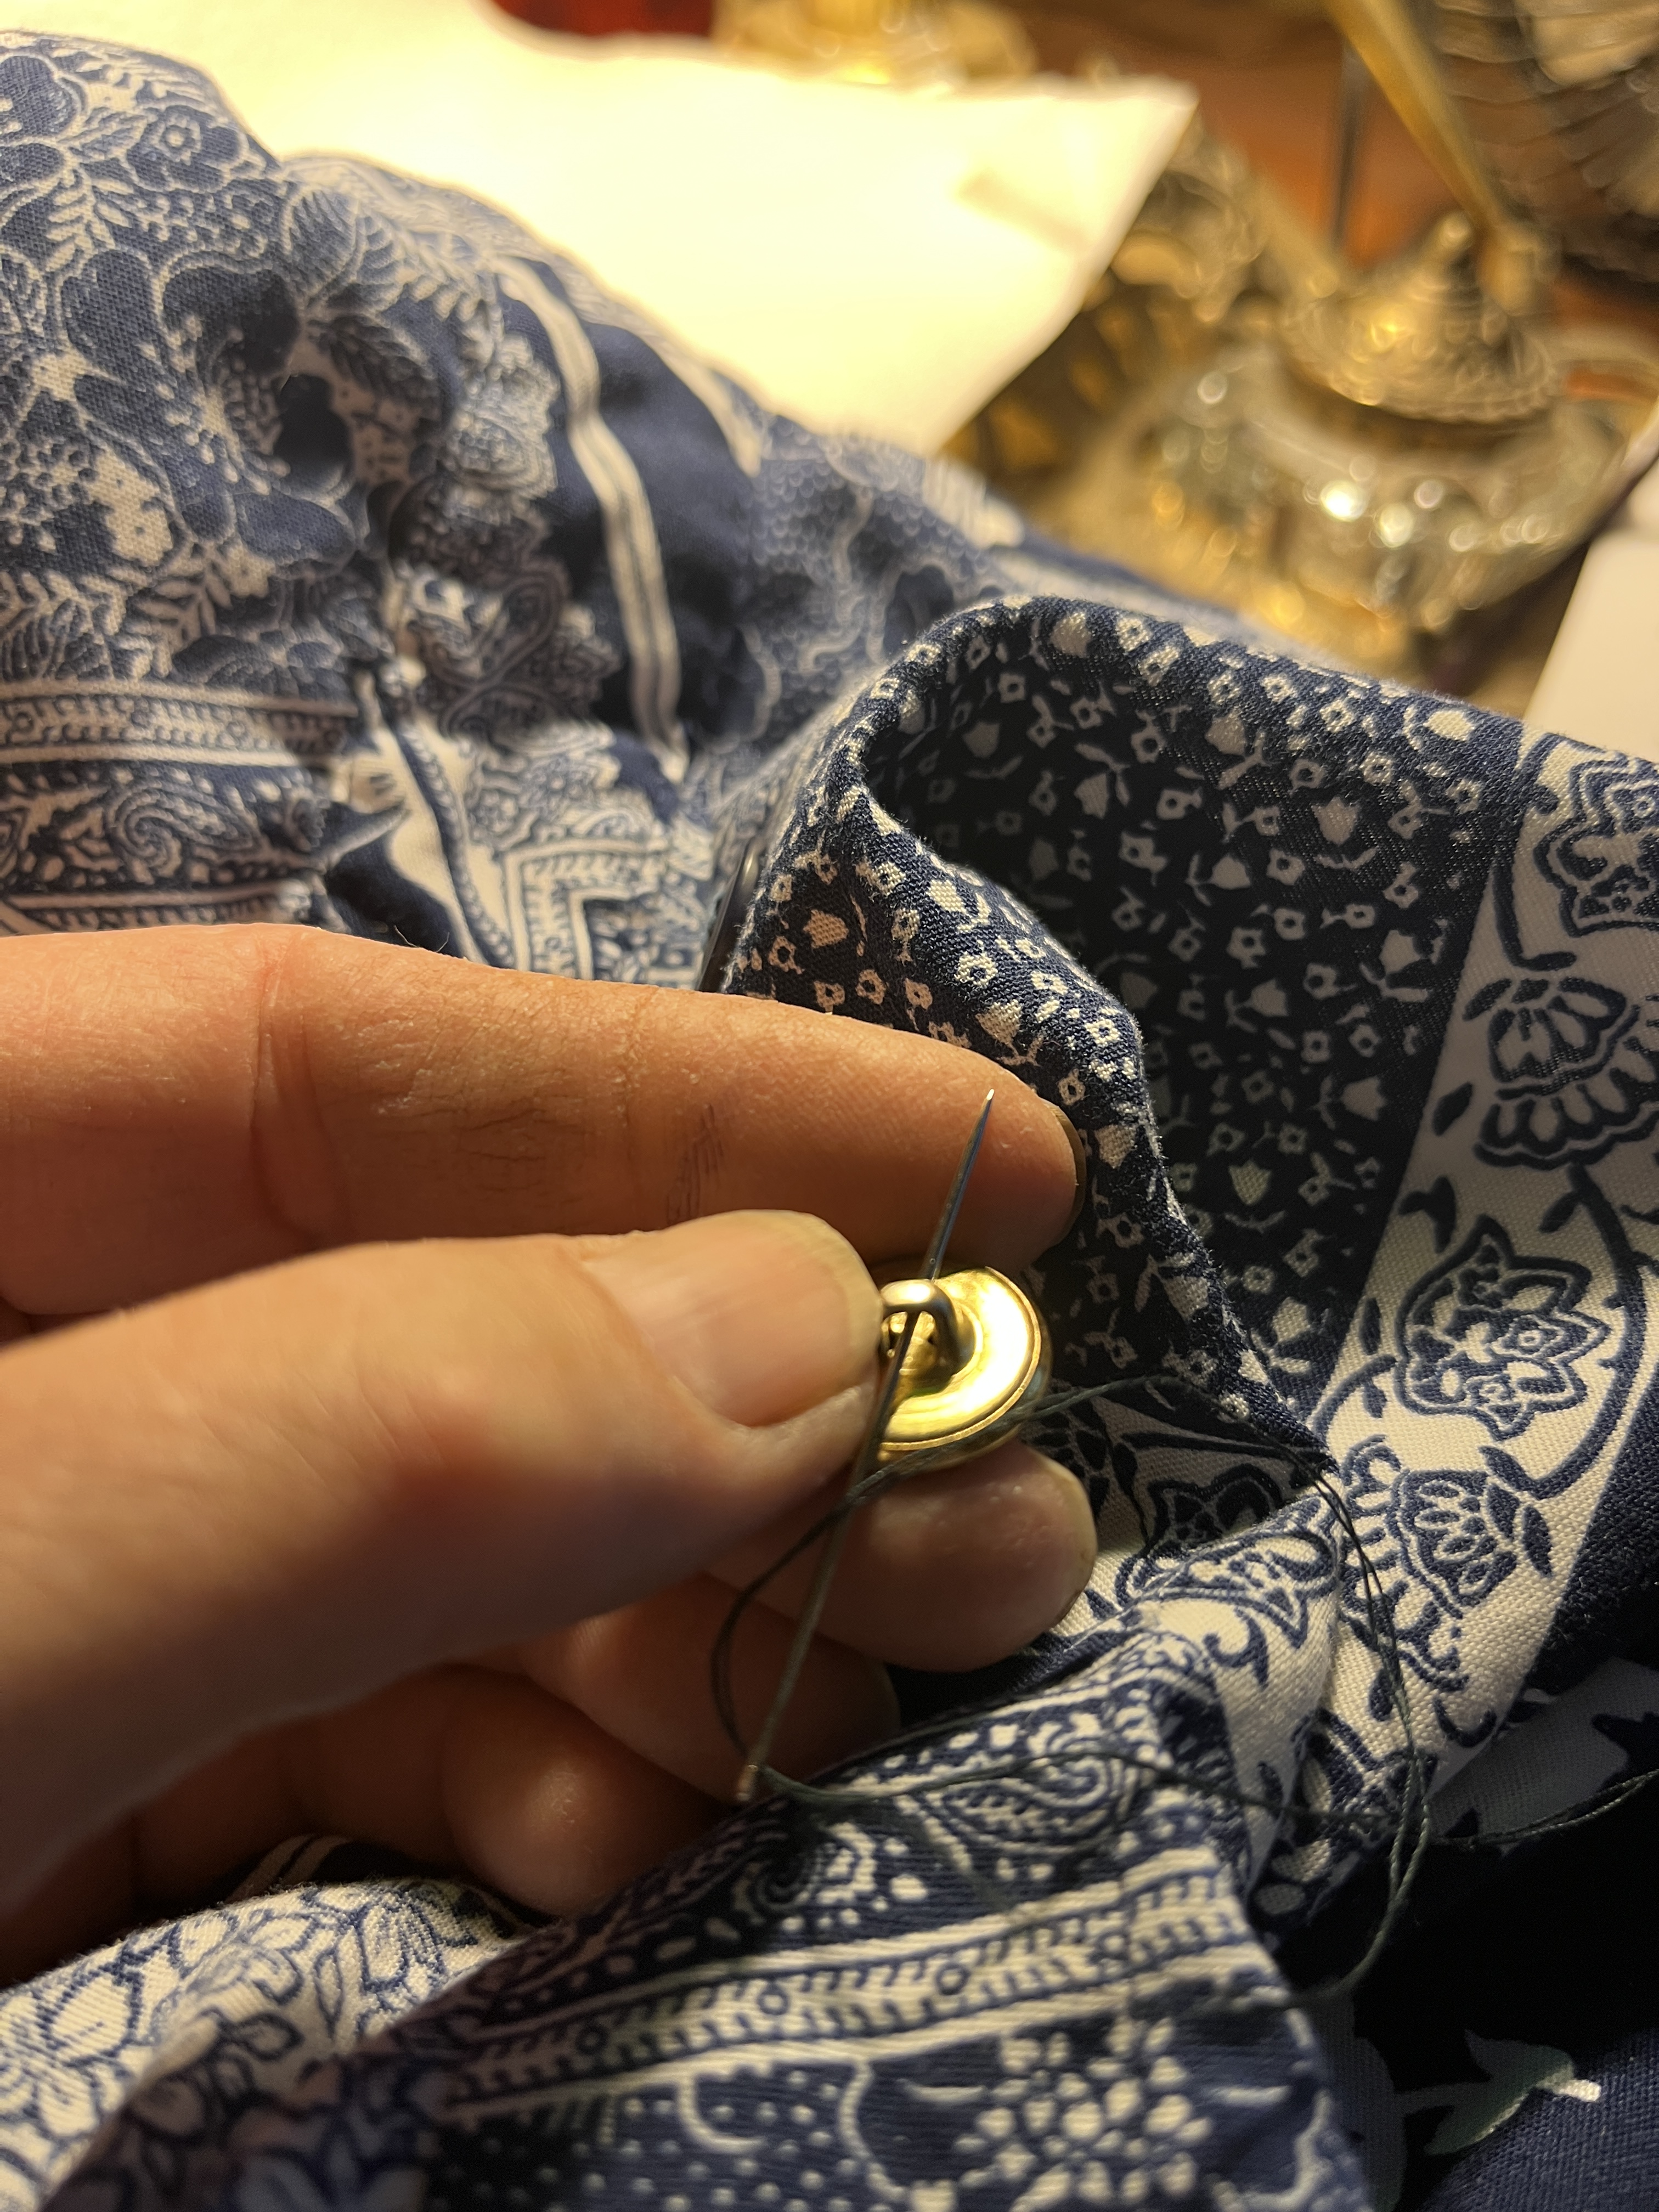
Put the needle through the 1st hole in the button. Usually there’s either 2 holes or 4. This one has 4. Pull the thread through.
Now put the needle down through the next hole. Pull the thread tight.
Now carefully put the needle up through the 3rd hole and pull the thread tight.
Put the thread down through the 4th hole and pull the thread tight.
You’re probably seeing a pattern by now.
If you’d rather make an X than 2 lines you can do that.
Or you can make a square around all 4 holes, whatever delights you. Just go up and down a few times through all the holes. Yes, a 2-hole button would be simpler but I didn’t have one and I wouldn’t have been able to show the optional patterns, so there you are.
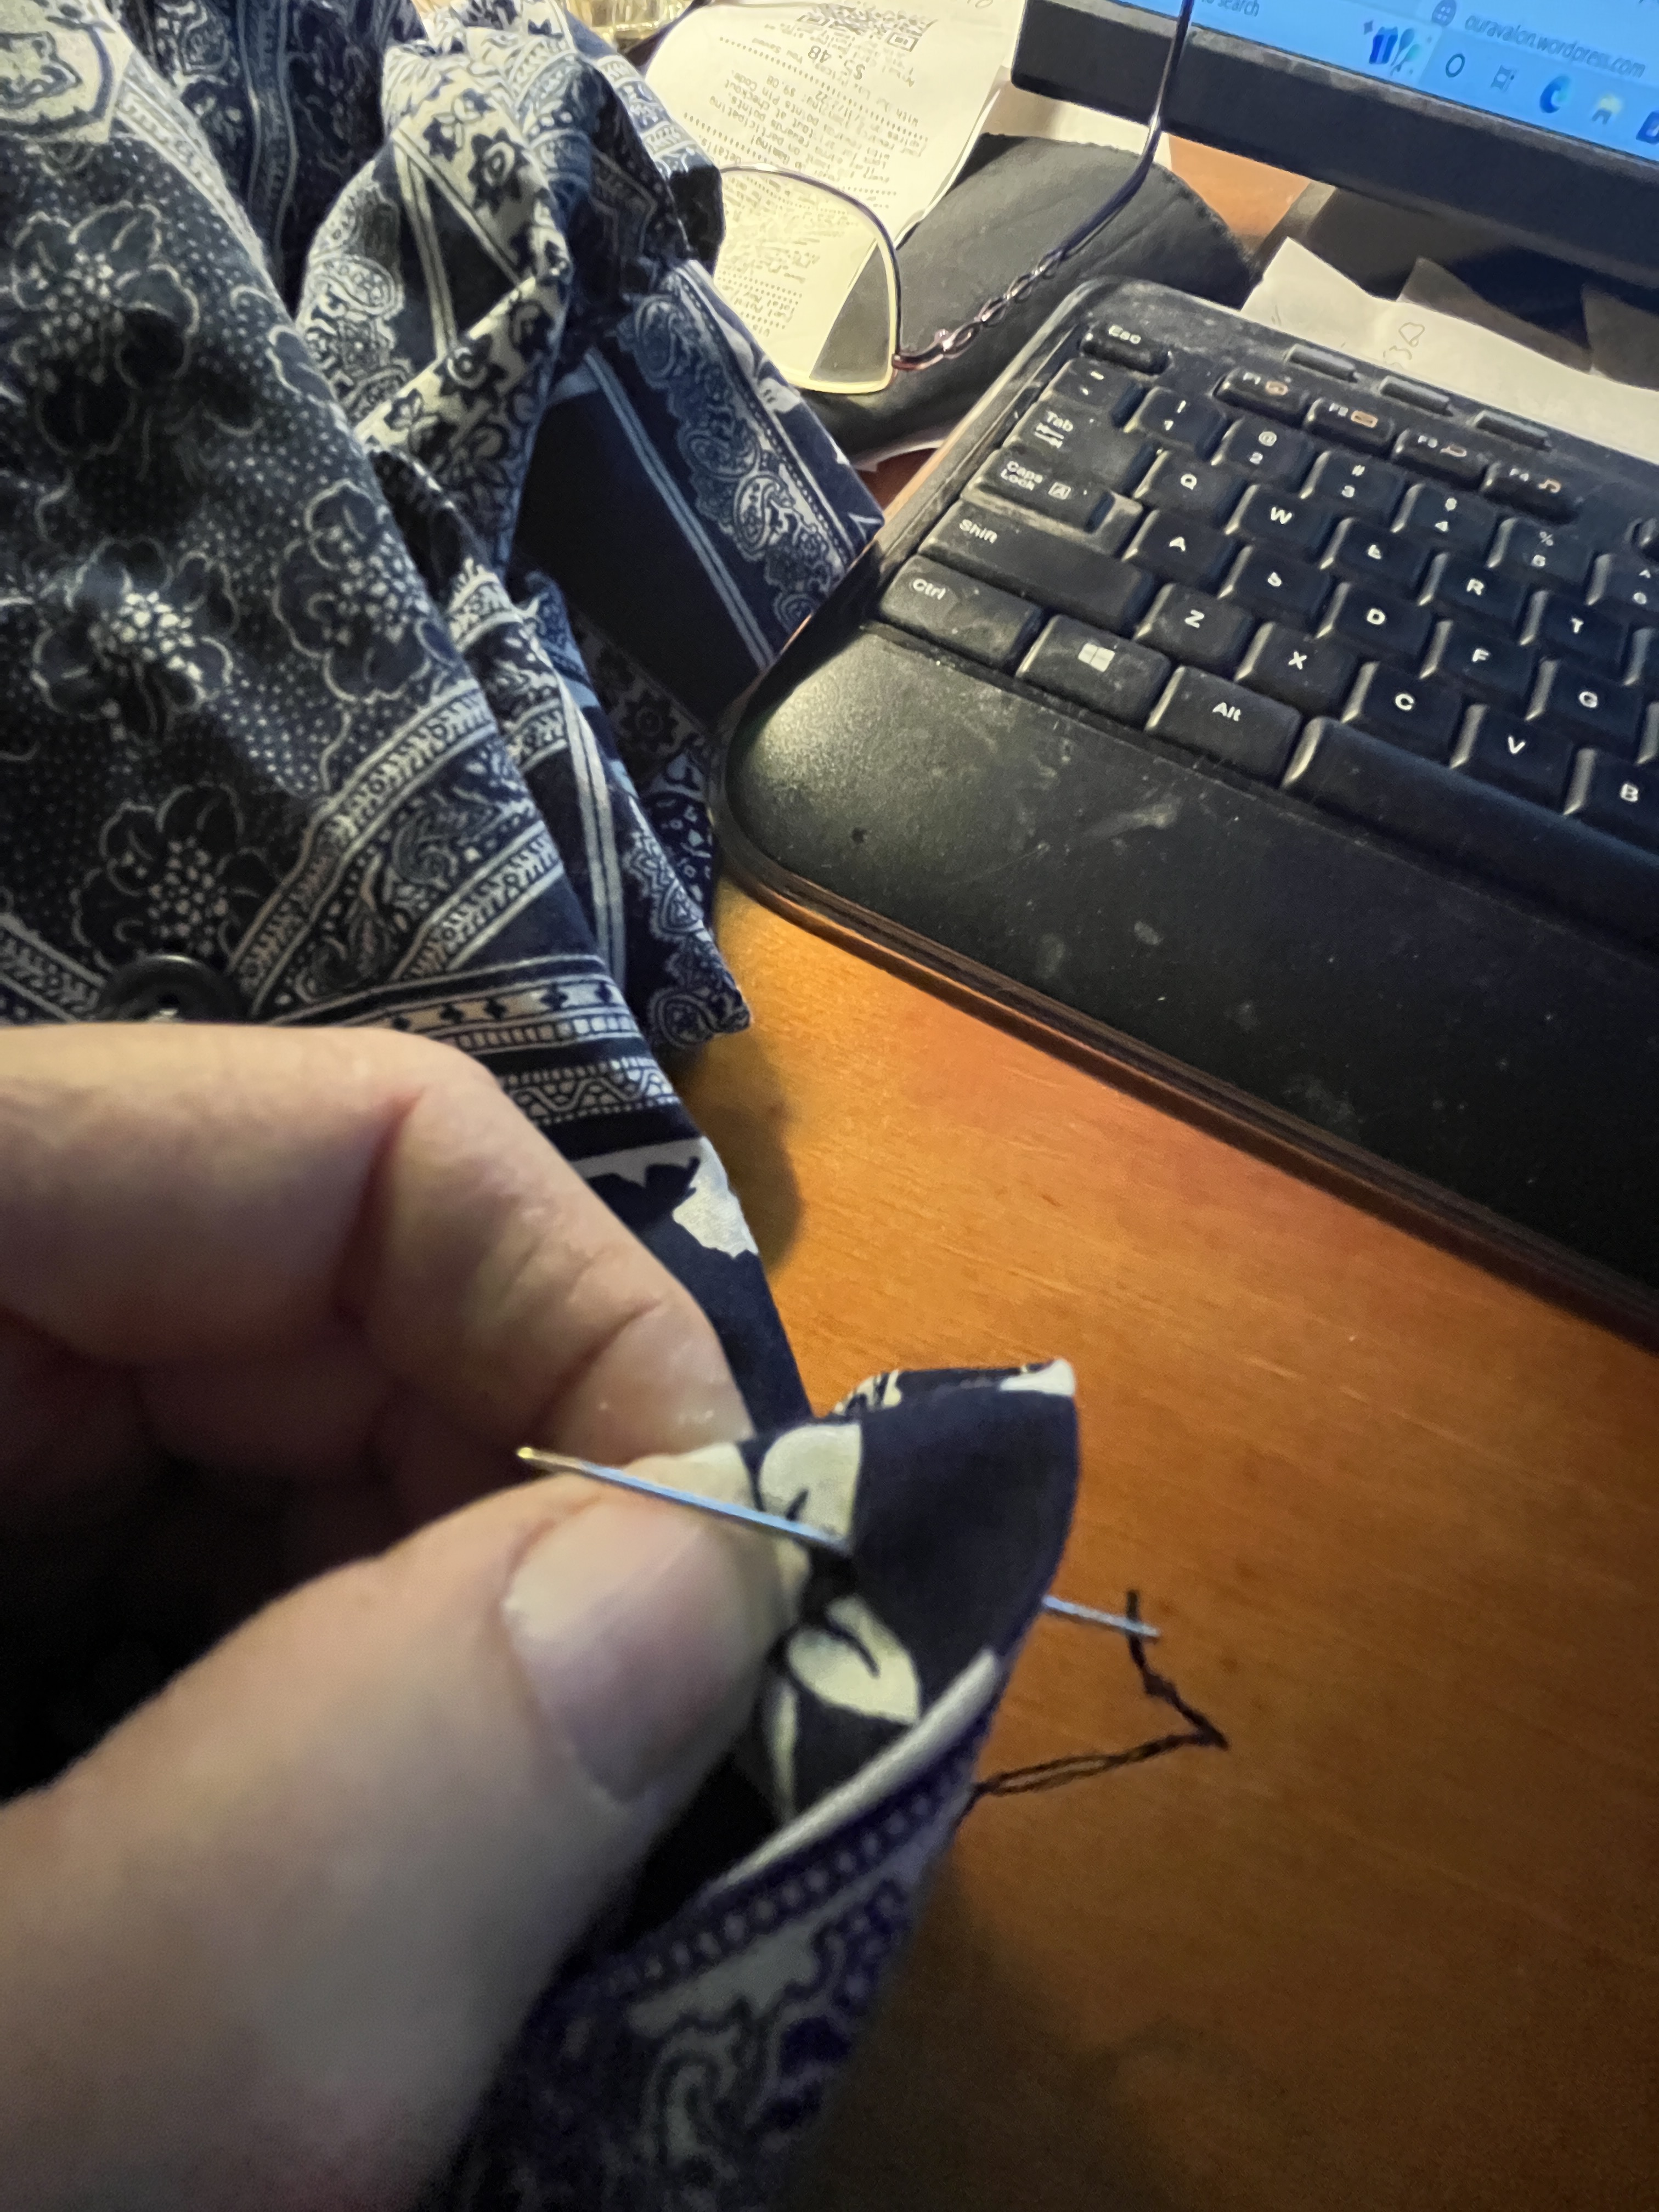
Next come up through the cloth but don’t go through a hole.
Pull the thread to one side and wrap it around the stitches on the underside of the button 3 or 4 times.
Now put the needle back through to the back of the cloth. This wrapping isn’t strictly necessary, but it makes a stronger bit of sewing.
Now put the needle through one of the stitches on the back.
Pull the thread through til it’s a manageable loop.
Pull the thread through the loop
and pull into a knot.
Put the needle through again,
make another loop,
pull it tight. Yes, you can do this a 3rd time if you want to. Now cut the thread and you’re done with this button.
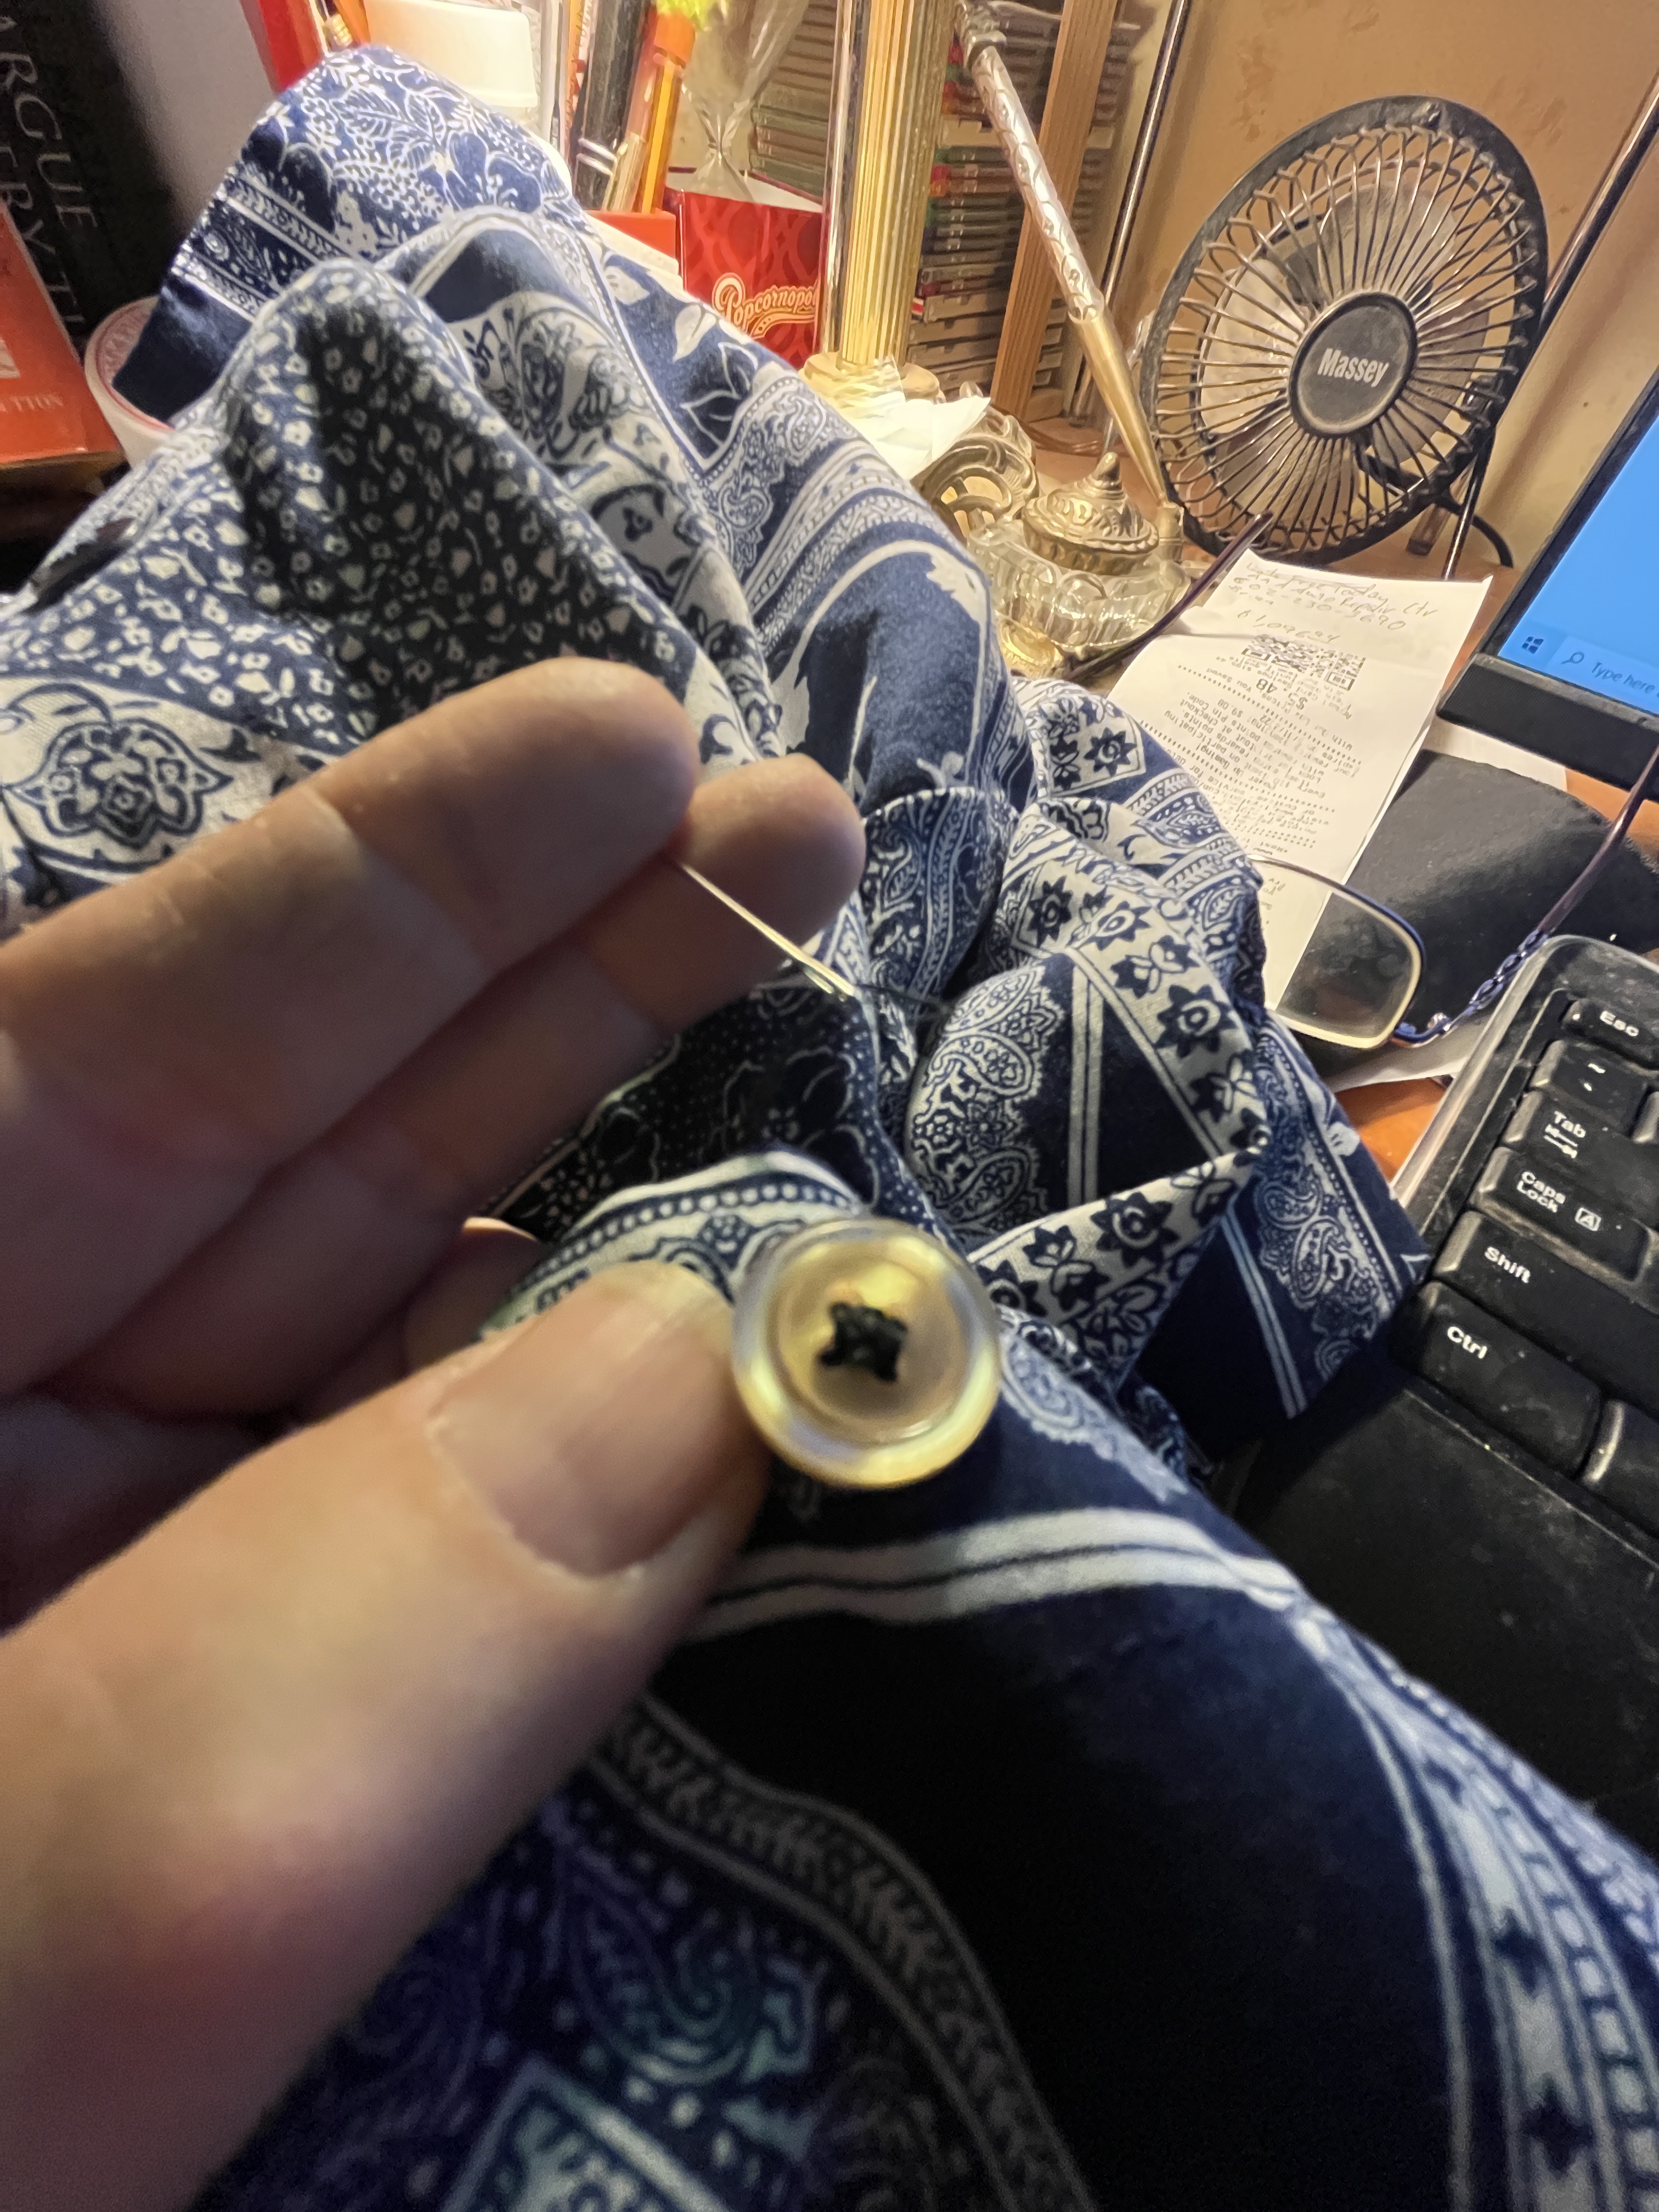
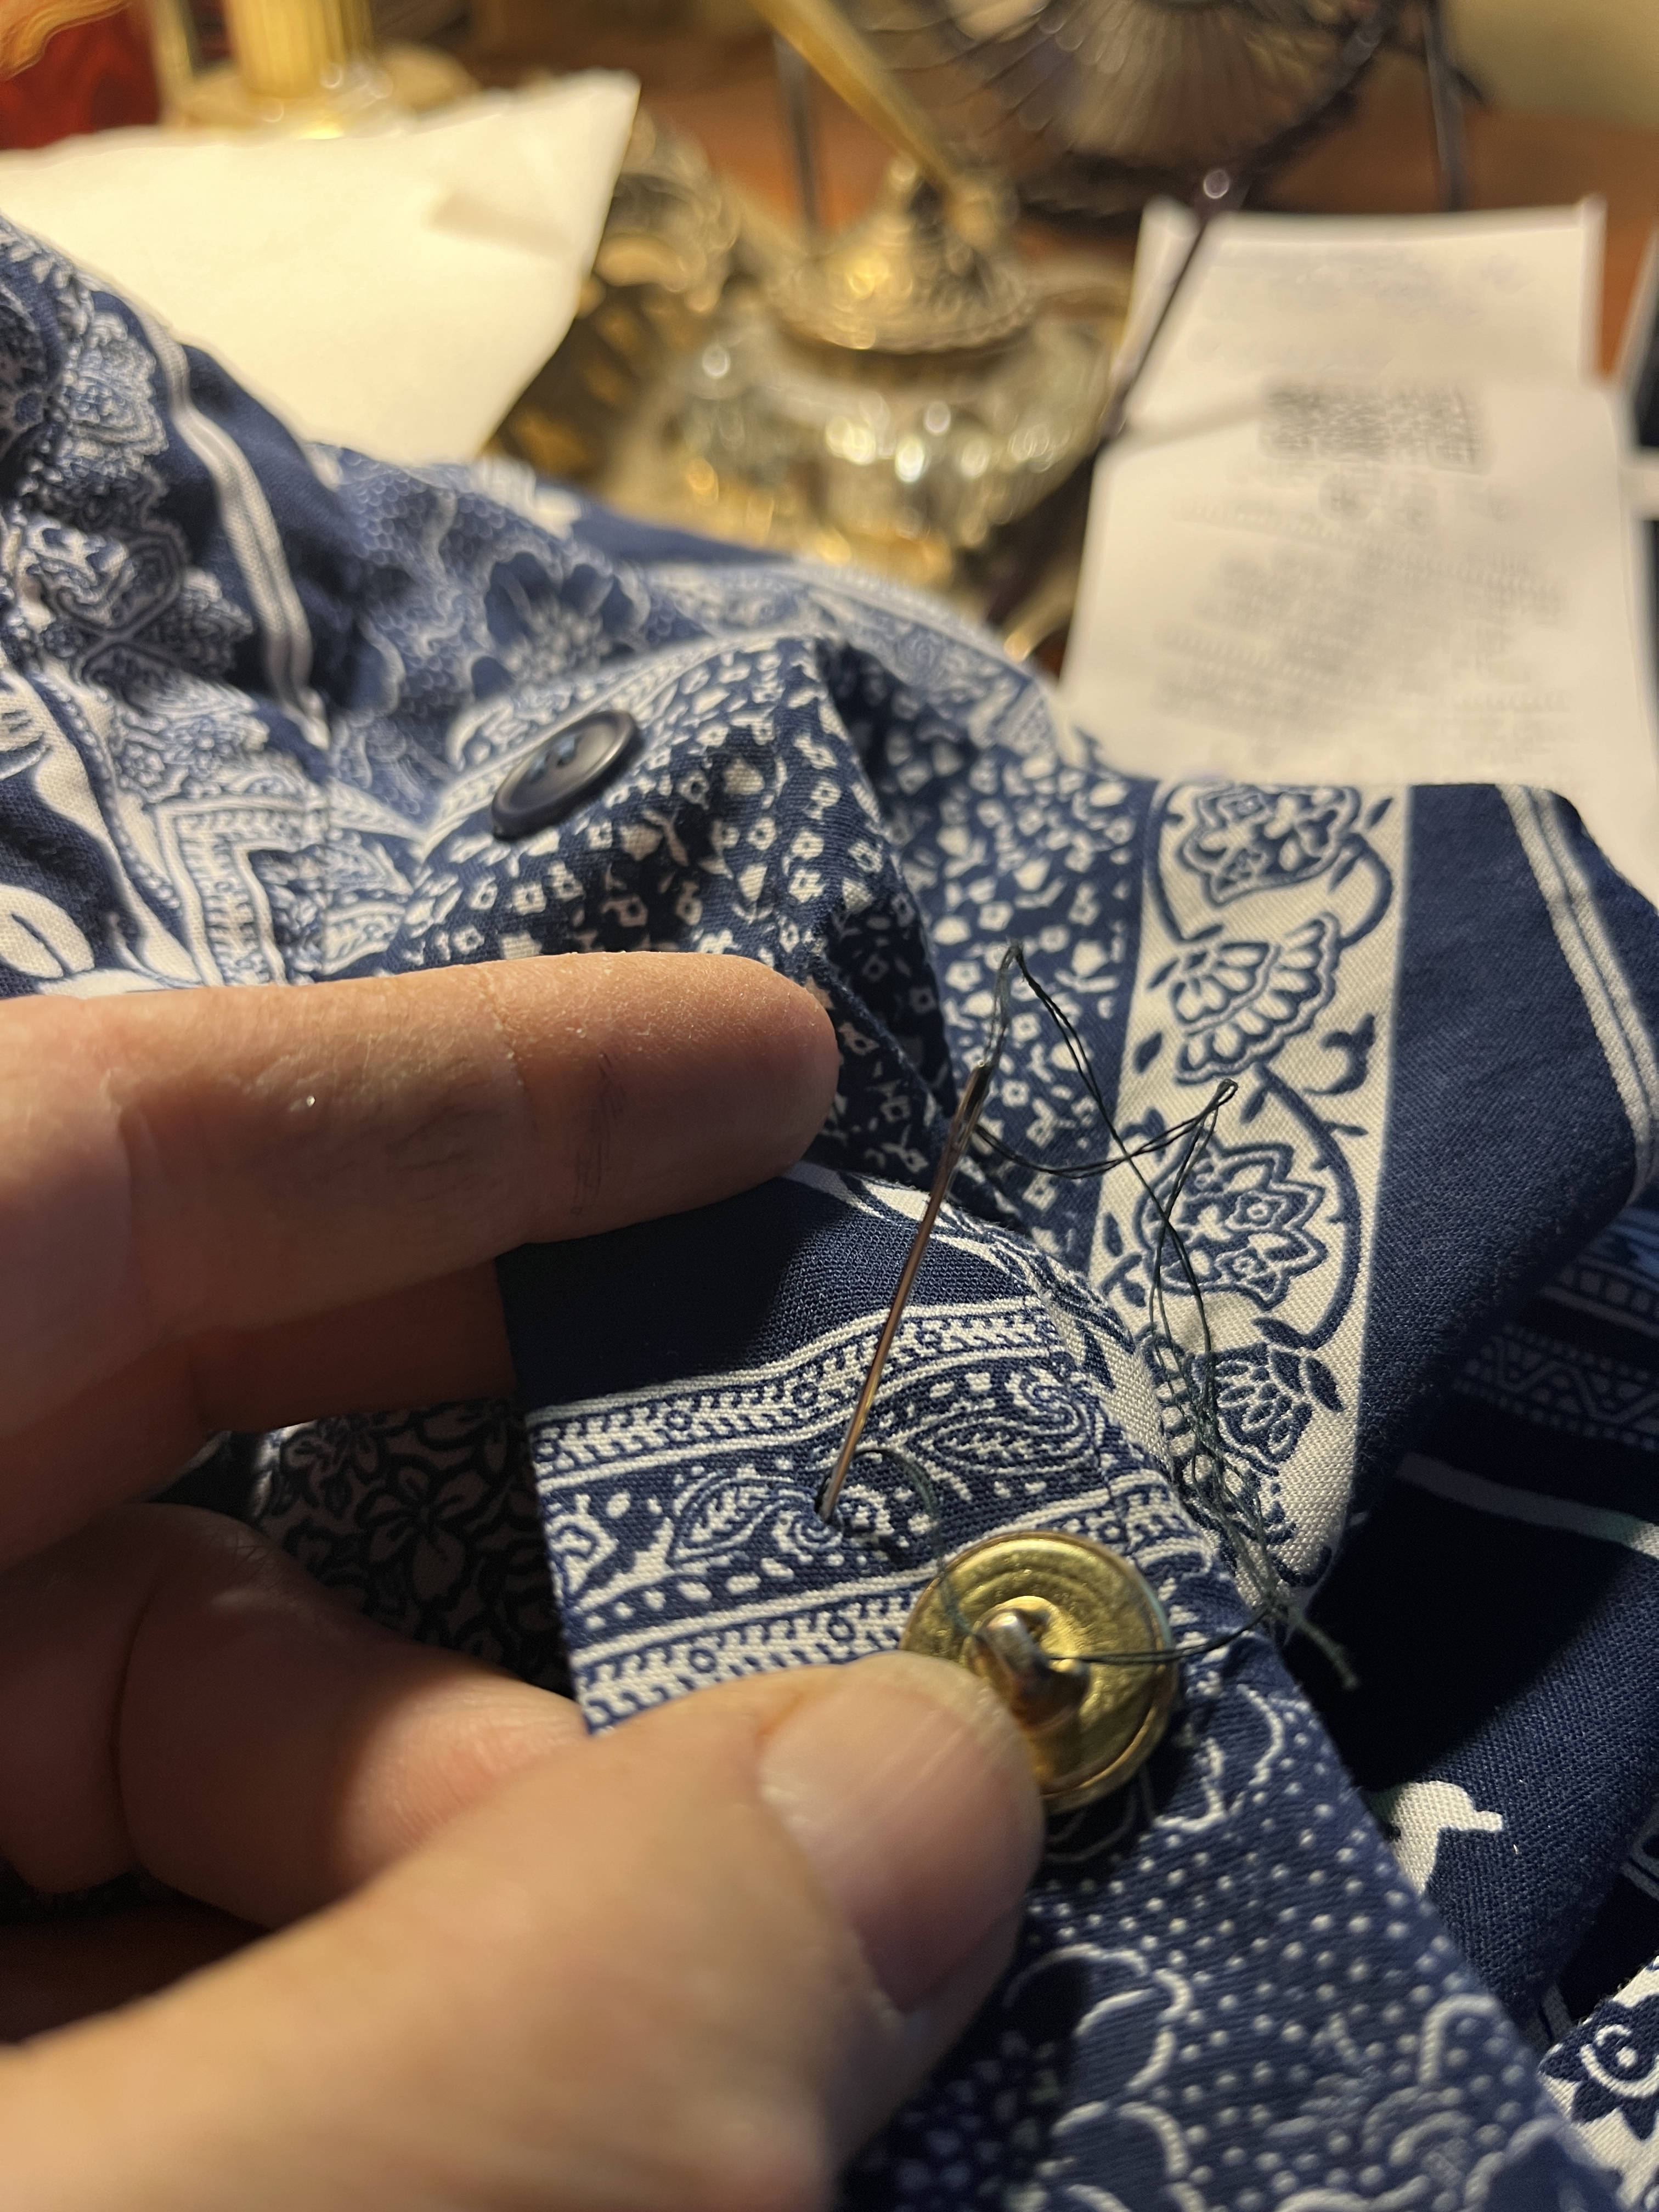
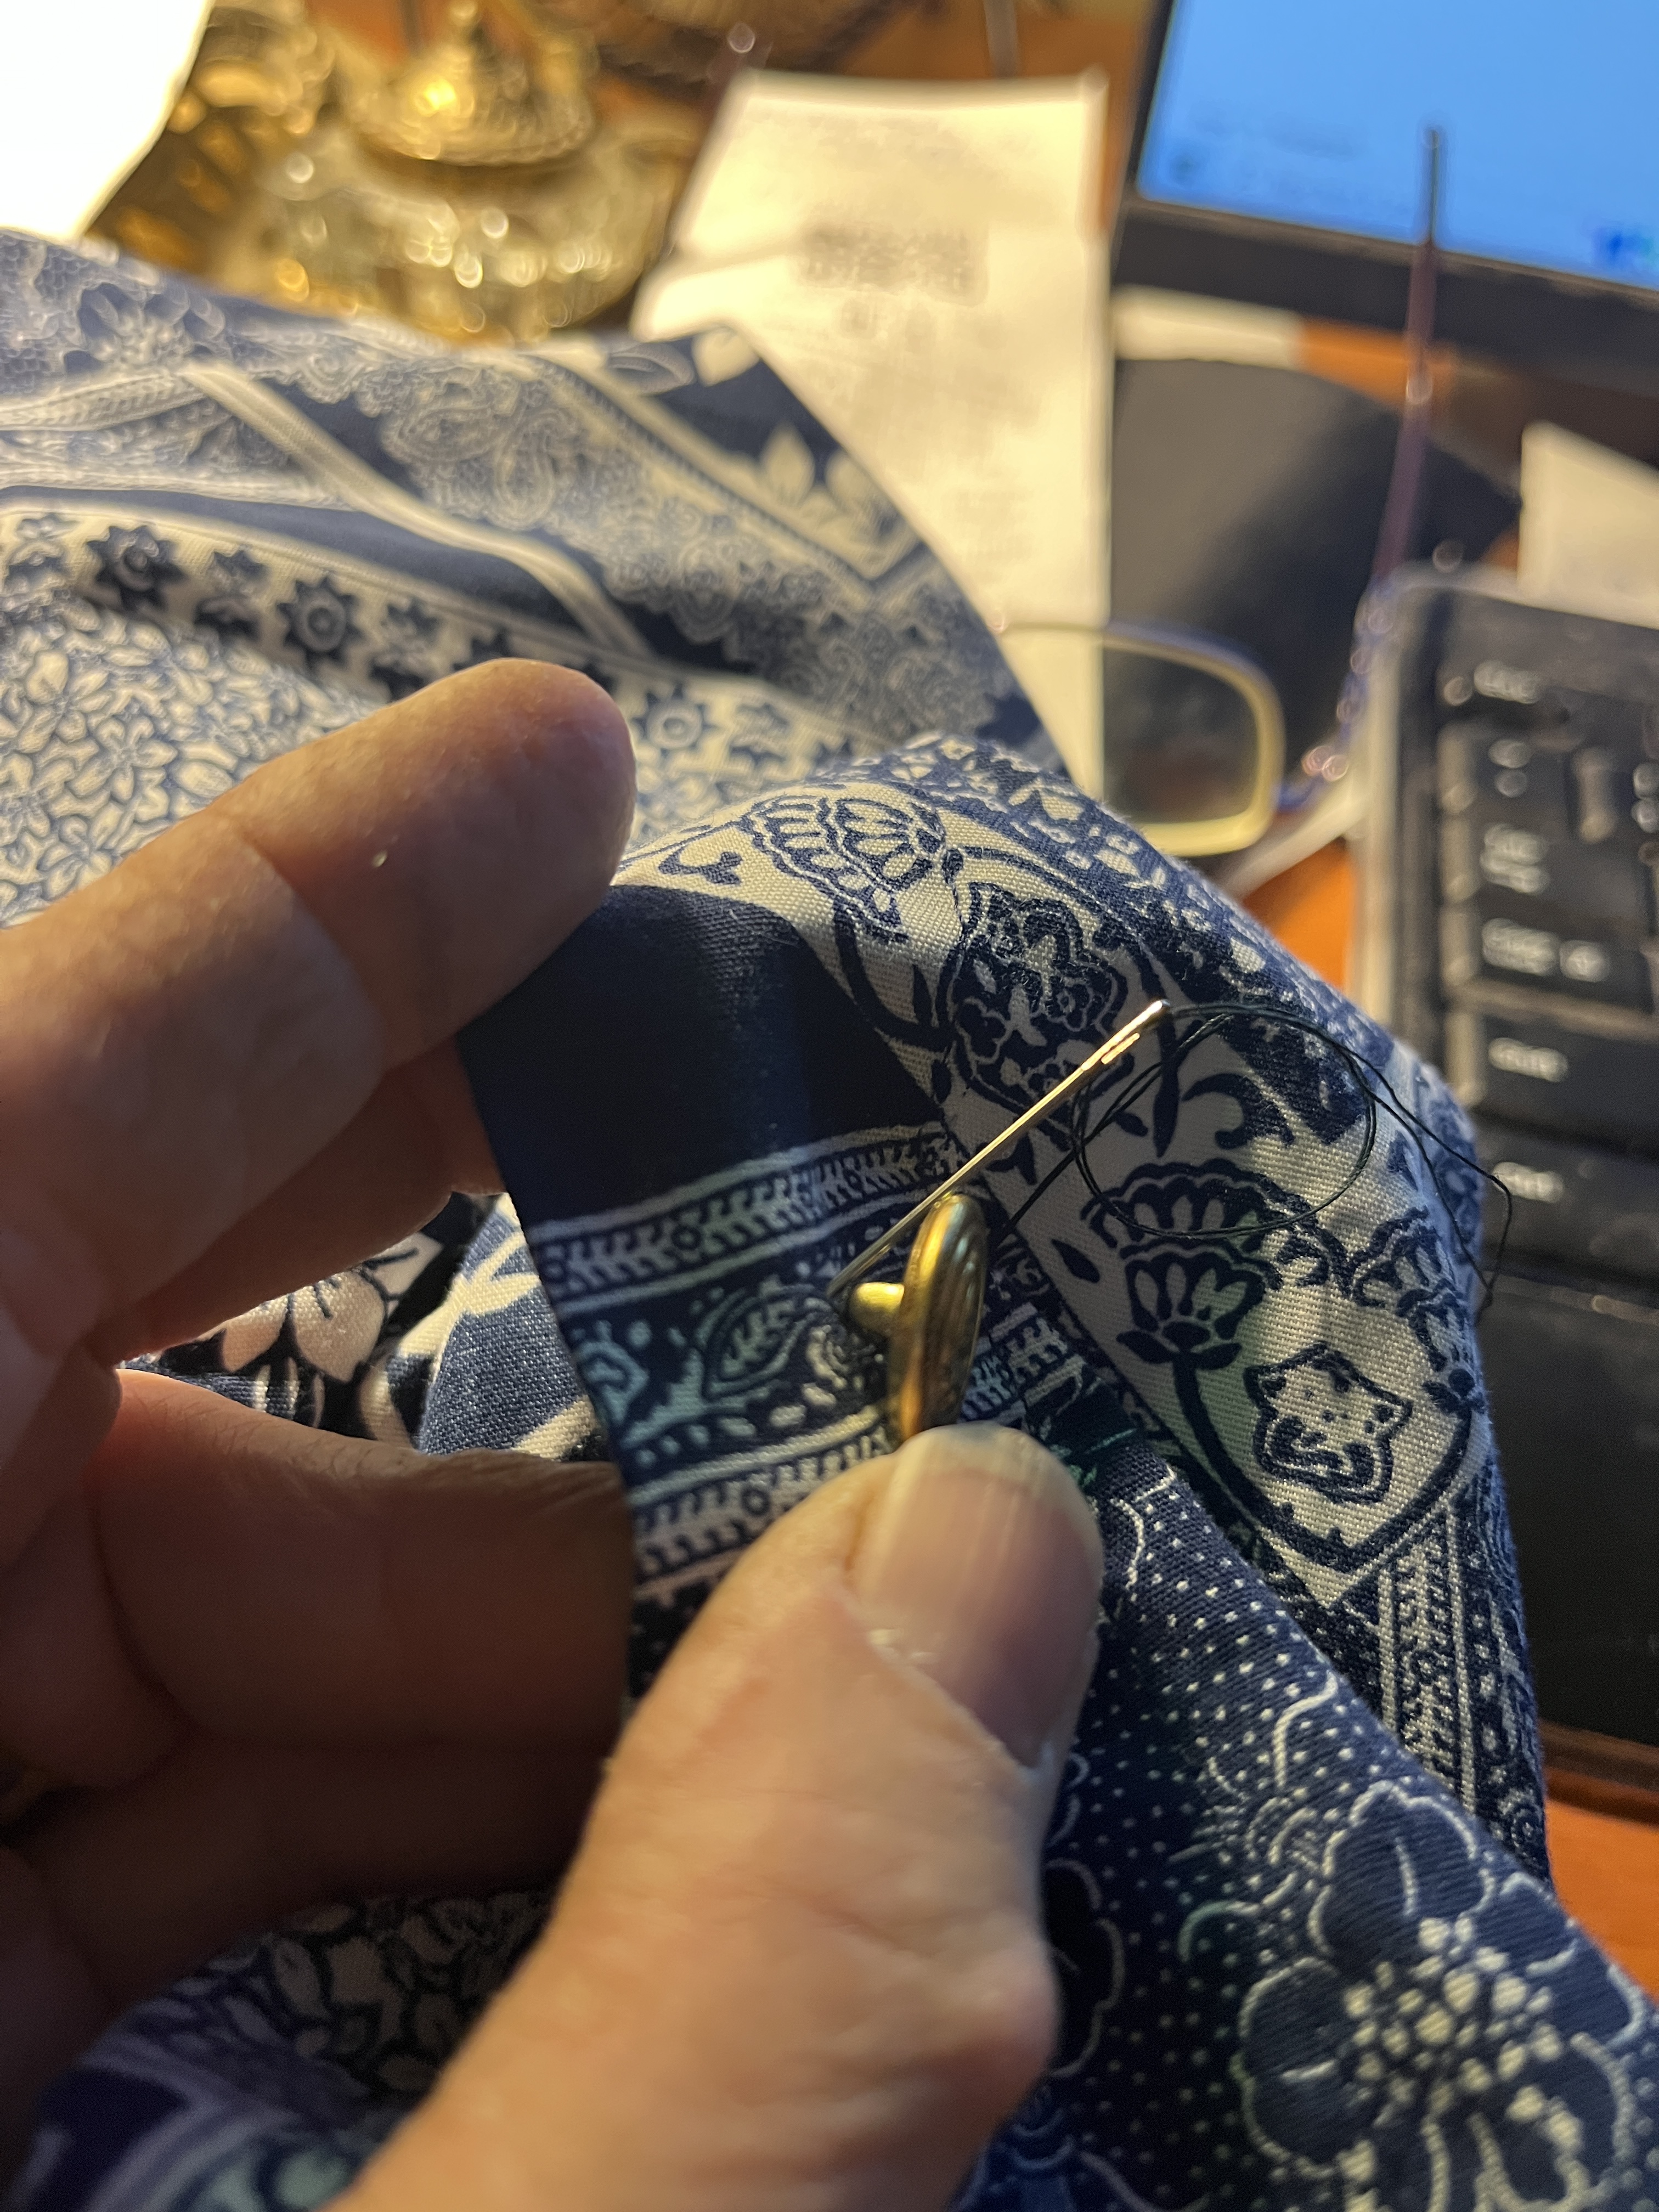
Now for the shank button. Put another knot in the thread, put the needle through the spot where the button needs to go and pull it tight, just like the 1st button, then put the needle through the shank of the button.
Put the needle through the cloth next to where it came up.
Pull the thread tight.
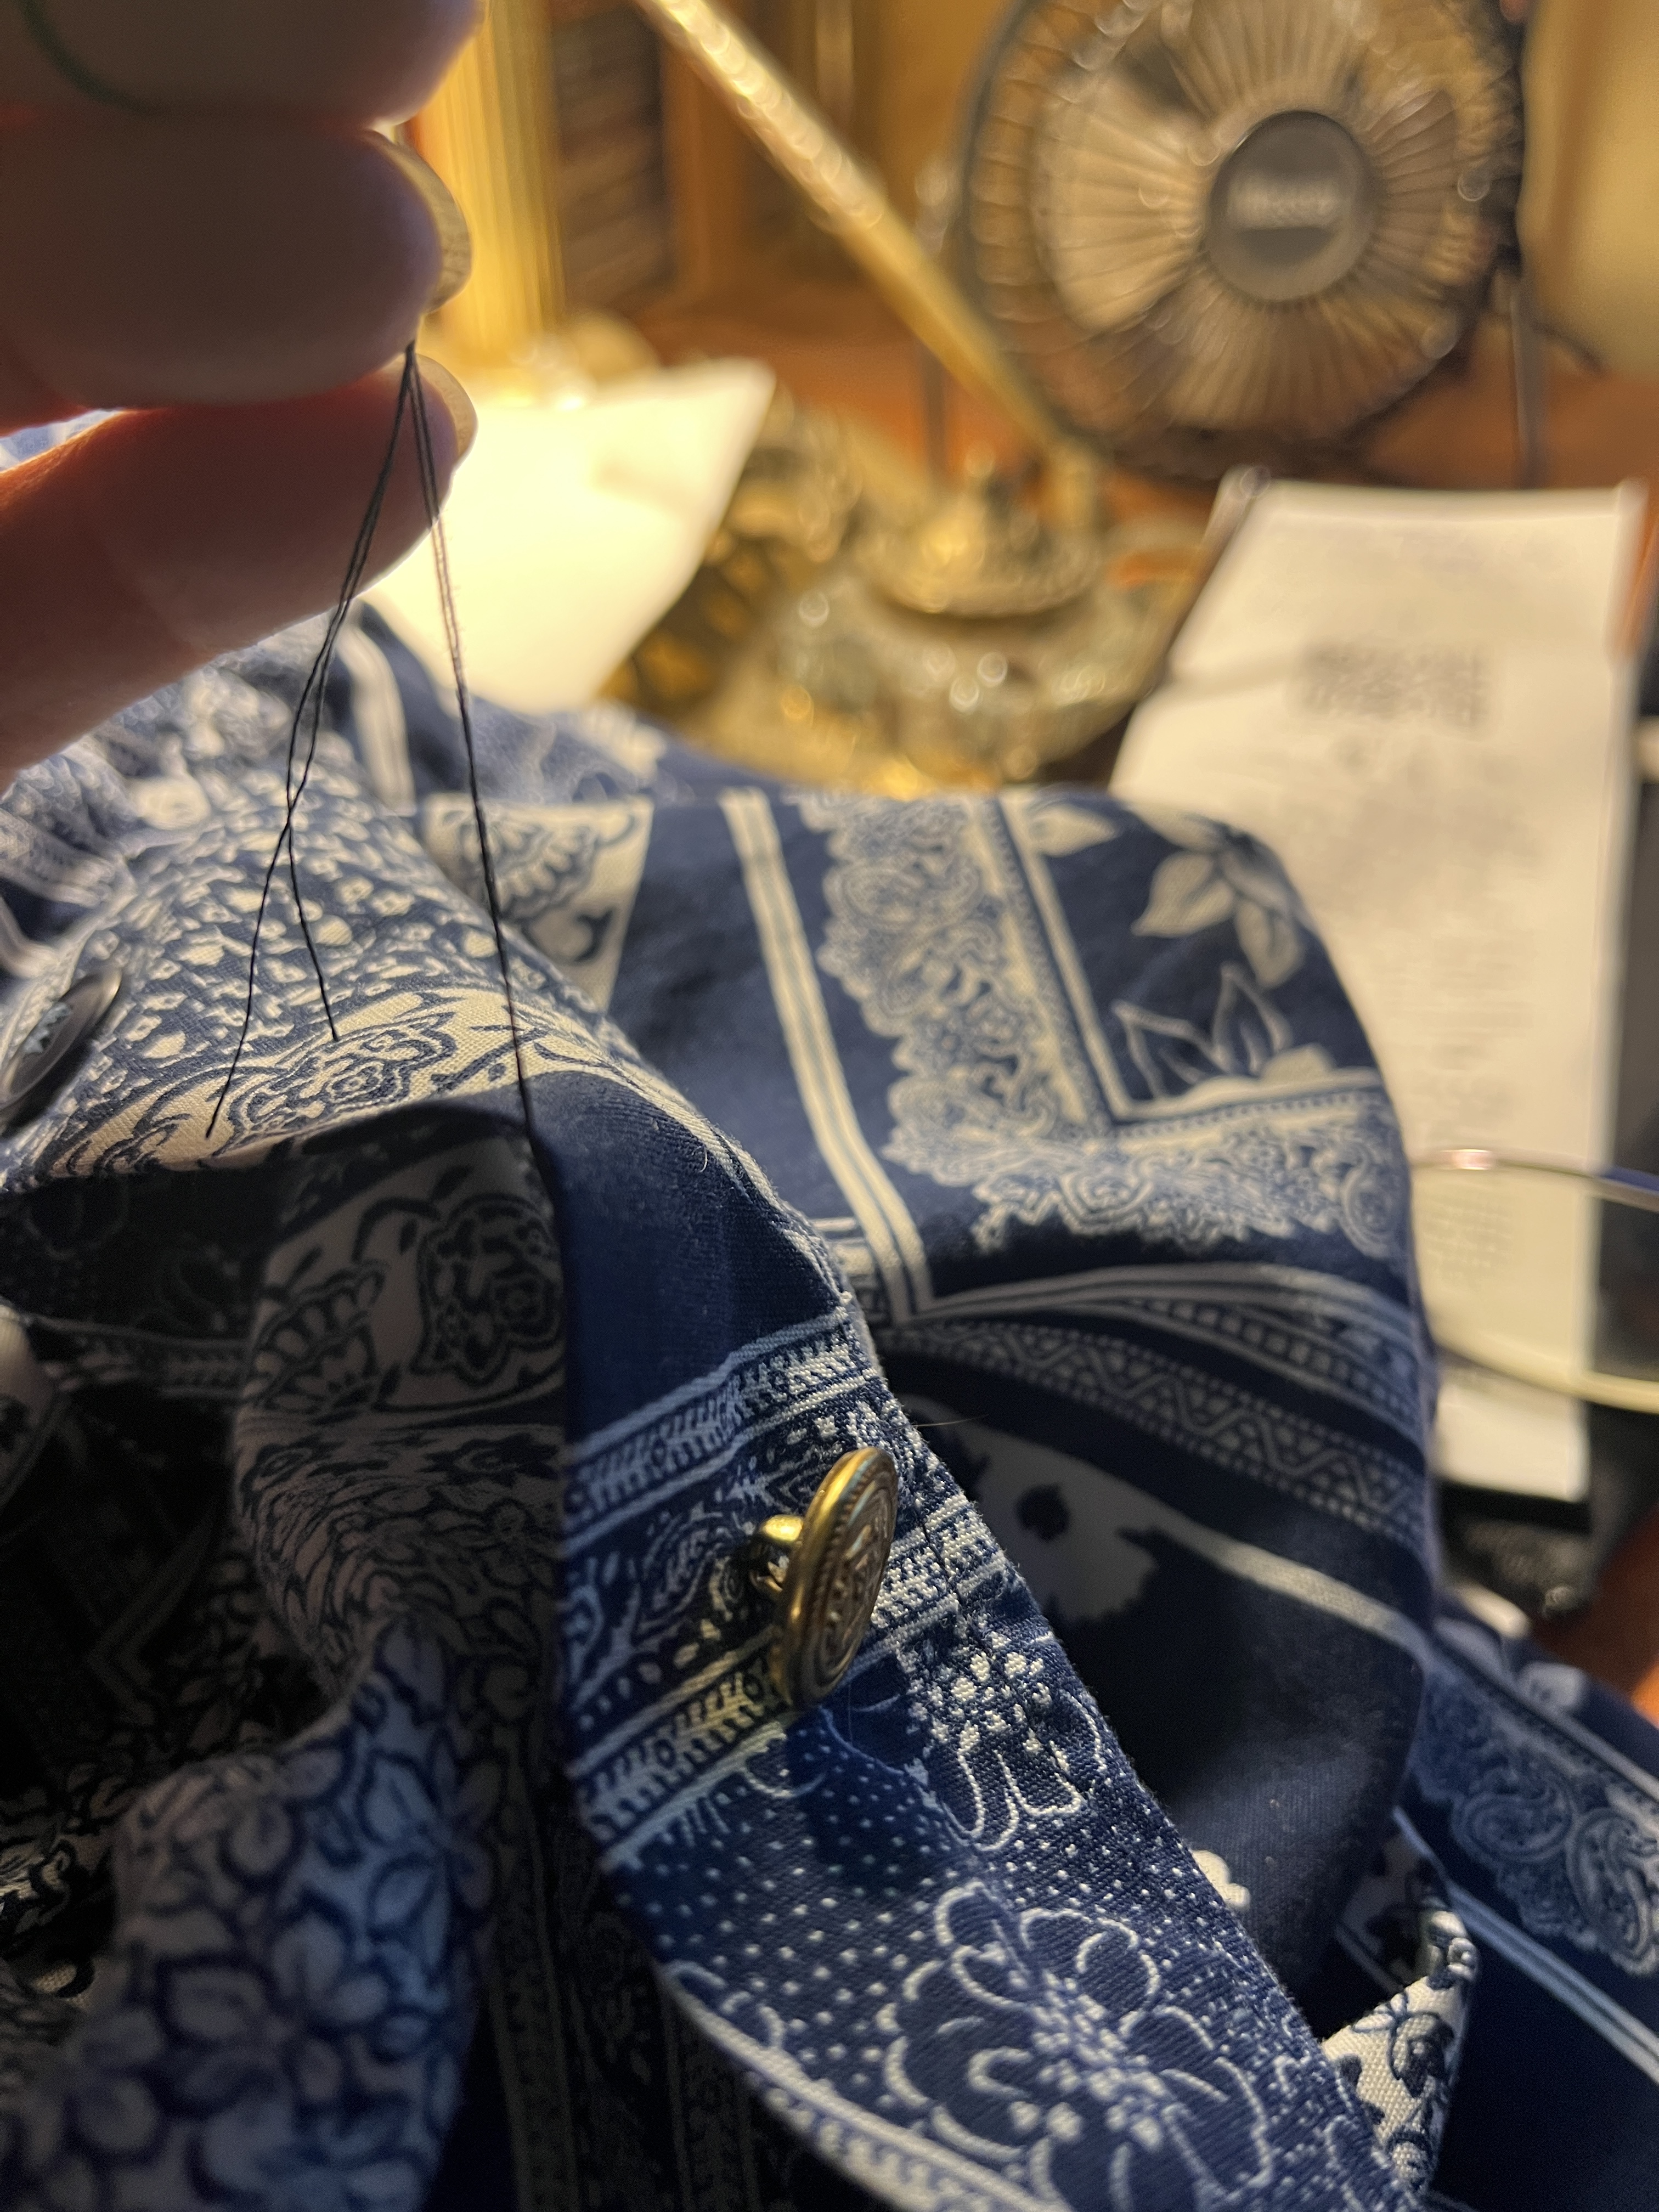
Put the needle back up through the cloth and shank, pull the thread tight.
Put the needle back down through the cloth and pull tight again. Repeat a few times.
Now tie a knot like before. Yes, this button’s a bit easier. You can do a bit of a wrap to strengthen the stitches if you want, or not, it’s up to you.
No, they don’t match, but I don’t care. Another’ll come off soon and I’ll find another odd button to replace it with that doesn’t match, either. This particular blouse doesn’t need to match. Now go forth and save your favourite shirts and other pieces of clothing with buttons.
Buttons come in a dizzying variety! You can get really artsy on clothes for not a lot of money. The designs are quite surprising if you’ve never thought about buying buttons before. You might even start customizing your clothes with whole new sets of buttons! Better get a bigger cookie tin for buttons! You’ll need it for the buttons you cut off for new, cooler buttons. Another option is to sew buttons on clothes and hats as a design element in themselves. There’s a whole Cockney tradition for this in England, but that’s another story. Get artsy and have fun!
Addition 10/6/22:
Of course, if you don’t have time to sew on a button, or if you don’t have the stuff to sew one on (yet) you can always use a safety pin. Don’t have a safety pin? Run to the store and get a package of assorted sizes. They’re handy and you’ll be surprised how often you need one. While you’re there pick up a few sewing notions you need to sew on that button or do random other mending chores.
I just had to try this. Saw people slicing and cooking cauliflower here and there so I figured I’d give it a try. I haven’t cleaned up around the fire pit yet so I used the broiler tonight. Can’t wait to try it on the grill over mesquite wood coals.
1 head of Cauliflower
Salt, Pepper, Garlic to taste
Worcestershire
Soy Sauce
Italian Salad Dressing, any brand, or just a good home-made vinaigrette
Rinse the cauliflower under the tap, then shake off and slice. You can save the edges for the vegetable side in another meal, maybe sauteing with onions, peppers and finishing with a sprinkle of cheese, but that’s another meal. Give the stem and leafy trimmings to the chickens or toss in the compost. Waste not want not.
While the slices/steaks are marinating make some rice. Basmati is fabulous but Jasmine and other kinds are good, too, so make your favourite.
Put the slices/steaks in a pie tin or some sort of flat pan and sprinkle with salt, pepper, garlic and whatever you like. Splash on some Worcestershire, soy sauce and vinaigrette and allow to marinate an hour or so, turning once in a while.
Put the slices on a rimmed cookie sheet, pour any marinade over them and put under the broiler. Broil on each side about 3 to 5 minutes. The stuffing is finishing on the bottom shelf, enjoying the heat. When you turn them, if the marinade is drying and threatening to burn, add some wine and let it flow over the pan under the cauliflower so stuff doesn’t get smoky but enjoys the yumminess of wine.
Yes, it did just occur to me that you could sprinkle with shredded cheese but that would be gilding the lily. Oh, go ahead and gild away if you want. Yum is yum.
Serve on a bed of rice or with rice on the side. I like on the side. Instead of salt we used soy sauce. Tonight I made stuffing because I like stuffing and it’s so full of broth it’s almost a protein (that’s my story and I’m sticking with it), but a protein of some sort as a side would be nice. I do love a bit of plain buttered rice.
If you want to go a bit simple you can skip the slicing, go straight to the marinating and bake or roast the whole head at 350. Check after 10 minutes to see how it’s doing and decide if you want to leave it in another 5 or 10 minutes. Poke it with a fork or knife, if it’s tough leave it in a bit longer. At about that time you can decide if you want to sprinkle it with grated cheese of make a nice cheese sauce to gild this lily.
Yes, this was our main dish tonight. This goes well with wine, beer, milk, tea, ice water or whatever you like. We had easy strawberry sauce over vanilla ice cream with a sprinkle of balsamic vinegar for dessert.
Mom used to make these for special occasions. Yes, they’re a bit more trouble than simple drop cookies but they’re fun to make, you can make them ahead and refrigerate or freeze to bake later, they’re decorative and yummy. What more could you want from a cookie? These can be in any configuration you can manage, but checkerboard makes them wonderful for game-side snacking or even using. Well, so does the pinwheel pattern, since it’s like a race game…kind of…and marble is good because it’s pretty, like things (like pieces and game-boards) made out of marble. So get cooking.
1 oz Butter (for melting the chocolate)
2 oz melted Bittersweet Chocolate (next time try just 1 oz)
1 stick (8oz) Butter or Margarine, softened (yes, you need to plan ahead).
1 c sugar (I used 1/2 brown and 1/2 granulated in this batch). I used brown sugar because I like the flavour, but you can use all plain granulated sugar if you like.
1 tsp Vanilla
1 Egg
1/4 tsp Salt
1/2 tsp Baking Powder
2 1/2 c All Purpose Flour (I use unbleached, for what it’s worth)
1 or 2 Tbsp Cocoa Powder (how chocolatey do you want it?)
Melt 2 oz unsweetened baking chocolate with 1 oz butter. I warm a small pan, let the butter melt, then turn off the heat and let the residual heat melt the chocolate in the butter. It’ll melt while you mix up the other stuff.
Cream together the butter, sugar and vanilla.
Stir in an egg. with the salt and baking powder.
Mix in the flour
Divide the dough in half. One half might be a but larger than the other half. If you make the smaller half the coloured one the remaining dough you marble at the end will probably be nicer.
Stir the chocolate to make sure it’s all melted and mixed with the butter, then add it and the cocoa powder to half the dough and mix well.
You might want to refrigerate the dough for a bit, maybe 30 minutes or so (longer if you get distracted). This’ll make it easier to handle when rolling.
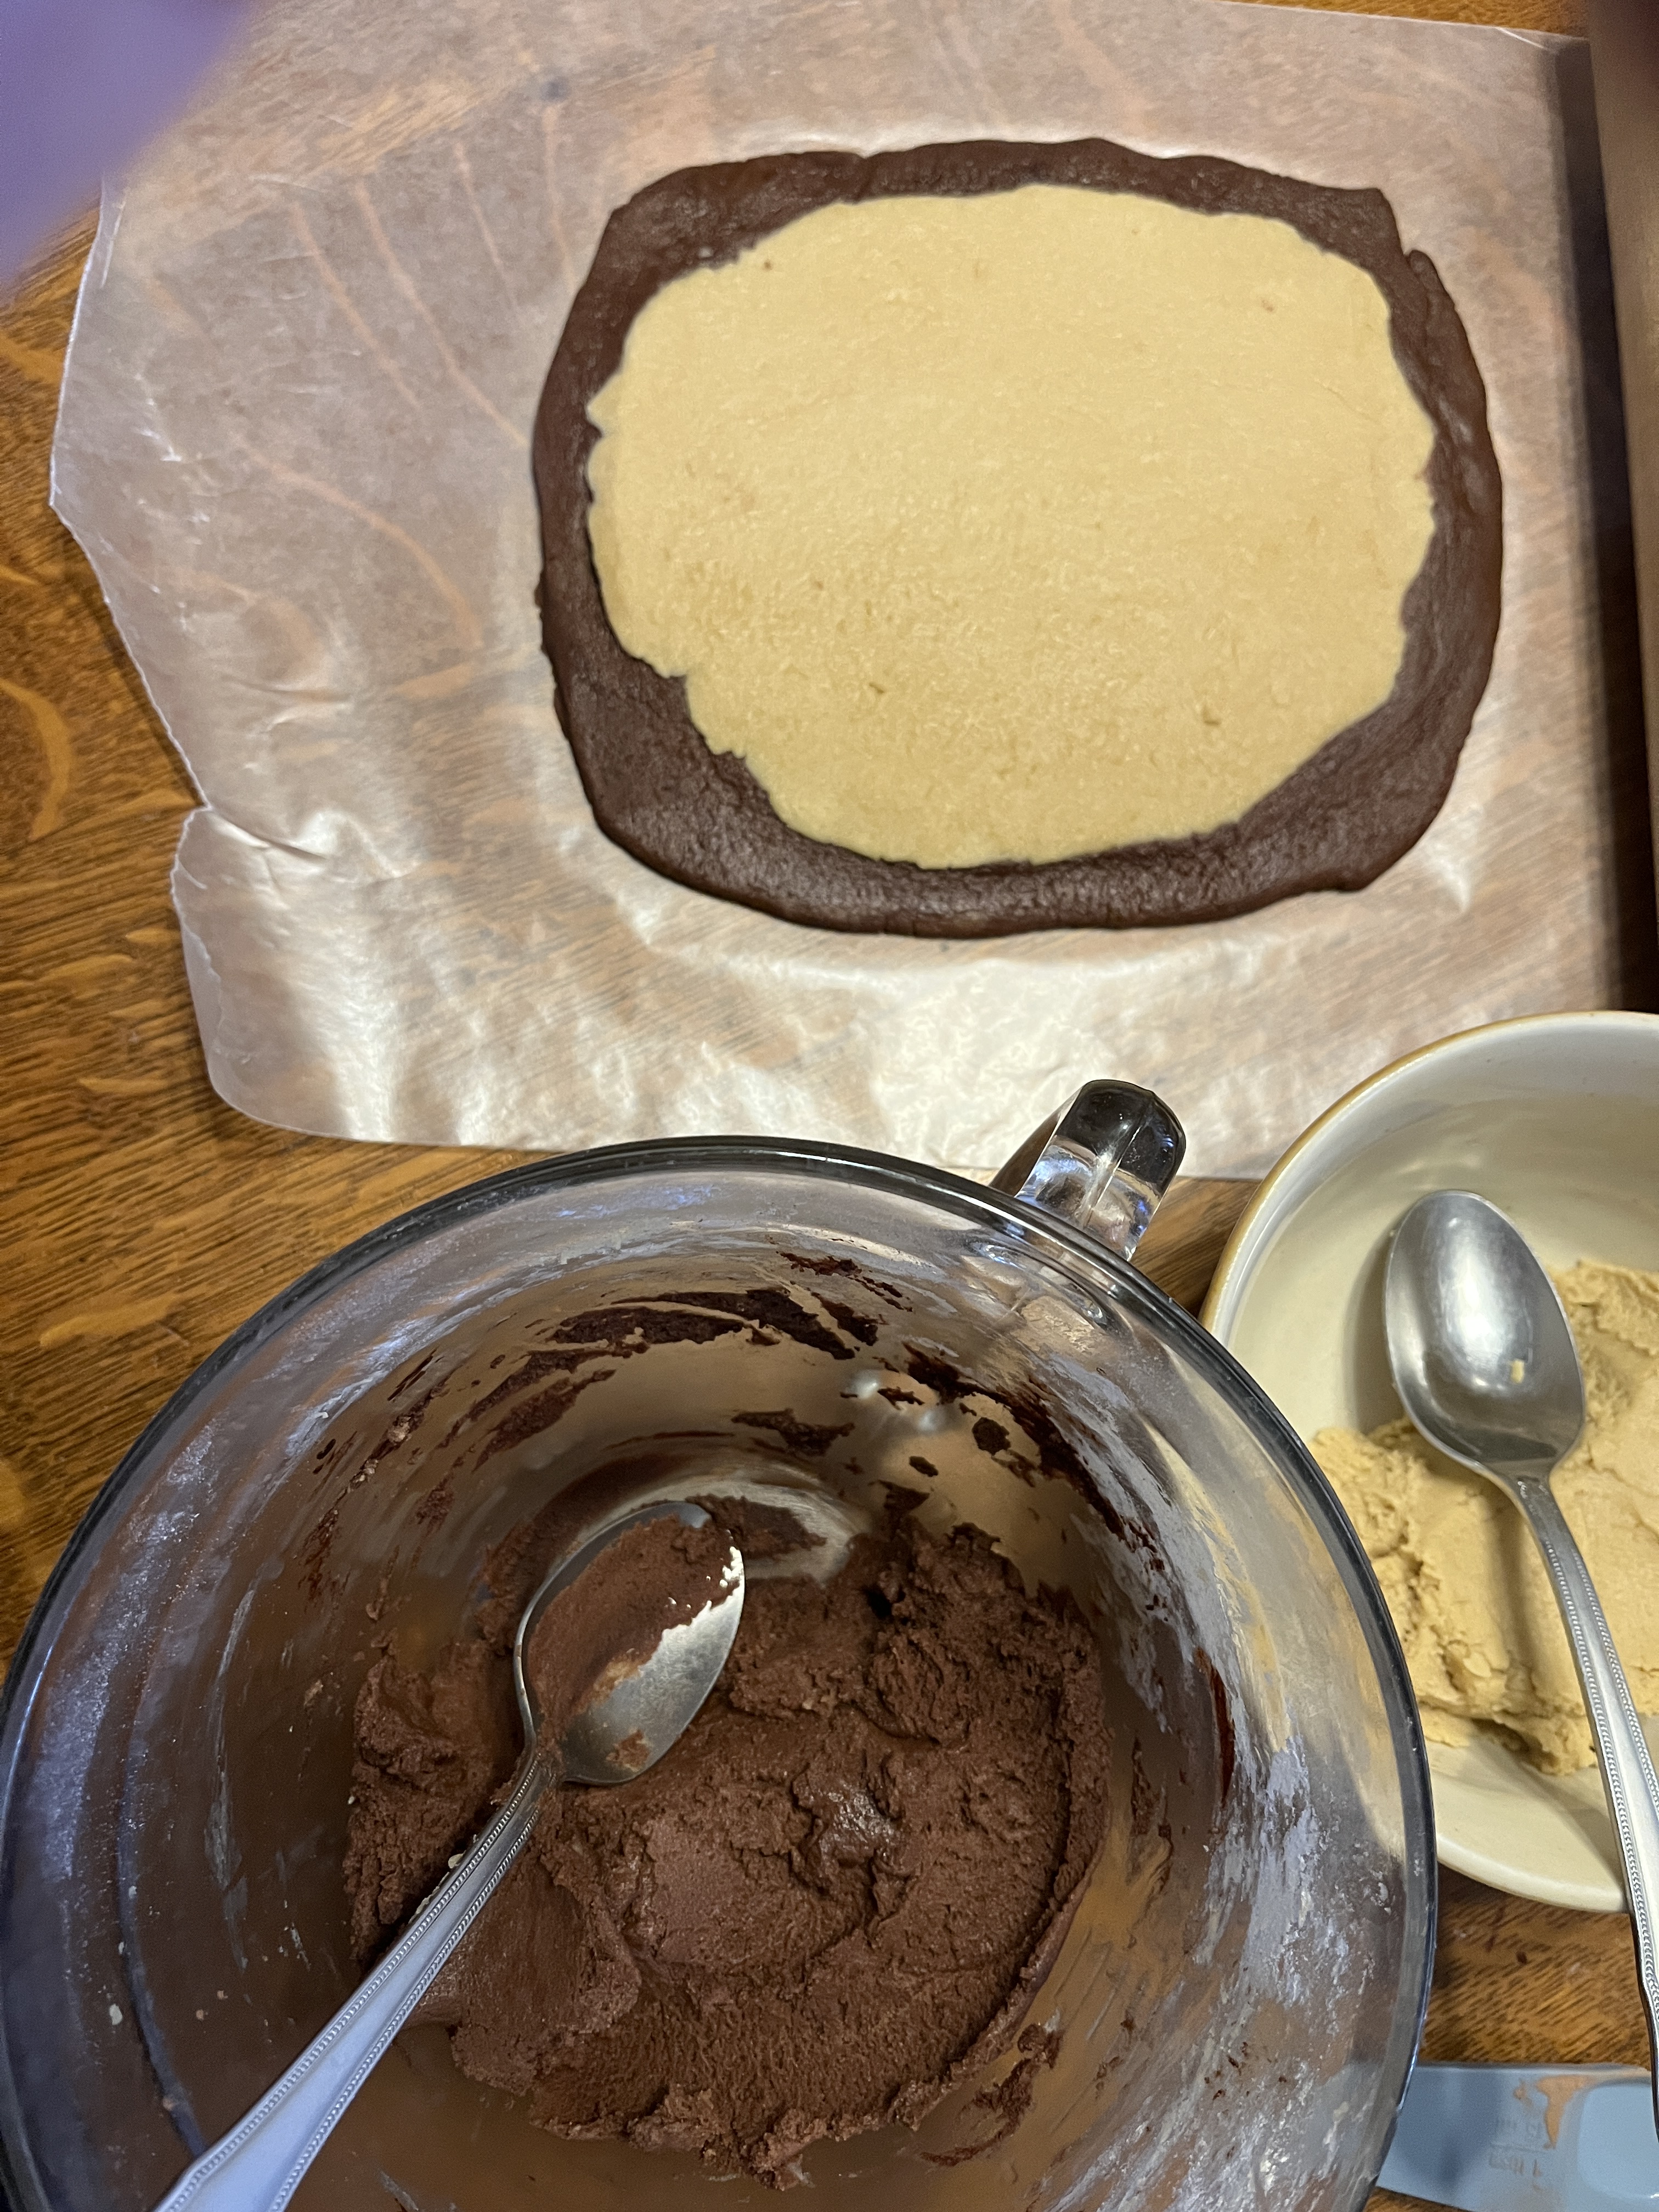
Divide the chocolate dough in half and roll half the chocolate dough out on a piece of waxed paper.
Divide the plain dough in half, flatten it with your hands and roll it out on top of the chocolate dough. On second thought, next time I think I’ll roll them out on their own pieces of waxed paper and then put one on top before rolling it up. Cut off the wonky ends and put them aside.
Use the waxed paper to roll the dough into a log, then wrap it all in the waxed paper.
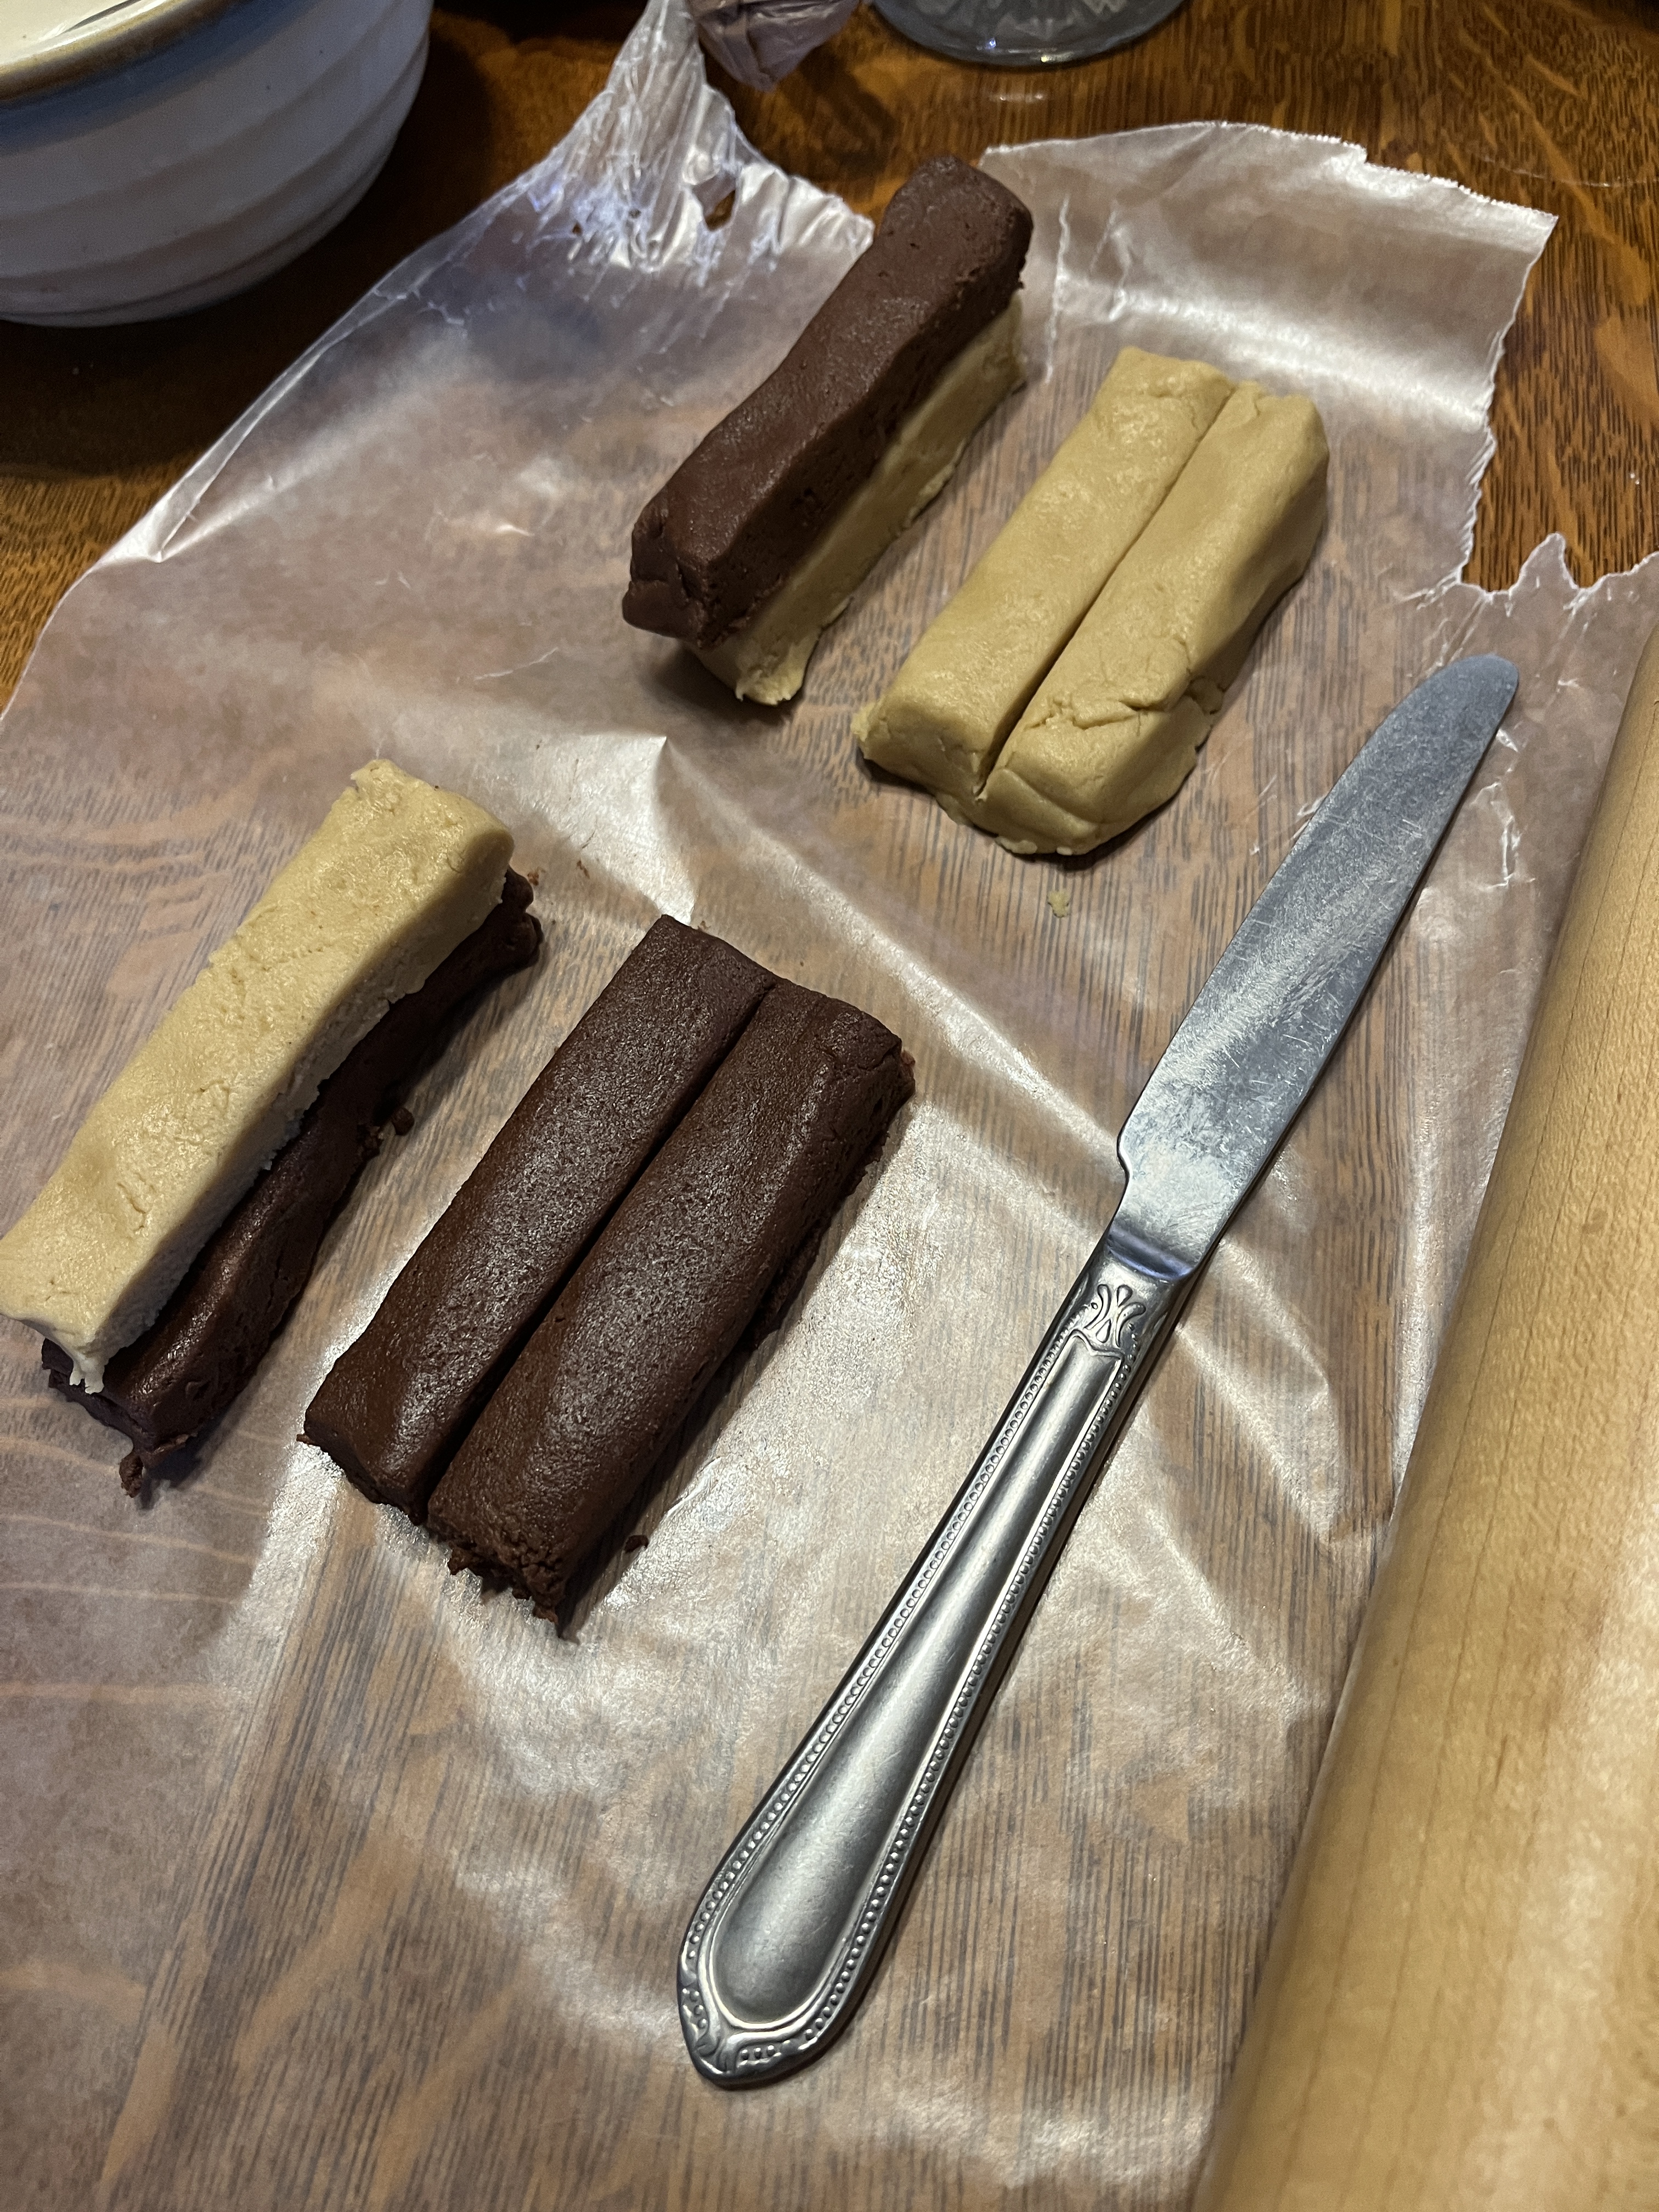
Next take the plain dough and form into a square about 1/4 inch thick on another piece of waxed paper, then do the same with the chocolate dough. If either is bigger than the other cut the bigger one down to size and add the off-cuts to the scrap pile.
Cut each square into 4 long pieces and stack the pieces into a checkerboard pattern.
Work the checkered plank into a long form. Cut off the ends to square it off and set them aside. Wrap in the dough in the waxed paper, trying to keep the log square-ish.
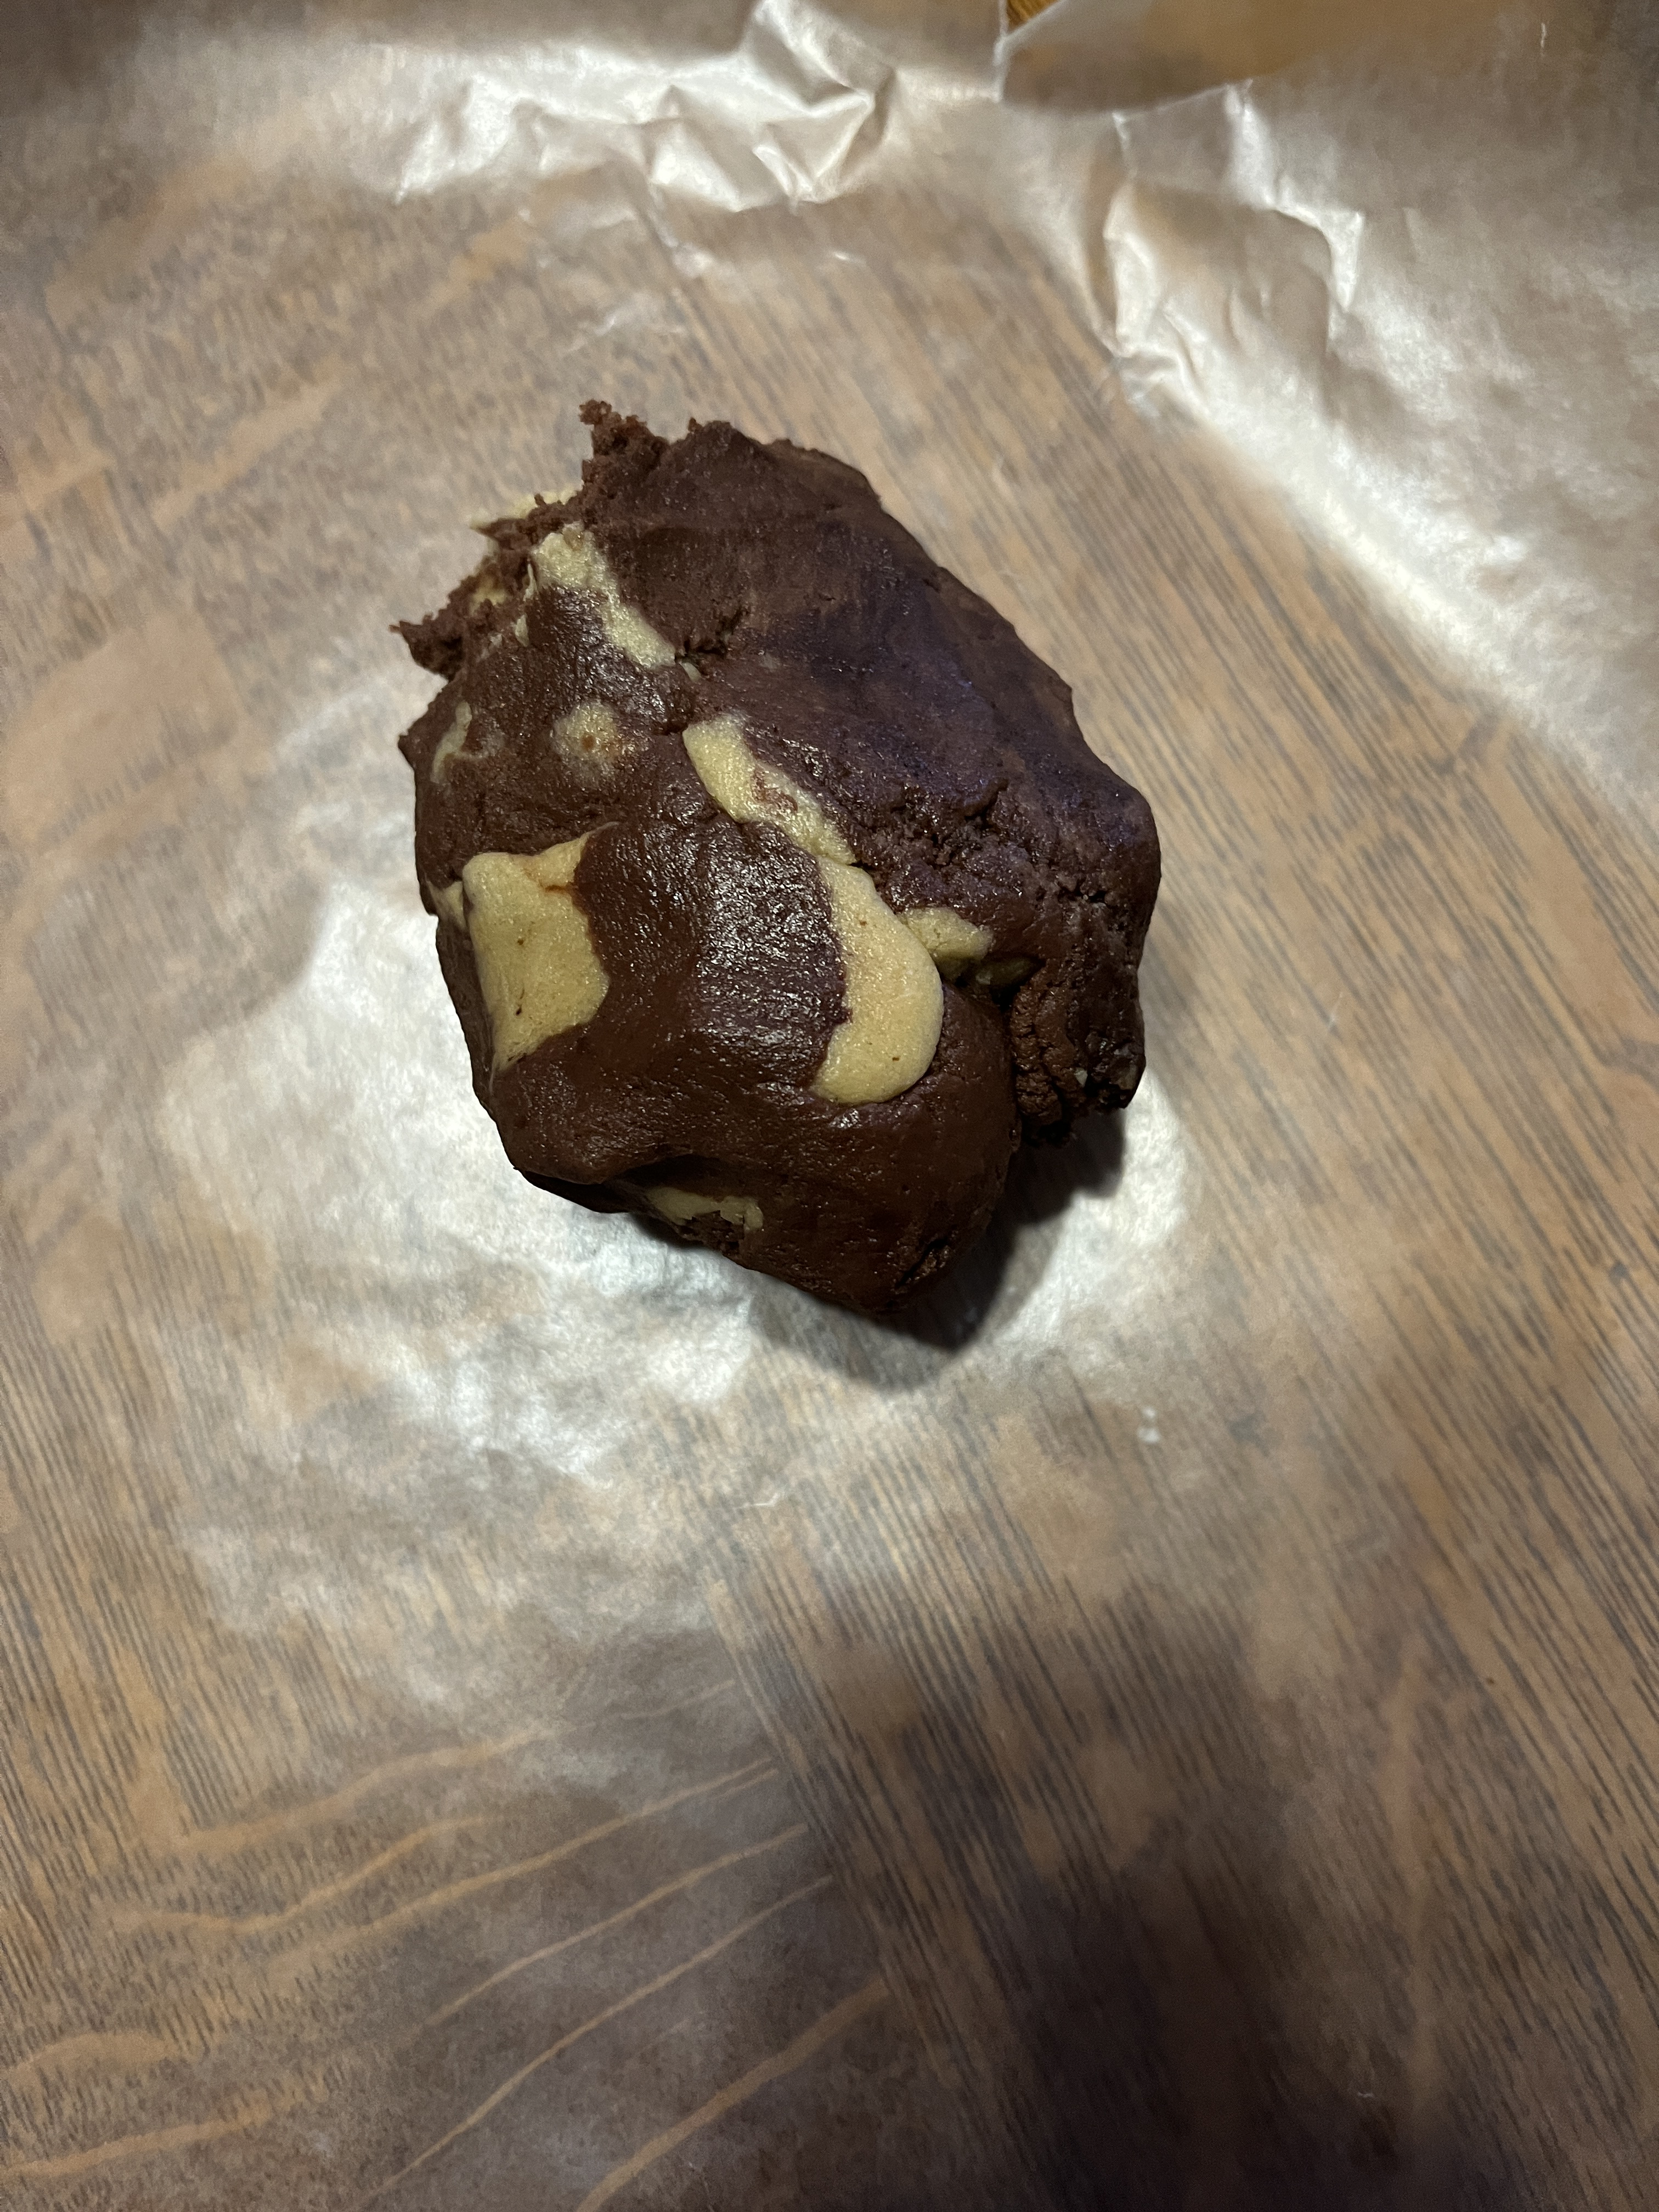
Now take the scrap pile and roughly tear and mix it to make it marble-y.
Roll it into a log and roll up in waxed paper.
Chill them all for at least 30 minutes or until you get something else done or have time to make the cookies. I put these in the freezer to chill them faster. If you put them in the freezer too long they can be harder to cut, but if you freeze them for long storage (a week or more) you can put them in the fridge the day before you plan on baking them so they can defrost but still be firm enough to cut into cookies.
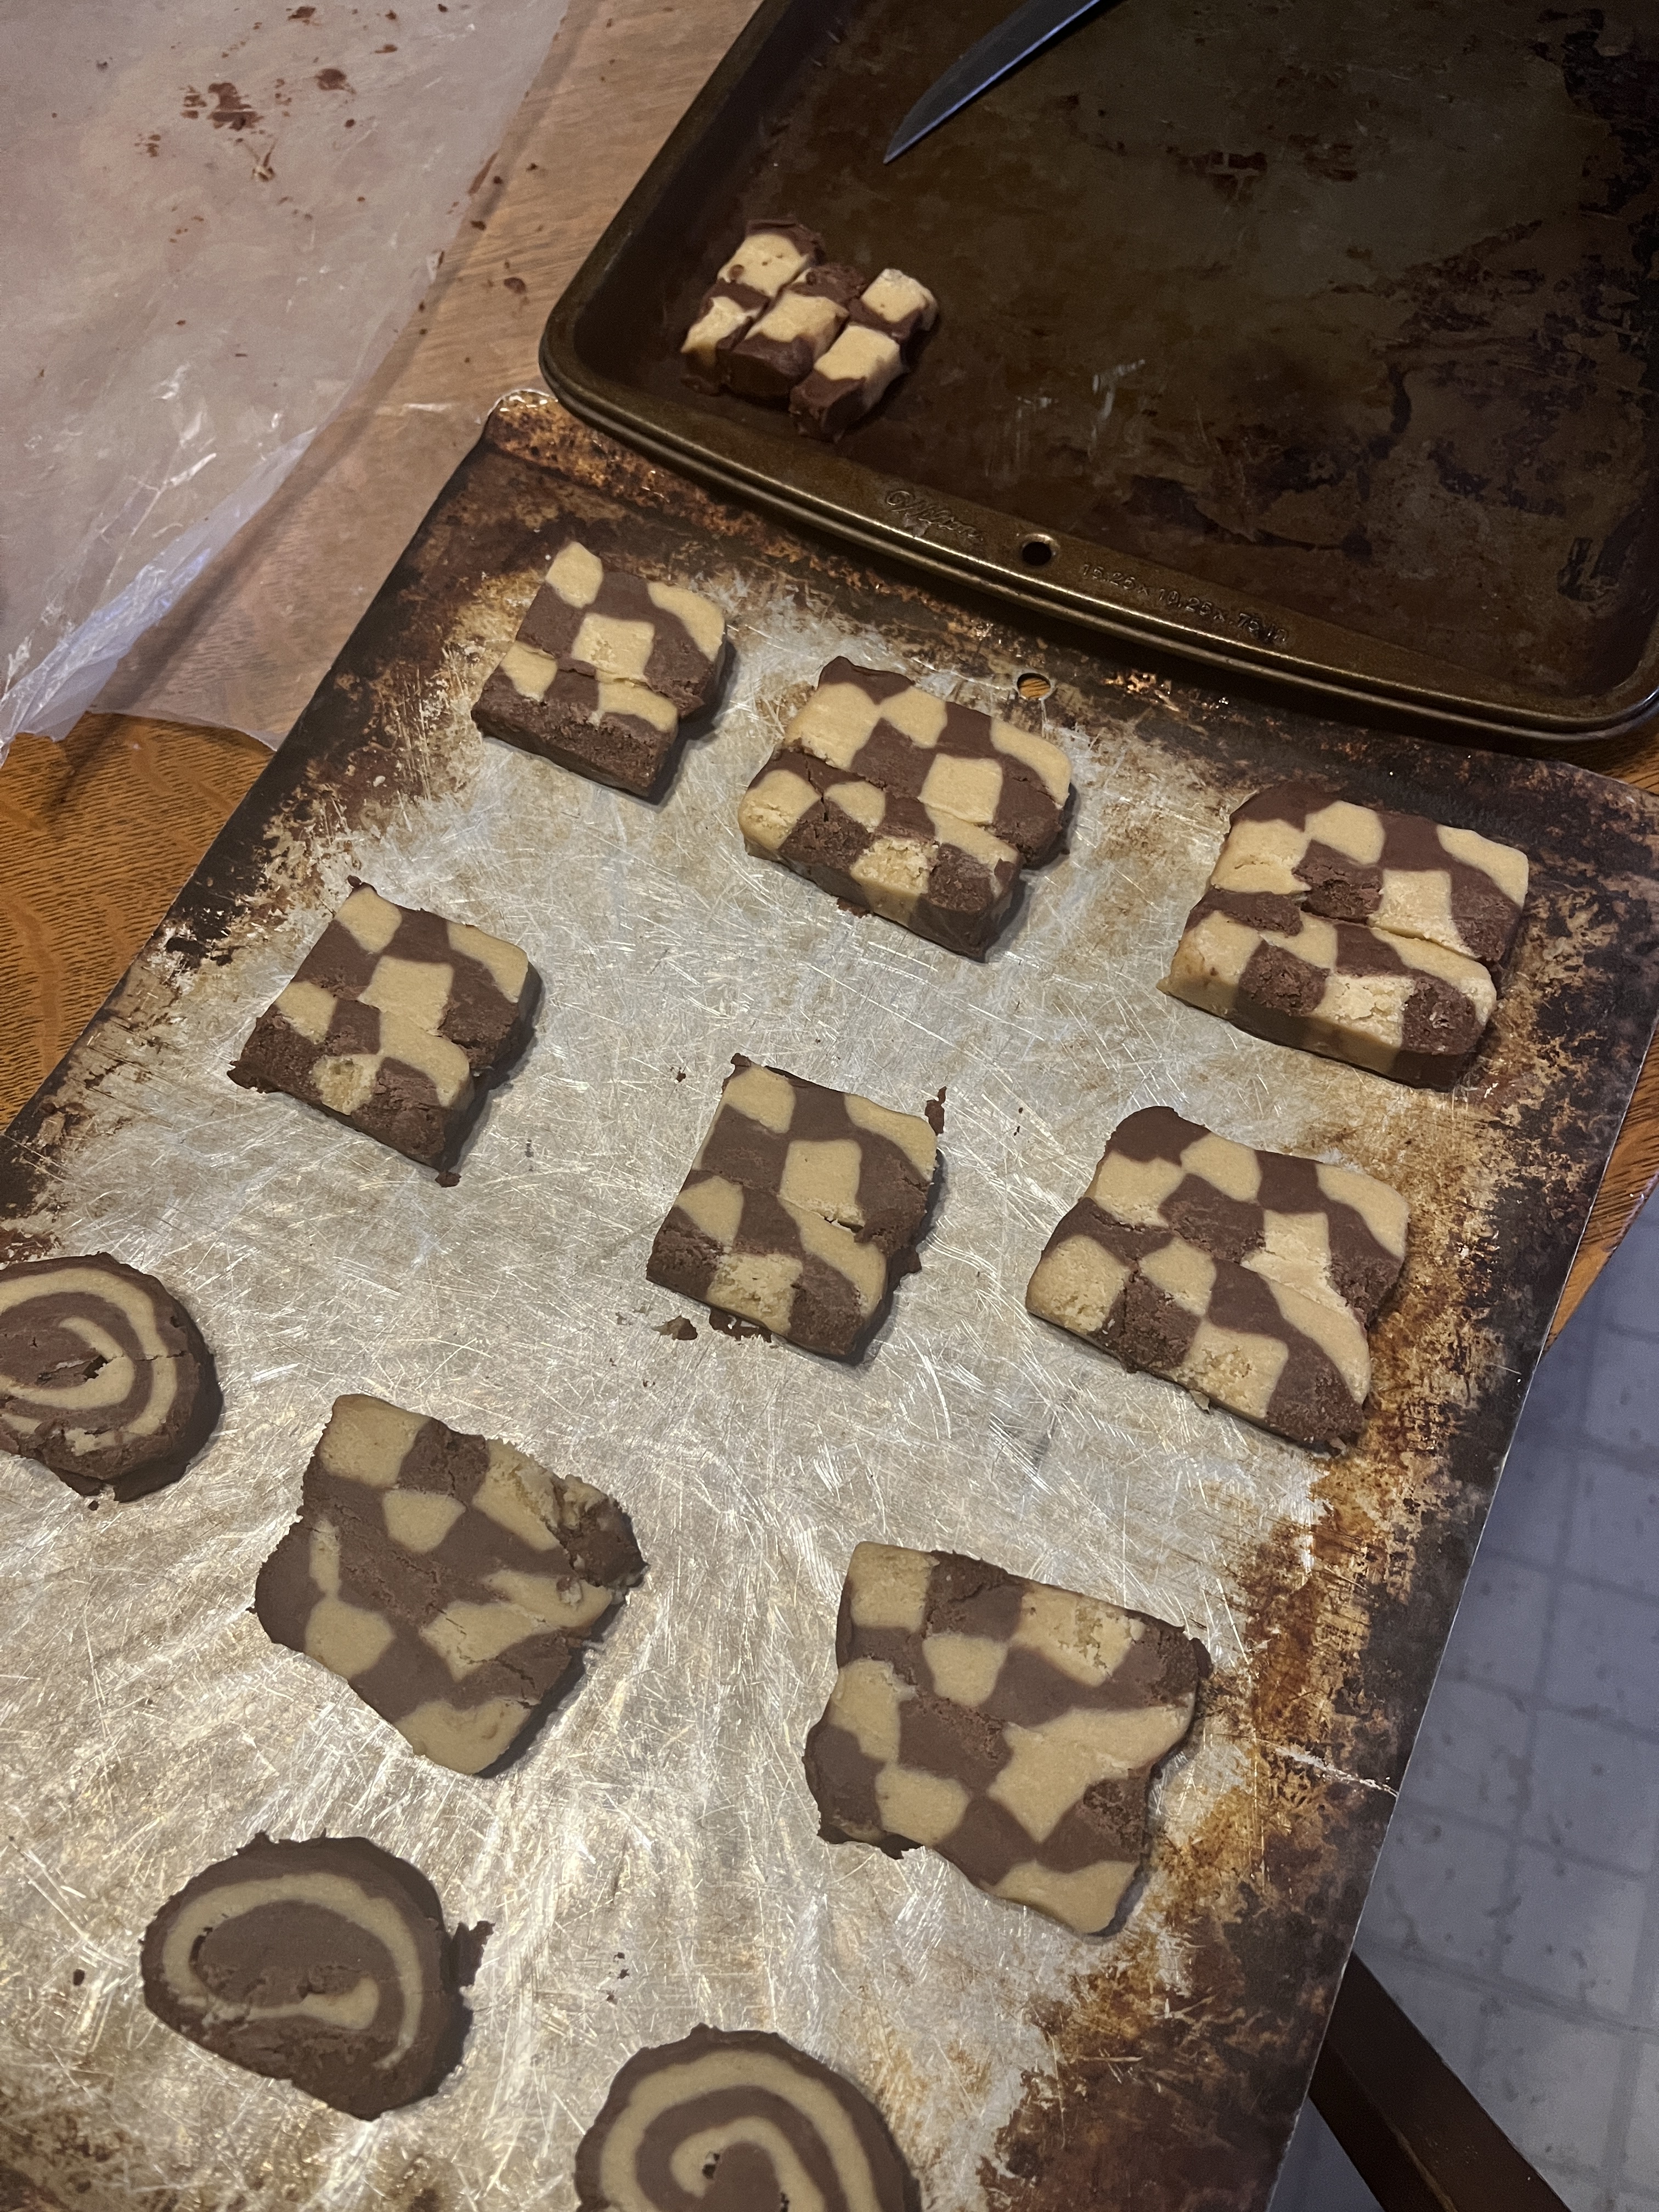
Slice about 1/4 inch thick and place each slice on a cookie sheet. Spraying with oil is not necessary but you can adjust the thickness to your taste. You’ll probably also get some that aren’t evenly cut, but that’s OK, you’ll get better with practice.
When all the logs are sliced and arranged bake them at 350 degrees f for about 8 minutes or so. Don’t let them get too brown.
When done take them off the cookie sheets with a spatula and stack on a plate to cool. Serve with milk, coffee, tea or cocoa. Yum.
The plastic containers in the background are meat pies I made for my lunches at work. They’re cooling enough to put in the fridge. the potato sprouted so it’s about to go into the garden to make more potatoes.
If you don’t like chocolate you can use food coloring and flavour extracts to make the 2nd colour. Red with strawberry, cherry, raspberry or even peppermint could be nice. Green with lime or spearmint, orange with orange, blue with anything you want.
I’m thinking a doughnut cutter could be used to make cookies with a center that can be taken out and exchanged with the other colour for another pattern. These in turn could also be cut into pieces and re-arranged into patterns with quartered colours. I’ll have to play with this some more.
Experiment with flavours and shapes and have fun baking.
OK, maybe it’s just Tzadziki, but people often seem to need to specify things and make sure we all know how something is used. I first encountered this when a friend in Florida had us over for dinner and made some lovely Greek food. I fell in love. Turns out, I’d had it before years ago at a little gyro place in Scottsdale that I still go to once in a while now that I’m back home. I looked it up and decided I could make it and it’d be good for using up leftovers. The guys agreed and we used it on leftover chicken, pork or beef for roll-ups depending on what we’d cooked/baked/roasted earlier in the week. Here goes:
1 cucumber, half a pint container yogurt, dill, mint, lemon, garlic and olive oil. The measurements are approximate, depending on your taste and mood.
Peel the cucumber.
Scoop/scrape the seeds out with a spoon. Give the peels and seeds to the chickens or add to the compost heap.
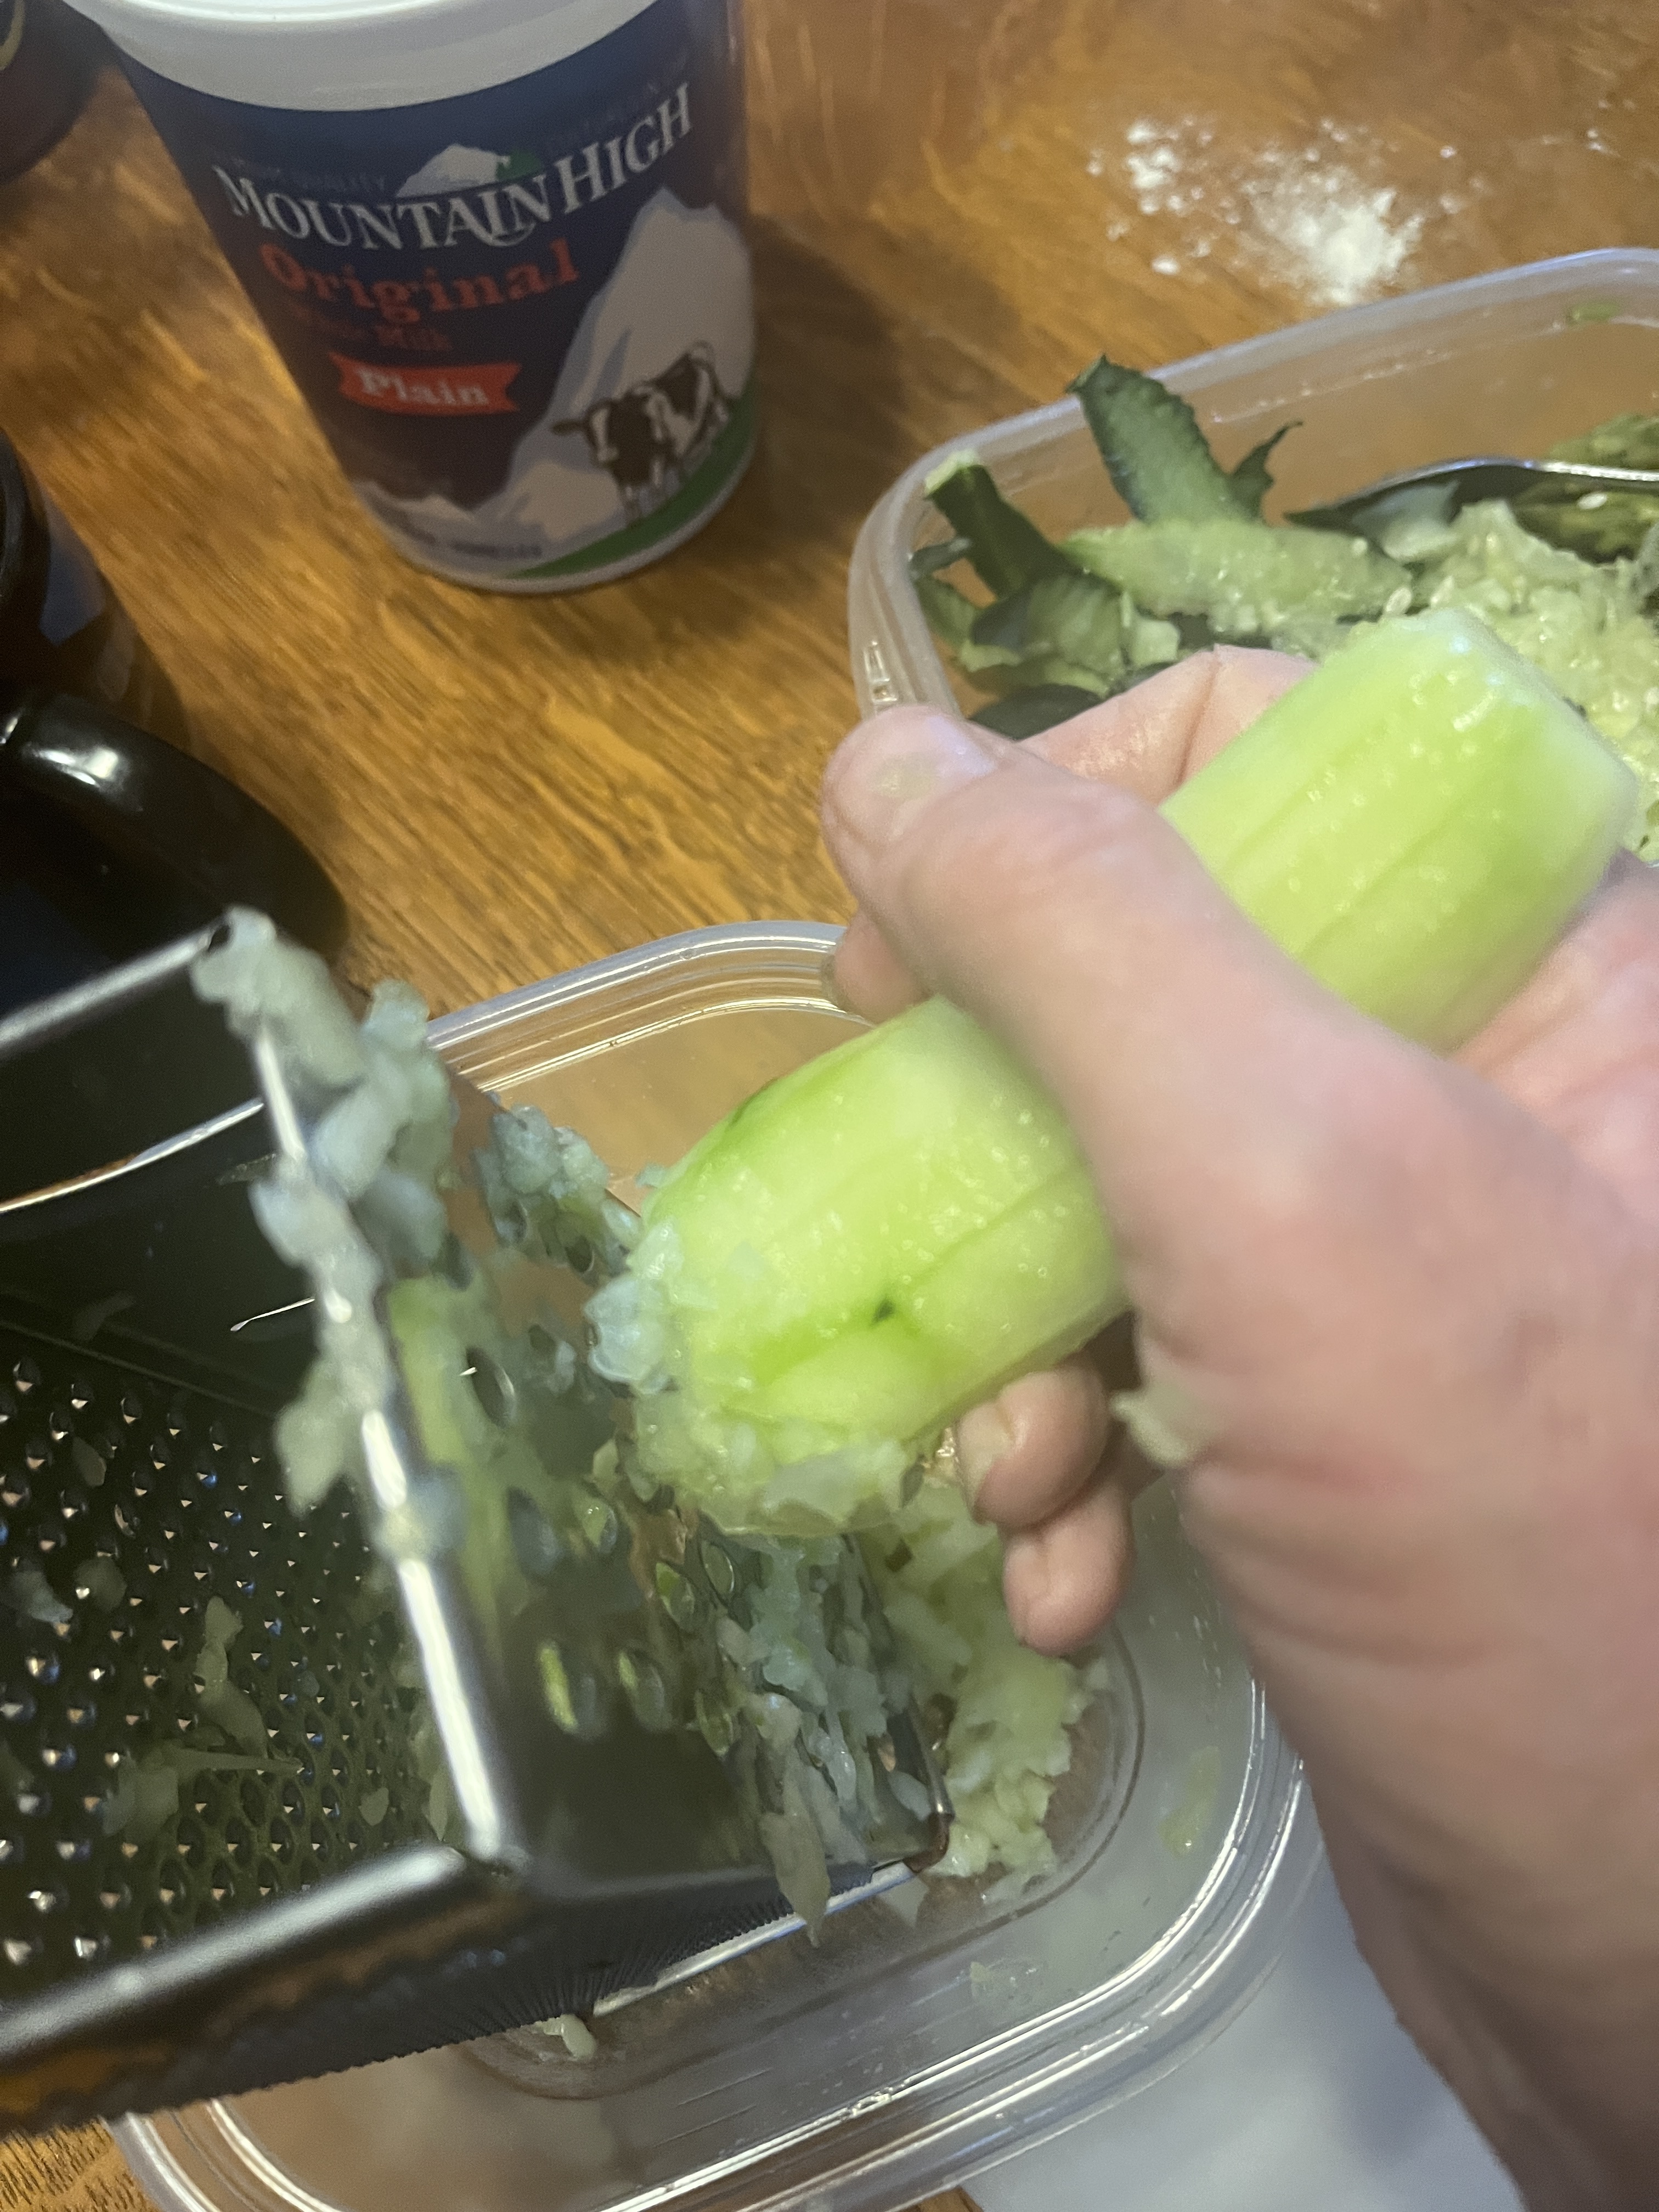
Grate the cucumber.
Salt it. Set it aside for a few minutes while you do something else, like take the peels out to the chickens. They can be amusing, so you can be excused for watching them for a bit.
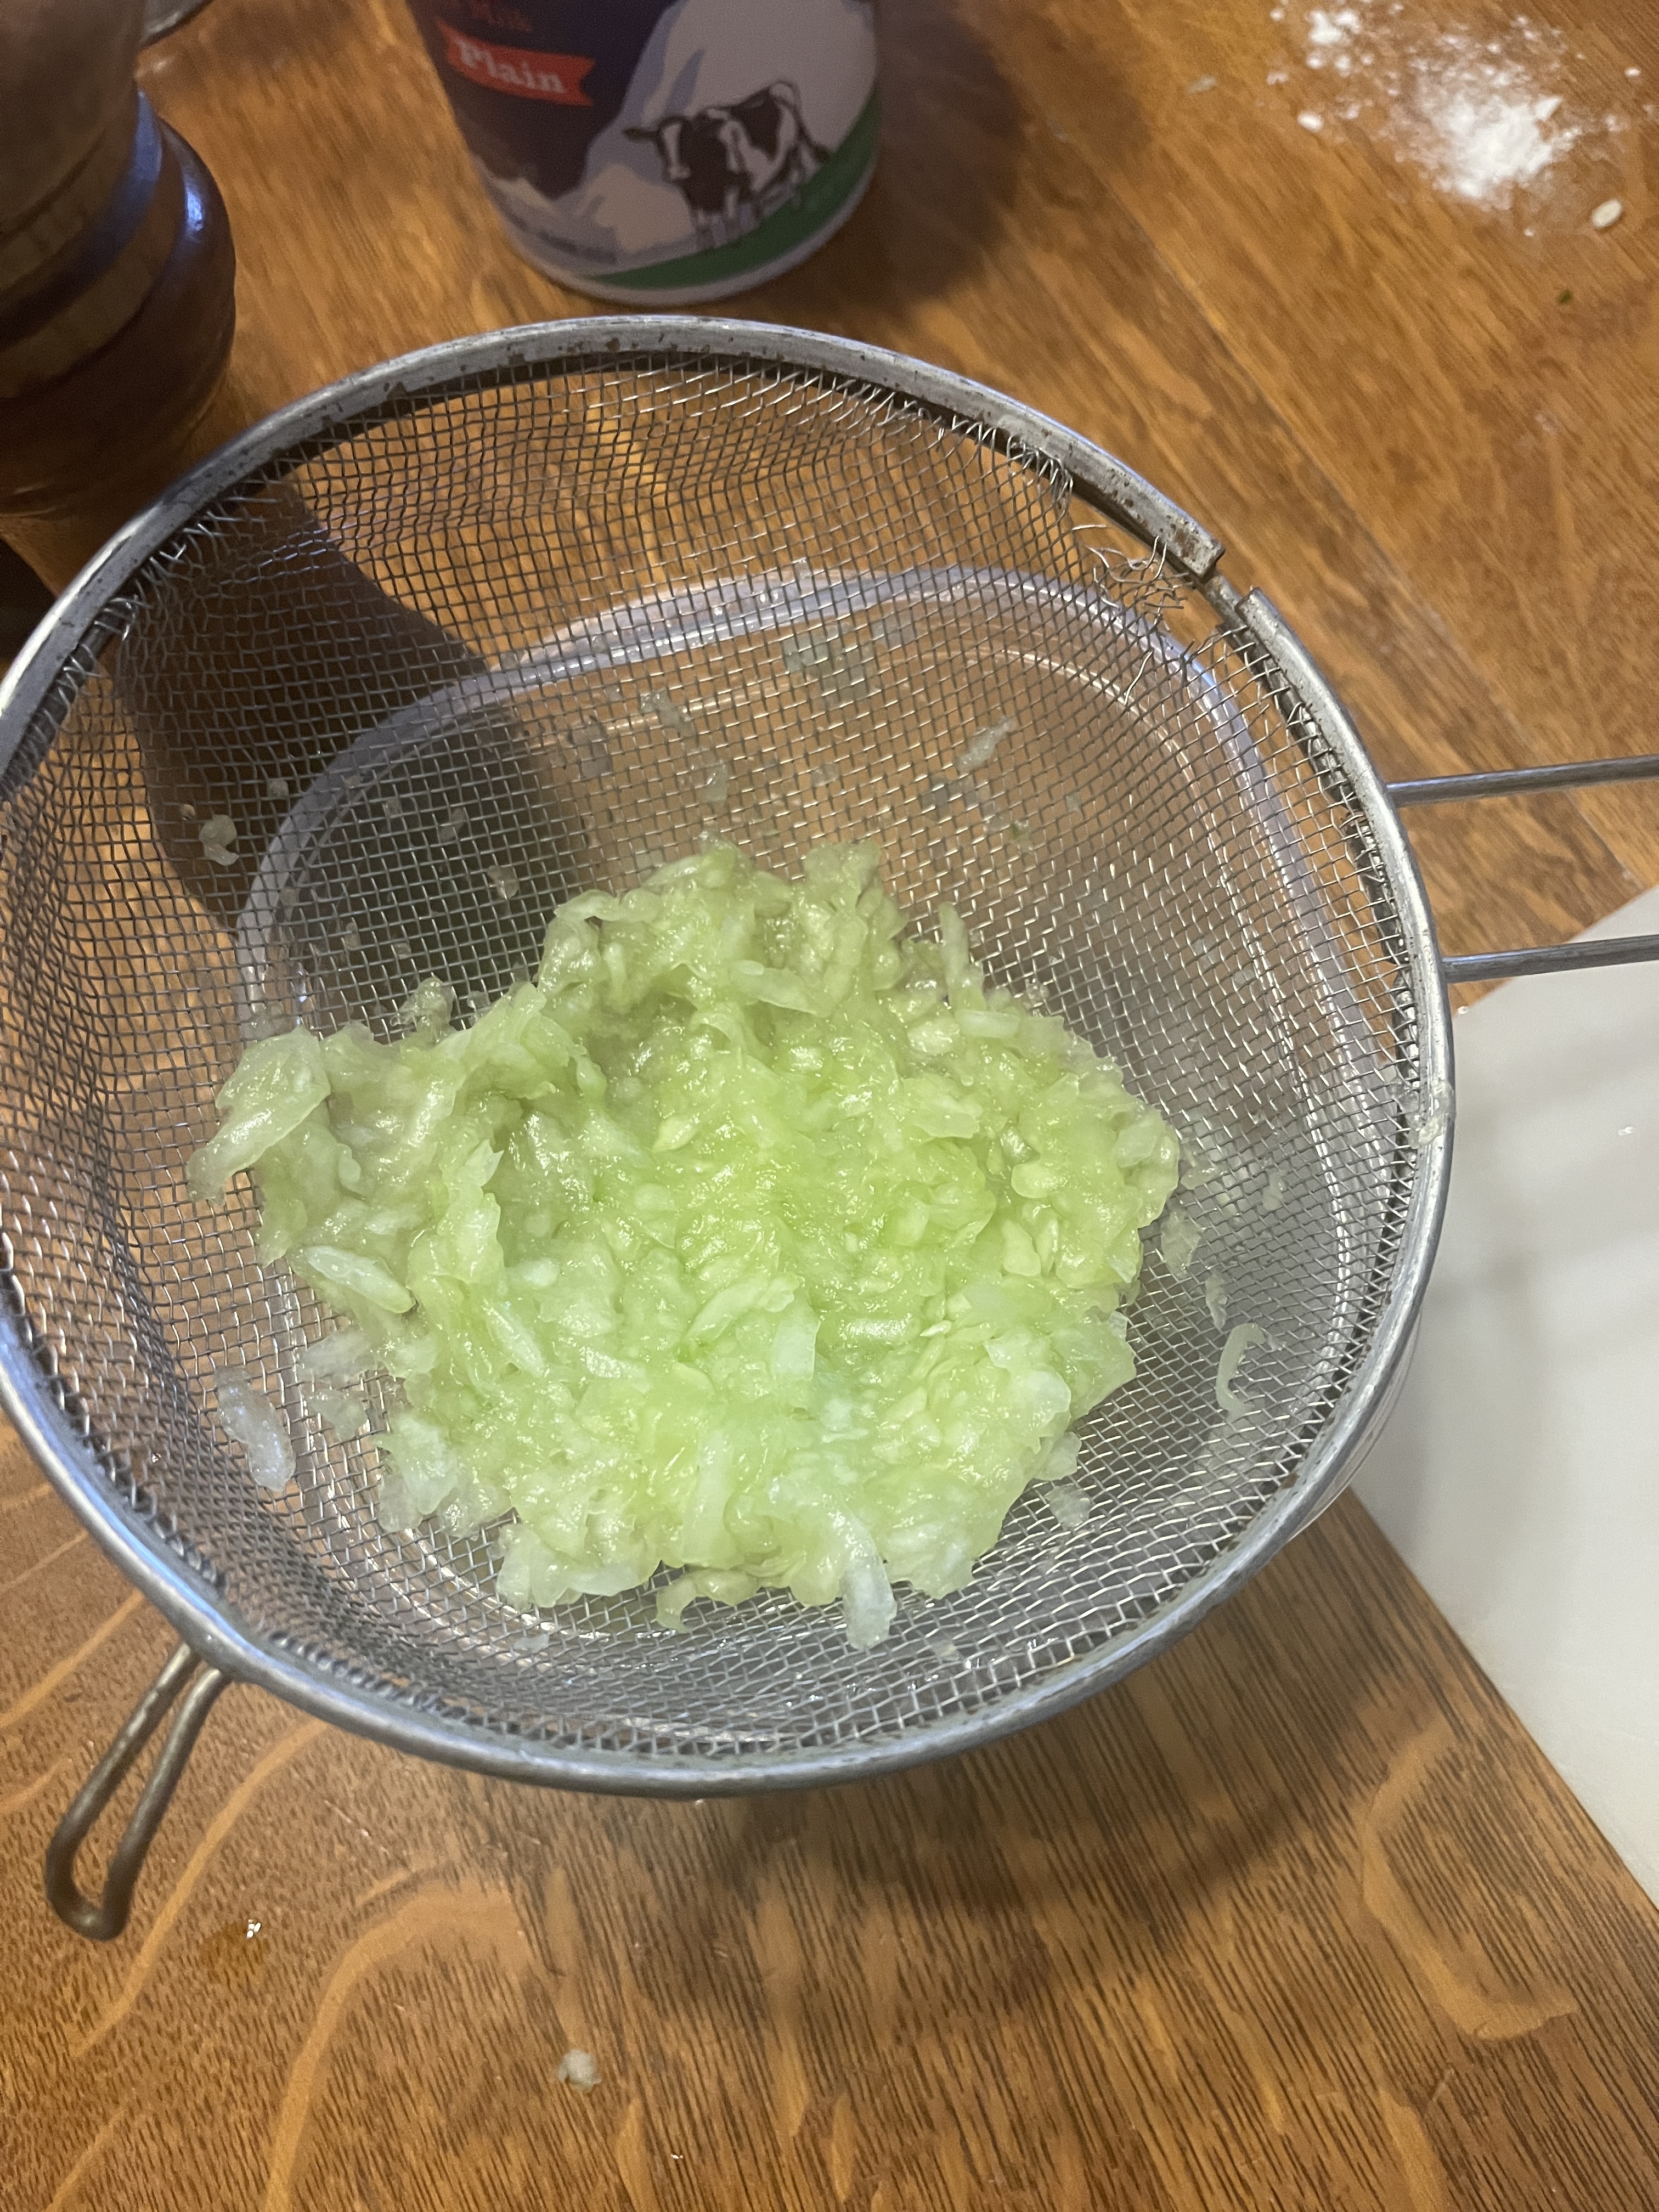
Drain the cucumber in a sieve or linen tea towel. press as much of the moisture out as is easy for you.
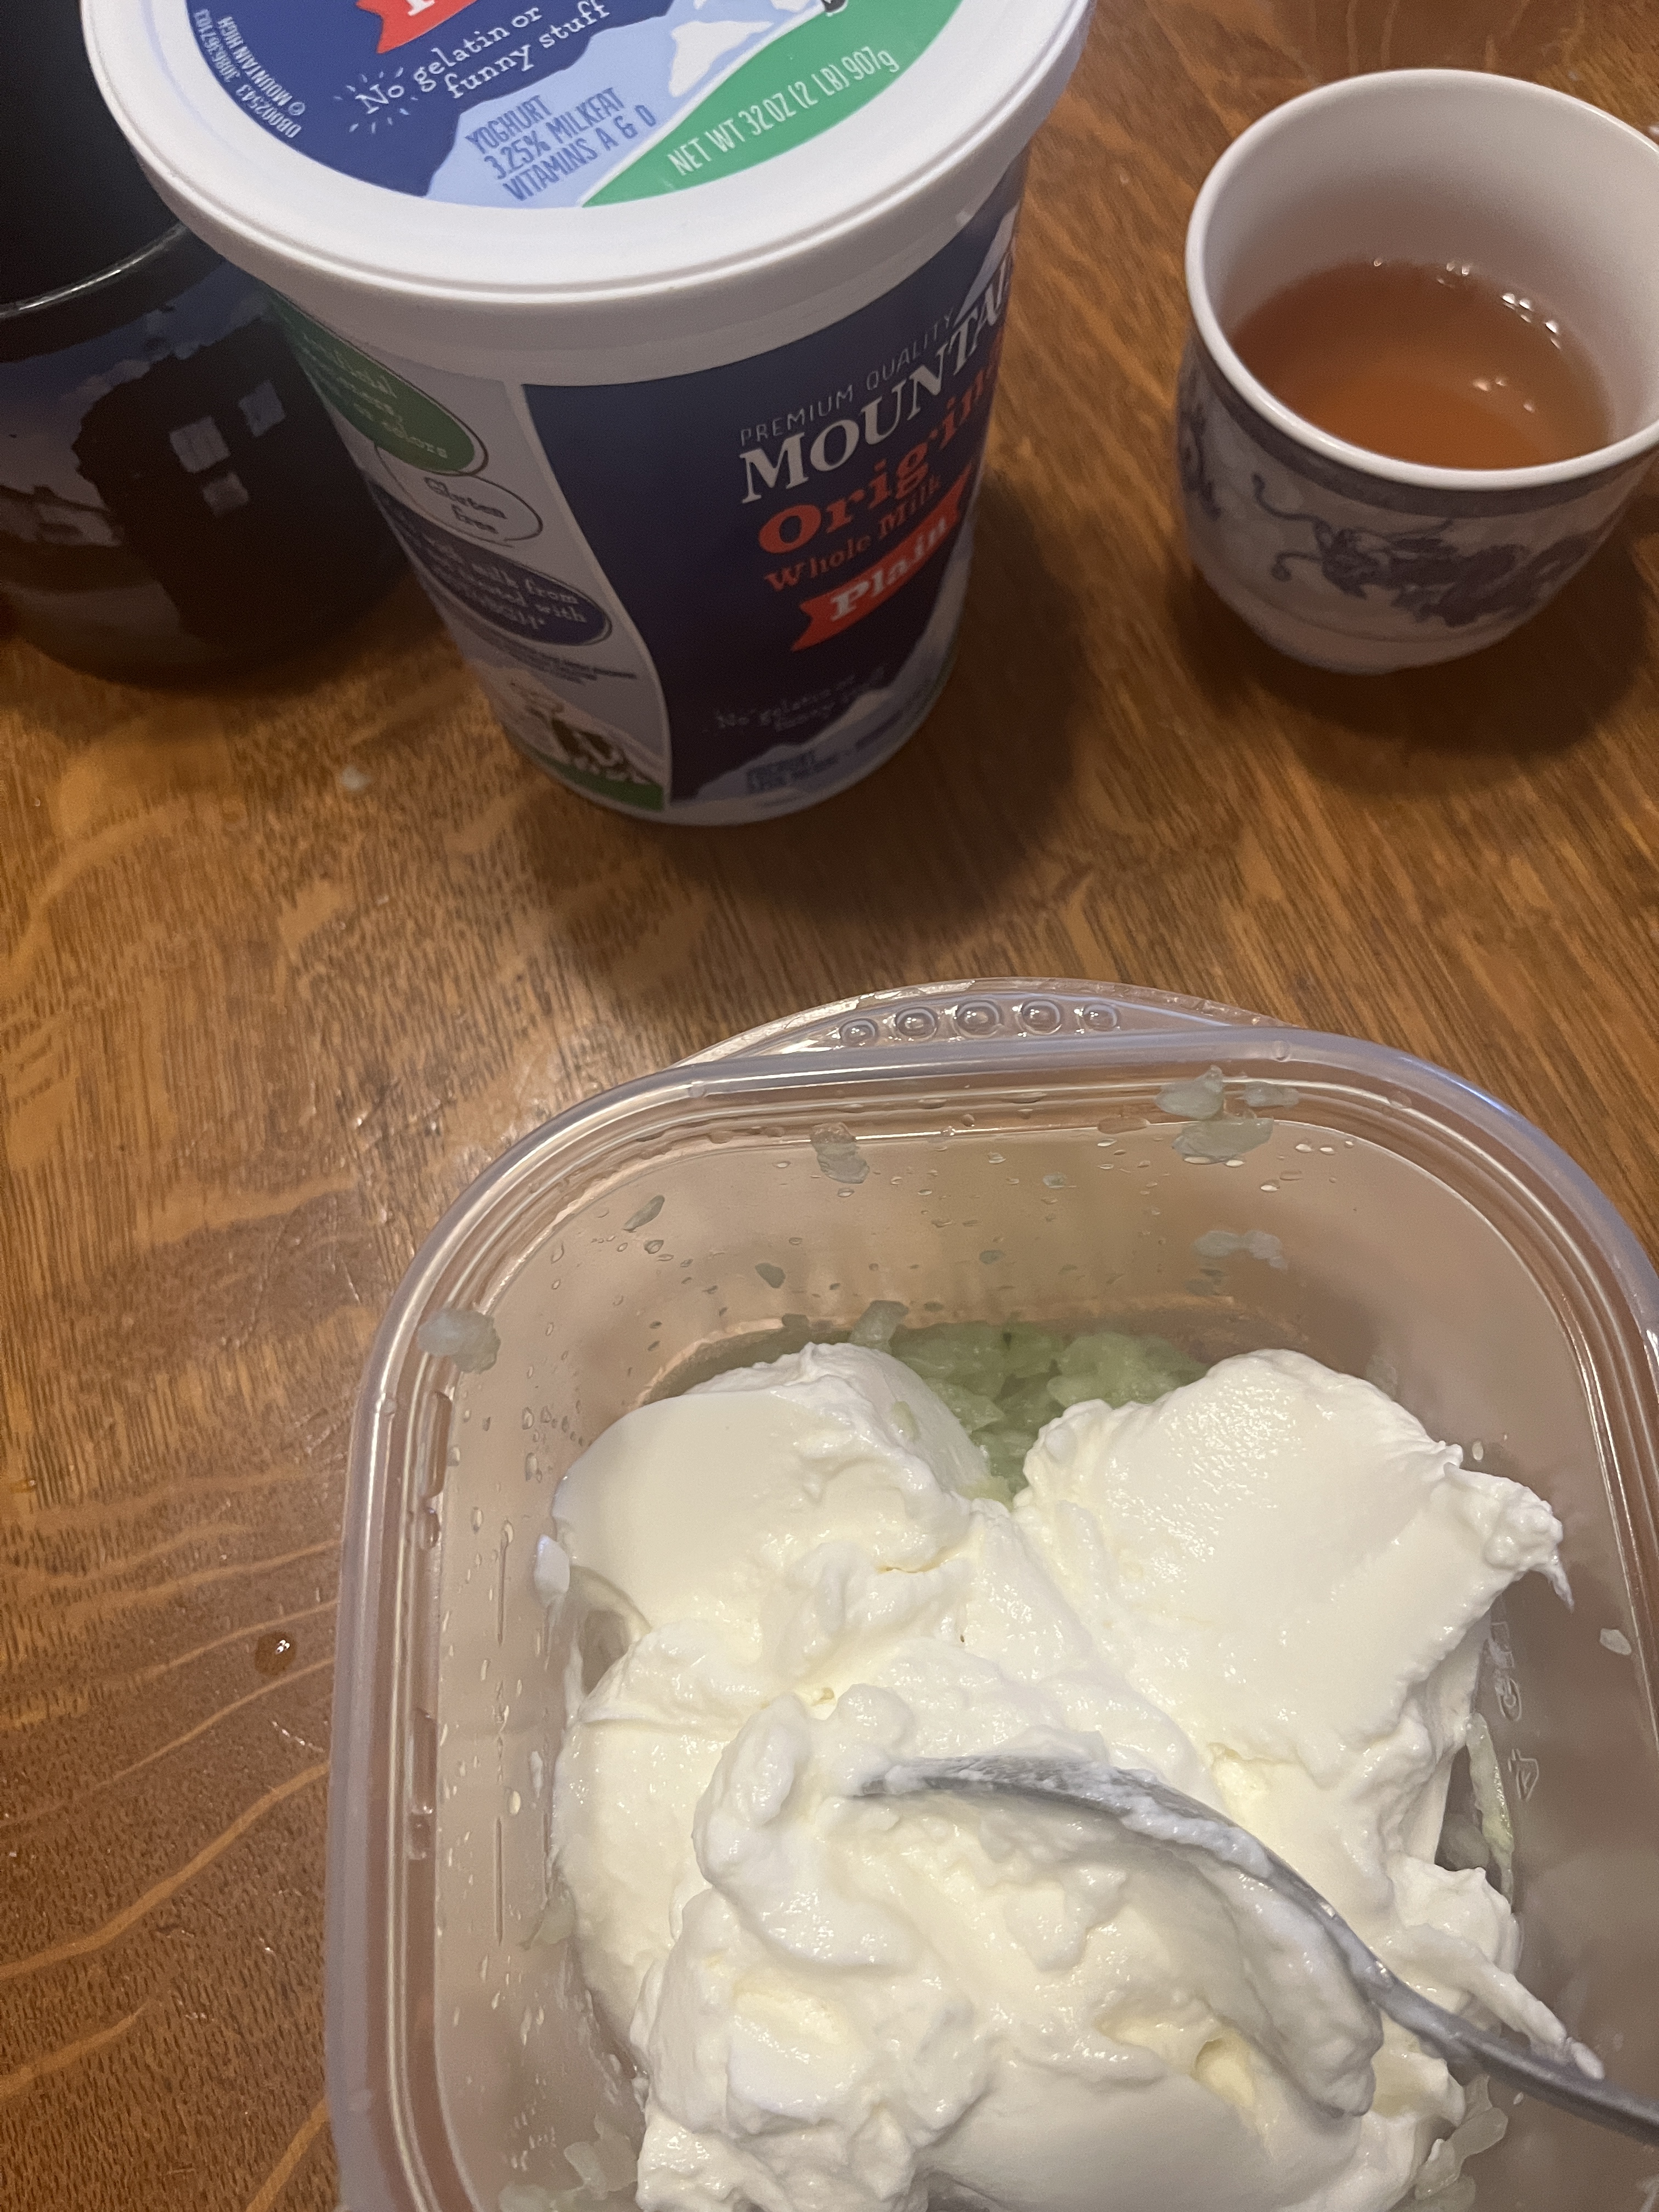
Add about half the yogurt in the container.
Grate the zest off a lemon with the fine part of the grater.
If you need to, scrape the zest out from between the grater holes with the tip of a knife.
Cut the lemon in half and squeeze the juice into the yogurt.
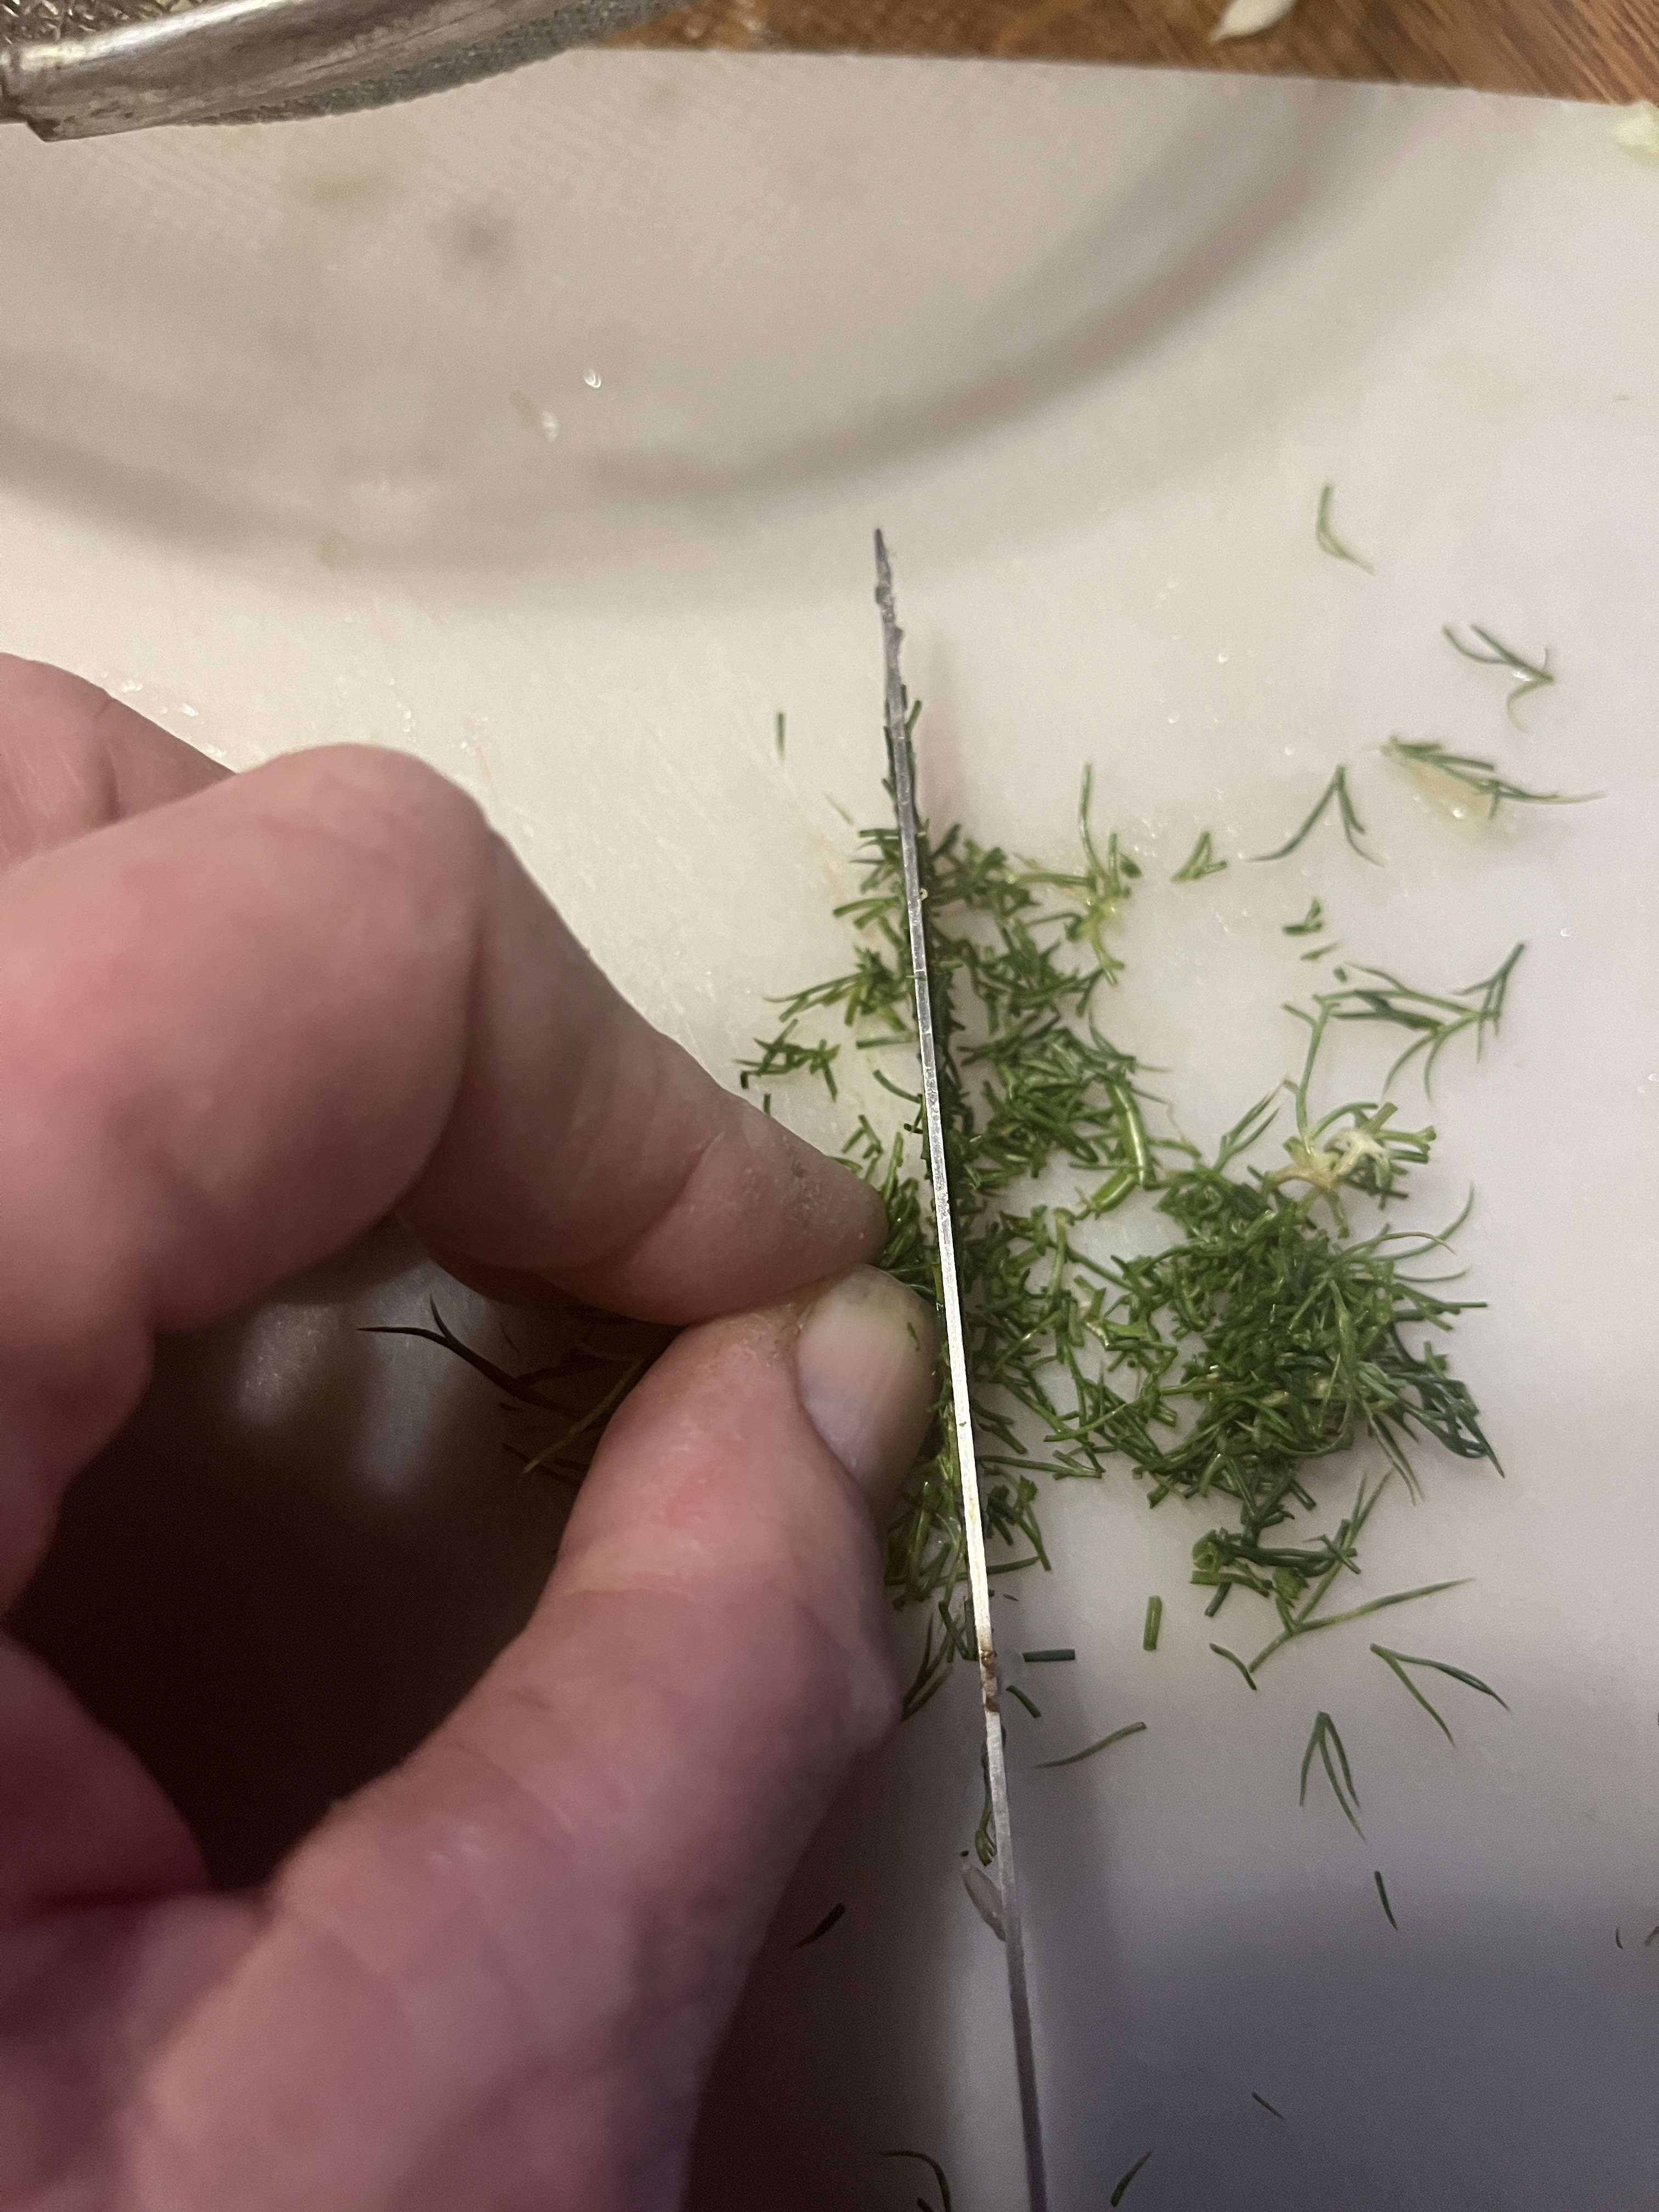
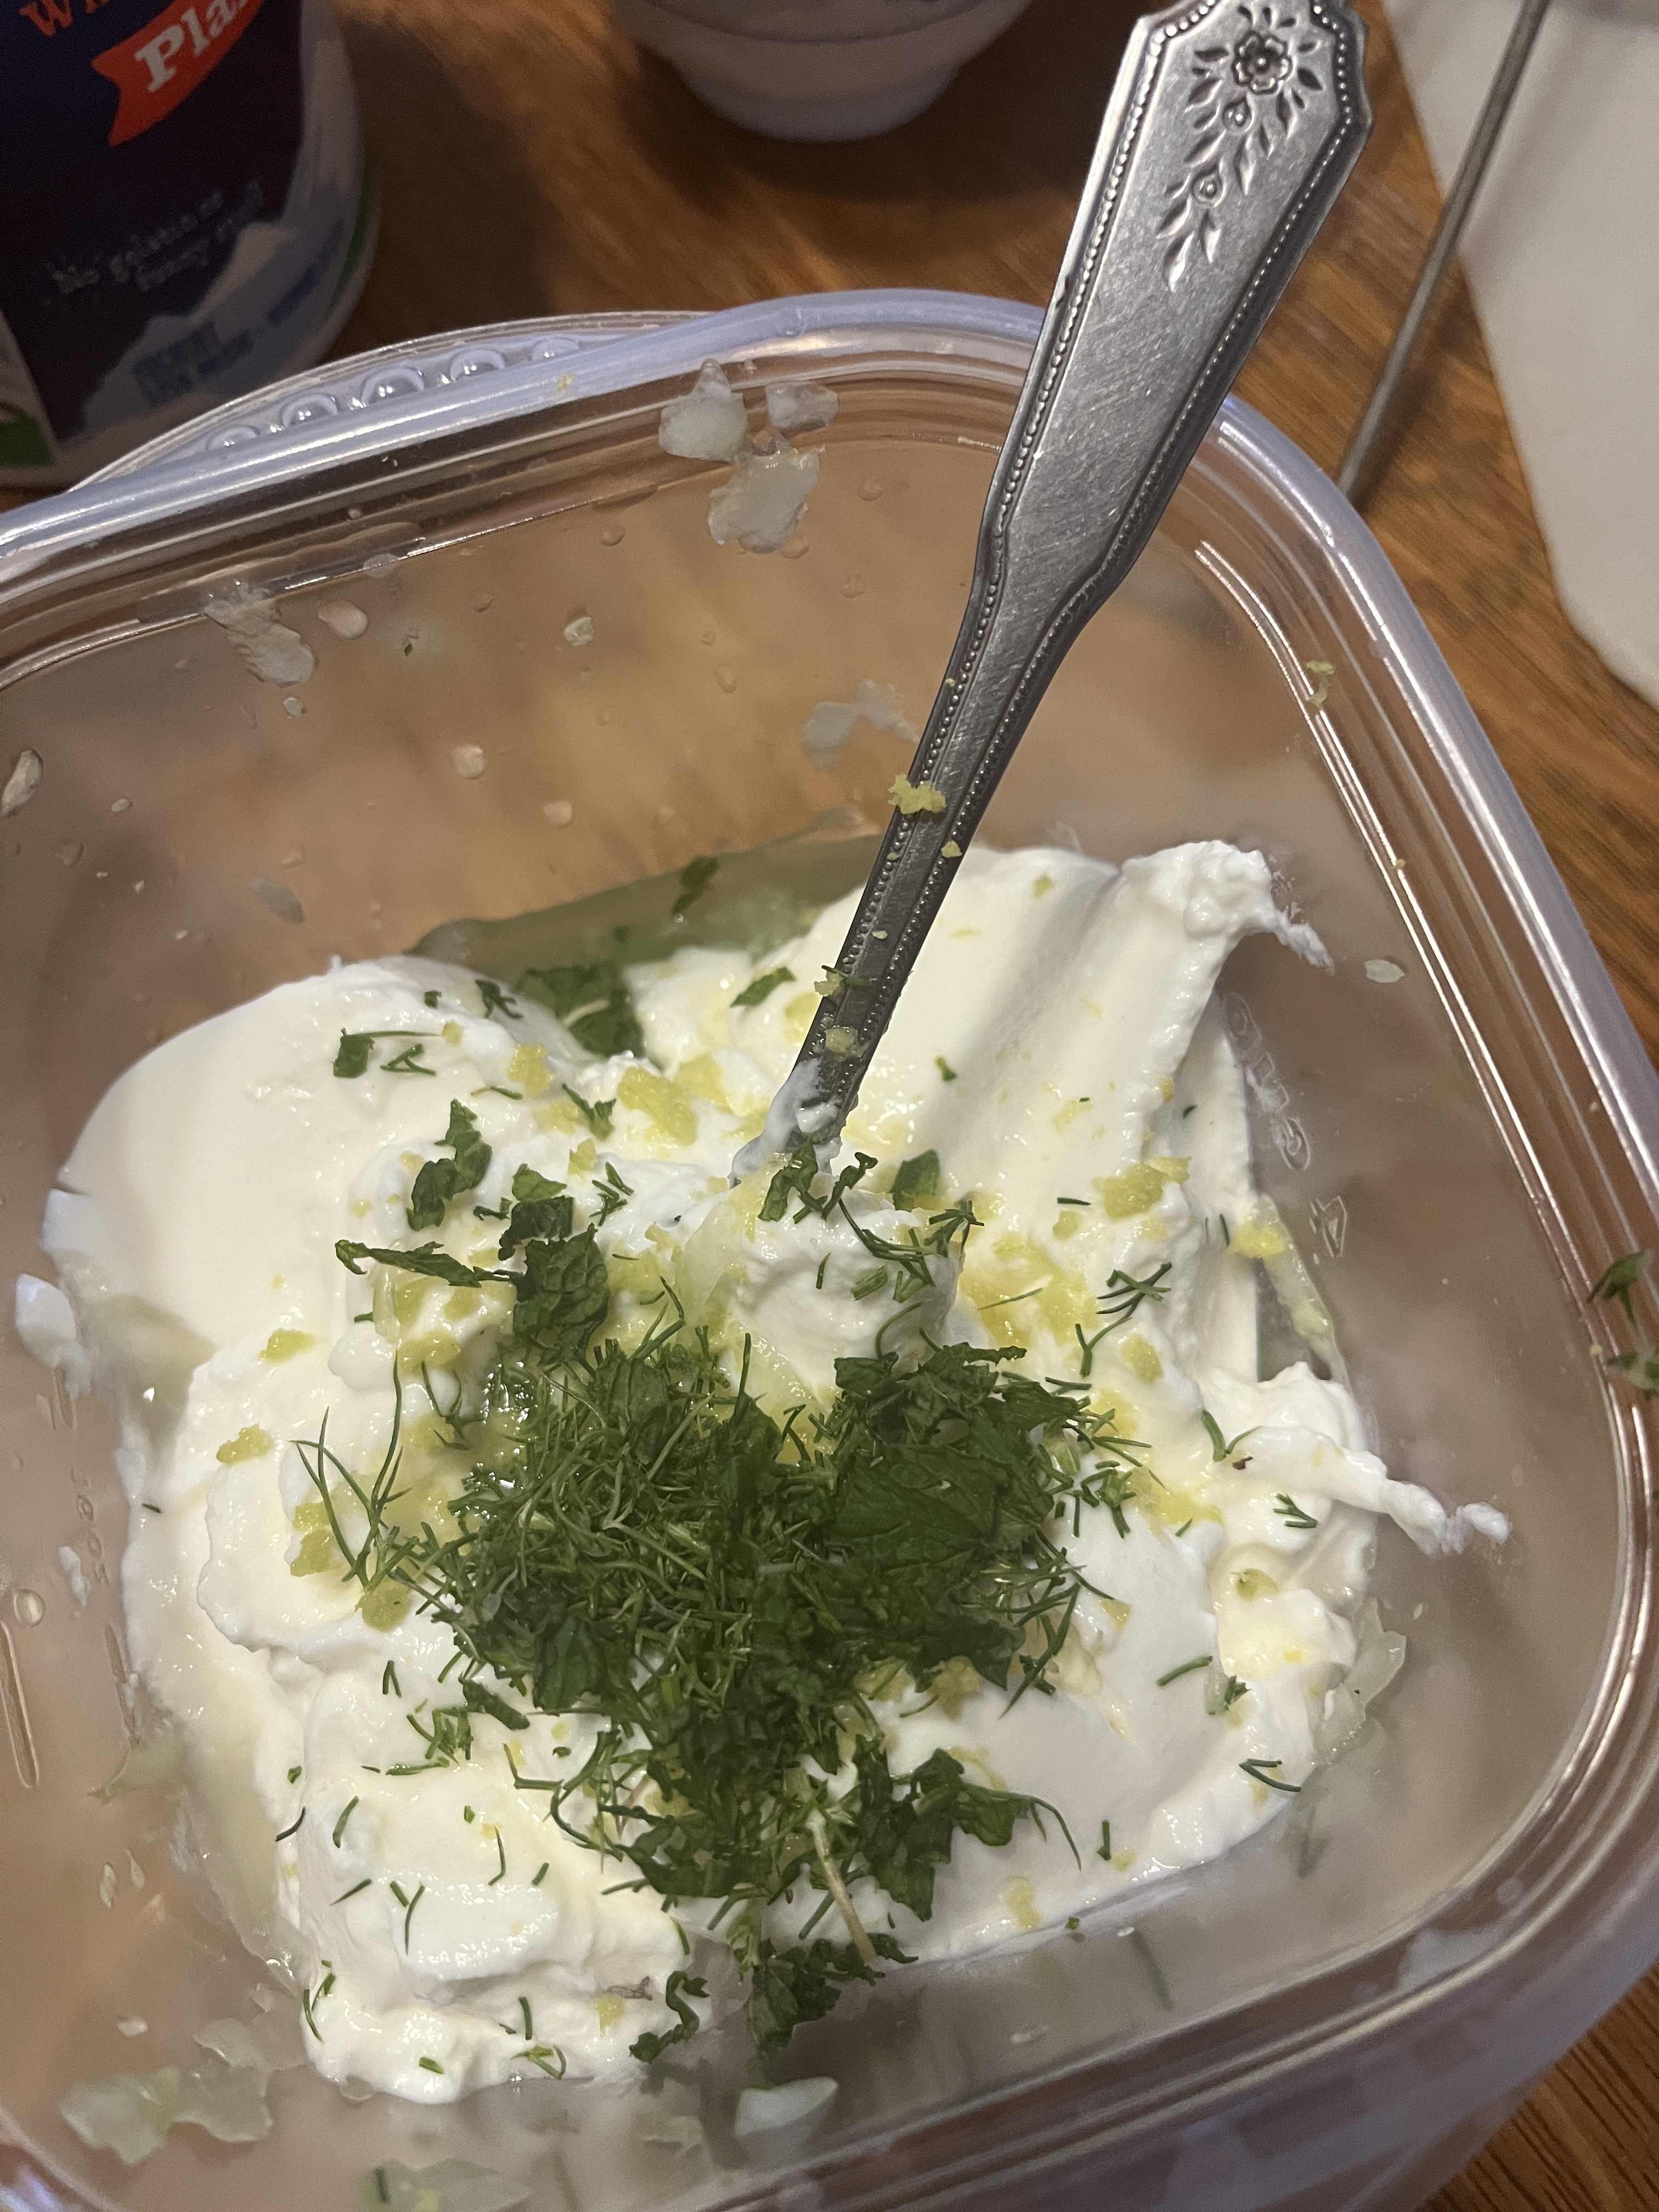
Pick some dill out of the garden.
Squish it into a ball and chop it.
Pick some mint out of the garden.
Pull some leaves off the mint, roll them up, chop them and add them with the dill to the yogurt.
Mix well.
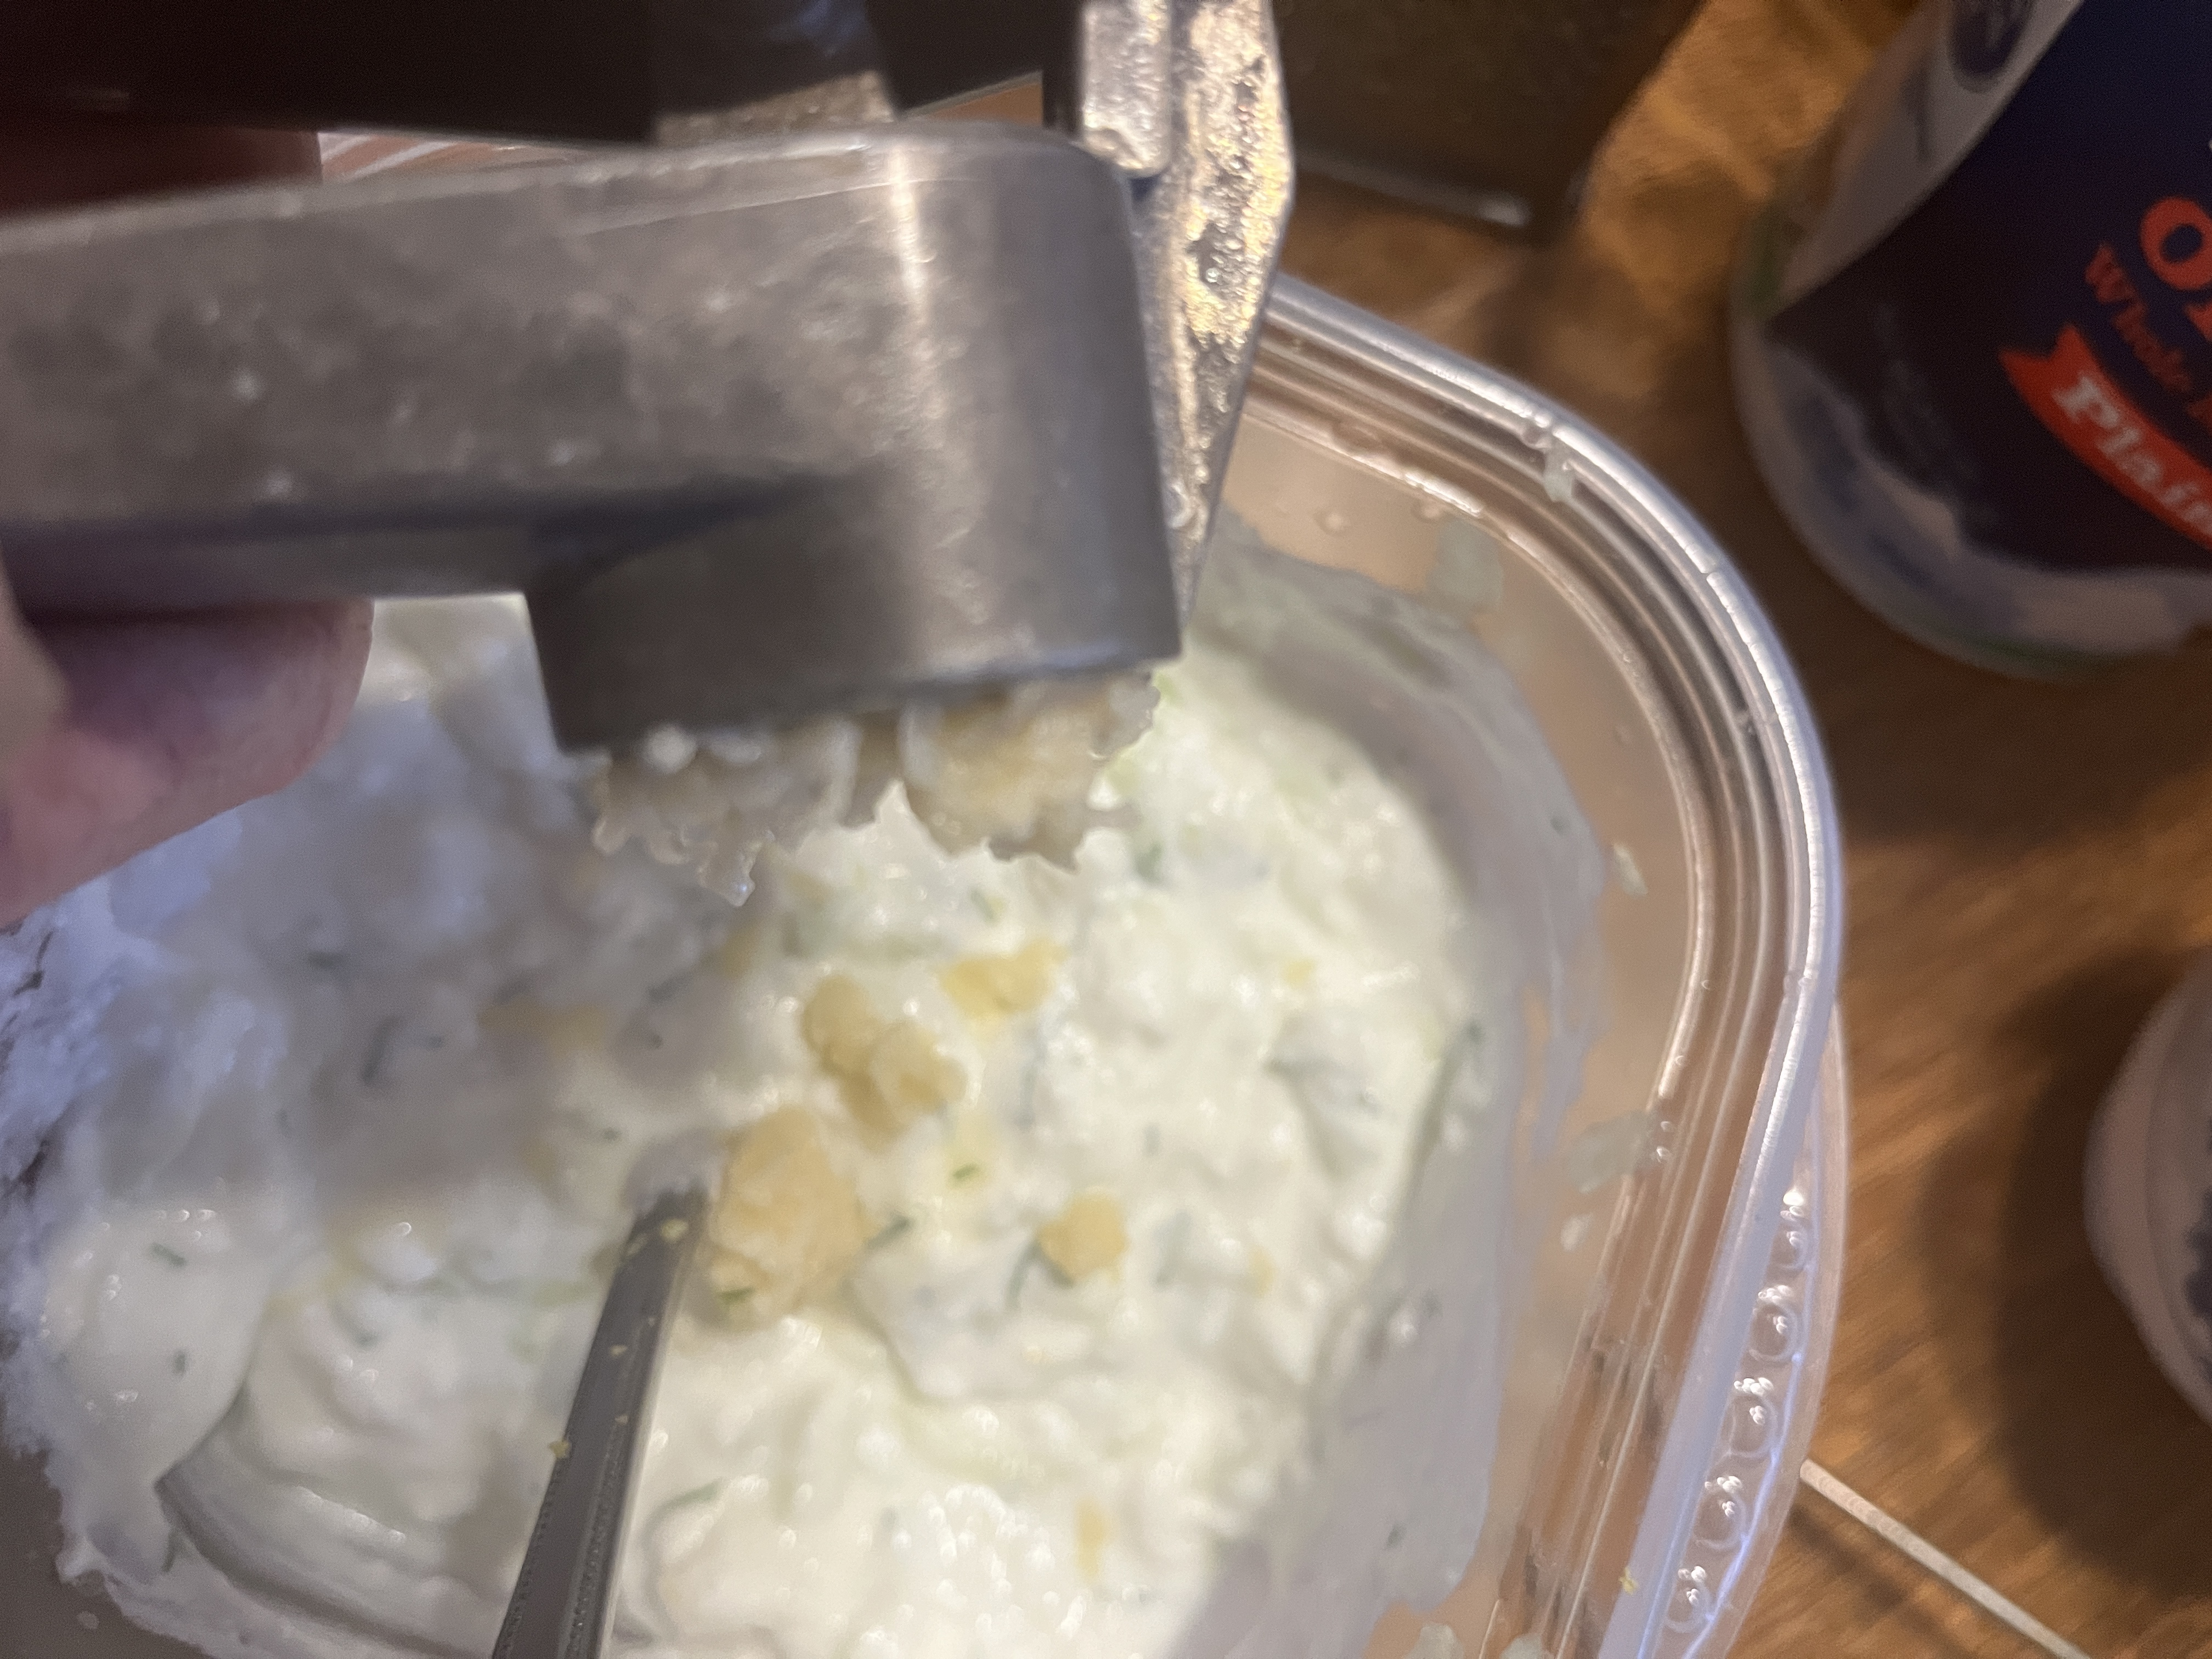
Oh, I forgot! Add garlic. You can mince it but a press like this is easier.
Squeeze through and scrape off with a knife.
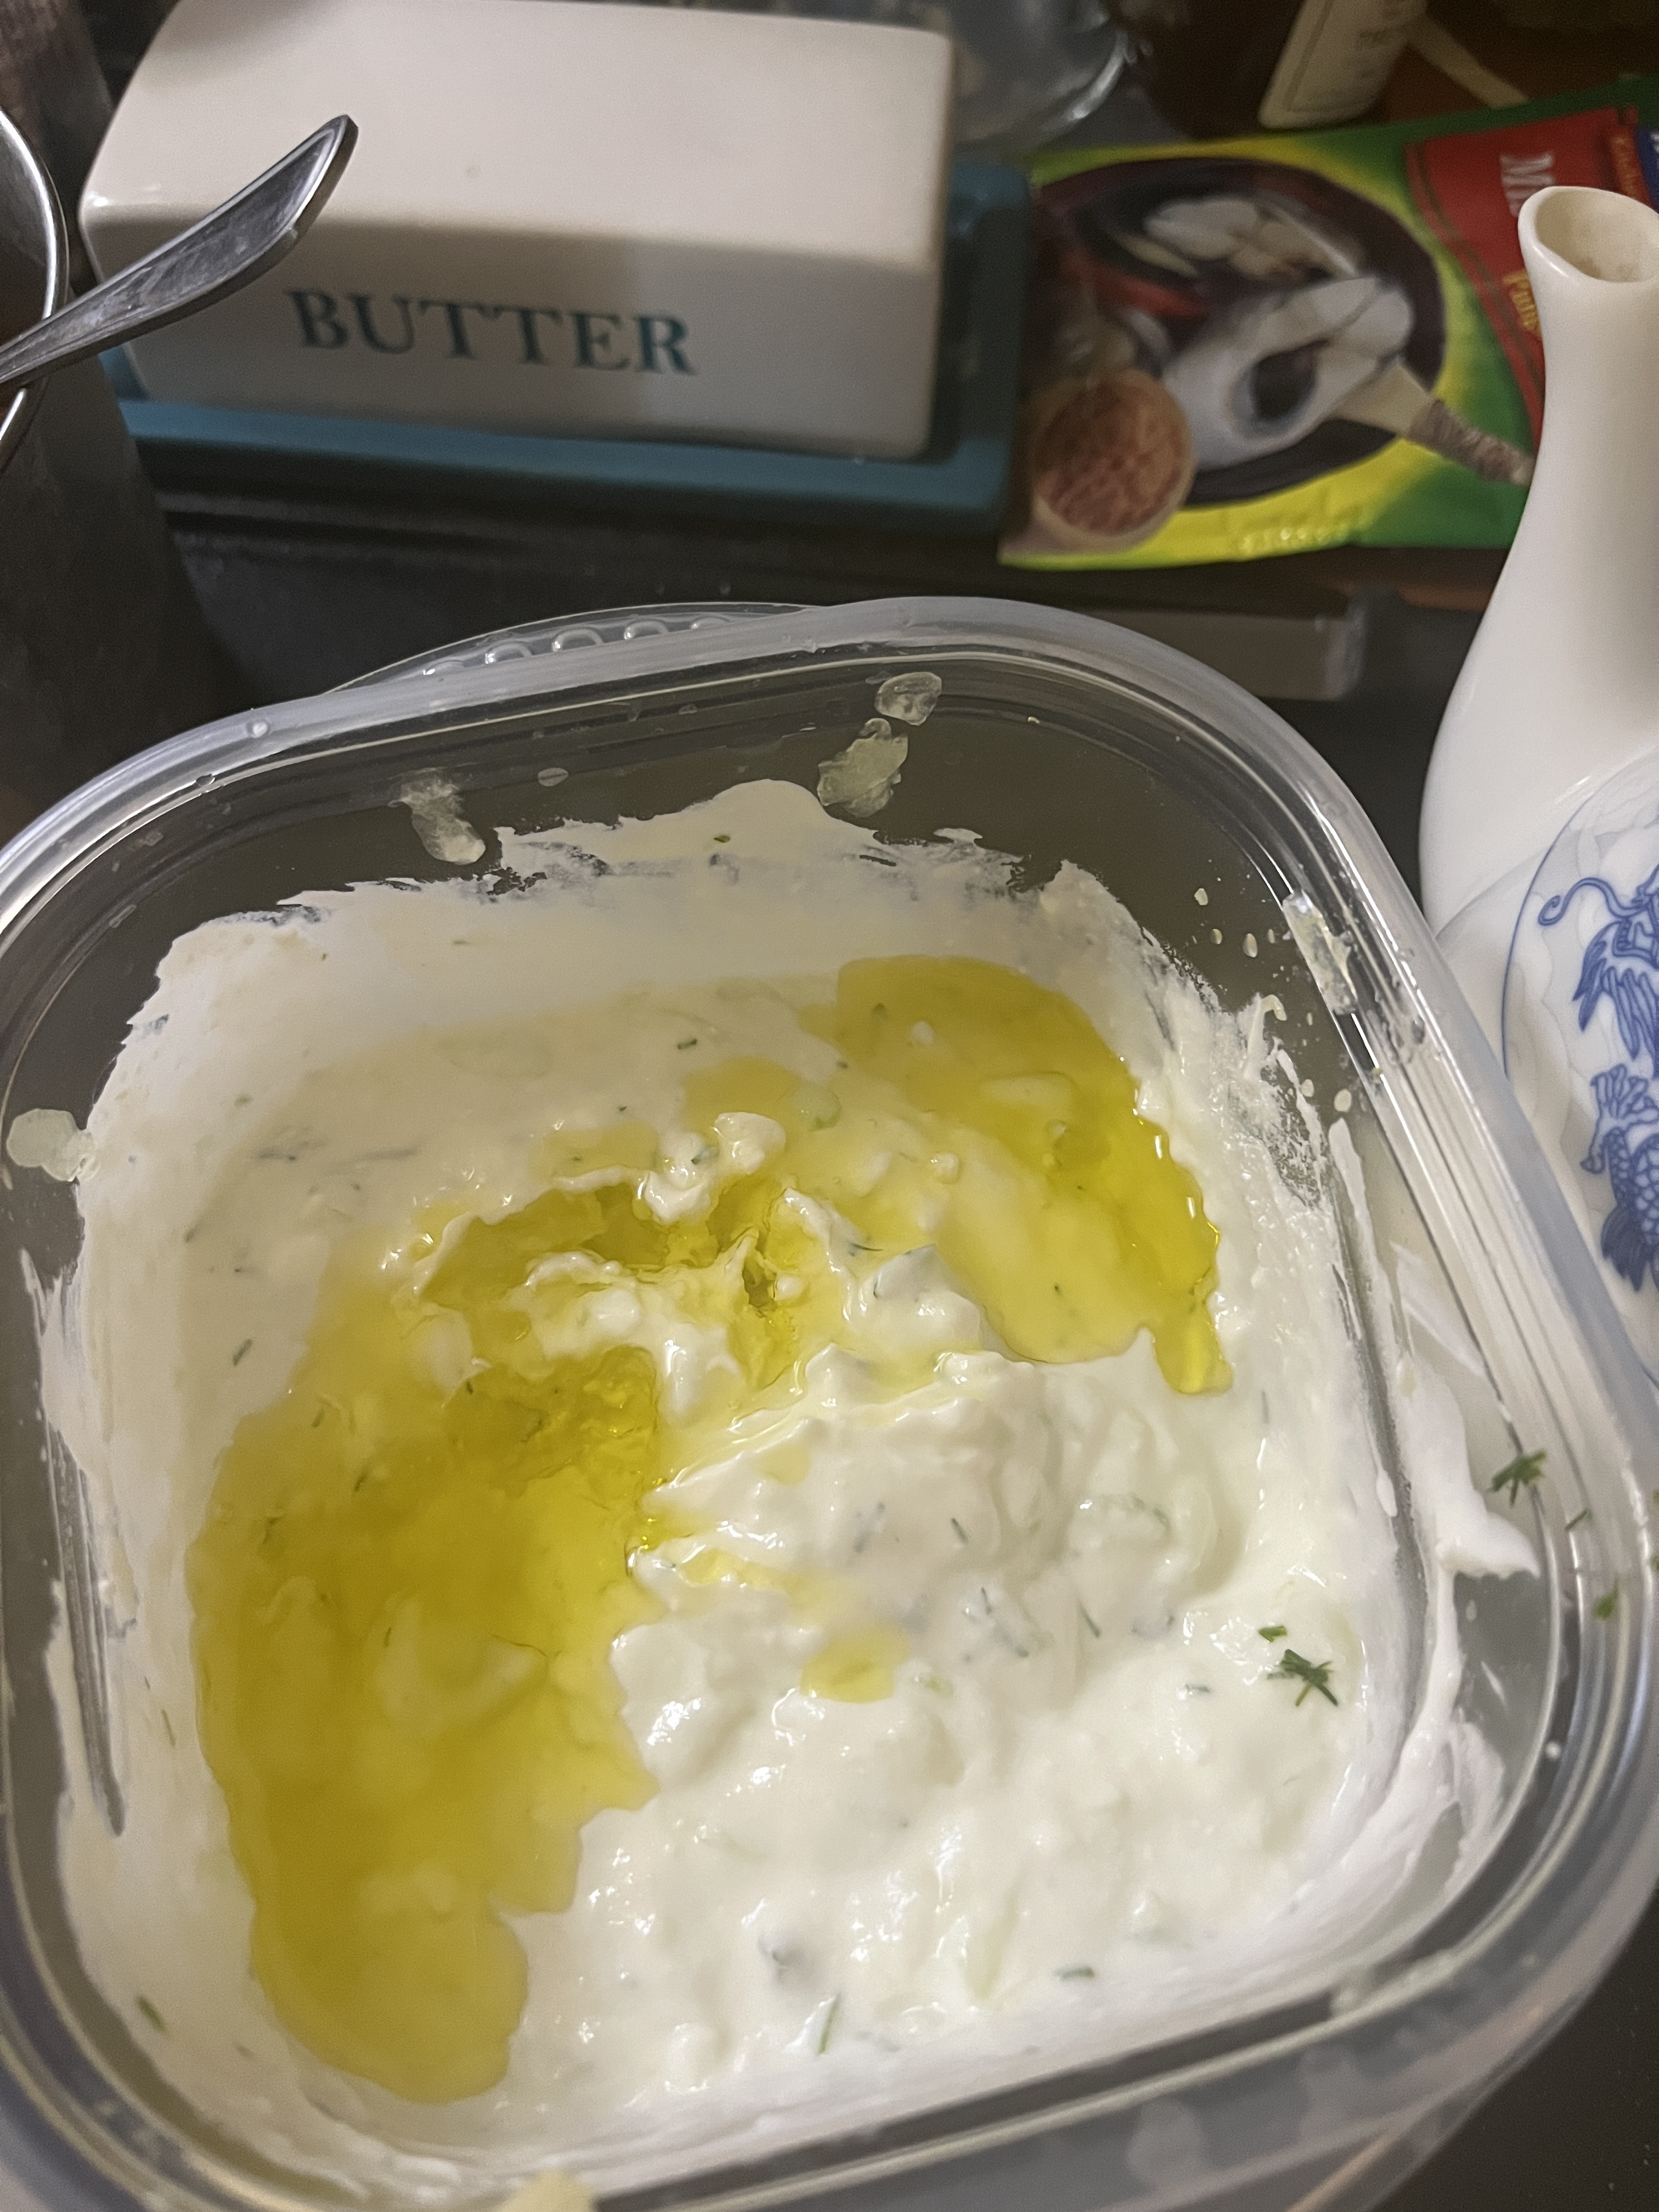
Pour in a couple tablespoons worth of olive oil and mix well. Refrigerate until needed.
Spread on a tortilla or in a pita. Add meat (chicken tonight), lettuce, bell pepper, onion, tomato, cheese…anything you think might taste good. If using a tortilla or other soft flatbread, roll and eat. If using a pita, just cut it open and fill before enjoying your creation.
Didn’t know what to have for dinner tonight. Looked on the table: onions. Looked in the fridge: leftover pork, asparagus, mushrooms, beans and wine. Looked in the pantry: rice. OK, something to go over rice. Yes, sometimes I just make it up as I go along. So I walked outside and picked a lemon that was still on the tree.
I cut the onion in 2, then sliced it into slivers and fried it with a little bacon fat and mostly olive oil. A little bacon fat goes a long way. Then I threw in the onion. I sliced the lemon thinly and tossed it in, then some mushrooms. I’ll save 1/2 the basket for tomorrow and make more fried onions and mushrooms then, too. They make a fabulous side for any meat…well, anything, really.
The roommate put rice into a cooker and went back to what she was doing.
I snapped the bottoms off the asparagus, put it in a pan with water to boil and gave the ends to the chickens.
Then I looked back in the fridge and decided to slice up a couple dates and promised myself the rest would go into another batch of chutney before it gets too hot to cook. Cut up about 1/3 lb leftover pork, compleat with a bit of fat and a lot of gravy. Look back in fridge and pour a glass of wine, savour a sip and give the rest to the pot.
Decided the sauce was a bit thin so I made a slurry of 1/2 tsp corn starch and water, tipped the pan so the food could be pulled to one side and the sauce would slide to the low part and poured in the slurry, stirring well, then stirred it all back together. I also sprinkled in some garlic.
I put 3 heaping big spoonfulls of beans in just because. I’ll make refried beans out of the rest in a day or 2 when I have more time.
We had to wait for the rice to finish so I came in and wrote this.
Tomorrow I’ll have to remember I have carrots in the garden and do something with them, too.
Here’s what it looked like before we nommed. Put whatever you like on it, just salt and pepper, Worcestershire, ponzu, soy, sour cream…what-have-you.
Happy making-do everyone! Don’t let anything go to waste and you may be surprised what you come up with.
Rambling around the internet and watching random things on TV (especially PBS, NHK and BBC) you find interesting stuff. That’s how I found a reference to Cornish Fairings so I looked it up. Sounded yummy, I had golden syrup for something else, so why not!? Looks like a spiced shortbread. Smells like gingerbread. Goes great with tea or milk and might even make a nice crust for custard tarts. So, after looking at a few recipes, this is what I did.
1 2/3c Flour
1 1/2 tsp Baking Soda
1 1/2 tsp Baking Powder
1/2 tsp Salt
1 heaping tsp Ginger
1 tsp Cinnamon
1/2 tsp Nutmeg
1/4 tsp Ground Cloves
1/2 c Sugar
1 stick or 1/2c Butter
4 Tbsp Golden Syrup
1 Tbsp Milk
Mix together dry ingredients
Mix together butter, milk and syrup
Mix dry ingredients into butter mixture, about 1/4 of the dry stuff at a time.
I found it easier to put about 1/2 the mixture back into the dry ingredient bowl so I could work bits into walnut-sized balls.
Put those on a cookie sheet, leaving plenty of room to spread, and bake for 10 or 12 minutes.
Spatula them onto a plate to cool and serve with milk, coffee or tea. They’re wonderful for dunking. This time we had Darjeeling. Maybe I should have poured the tea before taking the picture. Oh well, it was all yum.
Ending thought: If you want to use this as a pie crust you can just press it into a pie tin like you do for graham cracker crusts. Next time I make it, when I’ve figured out a good filling (custard?) to go with it I’ll try that and update this post.


You must be logged in to post a comment.